

Maintenance Manual
Page 19
..., press this button to launch the program automatically. It supports wireless communication switch. ‰ TOSHIBA Assist button Press this button to accommodate a telephone line. The RJ11 modem jack is used to...start the computer and launch the program. ‰ Back light On/Off button If you turn off the back light outdoors in a good weather, you can be switched on the computer....Kbps for data reception, 33.6 Kbps for data transmission, and 14,400 bps for a longer period. PORTEGE R500 Maintenance Manual (960-634) [CONFIDENTIAL] 1-5 However, the actual speed depends on LAN (WOL), Magic...
..., press this button to launch the program automatically. It supports wireless communication switch. ‰ TOSHIBA Assist button Press this button to accommodate a telephone line. The RJ11 modem jack is used to...start the computer and launch the program. ‰ Back light On/Off button If you turn off the back light outdoors in a good weather, you can be switched on the computer....Kbps for data reception, 33.6 Kbps for data transmission, and 14,400 bps for a longer period. PORTEGE R500 Maintenance Manual (960-634) [CONFIDENTIAL] 1-5 However, the actual speed depends on LAN (WOL), Magic...

Maintenance Manual
Page 33
... 1-6 PORTEGE R500 Maintenance Manual (960-634) [CONFIDENTIAL] 1-19 Controls the battery icon, and DC IN icon. 4. Provides more accurate detection of the main battery. The power supply output rating is connected to the system board and performs the following functions: 1. Turns the...detects a fully charged battery. 5. Controls the transmission of the status signal of a low battery. 7. Calculates the remaining battery capacity. 8. Turns the power supply on and off . 6. 1.9 Power Supply 1 Hardware Overview 1.9 Power Supply The power supply supplies many different voltages to ...
... 1-6 PORTEGE R500 Maintenance Manual (960-634) [CONFIDENTIAL] 1-19 Controls the battery icon, and DC IN icon. 4. Provides more accurate detection of the main battery. The power supply output rating is connected to the system board and performs the following functions: 1. Turns the...detects a fully charged battery. 5. Controls the transmission of the status signal of a low battery. 7. Calculates the remaining battery capacity. 8. Turns the power supply on and off . 6. 1.9 Power Supply 1 Hardware Overview 1.9 Power Supply The power supply supplies many different voltages to ...

Maintenance Manual
Page 38
Table 1-9 RTC battery charging/data preservation time Status Charging Time (power on) Data preservation period (full charge) Time 24 hours 30 days 1-24 [CONFIDENTIAL] PORTEGE R500 Maintenance Manual (960-634) 1 Hardware Overview 1.10 Batteries 1.10.3 RTC battery The RTC battery provides power to keep the current date, time and other setup information in memory while the computer is turned off. Table 1-9 lists the charging time and data preservation period of the RTC battery.
Table 1-9 RTC battery charging/data preservation time Status Charging Time (power on) Data preservation period (full charge) Time 24 hours 30 days 1-24 [CONFIDENTIAL] PORTEGE R500 Maintenance Manual (960-634) 1 Hardware Overview 1.10 Batteries 1.10.3 RTC battery The RTC battery provides power to keep the current date, time and other setup information in memory while the computer is turned off. Table 1-9 lists the charging time and data preservation period of the RTC battery.
Maintenance Manual
Page 59
If you cannot turn on the power, go to Check 5. When charge is too hot or cold. Check 4 The battery's temperature is ... execute subtest 04 (Quick charge) described in Chapter 3. 4. Check 5 Replace the battery pack with a new one. Attach the AC adaptor and turn on the power. Run the Diagnostic test, go to Procedure 5. Check 2 Make sure the battery is installed. 8 Any other problems. Check items...If these cables are firmly plugged into the DC IN socket and the wall outlet. Reinstall the battery pack. 2. PORTEGE R500 Maintenance Manual (960-634) [CONFIDENTIAL] 2-13
If you cannot turn on the power, go to Check 5. When charge is too hot or cold. Check 4 The battery's temperature is ... execute subtest 04 (Quick charge) described in Chapter 3. 4. Check 5 Replace the battery pack with a new one. Attach the AC adaptor and turn on the power. Run the Diagnostic test, go to Procedure 5. Check 2 Make sure the battery is installed. 8 Any other problems. Check items...If these cables are firmly plugged into the DC IN socket and the wall outlet. Reinstall the battery pack. 2. PORTEGE R500 Maintenance Manual (960-634) [CONFIDENTIAL] 2-13
Maintenance Manual
Page 62
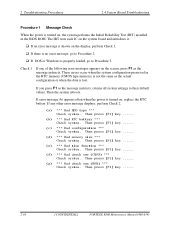
.... Then press [F1] key ...... 2-16 [CONFIDENTIAL] PORTEGE R500 Maintenance Manual (960-634) Then press [F1] key ...... (e) *** Bad time function *** Check system. 2 Troubleshooting Procedures 2.4 System Board Troubleshooting Procedure 1 Message Check When the power is turned on , replace the RTC battery. If error message (b)...[F1] key ...... (c) *** Bad configuration *** Check system. If you press F1 as the actual configuration or when the data is turned on , the system performs the Initial Reliability Test (IRT) installed in the BIOS ROM. Then press [F1] key ...... (b) ***...
.... Then press [F1] key ...... 2-16 [CONFIDENTIAL] PORTEGE R500 Maintenance Manual (960-634) Then press [F1] key ...... (e) *** Bad time function *** Check system. 2 Troubleshooting Procedures 2.4 System Board Troubleshooting Procedure 1 Message Check When the power is turned on , replace the RTC battery. If error message (b)...[F1] key ...... (c) *** Bad configuration *** Check system. If you press F1 as the actual configuration or when the data is turned on , the system performs the Initial Reliability Test (IRT) installed in the BIOS ROM. Then press [F1] key ...... (b) ***...

Maintenance Manual
Page 68
... F105H Transition to RESUME-MAIN Resume error process Reset of CPU clock to low Prohibition of all SMI Clearance of resume status Return to ROM Turning area of C0000h to EFFFFh to PCI (Prohibition of DRAM) Setting of resume error request Copying ROM/RAM of system BIOS (HLT, when error occurs... Microcode Update APIC initialization WakeUp factor check SMRAM base rewriting and CPU state map saving for BIOS Permission of SMI based on ASMI 2-22 [CONFIDENTIAL] PORTEGE R500 Maintenance Manual (960-634)
... F105H Transition to RESUME-MAIN Resume error process Reset of CPU clock to low Prohibition of all SMI Clearance of resume status Return to ROM Turning area of C0000h to EFFFFh to PCI (Prohibition of DRAM) Setting of resume error request Copying ROM/RAM of system BIOS (HLT, when error occurs... Microcode Update APIC initialization WakeUp factor check SMRAM base rewriting and CPU state map saving for BIOS Permission of SMI based on ASMI 2-22 [CONFIDENTIAL] PORTEGE R500 Maintenance Manual (960-634)

Maintenance Manual
Page 77
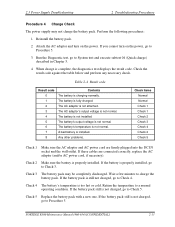
... 3, Tests and Diagnostics. 2.5 USB FDD Troubleshooting 2 Troubleshooting Procedures 2.5 USB FDD Troubleshooting This section describes how to Procedure 3 and Procedure 4. PORTEGE R500 Maintenance Manual (960-634) [CONFIDENTIAL] 2-31 Clean the USB FDD heads using the cleaning kit. Perform the steps below starting with Procedure 1... Procedure 1 USB FDD Head Cleaning Check USB FDD head cleaning operation details are given in the computer's floppy disk drive, turn on the computer and run the test. If the USB FDD still does not function properly after cleaning, go to determine ...
... 3, Tests and Diagnostics. 2.5 USB FDD Troubleshooting 2 Troubleshooting Procedures 2.5 USB FDD Troubleshooting This section describes how to Procedure 3 and Procedure 4. PORTEGE R500 Maintenance Manual (960-634) [CONFIDENTIAL] 2-31 Clean the USB FDD heads using the cleaning kit. Perform the steps below starting with Procedure 1... Procedure 1 USB FDD Head Cleaning Check USB FDD head cleaning operation details are given in the computer's floppy disk drive, turn on the computer and run the test. If the USB FDD still does not function properly after cleaning, go to determine ...

Maintenance Manual
Page 78
... the computer and run the test. If any other errors occur while executing the FDD diagnostics test, go to Procedure 3. 2-32 [CONFIDENTIAL] PORTEGE R500 Maintenance Manual (960-634) Refer to Check 1. Make sure the floppy disk is formatted correctly and that the write protect tab is formatted correctly.... Floppy disk drive test error codes and their status names are listed in the USB FDD, turn on the floppy disk. If it is, go to Chapter 3, Tests and Diagnostics, for more information about the diagnostics test procedures. 2 ...
... the computer and run the test. If any other errors occur while executing the FDD diagnostics test, go to Procedure 3. 2-32 [CONFIDENTIAL] PORTEGE R500 Maintenance Manual (960-634) Refer to Check 1. Make sure the floppy disk is formatted correctly and that the write protect tab is formatted correctly.... Floppy disk drive test error codes and their status names are listed in the USB FDD, turn on the floppy disk. If it is, go to Chapter 3, Tests and Diagnostics, for more information about the diagnostics test procedures. 2 ...

Maintenance Manual
Page 88
...connection is detected, go to CN5601 on the computer and run the test. If there is securely connected to Procedure 3. 2-42 [CONFIDENTIAL] PORTEGE R500 Maintenance Manual (960-634) Procedure 2 Connector Check and Cable Check Check 1 Make sure the LCD cable is still an error, go to... Procedure 2. Insert the Diagnostics disk in the computer's floppy disk drive, turn on the system board. If an error is loose, reconnect firmly and restart the computer. 2 Troubleshooting Procedures 2.8 Display Troubleshooting 2.8 Display ...
...connection is detected, go to CN5601 on the computer and run the test. If there is securely connected to Procedure 3. 2-42 [CONFIDENTIAL] PORTEGE R500 Maintenance Manual (960-634) Procedure 2 Connector Check and Cable Check Check 1 Make sure the LCD cable is still an error, go to... Procedure 2. Insert the Diagnostics disk in the computer's floppy disk drive, turn on the system board. If an error is loose, reconnect firmly and restart the computer. 2 Troubleshooting Procedures 2.8 Display Troubleshooting 2.8 Display ...

Maintenance Manual
Page 90
...with Procedure 1 and continue with the other procedures as required. Then insert the Diagnostics Disk in the Diagnostics Disk. Refer to Procedure 2. 2-44 [CONFIDENTIAL] PORTEGE R500 Maintenance Manual (960-634) Procedure 1: Diagnostic Test Program Execution Check Procedure 2: Connector Check and Replacement Check Procedure 1 Diagnostic Test Program Execution Check The CD-ROM... how to determine if the optical drive (Super Multi drive) in the Slim Select Bay is stored in the computer's floppy disk drive, turn on the computer and run the test. For the test, prepare test Media.
...with Procedure 1 and continue with the other procedures as required. Then insert the Diagnostics Disk in the Diagnostics Disk. Refer to Procedure 2. 2-44 [CONFIDENTIAL] PORTEGE R500 Maintenance Manual (960-634) Procedure 1: Diagnostic Test Program Execution Check Procedure 2: Connector Check and Replacement Check Procedure 1 Diagnostic Test Program Execution Check The CD-ROM... how to determine if the optical drive (Super Multi drive) in the Slim Select Bay is stored in the computer's floppy disk drive, turn on the computer and run the test. For the test, prepare test Media.

Maintenance Manual
Page 93
... the left side of the computer is not, slide the switch toward the back of the computer to turn it with the other procedures as required. PORTEGE R500 Maintenance Manual (960-634) [CONFIDENTIAL] 2-47 2.11 Bluetooth Troubleshooting 2 Troubleshooting Procedures 2.11 Bluetooth Troubleshooting... passes the test, the function is functioning properly. Check 2 The Bluetooth module may be defective or damaged. If it is turned "On". Then perform the test program again. Procedure 1: Diagnostic Test Program Execution Check Procedure 2: Connection Check Procedure 3: Replacement Check...
... the left side of the computer is not, slide the switch toward the back of the computer to turn it with the other procedures as required. PORTEGE R500 Maintenance Manual (960-634) [CONFIDENTIAL] 2-47 2.11 Bluetooth Troubleshooting 2 Troubleshooting Procedures 2.11 Bluetooth Troubleshooting... passes the test, the function is functioning properly. Check 2 The Bluetooth module may be defective or damaged. If it is turned "On". Then perform the test program again. Procedure 1: Diagnostic Test Program Execution Check Procedure 2: Connection Check Procedure 3: Replacement Check...

Maintenance Manual
Page 96
... slide the switch toward the back of the computer is turned "On". You will need a second computer that can communicate by the wireless LAN. If the computer does not pass the test, perform Procedure 2. 2-50 [CONFIDENTIAL] PORTEGE R500 Maintenance Manual (960-634) If the computer passes the test... computer to check the transmittingreceiving function of the wireless LAN. Refer to Chapter 3, Tests and Diagnostics for the wireless LAN function to turn it on how to determine if the computer's Wireless LAN is correctly working. Check 1 Execute test program for more information on ....
... slide the switch toward the back of the computer is turned "On". You will need a second computer that can communicate by the wireless LAN. If the computer does not pass the test, perform Procedure 2. 2-50 [CONFIDENTIAL] PORTEGE R500 Maintenance Manual (960-634) If the computer passes the test... computer to check the transmittingreceiving function of the wireless LAN. Refer to Chapter 3, Tests and Diagnostics for the wireless LAN function to turn it on how to determine if the computer's Wireless LAN is correctly working. Check 1 Execute test program for more information on ....

Maintenance Manual
Page 104
... well, warning message appears. Procedure 3 Authentication of your finger registered and slide your finger sideways. Click Finish to Windows. 2-58 [CONFIDENTIAL] PORTEGE R500 Maintenance Manual (960-634) In the Windows logon window, put lightly the first joint of fingerprint 1. Turn on the computer to Sensor screen is displayed in the fingerprint authentication display.
... well, warning message appears. Procedure 3 Authentication of your finger registered and slide your finger sideways. Click Finish to Windows. 2-58 [CONFIDENTIAL] PORTEGE R500 Maintenance Manual (960-634) In the Windows logon window, put lightly the first joint of fingerprint 1. Turn on the computer to Sensor screen is displayed in the fingerprint authentication display.
Maintenance Manual
Page 116
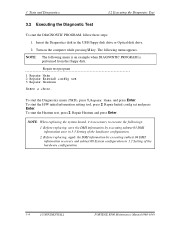
...Enter. Before replacing, apply the DMI information by executing subtest 03 DMI information save in 3.3 Setting of the hardware configuration. 3-4 [CONFIDENTIAL] PORTEGE R500 Maintenance Manual (960-634) NOTE: The following menu appears. To start the DIAGNOSTIC PROGRAM, follow these steps: 1. Before replacing, save ...Executing the Diagnostic Test 3.2 Executing the Diagnostic Test To start the Diagnostics menu (T&D), press 1, Repair Main and press Enter. Turn on the computer while pressing U key. NOTE: When replacing the system board, it is performed from the floppy disk.
...Enter. Before replacing, apply the DMI information by executing subtest 03 DMI information save in 3.3 Setting of the hardware configuration. 3-4 [CONFIDENTIAL] PORTEGE R500 Maintenance Manual (960-634) NOTE: The following menu appears. To start the DIAGNOSTIC PROGRAM, follow these steps: 1. Before replacing, save ...Executing the Diagnostic Test 3.2 Executing the Diagnostic Test To start the Diagnostics menu (T&D), press 1, Repair Main and press Enter. Turn on the computer while pressing U key. NOTE: When replacing the system board, it is performed from the floppy disk.

Maintenance Manual
Page 162
The data is turned off, the error information will be lost. 3-50 [CONFIDENTIAL] PORTEGE R500 Maintenance Manual (960-634) Test name, Subtest number (TS-No) 3. FDD/HDD or memory address (ADDR) 6. HDC status (HSTS) 9. Error status (STS) 5. Write data (WD) 7. ...
The data is turned off, the error information will be lost. 3-50 [CONFIDENTIAL] PORTEGE R500 Maintenance Manual (960-634) Test name, Subtest number (TS-No) 3. FDD/HDD or memory address (ADDR) 6. HDC status (HSTS) 9. Error status (STS) 5. Write data (WD) 7. ...

Maintenance Manual
Page 179
... LAN test, use the Diagnostics disk for wireless LAN test into the Floppy Disk Drive. Turn on the wireless LAN card is described. * * * Module : Module : Intel PRO/Wireless XXXXABG * * Network Connection (Mow1) * * G-code : G360001U110 * * TA No. : D26539 * * * PORTEGE R500 Maintenance Manual (960-634) [CONFIDENTIAL] 3-67 Selecting this subtest, following menu appears in the...
... LAN test, use the Diagnostics disk for wireless LAN test into the Floppy Disk Drive. Turn on the wireless LAN card is described. * * * Module : Module : Intel PRO/Wireless XXXXABG * * Network Connection (Mow1) * * G-code : G360001U110 * * TA No. : D26539 * * * PORTEGE R500 Maintenance Manual (960-634) [CONFIDENTIAL] 3-67 Selecting this subtest, following menu appears in the...

Maintenance Manual
Page 183
... execute the wireless LAN test, use the Diagnostics disk for wireless LAN test into the Floppy Disk Drive. PORTEGE R500 Maintenance Manual (960-634) [CONFIDENTIAL] 3-71 Insert the Diagnostics disk for wireless LAN test. Turn on the power while pressing U. Selecting this subtest, following menu appears in the display. 3.28 Wireless LAN Test...
... execute the wireless LAN test, use the Diagnostics disk for wireless LAN test into the Floppy Disk Drive. PORTEGE R500 Maintenance Manual (960-634) [CONFIDENTIAL] 3-71 Insert the Diagnostics disk for wireless LAN test. Turn on the power while pressing U. Selecting this subtest, following menu appears in the display. 3.28 Wireless LAN Test...

Maintenance Manual
Page 187
... appear: ######### i82562 ICHx GbE (i82540) Diagnostics program ##### * * * 1 i82562 + ICHx) * * * * 2 GbE) * * * * 3 Marvel) * * * .... PORTEGE R500 Maintenance Manual (960-634) [CONFIDENTIAL] 3-75 Modem [Not used] 3. Press test number [1-2] ? Insert the test program disk for LAN/Modem/Bluetooth/IEEE1394 test in FDD and turn on the power. Therefore, LAN/Modem/Bluetooth/IEEE1394 test can not...
... appear: ######### i82562 ICHx GbE (i82540) Diagnostics program ##### * * * 1 i82562 + ICHx) * * * * 2 GbE) * * * * 3 Marvel) * * * .... PORTEGE R500 Maintenance Manual (960-634) [CONFIDENTIAL] 3-75 Modem [Not used] 3. Press test number [1-2] ? Insert the test program disk for LAN/Modem/Bluetooth/IEEE1394 test in FDD and turn on the power. Therefore, LAN/Modem/Bluetooth/IEEE1394 test can not...

Maintenance Manual
Page 197
The following display appears. *1: In the case of a model with built-in 1.8 type HDD, it is not displayed. 3.31 BIOS SETUP 3 Tests and Diagnostics 3.31.2 Accessing the SETUP Program While pressing ESC, turn on the power. PORTEGE R500 Maintenance Manual (960-634) [CONFIDENTIAL] 3-85 Primary IDE(1F0H/IRQ14) *2: In the case of a model with built-in 1:1.8 type HDD, it is displayed as follows. Then press F1.
The following display appears. *1: In the case of a model with built-in 1.8 type HDD, it is not displayed. 3.31 BIOS SETUP 3 Tests and Diagnostics 3.31.2 Accessing the SETUP Program While pressing ESC, turn on the power. PORTEGE R500 Maintenance Manual (960-634) [CONFIDENTIAL] 3-85 Primary IDE(1F0H/IRQ14) *2: In the case of a model with built-in 1:1.8 type HDD, it is displayed as follows. Then press F1.

Maintenance Manual
Page 202
... buffer overflow problem on LAN function whenoperating from the battery (Default). 3-90 [CONFIDENTIAL] PORTEGE R500 Maintenance Manual (960-634) Alarm Date Option appears only when Alarm Time is not set. To set to "Disabled", the time to turn on and enable or disable the ring indicator feature. Press ↓ to move the... cursor to the right and ↑ to move the cursor to the left when you set the time to turn on automatically is enabled. When it is set the time, use the AC adapter. To activate this option to "Enabled" only when "Built-in...
... buffer overflow problem on LAN function whenoperating from the battery (Default). 3-90 [CONFIDENTIAL] PORTEGE R500 Maintenance Manual (960-634) Alarm Date Option appears only when Alarm Time is not set. To set to "Disabled", the time to turn on and enable or disable the ring indicator feature. Press ↓ to move the... cursor to the right and ↑ to move the cursor to the left when you set the time to turn on automatically is enabled. When it is set the time, use the AC adapter. To activate this option to "Enabled" only when "Built-in...


