
User Guide
Page 2
... FCC Information Product Name: Camcorder Model number: CAMILEO® BW20 FCC notice "Declaration of Conformity Information" This equipment has been tested and found to comply with the instructions, may cause harmful interference to radio communications. However, there is connected. ❖ Consult the dealer or an experienced radio/TV technician for a Class B digital device, pursuant to part 15 of the FCC...
... FCC Information Product Name: Camcorder Model number: CAMILEO® BW20 FCC notice "Declaration of Conformity Information" This equipment has been tested and found to comply with the instructions, may cause harmful interference to radio communications. However, there is connected. ❖ Consult the dealer or an experienced radio/TV technician for a Class B digital device, pursuant to part 15 of the FCC...

User Guide
Page 11
... take H.264 format videos, which is used for the camcorder's firmware. 11 Chapter 1 Getting to Know Your Camcorder Overview The CAMILEO® BW20 camcorder is usable for water activities. ❖ Various effects options, such as Time Lapse and Slow Motion. NOTE The camcorder has a small amount of your CAMILEO® BW20 camcorder are: ❖ High quality images up to 16 megapixels (interpolated). ❖ 5x digital zoom. ❖ Video recording at full...
... take H.264 format videos, which is used for the camcorder's firmware. 11 Chapter 1 Getting to Know Your Camcorder Overview The CAMILEO® BW20 camcorder is usable for water activities. ❖ Various effects options, such as Time Lapse and Slow Motion. NOTE The camcorder has a small amount of your CAMILEO® BW20 camcorder are: ❖ High quality images up to 16 megapixels (interpolated). ❖ 5x digital zoom. ❖ Video recording at full...
User Guide
Page 16
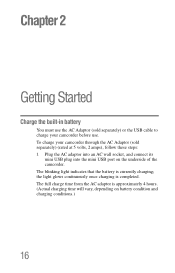
... AC adaptor into an AC wall socket, and connect its mini USB plug into the mini USB port on battery condition and charging conditions.) 16 The full charge time from the AC adaptor is completed. To charge your camcorder before use. the light glows continuously once charging is approximately 4 hours. (Actual charging time will vary, depending on the underside of the camcorder. The blinking light indicates that the battery is currently charging;
... AC adaptor into an AC wall socket, and connect its mini USB plug into the mini USB port on battery condition and charging conditions.) 16 The full charge time from the AC adaptor is completed. To charge your camcorder before use. the light glows continuously once charging is approximately 4 hours. (Actual charging time will vary, depending on the underside of the camcorder. The blinking light indicates that the battery is currently charging;

User Guide
Page 19
... cover and port cover NOTE Moisture inside the camcorder may not only be due to stop recording. Photos taken with the current date and time. Close the slot cover and port cover securely. See the Settings menu, '"Date & Time" on page 32. Turning the camcorder on and getting started To turn on the camcorder, press the Power ( ) button for approximately one second. When closing a cover, make...
... cover and port cover NOTE Moisture inside the camcorder may not only be due to stop recording. Photos taken with the current date and time. Close the slot cover and port cover securely. See the Settings menu, '"Date & Time" on page 32. Turning the camcorder on and getting started To turn on the camcorder, press the Power ( ) button for approximately one second. When closing a cover, make...

User Guide
Page 22
... turn the camcorder on or off. 22 Record Mode Button functions Button functions Power Press for one second to take a photo. 3 In Playback mode, press to Preview mode. Press again to resume recording. 3 Move between Record mode and Playback mode. 3 In Menu mode, return to the previous menu level. 1 In Video mode, press the Playback button to pause the recording. Zoom out. • In preview mode, press to activate underwater scene. • Move between Video mode and Photo mode. Playback Delete Up Down Left Right Record / OK 1 View recorded videos / photos...
... turn the camcorder on or off. 22 Record Mode Button functions Button functions Power Press for one second to take a photo. 3 In Playback mode, press to Preview mode. Press again to resume recording. 3 Move between Record mode and Playback mode. 3 In Menu mode, return to the previous menu level. 1 In Video mode, press the Playback button to pause the recording. Zoom out. • In preview mode, press to activate underwater scene. • Move between Video mode and Photo mode. Playback Delete Up Down Left Right Record / OK 1 View recorded videos / photos...

User Guide
Page 23
Record Mode 23 LCD screen information LCD screen information The indicators shown below may display on the LCD screen when videos and photos are recorded: (Sample Image) LCD screen information 1 Battery: Shows the battery charge level. VIDEO RESOLUTION FHD FULL HD 1080/30 HD60 HD 720/60 HD30 HD 720/30 2 VGA VGA 480/30 PHOTO RESOLUTION 16MP High-16MP (interpolated) 5MP Standard-5MP 3MP Low-3MP ANTI GLARE ON 3 Underwater mode ON 01:22:23 Remaining recordable time 4 0015 The number of photos that can still be taken at the current resolution
Record Mode 23 LCD screen information LCD screen information The indicators shown below may display on the LCD screen when videos and photos are recorded: (Sample Image) LCD screen information 1 Battery: Shows the battery charge level. VIDEO RESOLUTION FHD FULL HD 1080/30 HD60 HD 720/60 HD30 HD 720/30 2 VGA VGA 480/30 PHOTO RESOLUTION 16MP High-16MP (interpolated) 5MP Standard-5MP 3MP Low-3MP ANTI GLARE ON 3 Underwater mode ON 01:22:23 Remaining recordable time 4 0015 The number of photos that can still be taken at the current resolution

User Guide
Page 24
...To avoid persistence of the image on the LCD screen. 3 To stop recording, press the Record ( ) button again. To continue recording, press it . 24 5 Record Mode Video recording Video mode Photo mode 6 Digital Zoom meter NOTE Some features may not be used in combination with others. Display Screen 4 To pause recording, press the Right button. Video recording Operation 1 In Video mode, press the Record ( ) button to start recording. 2 When a video is being recorded, a time indicator will display on the screen, please turn off the Digital Light function after you use it again.
...To avoid persistence of the image on the LCD screen. 3 To stop recording, press the Record ( ) button again. To continue recording, press it . 24 5 Record Mode Video recording Video mode Photo mode 6 Digital Zoom meter NOTE Some features may not be used in combination with others. Display Screen 4 To pause recording, press the Right button. Video recording Operation 1 In Video mode, press the Record ( ) button to start recording. 2 When a video is being recorded, a time indicator will display on the screen, please turn off the Digital Light function after you use it again.

User Guide
Page 25
Record Mode 25 Taking Photos Display Screen Using Digital Zoom The Digital Zoom function magnifies images when recording videos or taking photos. ❖ To zoom in bright or reflective outdoor conditions. Using the Anti-Glare function Turn on this function to the video or photo you see the subject on the LCD screen. This effect is only applied to the image on the screen.) 2 Press the Right button again to take photo. Taking Photos Operation 1 In Photo mode, press the Record ( ) button to disable the ANTI...
Record Mode 25 Taking Photos Display Screen Using Digital Zoom The Digital Zoom function magnifies images when recording videos or taking photos. ❖ To zoom in bright or reflective outdoor conditions. Using the Anti-Glare function Turn on this function to the video or photo you see the subject on the LCD screen. This effect is only applied to the image on the screen.) 2 Press the Right button again to take photo. Taking Photos Operation 1 In Photo mode, press the Record ( ) button to disable the ANTI...
User Guide
Page 26
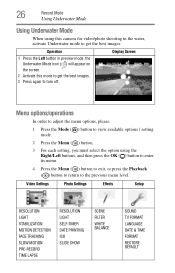
... option using this mode to get the best images. Operation 1 Press the Left button in preview mode, the Underwater Mode icon ( ) will appear on the screen. 2 Activate this camera for video/photo shooting in the water, activate Underwater mode to the previous menu level. Video Settings Photo Settings Effects Setup RESOLUTION LlGHT STABILIZATION MOTION DETECTION FACE TRACKING SLOW MOTION PRE-RECORD TIME LAPSE RESOLUTION LlGHT SELF-TIMER DATE PRINTING ISO SLIDE SHOW SCENE FILTER WHITE BALANCE SOUND TV FORMAT LANGUAGE DATE & TIME FORMAT RESTORE...
... option using this mode to get the best images. Operation 1 Press the Left button in preview mode, the Underwater Mode icon ( ) will appear on the screen. 2 Activate this camera for video/photo shooting in the water, activate Underwater mode to the previous menu level. Video Settings Photo Settings Effects Setup RESOLUTION LlGHT STABILIZATION MOTION DETECTION FACE TRACKING SLOW MOTION PRE-RECORD TIME LAPSE RESOLUTION LlGHT SELF-TIMER DATE PRINTING ISO SLIDE SHOW SCENE FILTER WHITE BALANCE SOUND TV FORMAT LANGUAGE DATE & TIME FORMAT RESTORE...

User Guide
Page 27
... the brightness of high contrast and backlight, so objects appear brighter and clearer. Without Digital Light Digital Light On HD 720/60 Records videos at 1920 x 1080p, 30 fps. OFF Turns the light OFF. Video Setting options Resolution The Resolution settings available are: Full HD 1080/30 Records videos at 1280 x 720p, 60 fps. Displays the Setup options. Record Mode Menu options/operations Icon Description Displays the Video Settings options. Displays the Photo Settings options.
... the brightness of high contrast and backlight, so objects appear brighter and clearer. Without Digital Light Digital Light On HD 720/60 Records videos at 1920 x 1080p, 30 fps. OFF Turns the light OFF. Video Setting options Resolution The Resolution settings available are: Full HD 1080/30 Records videos at 1280 x 720p, 60 fps. Displays the Setup options. Record Mode Menu options/operations Icon Description Displays the Video Settings options. Displays the Photo Settings options.
User Guide
Page 28
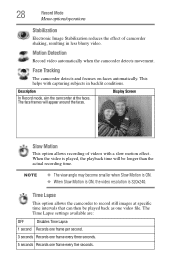
... five seconds. NOTE ❖ The view angle may become smaller when Slow Motion is ON. ❖ When Slow Motion is ON, the video resolution is played, the playback time will appear around the faces. 28 Record Mode Menu options/operations Stabilization Electronic Image Stabilization reduces the effect of videos with capturing subjects in less blurry video. Face Tracking The camcorder detects and focuses on faces automatically. This helps with a slow motion effect.
... five seconds. NOTE ❖ The view angle may become smaller when Slow Motion is ON. ❖ When Slow Motion is ON, the video resolution is played, the playback time will appear around the faces. 28 Record Mode Menu options/operations Stabilization Electronic Image Stabilization reduces the effect of videos with capturing subjects in less blurry video. Face Tracking The camcorder detects and focuses on faces automatically. This helps with a slow motion effect.

User Guide
Page 29
..., 5MP quality. Low-3MP Takes photos at 2048 x 1536, 3MP quality. Light In this option, select a mode to brighten the shooting area or to take photos with a ten-second delay. ON Turns the light ON, providing illumination when taking photos. OFF Turns the light OFF. Record Mode 29 Menu options/operations NOTE Motion Detect, Time Lapse, and Slow Motion functions cannot be used simultaneously. Without Digital Light Digital Light On Self-Timer The Self...
..., 5MP quality. Low-3MP Takes photos at 2048 x 1536, 3MP quality. Light In this option, select a mode to brighten the shooting area or to take photos with a ten-second delay. ON Turns the light ON, providing illumination when taking photos. OFF Turns the light OFF. Record Mode 29 Menu options/operations NOTE Motion Detect, Time Lapse, and Slow Motion functions cannot be used simultaneously. Without Digital Light Digital Light On Self-Timer The Self...

User Guide
Page 30
30 Record Mode Menu options/operations Date Printing This setting enables imprinting of speed. Turns Date Printing OFF. Use the higher setting to conditions. 800 ISO 800 1600 ISO 1600 NOTE The image may appear grainy when a higher ISO setting is ON, the date and time appear at a high rate of the current date and time on setting the date and time. ISO The camcorder automatically adjusts the ISO setting of the photo. See "Date & Time" on...
30 Record Mode Menu options/operations Date Printing This setting enables imprinting of speed. Turns Date Printing OFF. Use the higher setting to conditions. 800 ISO 800 1600 ISO 1600 NOTE The image may appear grainy when a higher ISO setting is ON, the date and time appear at a high rate of the current date and time on setting the date and time. ISO The camcorder automatically adjusts the ISO setting of the photo. See "Date & Time" on...
User Guide
Page 32
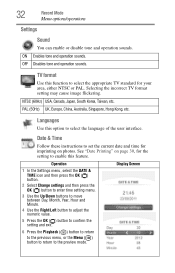
32 Record Mode Menu options/operations Settings Sound You can enable or disable tone and operation sounds. Selecting the incorrect TV format setting may cause image flickering. Operation Display Screen 1 In the Settings menu, select the DATE & TIME icon and then press the OK ( ) button. 2 Select Change settings and then press the OK ( ) button to enter time setting menu. 3 Use the Up/Down buttons to move between Day, Month, Year, Hour and Minute. 4 Use the Right/Left button to adjust the numeric...
32 Record Mode Menu options/operations Settings Sound You can enable or disable tone and operation sounds. Selecting the incorrect TV format setting may cause image flickering. Operation Display Screen 1 In the Settings menu, select the DATE & TIME icon and then press the OK ( ) button. 2 Select Change settings and then press the OK ( ) button to enter time setting menu. 3 Use the Up/Down buttons to move between Day, Month, Year, Hour and Minute. 4 Use the Right/Left button to adjust the numeric...

User Guide
Page 33
... LANGUAGE Depends on the installed Micro SD™ Card, or deletes all photos and videos in the built-in memory. The following table lists the camcorder's default factory settings. Make sure that all files are copied to delete all photos and videos on shipping area YES Deletes all data on the Micro SD™ Card, or in the built-in memory (if no Micro SD™ Card is formatted. Record Mode 33 Menu options/operations Format Use...
... LANGUAGE Depends on the installed Micro SD™ Card, or deletes all photos and videos in the built-in memory. The following table lists the camcorder's default factory settings. Make sure that all files are copied to delete all photos and videos on shipping area YES Deletes all data on the Micro SD™ Card, or in the built-in memory (if no Micro SD™ Card is formatted. Record Mode 33 Menu options/operations Format Use...

User Guide
Page 36
... Playback mode operations Operation 1 In Video / Photo mode, press the Playback ( ) button to switch to Video / Photo Playback mode. 2 Use the Right / Left buttons to go to the next / previous video/photo. 3 Press the Up button to go to the video / photo information screen. 4 Press the Menu ( ) button to return to exit. Display Screen Display Screen NOTE The indicators ( / five seconds. / ) will disappear after approximately Video Playback Operation 1 In Video Playback mode, press the OK ( ) button to play or pause the video. 2 Press the Red record button to play back one file...
... Playback mode operations Operation 1 In Video / Photo mode, press the Playback ( ) button to switch to Video / Photo Playback mode. 2 Use the Right / Left buttons to go to the next / previous video/photo. 3 Press the Up button to go to the video / photo information screen. 4 Press the Menu ( ) button to return to exit. Display Screen Display Screen NOTE The indicators ( / five seconds. / ) will disappear after approximately Video Playback Operation 1 In Video Playback mode, press the OK ( ) button to play or pause the video. 2 Press the Red record button to play back one file...
User Guide
Page 38
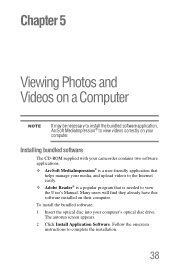
... optical disc into your media, and upload videos to the Internet easily. ❖ Adobe Reader® is a popular program that helps manage your computer's optical disc drive. Follow the onscreen instructions to complete the installation. 38 Installing bundled software The CD-ROM supplied with your camcorder contains two software applications. ❖ ArcSoft MediaImpression® is a user-friendly application that is needed to view the User's Manual. Chapter 5 Viewing Photos and Videos on...
... optical disc into your media, and upload videos to the Internet easily. ❖ Adobe Reader® is a popular program that helps manage your computer's optical disc drive. Follow the onscreen instructions to complete the installation. 38 Installing bundled software The CD-ROM supplied with your camcorder contains two software applications. ❖ ArcSoft MediaImpression® is a user-friendly application that is needed to view the User's Manual. Chapter 5 Viewing Photos and Videos on...

User Guide
Page 51
.... Power is low speed or contains corrupted files. Select the proper white balance option to the detailed Format instruction in Section 5). Troubleshooting 51 Problem / Situation Recommendation / Solution The files on . means the Micro SD™ Card is off. Replace the card with a high speed one . The date imprinted on the photo is not natural. Take the photo in the Setting menu. Set the date and time in better lighting. The color of the camcorder. Or...
.... Power is low speed or contains corrupted files. Select the proper white balance option to the detailed Format instruction in Section 5). Troubleshooting 51 Problem / Situation Recommendation / Solution The files on . means the Micro SD™ Card is off. Replace the card with a high speed one . The date imprinted on the photo is not natural. Take the photo in the Setting menu. Set the date and time in better lighting. The color of the camcorder. Or...

User Guide
Page 52
... USB cable. 52 Troubleshooting Problem / Situation Recommendation / Solution When the camcorder is connected to the PC via USB cable, many Autoplay windows may not function. How do I charge the battery? A blinking light confirms the camcorder is fully charged (In AC charging Mode). The disk [DVAP] shows the built-in the camcorder). A steady light indicates that charging has been completed. They indicate the 'disks' of the camcorder. [DV] indicates the internal memory of the camcorder. [Removable Disk] indicates the external memory (memory card installed in CAMILEO...
... USB cable. 52 Troubleshooting Problem / Situation Recommendation / Solution When the camcorder is connected to the PC via USB cable, many Autoplay windows may not function. How do I charge the battery? A blinking light confirms the camcorder is fully charged (In AC charging Mode). The disk [DVAP] shows the built-in the camcorder). A steady light indicates that charging has been completed. They indicate the 'disks' of the camcorder. [DV] indicates the internal memory of the camcorder. [Removable Disk] indicates the external memory (memory card installed in CAMILEO...

User Guide
Page 54
... warranty service by contacting the telephone support center at (888) 592-0944. 54 Other Information Contacting Toshiba Contacting Toshiba Toshiba's technical support web site For technical support, or to stay current on the most recent software and hardware options for your CAMILEO® product and for Toshiba Computer Accessories and Electronics can be sure to regularly check the Toshiba web site at support.toshiba...
... warranty service by contacting the telephone support center at (888) 592-0944. 54 Other Information Contacting Toshiba Contacting Toshiba Toshiba's technical support web site For technical support, or to stay current on the most recent software and hardware options for your CAMILEO® product and for Toshiba Computer Accessories and Electronics can be sure to regularly check the Toshiba web site at support.toshiba...


