
User Guide
Page 7
... screen information 40 Notification icons 41 Playback mode operations 42 Video Playback 43 Photo Playback 43 Delete a file in Playback mode 44 Chapter 5: Camcorder Settings 45 Setup menu 45 Menu Sound 46 TV 46 Language 47 Time settings 47 Format 48 Default setting 49 Chapter 6: CAMILEO® AIR10 Connect 50 Advanced operations on your computer (CAMILEO® AIR10 Connect 50 Installing CAMILEO® AIR10 Connect 50 Using CAMILEO® AIR10 Connect via Wi-Fi® (Infrastructure mode 52 Using CAMILEO AIR10 Connect via USB 55 Chapter 7: Wi-Fi® Functions 58 Uploading...
... screen information 40 Notification icons 41 Playback mode operations 42 Video Playback 43 Photo Playback 43 Delete a file in Playback mode 44 Chapter 5: Camcorder Settings 45 Setup menu 45 Menu Sound 46 TV 46 Language 47 Time settings 47 Format 48 Default setting 49 Chapter 6: CAMILEO® AIR10 Connect 50 Advanced operations on your computer (CAMILEO® AIR10 Connect 50 Installing CAMILEO® AIR10 Connect 50 Using CAMILEO® AIR10 Connect via Wi-Fi® (Infrastructure mode 52 Using CAMILEO AIR10 Connect via USB 55 Chapter 7: Wi-Fi® Functions 58 Uploading...
User Guide
Page 9
...) ❖ Color LCD screen for easy viewing of photos and videos ❖ Video recording at full HD resolution of 1920 x1080p ❖ HDTV connectivity via an HDMI® cable (HDMI® cable sold separately) ❖ Easy playback of recorded high-definition videos on wide screen HDTV ❖ ISO and white balance can record H.264 format videos. Chapter 1 Getting to automatic or may be manually adjusted ❖ 5x digital zoom ❖ Webcam for extended video recording with...
...) ❖ Color LCD screen for easy viewing of photos and videos ❖ Video recording at full HD resolution of 1920 x1080p ❖ HDTV connectivity via an HDMI® cable (HDMI® cable sold separately) ❖ Easy playback of recorded high-definition videos on wide screen HDTV ❖ ISO and white balance can record H.264 format videos. Chapter 1 Getting to automatic or may be manually adjusted ❖ 5x digital zoom ❖ Webcam for extended video recording with...
User Guide
Page 10
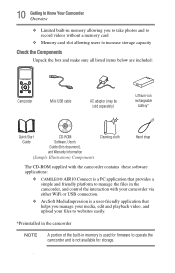
...-in memory allowing you to take photos and to record videos without a memory card ❖ Memory card slot allowing users to increase storage capacity Check the Components Unpack the box and make sure all listed items below are included: MENU OK Camcorder Mini USB cable AC adaptor (may be sold separately) Lithium-ion rechargeable battery* Quick Start CD-ROM Guide Software, User's Guide (this document), and Warranty information (Sample Illustration) Components Cleaning cloth...
...-in memory allowing you to take photos and to record videos without a memory card ❖ Memory card slot allowing users to increase storage capacity Check the Components Unpack the box and make sure all listed items below are included: MENU OK Camcorder Mini USB cable AC adaptor (may be sold separately) Lithium-ion rechargeable battery* Quick Start CD-ROM Guide Software, User's Guide (this document), and Warranty information (Sample Illustration) Components Cleaning cloth...
User Guide
Page 19
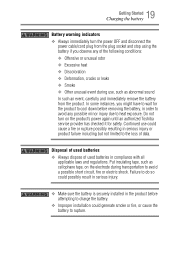
.... 19 Getting Started Charging the battery Battery warning indicators ❖ Always immediately turn on the electrode during use could generate smoke or fire, or cause the battery to rupture. Disposal of used batteries ❖ Always dispose of data. Put insulating tape, such as abnormal sound In such an event, carefully and immediately remove the battery from the plug socket and stop using the battery if you might...
.... 19 Getting Started Charging the battery Battery warning indicators ❖ Always immediately turn on the electrode during use could generate smoke or fire, or cause the battery to rupture. Disposal of used batteries ❖ Always dispose of data. Put insulating tape, such as abnormal sound In such an event, carefully and immediately remove the battery from the plug socket and stop using the battery if you might...
User Guide
Page 22
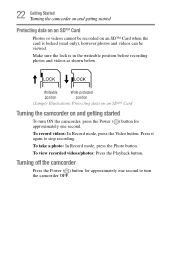
... stop recording. Make sure the lock is locked (read only), however photos and videos can be recorded on and getting started To turn ON the camcorder, press the Power ( ) button for approximately one second. To view recorded videos/photos: Press the Playback button. To take a photo: In Record mode, press the Photo button. Press it again to turn the camcorder OFF. Writeable position Write-protected position (Sample Illustration) Protecting data on an SD™ Card Turning...
... stop recording. Make sure the lock is locked (read only), however photos and videos can be recorded on and getting started To turn ON the camcorder, press the Power ( ) button for approximately one second. To view recorded videos/photos: Press the Playback button. To take a photo: In Record mode, press the Photo button. Press it again to turn the camcorder OFF. Writeable position Write-protected position (Sample Illustration) Protecting data on an SD™ Card Turning...

User Guide
Page 26
... the 6 25 current resolution settings 12 Current number of photos taken NOTE: Maximum number of photos shown is being recorded. Video recording In Record mode, press the Video ( ) button to stop recording. Press the Playback button to view a recorded video. however, more photos may be recorded. 7 Motion Detection (Video Record mode only) Zoom meter: 8 1x~5x (5x Digital zoom) NOTE Filter: Black & White/Classic/Negative can be previewed immediately without the indicator on the LCD screen when a video is 9999; A time indicator displays on the LCD screen.
... the 6 25 current resolution settings 12 Current number of photos taken NOTE: Maximum number of photos shown is being recorded. Video recording In Record mode, press the Video ( ) button to stop recording. Press the Playback button to view a recorded video. however, more photos may be recorded. 7 Motion Detection (Video Record mode only) Zoom meter: 8 1x~5x (5x Digital zoom) NOTE Filter: Black & White/Classic/Negative can be previewed immediately without the indicator on the LCD screen when a video is 9999; A time indicator displays on the LCD screen.

User Guide
Page 28
... Menu screen appears. 2 Use the Directional buttons to select the Video Setting icon, and then press the OK button to enter the settings menu. 3 The Video Setting menu options are : ON Turns the light ON, providing illumination when recording. Screen Light In this option select a mode to brighten the shooting area or to exit. The options available are: Video Setting, Photo Setting, Effects, Setup, and Wi-Fi. 28 Record Mode Menu options/operations Operation 1 In Record mode, Press the MENU/OK button. OFF Digital Light Turns the light...
... Menu screen appears. 2 Use the Directional buttons to select the Video Setting icon, and then press the OK button to enter the settings menu. 3 The Video Setting menu options are : ON Turns the light ON, providing illumination when recording. Screen Light In this option select a mode to brighten the shooting area or to exit. The options available are: Video Setting, Photo Setting, Effects, Setup, and Wi-Fi. 28 Record Mode Menu options/operations Operation 1 In Record mode, Press the MENU/OK button. OFF Digital Light Turns the light...

User Guide
Page 34
... 800 1600 ISO 1600 Screen ISO The camcorder automatically adjusts the ISO setting of speed. Use the higher setting to take a photo in the dark or in a poorly lit location, or for a subject moving at a high rate of images. Two manual ISO sensitivity settings are also available (800 and 1600). 34 Record Mode Menu options/operations Date Printing With this function is activated, the date appears on each...
... 800 1600 ISO 1600 Screen ISO The camcorder automatically adjusts the ISO setting of speed. Use the higher setting to take a photo in the dark or in a poorly lit location, or for a subject moving at a high rate of images. Two manual ISO sensitivity settings are also available (800 and 1600). 34 Record Mode Menu options/operations Date Printing With this function is activated, the date appears on each...
User Guide
Page 38
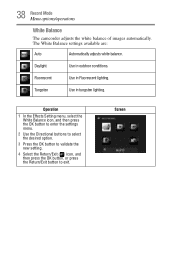
38 Record Mode Menu options/operations White Balance The camcorder adjusts the white balance of images automatically. Daylight Use in Fluorescent lighting. Screen Fluorescent Use in outdoor conditions. Operation 1 In the Effects Setting menu, select the White Balance icon, and then press the OK button to enter the settings menu. 2 Use the Directional buttons to select the desired option. 3 Press the OK button to validate the new setting. 4 Select the Return/Exit ( ) icon, and then press the OK button, or...
38 Record Mode Menu options/operations White Balance The camcorder adjusts the white balance of images automatically. Daylight Use in Fluorescent lighting. Screen Fluorescent Use in outdoor conditions. Operation 1 In the Effects Setting menu, select the White Balance icon, and then press the OK button to enter the settings menu. 2 Use the Directional buttons to select the desired option. 3 Press the OK button to validate the new setting. 4 Select the Return/Exit ( ) icon, and then press the OK button, or...
User Guide
Page 42
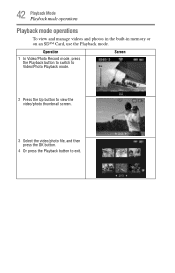
42 Playback Mode Playback mode operations Playback mode operations To view and manage videos and photos in the built-in memory or on an SD™ Card, use the Playback mode. Screen 2 Press the Up button to view the video/photo thumbnail screen. 3 Select the video/photo file, and then press the OK button. 4 Or press the Playback button to Video/Photo Playback mode. Operation 1 In Video/Photo Record mode, press the Playback button to switch to exit.
42 Playback Mode Playback mode operations Playback mode operations To view and manage videos and photos in the built-in memory or on an SD™ Card, use the Playback mode. Screen 2 Press the Up button to view the video/photo thumbnail screen. 3 Select the video/photo file, and then press the OK button. 4 Or press the Playback button to Video/Photo Playback mode. Operation 1 In Video/Photo Record mode, press the Playback button to switch to exit.
User Guide
Page 45
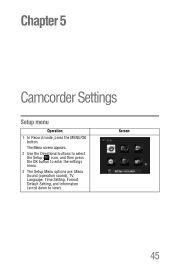
Screen 45 Chapter 5 Camcorder Settings Setup menu Operation 1 In Record mode, press the MENU/OK button. The Menu screen appears. 2 Use the Directional buttons to select the Setup ( ) icon, and then press the OK button to enter the settings menu. 3 The Setup Menu options are: Menu Sound (operation sound), TV, Language, Time Setting, Format, Default Setting, and Information (scroll down to view).
Screen 45 Chapter 5 Camcorder Settings Setup menu Operation 1 In Record mode, press the MENU/OK button. The Menu screen appears. 2 Use the Directional buttons to select the Setup ( ) icon, and then press the OK button to enter the settings menu. 3 The Setup Menu options are: Menu Sound (operation sound), TV, Language, Time Setting, Format, Default Setting, and Information (scroll down to view).
User Guide
Page 46
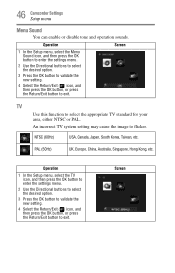
... cause the image to select the appropriate TV standard for your area, either NTSC or PAL. Screen NTSC (60Hz) USA, Canada, Japan, South Korea, Taiwan, etc. 46 Camcorder Settings Setup menu Menu Sound You can enable or disable tone and operation sounds. TV Use this function to flicker. Operation 1 In the Setup menu, select the TV icon, and then press the OK button to enter the settings menu. 2 Use the Directional buttons to select...
... cause the image to select the appropriate TV standard for your area, either NTSC or PAL. Screen NTSC (60Hz) USA, Canada, Japan, South Korea, Taiwan, etc. 46 Camcorder Settings Setup menu Menu Sound You can enable or disable tone and operation sounds. TV Use this function to flicker. Operation 1 In the Setup menu, select the TV icon, and then press the OK button to enter the settings menu. 2 Use the Directional buttons to select...
User Guide
Page 47
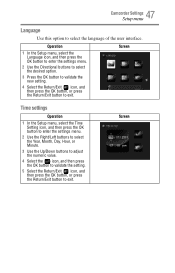
..., and then press the OK button, or press the Return/Exit button to select the language of the user interface. Screen Time settings Operation 1 In the Setup menu, select the Time Setting icon, and then press the OK button to enter the settings menu. 2 Use the Right/Left buttons to select the Year, Month, Day, Hour, or Minute. 3 Use the Up/Down buttons to adjust the numeric value. 4 Select the...
..., and then press the OK button, or press the Return/Exit button to select the language of the user interface. Screen Time settings Operation 1 In the Setup menu, select the Time Setting icon, and then press the OK button to enter the settings menu. 2 Use the Right/Left buttons to select the Year, Month, Day, Hour, or Minute. 3 Use the Up/Down buttons to adjust the numeric value. 4 Select the...
User Guide
Page 48
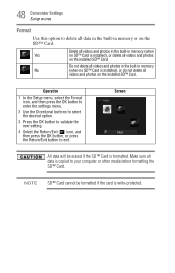
... SD™ Card is copied to your computer or other media before formatting the SD™ Card. NOTE SD™ Card cannot be erased if the SD™ Card is installed), or delete all videos and photos on the installed SD™ Card. Do not delete all videos and photos in the built-in memory or on the SD™ Card. Operation 1 In the Setup menu, select the Format icon, and then press the OK button to enter the settings menu. 2 Use the Directional buttons...
... SD™ Card is copied to your computer or other media before formatting the SD™ Card. NOTE SD™ Card cannot be erased if the SD™ Card is installed), or delete all videos and photos on the installed SD™ Card. Do not delete all videos and photos in the built-in memory or on the SD™ Card. Operation 1 In the Setup menu, select the Format icon, and then press the OK button to enter the settings menu. 2 Use the Directional buttons...
User Guide
Page 49
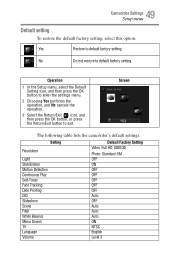
.../Exit button to default factory setting. Screen The following table lists the camcorder's default settings: Setting Resolution Light Stabilization Motion Detection Continuous Play Self-Timer Face Tracking Date Printing ISO Slideshow Scene Filter White Balance Menu Sound TV Language Volume Default Factory Setting Video: Full HD 1080/30 Photo: Standard-5M OFF ON OFF OFF OFF OFF OFF Auto OFF Auto Auto Auto ON NTSC English Level 3 Yes Restore to exit. 49 Camcorder Settings Setup menu Default setting To restore the default factory setting, select...
.../Exit button to default factory setting. Screen The following table lists the camcorder's default settings: Setting Resolution Light Stabilization Motion Detection Continuous Play Self-Timer Face Tracking Date Printing ISO Slideshow Scene Filter White Balance Menu Sound TV Language Volume Default Factory Setting Video: Full HD 1080/30 Photo: Standard-5M OFF ON OFF OFF OFF OFF OFF Auto OFF Auto Auto Auto ON NTSC English Level 3 Yes Restore to exit. 49 Camcorder Settings Setup menu Default setting To restore the default factory setting, select...
User Guide
Page 50
... then operate more functions on your computer: ❖ Transfer files from the camcorder ❖ Watch live streaming video from the camcorder on your computer ❖ Use the camcorder as a wireless webcam for online video chatting ❖ Configure your account information on your computer (CAMILEO® AIR10 Connect) The camcorder can connect to your camcorder and set up a security password to open the CAMILEO® AIR10 Connect application via Wi-Fi® connection Installing CAMILEO® AIR10 Connect To connect...
... then operate more functions on your computer: ❖ Transfer files from the camcorder ❖ Watch live streaming video from the camcorder on your computer ❖ Use the camcorder as a wireless webcam for online video chatting ❖ Configure your account information on your computer (CAMILEO® AIR10 Connect) The camcorder can connect to your camcorder and set up a security password to open the CAMILEO® AIR10 Connect application via Wi-Fi® connection Installing CAMILEO® AIR10 Connect To connect...
User Guide
Page 51
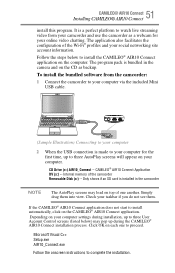
.... Internal memory of one to install automatically, click on the CD as a webcam for the first time, up during installation, up to three User Account Control screens (listed below to complete the installation. Depending on your computer settings during the CAMILEO® AIR10 Connect installation process. The program pack is installed in the camera and on the CAMILEO® AIR10 Connect application. CD Drive (x:) AIR10_Connect -- CAMILEO® AIR10 Connect Application DV (x:) -- 51 CAMILEO® AIR10 Connect Installing CAMILEO...
.... Internal memory of one to install automatically, click on the CD as a webcam for the first time, up during installation, up to three User Account Control screens (listed below to complete the installation. Depending on your computer settings during the CAMILEO® AIR10 Connect installation process. The program pack is installed in the camera and on the CAMILEO® AIR10 Connect application. CD Drive (x:) AIR10_Connect -- CAMILEO® AIR10 Connect Application DV (x:) -- 51 CAMILEO® AIR10 Connect Installing CAMILEO...
User Guide
Page 57
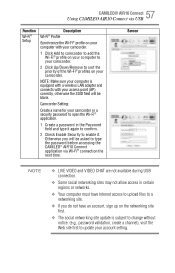
... Internet access to upload files to a networking site. ❖ If you will be asked to update your camcorder. 2 Click Up/Down/Remove to change without notice. (e.g,. NOTE: Make sure your computer is subject to sort the priority of the Wi-Fi® profiles on your computer to your account setting. 57 CAMILEO® AIR10 Connect Using CAMILEO AIR10 Connect via Wi-Fi® connection the next time. Screen...
... Internet access to upload files to a networking site. ❖ If you will be asked to update your camcorder. 2 Click Up/Down/Remove to change without notice. (e.g,. NOTE: Make sure your computer is subject to sort the priority of the Wi-Fi® profiles on your computer to your account setting. 57 CAMILEO® AIR10 Connect Using CAMILEO AIR10 Connect via Wi-Fi® connection the next time. Screen...

User Guide
Page 71
The camcorder must use a tripod when taking photos, see "Charging the battery" on page 47. Set the date and time in the camcorder. Select the proper white balance option to begin the installation automatically, see "Installing CAMILEO® AIR10 Connect" on page 50. DV: Indicates the internal memory of the video/photo is not natural USB connection to 4 hours and the light will turn the camcorder ON again. 71 Troubleshooting Problem How do some of my indoor photos look...
The camcorder must use a tripod when taking photos, see "Charging the battery" on page 47. Set the date and time in the camcorder. Select the proper white balance option to begin the installation automatically, see "Installing CAMILEO® AIR10 Connect" on page 50. DV: Indicates the internal memory of the video/photo is not natural USB connection to 4 hours and the light will turn the camcorder ON again. 71 Troubleshooting Problem How do some of my indoor photos look...
User Guide
Page 74
... included on the most recent software options for your CAMILEO® product and for other product information, be viewed online at http://pcsupport.toshiba.com/accessories1yr. Warranty Service Customers located in the fifty (50) United States and District of the warranty is covered by contacting the telephone support center at (888) 592-0944. A copy of Columbia may obtain...
... included on the most recent software options for your CAMILEO® product and for other product information, be viewed online at http://pcsupport.toshiba.com/accessories1yr. Warranty Service Customers located in the fifty (50) United States and District of the warranty is covered by contacting the telephone support center at (888) 592-0944. A copy of Columbia may obtain...


