
User Guide
Page 2
... conforms to big machinery or power units. Any other products or of this product in these working environments and related advices: Industrial environment (e.g. Automotive environment: Please search the owner instructions of this product due to possible strong electromagnetic fields especially near to the following website: http://epps.toshiba-teg.com. Model number: CAMILEO® BW10 Working Environment The Electromagnetic Compliance...
... conforms to big machinery or power units. Any other products or of this product in these working environments and related advices: Industrial environment (e.g. Automotive environment: Please search the owner instructions of this product due to possible strong electromagnetic fields especially near to the following website: http://epps.toshiba-teg.com. Model number: CAMILEO® BW10 Working Environment The Electromagnetic Compliance...

User Guide
Page 11
... format a media card 29 Turning the camcorder on and getting started ........29 Accessing the MENU screen 30 Setting the date and time 32 Resetting the date and time 33 Starting again from the power save mode 33 Chapter 3: Recording 35 Recording a video clip 35 Changing the video settings 36 Taking still photos 37 Zooming in or out on a subject 38 Changing the photo settings 39 Capturing a still photo while recording a video clip 39 Saving one frame from a video clip as a still image 40 Chapter 4: Playback 41 Playing...
... format a media card 29 Turning the camcorder on and getting started ........29 Accessing the MENU screen 30 Setting the date and time 32 Resetting the date and time 33 Starting again from the power save mode 33 Chapter 3: Recording 35 Recording a video clip 35 Changing the video settings 36 Taking still photos 37 Zooming in or out on a subject 38 Changing the photo settings 39 Capturing a still photo while recording a video clip 39 Saving one frame from a video clip as a still image 40 Chapter 4: Playback 41 Playing...

User Guide
Page 13
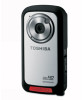
... connectivity via an HDMI™ cable (HDMI™ cable sold separately) ❖ Built-in YouTube® Direct application, allowing you to upload videos captured by the camcorder to YouTube® more effortlessly ❖ 10x digital zoom ❖ Built-in memory allowing you to take a few photos and to 5 Megapixels ❖ Color LCD screen for extended video recording with a 5 Megapixel sensor that can record H.264 format videos. Other features of your CAMILEO...
... connectivity via an HDMI™ cable (HDMI™ cable sold separately) ❖ Built-in YouTube® Direct application, allowing you to upload videos captured by the camcorder to YouTube® more effortlessly ❖ 10x digital zoom ❖ Built-in memory allowing you to take a few photos and to 5 Megapixels ❖ Color LCD screen for extended video recording with a 5 Megapixel sensor that can record H.264 format videos. Other features of your CAMILEO...
User Guide
Page 15
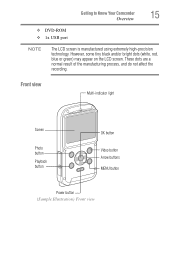
These dots are a normal result of the manufacturing process, and do not affect the recording. However, some tiny black and/or bright dots (white, red, blue or green) may appear on the LCD screen. Front view Multi-indicator light Screen Photo button Playback button OK button Video button Arrow buttons MENU button Power button (Sample Illustration) Front view Getting to Know Your Camcorder 15 Overview ❖ DVD-ROM ❖ 1x USB port NOTE The LCD screen is manufactured using extremely high-precision technology.
These dots are a normal result of the manufacturing process, and do not affect the recording. However, some tiny black and/or bright dots (white, red, blue or green) may appear on the LCD screen. Front view Multi-indicator light Screen Photo button Playback button OK button Video button Arrow buttons MENU button Power button (Sample Illustration) Front view Getting to Know Your Camcorder 15 Overview ❖ DVD-ROM ❖ 1x USB port NOTE The LCD screen is manufactured using extremely high-precision technology.

User Guide
Page 25
... of data. Do not turn the power off under running water and obtain prompt medical attention, to help prevent the electrolyte fluid from contacting your eyes, body or clothing. Battery warning indicators ❖ Always immediately turn on the product's power again until an authorized Toshiba service provider has checked it off and disconnect the power cable/cord plug from the plug socket and stop using the battery if...
... of data. Do not turn the power off under running water and obtain prompt medical attention, to help prevent the electrolyte fluid from contacting your eyes, body or clothing. Battery warning indicators ❖ Always immediately turn on the product's power again until an authorized Toshiba service provider has checked it off and disconnect the power cable/cord plug from the plug socket and stop using the battery if...
User Guide
Page 26
... warning message indicating that the battery power is exhausted has been displayed. 26 Getting Started Loading the battery Disposal of used batteries ❖ Always dispose of used batteries in the product before moving the product, always make sure the battery is inserted correctly and securely. Put insulating tape, such as cellophane tape, on the electrode during transportation to charge the battery. ❖ Improper installation could...
... warning message indicating that the battery power is exhausted has been displayed. 26 Getting Started Loading the battery Disposal of used batteries ❖ Always dispose of used batteries in the product before moving the product, always make sure the battery is inserted correctly and securely. Put insulating tape, such as cellophane tape, on the electrode during transportation to charge the battery. ❖ Improper installation could...

User Guide
Page 27
... use . When a card is advised that allows you to store photos and videos. The Media card reader supports the use batteries recommended by TOSHIBA as possible and turn the camcorder off. ❖ If the temperature continues to rise, the Temperature Alert icon begins to and played back from the card. Inserting and removing a media card Your camcorder comes with internal memory that you capture will be recorded to flash, and the camcorder turns off the power...
... use . When a card is advised that allows you to store photos and videos. The Media card reader supports the use batteries recommended by TOSHIBA as possible and turn the camcorder off. ❖ If the temperature continues to rise, the Temperature Alert icon begins to and played back from the card. Inserting and removing a media card Your camcorder comes with internal memory that you capture will be recorded to flash, and the camcorder turns off the power...

User Guide
Page 29
... the camcorder switches to the power save mode. ❖ If you press the Power button while holding down the Up arrow button to turn on the camera, the sound settings screen appears. Taking photos without a media card installed When no card installed. When closing a cover, make sure that no longer be waterproof. Up Arrow button Power button (Sample Illustration) Turning on , if no card is caught in the camcorder and press the Power button. The Format screen appears. The internal memory...
... the camcorder switches to the power save mode. ❖ If you press the Power button while holding down the Up arrow button to turn on the camera, the sound settings screen appears. Taking photos without a media card installed When no card installed. When closing a cover, make sure that no longer be waterproof. Up Arrow button Power button (Sample Illustration) Turning on , if no card is caught in the camcorder and press the Power button. The Format screen appears. The internal memory...

User Guide
Page 30
... the MENU screen. 4 Use the Up/Down arrow buttons to select the item you wish to the MENU screen. The MENU screen appears. MENU LED LIGHT FACE CHASER PHOTO VIEW CLOCK SET LANGUAGE TV OUTPUT OK OK button Arrow buttons FACE CHASER ON OFF OK (Sample Illustration) Accessing the Settings screen 5 Press the MENU button to return to change, and then press the OK button. 30 Getting Started Turning the camcorder on and getting started Accessing the MENU screen 1 Turn...
... the MENU screen. 4 Use the Up/Down arrow buttons to select the item you wish to the MENU screen. The MENU screen appears. MENU LED LIGHT FACE CHASER PHOTO VIEW CLOCK SET LANGUAGE TV OUTPUT OK OK button Arrow buttons FACE CHASER ON OFF OK (Sample Illustration) Accessing the Settings screen 5 Press the MENU button to return to change, and then press the OK button. 30 Getting Started Turning the camcorder on and getting started Accessing the MENU screen 1 Turn...
User Guide
Page 33
... capturing images. Getting Started 33 Starting again from the power save mode In order to preserve battery power, the power save mode NOTE Under normal conditions, while replacing the battery, the internal battery will automatically turn off after approximately twelve hours, if connected to a computer or printer. The Clock Set screen appears. 4 Use the Up/Down arrow buttons to toggle between selections and assign a value to check that the date and time settings are recorded...
... capturing images. Getting Started 33 Starting again from the power save mode In order to preserve battery power, the power save mode NOTE Under normal conditions, while replacing the battery, the internal battery will automatically turn off after approximately twelve hours, if connected to a computer or printer. The Clock Set screen appears. 4 Use the Up/Down arrow buttons to toggle between selections and assign a value to check that the date and time settings are recorded...

User Guide
Page 36
... screen appears. 36 Recording Recording a video clip NOTE It is the same as the video resolution. NOTE The resolution of still images taken while recording a video is not necessary to hold down the Video button while recording a video. 2M REC 00:00:09 Recording 5 time Photo button Video button MENU button Remaining recording time available Power button (Sample Illustration) Recording a video clip 3 Press the Video ( ) button again to the Recording screen without changing the settings, press the MENU button. Changing the video settings 1 With the Recording screen displayed...
... screen appears. 36 Recording Recording a video clip NOTE It is the same as the video resolution. NOTE The resolution of still images taken while recording a video is not necessary to hold down the Video button while recording a video. 2M REC 00:00:09 Recording 5 time Photo button Video button MENU button Remaining recording time available Power button (Sample Illustration) Recording a video clip 3 Press the Video ( ) button again to the Recording screen without changing the settings, press the MENU button. Changing the video settings 1 With the Recording screen displayed...
User Guide
Page 39
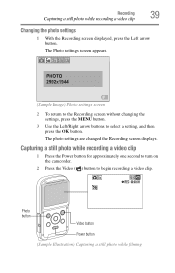
...turn on the camcorder. 2 Press the Video ( ) button to select a setting, and then press the OK button. Recording 39 Capturing a still photo while recording a video clip Changing the photo settings 1 With the Recording screen displayed, press the Left arrow button. The photo settings are changed the Recording screen displays. PHOTO 2592x1944 (Sample Image) Photo settings screen 2 To return to the Recording screen without changing the settings, press the MENU button. 3 Use the Left/Right arrow buttons to begin recording a video clip. 5M REC 00:00:09 Photo button Video button Power button...
...turn on the camcorder. 2 Press the Video ( ) button to select a setting, and then press the OK button. Recording 39 Capturing a still photo while recording a video clip Changing the photo settings 1 With the Recording screen displayed, press the Left arrow button. The photo settings are changed the Recording screen displays. PHOTO 2592x1944 (Sample Image) Photo settings screen 2 To return to the Recording screen without changing the settings, press the MENU button. 3 Use the Left/Right arrow buttons to begin recording a video clip. 5M REC 00:00:09 Photo button Video button Power button...

User Guide
Page 40
... Photo ( ) button. Video clip recording size setting Still image recording size 1920 x 1080 pixels 1280 x 720 pixels 640 x 480 pixels NOTE Depending on the video recording mode. NOTE During video clip playback, the sound of a motor is suggested that you take a still photo. 2 Press the Photo ( ) button. 40 Recording Capturing a still photo while recording a video clip 3 To take a still photo of media card used, recording may not play back properly on the camcorder screen or on the recording file size, as well as a still image 1 Play...
... Photo ( ) button. Video clip recording size setting Still image recording size 1920 x 1080 pixels 1280 x 720 pixels 640 x 480 pixels NOTE Depending on the video recording mode. NOTE During video clip playback, the sound of a motor is suggested that you take a still photo. 2 Press the Photo ( ) button. 40 Recording Capturing a still photo while recording a video clip 3 To take a still photo of media card used, recording may not play back properly on the camcorder screen or on the recording file size, as well as a still image 1 Play...
User Guide
Page 42
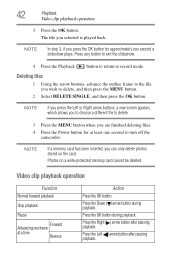
... pausing playback. Video clip playback operation Function Normal forward playback Stop playback Pause Forward Advancing one frame at least one second to the file you press the OK button for approximately one second a slideshow plays. Press the OK button during playback. NOTE If a memory card has been inserted, you are finished deleting files. 4 Press the Power button for at a time Reverse Action Press the OK button. Deleting files 1 Using the arrow buttons, advance the outline frame to turn...
... pausing playback. Video clip playback operation Function Normal forward playback Stop playback Pause Forward Advancing one frame at least one second to the file you press the OK button for approximately one second a slideshow plays. Press the OK button during playback. NOTE If a memory card has been inserted, you are finished deleting files. 4 Press the Power button for at a time Reverse Action Press the OK button. Deleting files 1 Using the arrow buttons, advance the outline frame to turn...
User Guide
Page 45
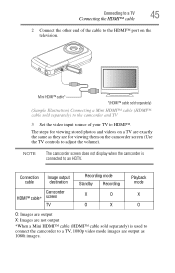
... TV to HDMI™. The steps for viewing them on a TV are exactly the same as 1080i images. Connection Image output cable destination Camcorder HDMI™ cable* screen TV Recording mode Standby Recording X O O X Playback mode X O O: Images are output X: Images are for viewing stored photos and videos on the camcorder screen (Use the TV controls to an HDTV. Mini HDMI™ cable* *(HDMI™ cable sold separately) (Sample Illustration) Connecting a Mini HDMI™ cable (HDMI™ cable sold separately) is connected to adjust the volume).
... TV to HDMI™. The steps for viewing them on a TV are exactly the same as 1080i images. Connection Image output cable destination Camcorder HDMI™ cable* screen TV Recording mode Standby Recording X O O X Playback mode X O O: Images are output X: Images are for viewing stored photos and videos on the camcorder screen (Use the TV controls to an HDTV. Mini HDMI™ cable* *(HDMI™ cable sold separately) (Sample Illustration) Connecting a Mini HDMI™ cable (HDMI™ cable sold separately) is connected to adjust the volume).
User Guide
Page 47
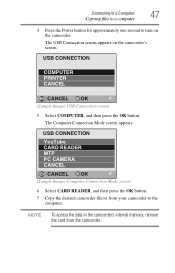
... then press the OK button. 7 Copy the desired camcorder file(s) from the camcorder. Connecting to a Computer 47 Copying files to a computer 4 Press the Power button for approximately one second to the computer. The Computer Connection Mode screen appears. USB CONNECTION COMPUTER PRINTER CANCEL CANCEL OK OK (Sample Image) USB Connection screen 5 Select COMPUTER, and then press the OK button. NOTE To access the data in the camcorder's internal memory, remove the card from your camcorder to turn on the camcorder's screen.
... then press the OK button. 7 Copy the desired camcorder file(s) from the camcorder. Connecting to a Computer 47 Copying files to a computer 4 Press the Power button for approximately one second to the computer. The Computer Connection Mode screen appears. USB CONNECTION COMPUTER PRINTER CANCEL CANCEL OK OK (Sample Image) USB Connection screen 5 Select COMPUTER, and then press the OK button. NOTE To access the data in the camcorder's internal memory, remove the card from your camcorder to turn on the camcorder's screen.
User Guide
Page 54
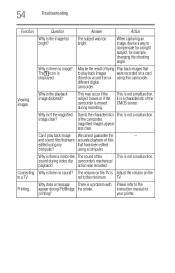
... a using a computer. instruction manual for example, changing the shooting angle. Why is there no sound? The icon is not a malfunction. This is displayed. Why is there a motor-like The sound of the camcorder, magnified images appear less clear. Connecting Why is there no image? When capturing an image, devise a way to the appear during PictBridge the printer. different digital camcorder. Viewing images Why is moved during video clip camcorder's mechanical playback...
... a using a computer. instruction manual for example, changing the shooting angle. Why is there no sound? The icon is not a malfunction. This is displayed. Why is there a motor-like The sound of the camcorder, magnified images appear less clear. Connecting Why is there no image? When capturing an image, devise a way to the appear during PictBridge the printer. different digital camcorder. Viewing images Why is moved during video clip camcorder's mechanical playback...

User Guide
Page 55
... use a card with the card or within the items: camcorder. 1 Remove the card and then reinstall it. 2 Remove the battery and then reinstall it. 3 Install a different card. memory. After saving your files to protected" message card is inoperable. Why does the "Card is The lock switch on the card or in the locked the unlocked position. A temporary internal Remove the battery form circuity problem may be the camcorder, wait a few the cause. Troubleshooting 55 Function...
... use a card with the card or within the items: camcorder. 1 Remove the card and then reinstall it. 2 Remove the battery and then reinstall it. 3 Install a different card. memory. After saving your files to protected" message card is inoperable. Why does the "Card is The lock switch on the card or in the locked the unlocked position. A temporary internal Remove the battery form circuity problem may be the camcorder, wait a few the cause. Troubleshooting 55 Function...

User Guide
Page 58
... located in the fifty (50) United States and District of Columbia may obtain warranty service by visiting the Toshiba Acclaim Web site at www.acclaim.toshiba.com or by contacting the telephone support center at http://pcsupport.toshiba.com/accessories1yr. Customers located outside the fifty (50) United States and District of Columbia may obtain warranty...
... located in the fifty (50) United States and District of Columbia may obtain warranty service by visiting the Toshiba Acclaim Web site at www.acclaim.toshiba.com or by contacting the telephone support center at http://pcsupport.toshiba.com/accessories1yr. Customers located outside the fifty (50) United States and District of Columbia may obtain warranty...

BW10.pdf
Page 1
...: Light: Video stabilization: File format: Interface: TV output Power saving mode: Battery information: Approximate photo capacity (1GB SD): Approximate video recording capacity - VGA (480p/30fps) = 31 min 24 sec Microsoft® Windows® XP (SP3)/ Windows Vista® / Windows® 7, CPU Intel Core Duo E4400, 2.0GHz above, 1GB RAM and 1GB free system hard disk space, DVD-ROM, available USB port Camileo™ BW10 with Li-Ion rechargeable battery, hand strap, USB cable, soft case, Quick Start Guide, DVD (CAMILEO Uploader...
...: Light: Video stabilization: File format: Interface: TV output Power saving mode: Battery information: Approximate photo capacity (1GB SD): Approximate video recording capacity - VGA (480p/30fps) = 31 min 24 sec Microsoft® Windows® XP (SP3)/ Windows Vista® / Windows® 7, CPU Intel Core Duo E4400, 2.0GHz above, 1GB RAM and 1GB free system hard disk space, DVD-ROM, available USB port Camileo™ BW10 with Li-Ion rechargeable battery, hand strap, USB cable, soft case, Quick Start Guide, DVD (CAMILEO Uploader...


