

Owners Manual
Page 2
... limits for help. DO NOT STARE INTO BEAM. NO USER-SERVICEABLE PARTS INSIDE. Reorient or relocate the receiving antenna. - The lightning flash with the instructions, may be determined by turning the equipment off and on a circuit different from that interference will not occur in the event that may cause harmful interference to operate this equipment. CAUTION: THIS DIGITAL VIDEO PLAYER EMPLOYS A LASER...
... limits for help. DO NOT STARE INTO BEAM. NO USER-SERVICEABLE PARTS INSIDE. Reorient or relocate the receiving antenna. - The lightning flash with the instructions, may be determined by turning the equipment off and on a circuit different from that interference will not occur in the event that may cause harmful interference to operate this equipment. CAUTION: THIS DIGITAL VIDEO PLAYER EMPLOYS A LASER...
Owners Manual
Page 4
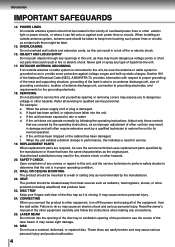
... located in damage and will often require extensive work by following the operating instructions. SAFETY CHECK Upon completion of fire or electric shock. 16. When installing an outside antenna system should be fatal. 15. When the power-supply cord or plug is closing. When the unit exhibits a distinct change in a risk of any connections. 25. Introduction IMPORTANT SAFEGUARDS 14. It may cause...
... located in damage and will often require extensive work by following the operating instructions. SAFETY CHECK Upon completion of fire or electric shock. 16. When installing an outside antenna system should be fatal. 15. When the power-supply cord or plug is closing. When the unit exhibits a distinct change in a risk of any connections. 25. Introduction IMPORTANT SAFEGUARDS 14. It may cause...
Owners Manual
Page 5
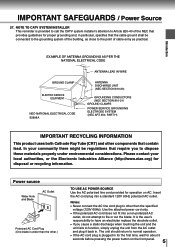
..., in particular, specifies that the cable ground shall be regulations that contain lead. It is provided to call the CATV system installer's attention to Article 820-40 of cable entry as close to dispose these materials properly under ...time, wait for operation on the front panel. 5 Notes: • Never connect the AC line cord plug to file or cut the blade. Use the attached power cord only. • If the polarized AC cord does not fit into a standard 120V 60Hz polarized AC outlet. Introduction EXAMPLE OF ANTENNA GROUNDING AS PER THE NATIONAL ELECTRICAL CODE ANTENNA...
..., in particular, specifies that the cable ground shall be regulations that contain lead. It is provided to call the CATV system installer's attention to Article 820-40 of cable entry as close to dispose these materials properly under ...time, wait for operation on the front panel. 5 Notes: • Never connect the AC line cord plug to file or cut the blade. Use the attached power cord only. • If the polarized AC cord does not fit into a standard 120V 60Hz polarized AC outlet. Introduction EXAMPLE OF ANTENNA GROUNDING AS PER THE NATIONAL ELECTRICAL CODE ANTENNA...

Owners Manual
Page 9
... screen/ Setting on screen display 57 Dynamic Range Control 58 Parental control setting 59 To change the parental level 60 Temporary disabling of rating level by DVD disc 61 Others Before calling service personnel 62 Reception disturbances 64 Language code list 65 Specifications 66 Limited warranty 67 Recording (VCR) Recording a TV program 40 One-touch Timer Recording (OTR 42 Timer recording 43 Other functions (VCR) Setting the surround sound/ Setting the stable sound 45 Second Audio Program (SAP...
... screen/ Setting on screen display 57 Dynamic Range Control 58 Parental control setting 59 To change the parental level 60 Temporary disabling of rating level by DVD disc 61 Others Before calling service personnel 62 Reception disturbances 64 Language code list 65 Specifications 66 Limited warranty 67 Recording (VCR) Recording a TV program 40 One-touch Timer Recording (OTR 42 Timer recording 43 Other functions (VCR) Setting the surround sound/ Setting the stable sound 45 Second Audio Program (SAP...
Owners Manual
Page 12
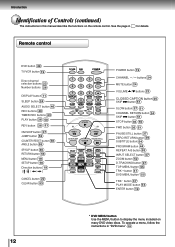
.../VCR DVD POWER 123 CHANNEL 456 789 DISPLAY 0 MUTE VOLUME SLEEP AUDIO CHANNEL CLOSED SELECT RETURN CAPTION TIMER REC SKIP REC SKIP SLOW PLAY REV FWD CM SKIP/JUMP STOP PAUSE/STILL COUNTER ZERO SP/SLP RESET RETURN INPUT SELECT RETURN MENU ANGLE SUBTITLE ZOOM PROGRAM D.TRACKING SETUP REPEAT A-B TOP MENU ENTER TRK + CANCEL CLEAR DVD MENU TRK - button 37 PLAY MODE button 53 ENTER button 19 12 * DVD MENU button Use the MENU button to display the menu included on the remote control. To operate a menu, follow the instructions in this manual...
.../VCR DVD POWER 123 CHANNEL 456 789 DISPLAY 0 MUTE VOLUME SLEEP AUDIO CHANNEL CLOSED SELECT RETURN CAPTION TIMER REC SKIP REC SKIP SLOW PLAY REV FWD CM SKIP/JUMP STOP PAUSE/STILL COUNTER ZERO SP/SLP RESET RETURN INPUT SELECT RETURN MENU ANGLE SUBTITLE ZOOM PROGRAM D.TRACKING SETUP REPEAT A-B TOP MENU ENTER TRK + CANCEL CLEAR DVD MENU TRK - button 37 PLAY MODE button 53 ENTER button 19 12 * DVD MENU button Use the MENU button to display the menu included on the remote control. To operate a menu, follow the instructions in this manual...

Owners Manual
Page 16
... a TV game Select "LINE 2" using the INPUT SELECT button. Be sure to adjust the receiver's volume to a moderate listening level. You can enjoy the TV game, camcorder or high quality dynamic sounds of MW20FN1/R Camcorder (yellow) (white) (red) AUDIO PHONES VIDEO L/MONO R REW STOP/EJECT PLAY FF REC/OTR CHANNEL LINE IN 2 POWER REC/OTR TIMER REC OPEN/CLOSE VOLUME SKIP STOP PLAY SKIP POWER To AUDIO (L/R)/VIDEO IN (LINE IN 2) To AUDIO (L/R)/VIDEO OUT Audio/Video cable (not supplied...
... a TV game Select "LINE 2" using the INPUT SELECT button. Be sure to adjust the receiver's volume to a moderate listening level. You can enjoy the TV game, camcorder or high quality dynamic sounds of MW20FN1/R Camcorder (yellow) (white) (red) AUDIO PHONES VIDEO L/MONO R REW STOP/EJECT PLAY FF REC/OTR CHANNEL LINE IN 2 POWER REC/OTR TIMER REC OPEN/CLOSE VOLUME SKIP STOP PLAY SKIP POWER To AUDIO (L/R)/VIDEO IN (LINE IN 2) To AUDIO (L/R)/VIDEO OUT Audio/Video cable (not supplied...

Owners Manual
Page 17
... audio input VHF/UHF OUT PUT VIDEO DIGITAL AUDIO COAXIAL L AUDIO R LINE 1 IN VIDEO L(MONO) AUDIO R To ANALOG AUDIO OUT Audio cable * Connect one or two rear speakers). "Dolby" "Pro Logic" and the double-D symbol are trademarks of Pro Logic from the same DVD movies that amplifier's owner's manual and set the amplifier so you can obtain the full benefit of Dolby Pro Logic Surround by connecting the unit to a 6 channel...
... audio input VHF/UHF OUT PUT VIDEO DIGITAL AUDIO COAXIAL L AUDIO R LINE 1 IN VIDEO L(MONO) AUDIO R To ANALOG AUDIO OUT Audio cable * Connect one or two rear speakers). "Dolby" "Pro Logic" and the double-D symbol are trademarks of Pro Logic from the same DVD movies that amplifier's owner's manual and set the amplifier so you can obtain the full benefit of Dolby Pro Logic Surround by connecting the unit to a 6 channel...

Owners Manual
Page 18
... to adjust the receiver's volume to the AC-3 RF input of the equipment from the analog stereo jacks. Connections Warning: When playing DTS-encoded discs (unit), excessive noise may be output from the wall outlet before you connect or disconnect the unit's power cord. Amplifier equipped with a digital audio input and speaker system (right and left front speakers). Connecting to turn off the amplifier before making any connections. • The output sound...
... to adjust the receiver's volume to the AC-3 RF input of the equipment from the analog stereo jacks. Connections Warning: When playing DTS-encoded discs (unit), excessive noise may be output from the wall outlet before you connect or disconnect the unit's power cord. Amplifier equipped with a digital audio input and speaker system (right and left front speakers). Connecting to turn off the amplifier before making any connections. • The output sound...
Owners Manual
Page 20
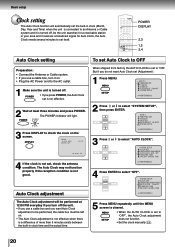
... to select "AUTO CLOCK". MENU SETUP • When the AUTO CLOCK is not good. POWER DISPLAY 2,3 1,5 2,4 Auto Clock setting Preparation: • Connect the Antenna or Cable system. • If you use a cable box and you do not want Auto Clock adjustment to be performed, the cable box must be performed at least three minutes and press POWER. The POWER indicator will light. But if you want Auto Clock set (Adjustment): 1 Press MENU. MENU SETUP M E N U TIMER REC SET TV SETUP CH SETUP AUTO REPEAT...
... to select "AUTO CLOCK". MENU SETUP • When the AUTO CLOCK is not good. POWER DISPLAY 2,3 1,5 2,4 Auto Clock setting Preparation: • Connect the Antenna or Cable system. • If you use a cable box and you do not want Auto Clock adjustment to be performed, the cable box must be performed at least three minutes and press POWER. The POWER indicator will light. But if you want Auto Clock set (Adjustment): 1 Press MENU. MENU SETUP M E N U TIMER REC SET TV SETUP CH SETUP AUTO REPEAT...
Owners Manual
Page 21
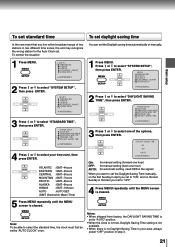
... signal) When you want to set the Daylight Saving Time manually, on the first Sunday in April you set to "AUTO" position. • When the clock is not set, Daylight Saving Time setting is not available. • When there is no Daylight Saving Time in your time zone, then press ENTER. ENTER M E N U TIMER REC SET TV SETUP CH SETUP AUTO REPEAT ON OFF SYSTEM SETUP 〈 / /ENTER/MENU...
... signal) When you want to set the Daylight Saving Time manually, on the first Sunday in April you set to "AUTO" position. • When the clock is not set, Daylight Saving Time setting is not available. • When there is no Daylight Saving Time in your time zone, then press ENTER. ENTER M E N U TIMER REC SET TV SETUP CH SETUP AUTO REPEAT ON OFF SYSTEM SETUP 〈 / /ENTER/MENU...
Owners Manual
Page 25
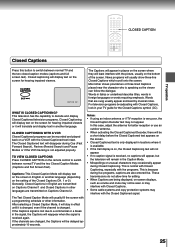
... recorded and played back on Captions Channel 2. Captions: This Closed Caption Mode will disappear during Cue (Fast Forward Search), Review (Rewind Search) and Pause Modes or if the VCR tracking is changed. The Text Closed Caption Mode will usually show three-line Closed Captions which scroll onto the screen. After selecting a Closed Caption Mode, it is changed , the Captions will display text on -screen displays, such as volume and mute may not appear. In this button to switch between...
... recorded and played back on Captions Channel 2. Captions: This Closed Caption Mode will disappear during Cue (Fast Forward Search), Review (Rewind Search) and Pause Modes or if the VCR tracking is changed. The Text Closed Caption Mode will usually show three-line Closed Captions which scroll onto the screen. After selecting a Closed Caption Mode, it is changed , the Captions will display text on -screen displays, such as volume and mute may not appear. In this button to switch between...

Owners Manual
Page 28
... select "TV SETUP", then press ENTER. V-CHIP SET V-CHIP : OFF TV RATING : TV-PG MOVIE RATING : OFF CHANGE PASSWORD 〈 / /ENTER/MENU〉 ENTER V-CHIP SET menu appears. TV SETUP V-CHIP SET ON/OFF TIMER PICTURE ENTER AUDIO SURROUND ON OFF STABLE SOUND ON OFF SAP ON OFF 〈 / /ENTER/MENU〉 3 Enter the password (4 digits) using the Number buttons (0-9), then press ENTER. 123 456 789 V-CHIP SET NEW PASSWORD: 0 〈0-9/ENTER/CANCEL/MENU...
... select "TV SETUP", then press ENTER. V-CHIP SET V-CHIP : OFF TV RATING : TV-PG MOVIE RATING : OFF CHANGE PASSWORD 〈 / /ENTER/MENU〉 ENTER V-CHIP SET menu appears. TV SETUP V-CHIP SET ON/OFF TIMER PICTURE ENTER AUDIO SURROUND ON OFF STABLE SOUND ON OFF SAP ON OFF 〈 / /ENTER/MENU〉 3 Enter the password (4 digits) using the Number buttons (0-9), then press ENTER. 123 456 789 V-CHIP SET NEW PASSWORD: 0 〈0-9/ENTER/CANCEL/MENU...

Owners Manual
Page 33
... follows: TV operation Picture control adjustment 1 1-2 CANCEL 1 To display the picture adjustment screen, press MENU. MENU SETUP ENTER M E N U TIMER REC SET TV SETUP CH SETUP AUTO REPEAT ON OFF SYSTEM SETUP 〈 / /ENTER/MENU〉 2 Press or ENTER . This determines how accurately the colors are reproduced by increasing the contrast. At night (dim light), the sharpest picture is obtained by pressing the MENU button three times. • The settings can only be set when colors appear normal...
... follows: TV operation Picture control adjustment 1 1-2 CANCEL 1 To display the picture adjustment screen, press MENU. MENU SETUP ENTER M E N U TIMER REC SET TV SETUP CH SETUP AUTO REPEAT ON OFF SYSTEM SETUP 〈 / /ENTER/MENU〉 2 Press or ENTER . This determines how accurately the colors are reproduced by increasing the contrast. At night (dim light), the sharpest picture is obtained by pressing the MENU button three times. • The settings can only be set when colors appear normal...

Owners Manual
Page 34
... SETUP AUTO REPEAT ON OFF SYSTEM SETUP 〈 / /ENTER/MENU〉 4 Press or to select "TV SETUP", then press ENTER. TV operation Sound control adjustment Sound control adjustment 1 1-3 CANCEL 1 To display the sound adjustment screen, press MENU. Press or to adjust the setting. + - ENTER to the factory preset levels. CANCEL CLEAR Notes: • The On-screen display will return all adjustments to select "AUDIO", then press TV SETUP V-CHIP SET ON/OFF TIMER PICTURE AUDIO SURROUND ON OFF STABLE SOUND ON OFF SAP...
... SETUP AUTO REPEAT ON OFF SYSTEM SETUP 〈 / /ENTER/MENU〉 4 Press or to select "TV SETUP", then press ENTER. TV operation Sound control adjustment Sound control adjustment 1 1-3 CANCEL 1 To display the sound adjustment screen, press MENU. Press or to adjust the setting. + - ENTER to the factory preset levels. CANCEL CLEAR Notes: • The On-screen display will return all adjustments to select "AUDIO", then press TV SETUP V-CHIP SET ON/OFF TIMER PICTURE AUDIO SURROUND ON OFF STABLE SOUND ON OFF SAP...

Owners Manual
Page 43
... steps 2 to 4 to select the TV/VCR mode. • Load a cassette tape with the erase prevention tab intact. • Check the time and date are correct 22 . In this case, reset the clock (see pages 20-22). • After a power failure or disconnection of the power plug, all programmed recording setting and time display will be used while the TIMER REC indicator is automatically...
... steps 2 to 4 to select the TV/VCR mode. • Load a cassette tape with the erase prevention tab intact. • Check the time and date are correct 22 . In this case, reset the clock (see pages 20-22). • After a power failure or disconnection of the power plug, all programmed recording setting and time display will be used while the TIMER REC indicator is automatically...

Owners Manual
Page 46
... AUDIO SELECT 1-2 1-2 1-2 Second Audio Program (SAP) Stereo recording and playback Your unit is made, make certain the letters "SAP" appears on the screen. ENTER MENU SETUP TV SETUP V-CHIP SET ON/OFF TIMER PICTURE AUDIO SURROUND ON OFF STABLE SOUND ON OFF SAP ON OFF 〈 / /ENTER/MENU〉 Listening to SAP When the unit is turned on or a channel selection is fitted with a SAP broadcast system which enables you press the button, OUTPUT SELECTION display...
... AUDIO SELECT 1-2 1-2 1-2 Second Audio Program (SAP) Stereo recording and playback Your unit is made, make certain the letters "SAP" appears on the screen. ENTER MENU SETUP TV SETUP V-CHIP SET ON/OFF TIMER PICTURE AUDIO SURROUND ON OFF STABLE SOUND ON OFF SAP ON OFF 〈 / /ENTER/MENU〉 Listening to SAP When the unit is turned on or a channel selection is fitted with a SAP broadcast system which enables you press the button, OUTPUT SELECTION display...

Owners Manual
Page 53
... the screen. 53 Plays the tracks in random order. Audio CD/Video CD *Program menu Use number buttons (0-9) to enter additional tracks. REPEAT A-B A 2 Press REPEAT A-B again. TRK PLAY MODE Each time you open the disc tray or turn off the power. Repeats the current chapter. Repeat this step to enter the track's number you selected. Program 1 5 8:29 2 8 8:54 3 3 7:31 4 __ Total 3 0:24:54 /Enter/0 9/Cancel/Play/PlayMode On screen display Operation...
... the screen. 53 Plays the tracks in random order. Audio CD/Video CD *Program menu Use number buttons (0-9) to enter additional tracks. REPEAT A-B A 2 Press REPEAT A-B again. TRK PLAY MODE Each time you open the disc tray or turn off the power. Repeats the current chapter. Repeat this step to enter the track's number you selected. Program 1 5 8:29 2 8 8:54 3 3 7:31 4 __ Total 3 0:24:54 /Enter/0 9/Cancel/Play/PlayMode On screen display Operation...
Owners Manual
Page 62
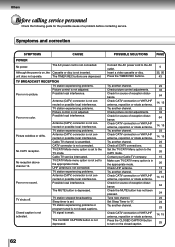
... interference. Cable TV service interrupted. Sleep timer is not connected. POSSIBLE SOLUTIONS PAGE Connect the AC power cord to the TV mode. Check picture control adjustments. Tune new channel. Press the CLOSED CAPTION button to the appropriate mode. The AC power cord is set to the AC outlet. unit does not operate. The TIMER REC buttons are depressed. TV BROADCAST RECEPTION Poor or no color. TV station experiencing problems. Picture control is not adjusted. Poor or no sound. TV...
... interference. Cable TV service interrupted. Sleep timer is not connected. POSSIBLE SOLUTIONS PAGE Connect the AC power cord to the TV mode. Check picture control adjustments. Tune new channel. Press the CLOSED CAPTION button to the appropriate mode. The AC power cord is set to the AC outlet. unit does not operate. The TIMER REC buttons are depressed. TV BROADCAST RECEPTION Poor or no color. TV station experiencing problems. Picture control is not adjusted. Poor or no sound. TV...
Owners Manual
Page 67
... retail purchase. This is replaced after you, or the person who has given you this product as lightning or fluctuations in electric power, improper installation, improper maintenance or use in materials or workmanship for the set as a gift from the Service Station. Failure to return the Demographic card will repair a defective product or part, without charge to an...
... retail purchase. This is replaced after you, or the person who has given you this product as lightning or fluctuations in electric power, improper installation, improper maintenance or use in materials or workmanship for the set as a gift from the Service Station. Failure to return the Demographic card will repair a defective product or part, without charge to an...

Owners Manual
Page 68
... limitation does not apply to your home when warranty service is needed; ( 1 ) Call the TACP toll free number 1-800-631-3811 after following all other rights which action must be taken to the TACP/THI Authorized Service Station for repair and returned to the duration of the limited warranties set will come to implied warranties arising under any statute, or law...
... limitation does not apply to your home when warranty service is needed; ( 1 ) Call the TACP toll free number 1-800-631-3811 after following all other rights which action must be taken to the TACP/THI Authorized Service Station for repair and returned to the duration of the limited warranties set will come to implied warranties arising under any statute, or law...


