
User Guide
Page 2
...which the receiver is no guarantee that interference will not occur in a particular installation. If this equipment, not expressly approved by TOSHIBA or parties authorized by one or more of the following measures: ❖ Reorient or relocate the receiving antenna. ❖ ... frequency energy and, if not installed and used in a residential installation. 2 Regulatory Information FCC Information Product Name: Camcorder Model number: CAMILEO® B10 FCC notice "Declaration of Conformity Information" This equipment has been tested and found to comply with the instructions, may cause...
...which the receiver is no guarantee that interference will not occur in a particular installation. If this equipment, not expressly approved by TOSHIBA or parties authorized by one or more of the following measures: ❖ Reorient or relocate the receiving antenna. ❖ ... frequency energy and, if not installed and used in a residential installation. 2 Regulatory Information FCC Information Product Name: Camcorder Model number: CAMILEO® B10 FCC notice "Declaration of Conformity Information" This equipment has been tested and found to comply with the instructions, may cause...
User Guide
Page 3
... may not cause harmful interference. (2) This device must be disposed of with Part 15 of the camcorder. 8 Remove the battery if it in direct sunlight. Contact Address: TOSHIBA America Information Systems, Inc. 9740 Irvine Boulevard Irvine, California 92618-1697 Telephone: (949) 583-3000... Safety Instructions 1 Do not drop, puncture or disassemble the camcorder; Doing so may affect the functionality of the FCC...
... may not cause harmful interference. (2) This device must be disposed of with Part 15 of the camcorder. 8 Remove the battery if it in direct sunlight. Contact Address: TOSHIBA America Information Systems, Inc. 9740 Irvine Boulevard Irvine, California 92618-1697 Telephone: (949) 583-3000... Safety Instructions 1 Do not drop, puncture or disassemble the camcorder; Doing so may affect the functionality of the FCC...
User Guide
Page 6
Contents Chapter 1: Getting to Know Your Camcorder 9 Overview 9 Check the Components 10 System Requirements 11 Front view 12 Rear view 13 Underside view 13 Chapter 2: Getting Started 14 Loading the battery 14 Charging the battery 15 Inserting and removing an SD™ Card (optional 20 Protecting data on an SD™ Card 20 Turning the camcorder on and getting started ........21 Turning off the camcorder 21 Chapter 3: Record Mode 22 Button functions 22 LCD screen information 23 Notification icons 24 6
Contents Chapter 1: Getting to Know Your Camcorder 9 Overview 9 Check the Components 10 System Requirements 11 Front view 12 Rear view 13 Underside view 13 Chapter 2: Getting Started 14 Loading the battery 14 Charging the battery 15 Inserting and removing an SD™ Card (optional 20 Protecting data on an SD™ Card 20 Turning the camcorder on and getting started ........21 Turning off the camcorder 21 Chapter 3: Record Mode 22 Button functions 22 LCD screen information 23 Notification icons 24 6
User Guide
Page 7
... 43 LCD screen information 44 Notification icons 45 Playback mode operations 46 Video Playback 47 Photo Playback 47 Delete a file in Playback mode 48 Chapter 5: Camcorder Settings 49 Setup menu 49 Menu Sound 50 TV 50 Language 51 Time settings 51 Format 52 Default setting 53 Chapter 6: Viewing Photos and Videos...
... 43 LCD screen information 44 Notification icons 45 Playback mode operations 46 Video Playback 47 Photo Playback 47 Delete a file in Playback mode 48 Chapter 5: Camcorder Settings 49 Setup menu 49 Menu Sound 50 TV 50 Language 51 Time settings 51 Format 52 Default setting 53 Chapter 6: Viewing Photos and Videos...
User Guide
Page 9
Chapter 1 Getting to automatic or may be set to Know Your Camcorder Overview Your Toshiba camcorder comes equipped with less memory. Other features of your CAMILEO® B10 camcorder are: ❖ High quality photos up to 16 Megapixels (interpolated) ❖ Color LCD screen for easy viewing of ... high-definition videos on wide screen HDTV ❖ Built-in CAMILEO® Uploader, allowing you to easily upload videos captured by the camcorder to the Internet (for extended video recording with a 5 Megapixel CMOS sensor that can be manually adjusted ❖ 16x digital zoom &#...
Chapter 1 Getting to automatic or may be set to Know Your Camcorder Overview Your Toshiba camcorder comes equipped with less memory. Other features of your CAMILEO® B10 camcorder are: ❖ High quality photos up to 16 Megapixels (interpolated) ❖ Color LCD screen for easy viewing of ... high-definition videos on wide screen HDTV ❖ Built-in CAMILEO® Uploader, allowing you to easily upload videos captured by the camcorder to the Internet (for extended video recording with a 5 Megapixel CMOS sensor that can be manually adjusted ❖ 16x digital zoom &#...
User Guide
Page 10
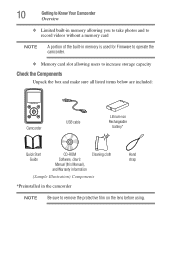
... photos and to record videos without a memory card NOTE A portion of the built-in memory is used for Firmware to operate the camcorder. ❖ Memory card slot allowing users to increase storage capacity Check the Components Unpack the box and make sure all listed items below... are included: CAMILEO B10 MENU OK Camcorder USB cable Lithium-ion Rechargeable battery* Quick Start CD-ROM Cleaning cloth Hand Guide Software, User's strap Manual (this Manual), and ...
... photos and to record videos without a memory card NOTE A portion of the built-in memory is used for Firmware to operate the camcorder. ❖ Memory card slot allowing users to increase storage capacity Check the Components Unpack the box and make sure all listed items below... are included: CAMILEO B10 MENU OK Camcorder USB cable Lithium-ion Rechargeable battery* Quick Start CD-ROM Cleaning cloth Hand Guide Software, User's strap Manual (this Manual), and ...

User Guide
Page 11
...) may appear on the LCD screen. These dots are a normal result of the manufacturing process, and do not affect the recording. Getting to Know Your Camcorder 11 Overview System Requirements ❖ Microsoft® Windows® XP/Windows Vista®/Windows® 7 ❖ CPU Intel® Pentium® 4, 2.4 GHz or above ❖...
...) may appear on the LCD screen. These dots are a normal result of the manufacturing process, and do not affect the recording. Getting to Know Your Camcorder 11 Overview System Requirements ❖ Microsoft® Windows® XP/Windows Vista®/Windows® 7 ❖ CPU Intel® Pentium® 4, 2.4 GHz or above ❖...
User Guide
Page 12
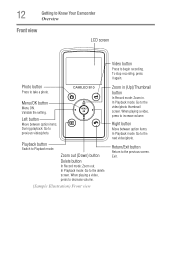
... previous screen. Zoom out (Down) button Delete button In Record mode: Zoom out. Return/Exit button Return to increase volume. 12 Getting to Know Your Camcorder Overview Front view LCD screen Photo button Press to the next video/photo. Menu/OK button Menu ON. Exit. Validate the setting. Left button Move...
... previous screen. Zoom out (Down) button Delete button In Record mode: Zoom out. Return/Exit button Return to increase volume. 12 Getting to Know Your Camcorder Overview Front view LCD screen Photo button Press to the next video/photo. Menu/OK button Menu ON. Exit. Validate the setting. Left button Move...
User Guide
Page 13
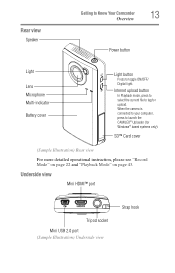
... For more detailed operational instruction, please see "Record Mode" on page 22 and "Playback Mode" on page 43. Rear view Speaker Getting to Know Your Camcorder 13 Overview Power button Light Lens Microphone Multi-indicator Battery cover Light button Press to tag for Windows® based systems only). Internet upload button...
... For more detailed operational instruction, please see "Record Mode" on page 22 and "Playback Mode" on page 43. Rear view Speaker Getting to Know Your Camcorder 13 Overview Power button Light Lens Microphone Multi-indicator Battery cover Light button Press to tag for Windows® based systems only). Internet upload button...
User Guide
Page 14
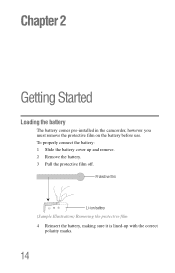
Chapter 2 Getting Started Loading the battery The battery comes pre-installed in the camcorder, however you must remove the protective film on the battery before use. Protective film Li-ion battery (Sample Illustration) Removing the protective film 4 Reinsert the battery, making sure it is lined-up and remove. 2 Remove the battery. 3 Pull the protective film off. To properly connect the battery: 1 Slide the battery cover up with the correct polarity marks. 14
Chapter 2 Getting Started Loading the battery The battery comes pre-installed in the camcorder, however you must remove the protective film on the battery before use. Protective film Li-ion battery (Sample Illustration) Removing the protective film 4 Reinsert the battery, making sure it is lined-up and remove. 2 Remove the battery. 3 Pull the protective film off. To properly connect the battery: 1 Slide the battery cover up with the correct polarity marks. 14
User Guide
Page 15
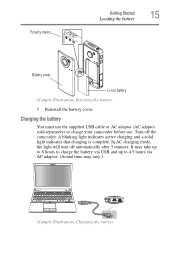
... It may take up to 8 hours to charge the battery via USB and up to charge your camcorder before use. Turn off automatically after 5 minutes. In AC charging mode, the light will turn off the camcorder. Polarity marks Getting Started 15 Loading the battery Battery cover Li-ion battery (Sample Illustration) Inserting...
... It may take up to 8 hours to charge the battery via USB and up to charge your camcorder before use. Turn off automatically after 5 minutes. In AC charging mode, the light will turn off the camcorder. Polarity marks Getting Started 15 Loading the battery Battery cover Li-ion battery (Sample Illustration) Inserting...
User Guide
Page 20
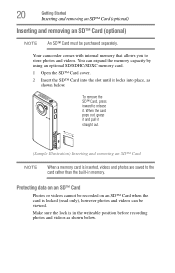
.... Protecting data on an SD™ Card Photos or videos cannot be recorded on an SD™ Card when the card is in memory. Your camcorder comes with internal memory that allows you to store photos and videos.
.... Protecting data on an SD™ Card Photos or videos cannot be recorded on an SD™ Card when the card is in memory. Your camcorder comes with internal memory that allows you to store photos and videos.
User Guide
Page 21
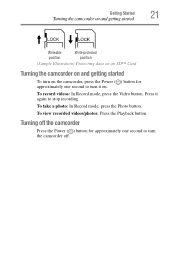
...recorded videos/photos: Press the Playback button. Getting Started 21 Turning the camcorder on and getting started Writeable Write-protected position position (Sample Illustration) Protecting data on an SD™ Card Turning the camcorder on and getting started To turn on . Press it again to turn... it on the camcorder, press the Power ( ) button for approximately one second to turn the camcorder off the camcorder Press the Power ( ) button for approximately one second to stop recording. To record videos: In Record mode...
...recorded videos/photos: Press the Playback button. Getting Started 21 Turning the camcorder on and getting started Writeable Write-protected position position (Sample Illustration) Protecting data on an SD™ Card Turning the camcorder on and getting started To turn on . Press it again to turn... it on the camcorder, press the Power ( ) button for approximately one second to turn the camcorder off the camcorder Press the Power ( ) button for approximately one second to stop recording. To record videos: In Record mode...
User Guide
Page 23
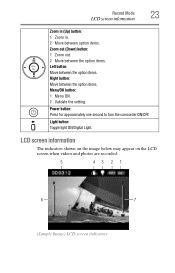
.... Right button: Move between the option items. Menu/OK button: 1 Menu ON. 2 Validate the setting. Power button: Press for approximately one second to turn the camcorder ON/OFF. Light button: Toggle light ON/Digital Light. LCD screen information The indicators shown on the image below may appear on the LCD screen...
.... Right button: Move between the option items. Menu/OK button: 1 Menu ON. 2 Validate the setting. Power button: Press for approximately one second to turn the camcorder ON/OFF. Light button: Toggle light ON/Digital Light. LCD screen information The indicators shown on the image below may appear on the LCD screen...

User Guide
Page 27
... Play Scene Filter White Balance Menu Sound TV Language Time Setting Format Default Setting Delete Video Delete Photo Select and Delete Delete All *Please see "Camcorder Settings" on page 49 for more information about Setup. Screen 2 Use the Directional buttons to select the desired option, and then press the OK button...
... Play Scene Filter White Balance Menu Sound TV Language Time Setting Format Default Setting Delete Video Delete Photo Select and Delete Delete All *Please see "Camcorder Settings" on page 49 for more information about Setup. Screen 2 Use the Directional buttons to select the desired option, and then press the OK button...
User Guide
Page 29
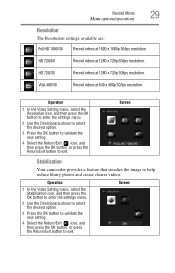
... the new setting. 4 Select the Return/Exit ( ) icon, and then press the OK button, or press the Return/Exit button to exit. Screen Stabilization Your camcorder provides a feature that steadies the image to help reduce blurry photos and create clearer videos. HD 720/30 Record videos at 640 x 480p 30/fps...
... the new setting. 4 Select the Return/Exit ( ) icon, and then press the OK button, or press the Return/Exit button to exit. Screen Stabilization Your camcorder provides a feature that steadies the image to help reduce blurry photos and create clearer videos. HD 720/30 Record videos at 640 x 480p 30/fps...

User Guide
Page 30
.... 4 Select the Return/Exit ( ) icon, and then press the OK button, or press the Return/Exit button to exit. When the video is disabled. The camcorder will be longer than the actual recording time. Operation 1 In the Video Setting menu, select the Motion Detect icon, and then press the OK button... then press the OK button, or press the Return/Exit button to exit. 30 Record Mode Menu options/operations Motion detection This option allows the camcorder to automatically record videos when the...
.... 4 Select the Return/Exit ( ) icon, and then press the OK button, or press the Return/Exit button to exit. When the video is disabled. The camcorder will be longer than the actual recording time. Operation 1 In the Video Setting menu, select the Motion Detect icon, and then press the OK button... then press the OK button, or press the Return/Exit button to exit. 30 Record Mode Menu options/operations Motion detection This option allows the camcorder to automatically record videos when the...

User Guide
Page 31
... OK button, or press the Return/Exit button to begin recording one second before the Record button is activated. Time Lapse This option allows the camcorder to record still images at specific time intervals that can then be used when the Pre-Record function is pressed. Record Mode 31 Menu options.../operations Pre-Record The Pre-record function allows the camcorder to exit. Screen NOTE The Time Lapse function cannot be then played back as one frame every five seconds.
... OK button, or press the Return/Exit button to begin recording one second before the Record button is activated. Time Lapse This option allows the camcorder to record still images at specific time intervals that can then be used when the Pre-Record function is pressed. Record Mode 31 Menu options.../operations Pre-Record The Pre-record function allows the camcorder to exit. Screen NOTE The Time Lapse function cannot be then played back as one frame every five seconds.
User Guide
Page 34
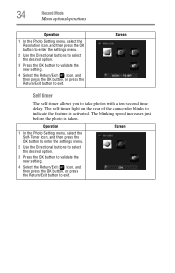
The self-timer light on the rear of the camcorder blinks to exit. The blinking speed increases just before the photo is activated. 34 Record Mode Menu options/operations Operation 1 In the Photo Setting menu, ...
The self-timer light on the rear of the camcorder blinks to exit. The blinking speed increases just before the photo is activated. 34 Record Mode Menu options/operations Operation 1 In the Photo Setting menu, ...

User Guide
Page 35
..., you can imprint the date and time on face(s) automatically. Screen Record Mode 35 Menu options/operations Face Tracking The camcorder detects and focuses on each photo. In Photo mode, when the camcorder is aimed at face(s), the face frame(s) appear on the screen. This function works in backlit conditions. Operation 1 In...
..., you can imprint the date and time on face(s) automatically. Screen Record Mode 35 Menu options/operations Face Tracking The camcorder detects and focuses on each photo. In Photo mode, when the camcorder is aimed at face(s), the face frame(s) appear on the screen. This function works in backlit conditions. Operation 1 In...


