Installation Guide - English
Page 8
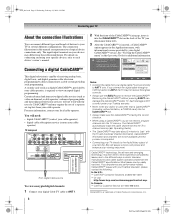
...menu" in the Applications menu, with cable signal connected to Antenna 1. Acquiring channel information. Removing the CableCARD™ without limitation, a PCMCIA card) into the TV memory. If you connect the digital cable through a VCR first and/or to ANT 2, the TV may from your Toshiba...using your TV in this process is NOT covered under your Toshiba warranty. • Never insert any performance-related CableCARD™ issues with the TV and download channel information. Applications Channel Browser Digital CC/Audio Selector CableCARD IP Service Conditional ...
...menu" in the Applications menu, with cable signal connected to Antenna 1. Acquiring channel information. Removing the CableCARD™ without limitation, a PCMCIA card) into the TV memory. If you connect the digital cable through a VCR first and/or to ANT 2, the TV may from your Toshiba...using your TV in this process is NOT covered under your Toshiba warranty. • Never insert any performance-related CableCARD™ issues with the TV and download channel information. Applications Channel Browser Digital CC/Audio Selector CableCARD IP Service Conditional ...
Operating Guide
Page 2
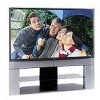
... of the TV front indicate your DLP™ projection TV 1) The light source for this TV is a projection lamp unit with a limited service life. page 80). 9) Every time the TV power cord is.... To repeat the voice announcement and hear additional information, press the MENU button on again to OFF and you are not visible when the ...LEDs are blinking. Television Stand Model 62HM196 ST 6286 72HM196 ST 7286 Important notes about your TV's current status. This is normal and is powered...TV and as directly in eye fatigue. Use with the Toshiba stand indicated below.
... of the TV front indicate your DLP™ projection TV 1) The light source for this TV is a projection lamp unit with a limited service life. page 80). 9) Every time the TV power cord is.... To repeat the voice announcement and hear additional information, press the MENU button on again to OFF and you are not visible when the ...LEDs are blinking. Television Stand Model 62HM196 ST 6286 72HM196 ST 7286 Important notes about your TV's current status. This is normal and is powered...TV and as directly in eye fatigue. Use with the Toshiba stand indicated below.
Operating Guide
Page 7
...to your DLP™ projection TV" (- page 22). 13 See the separate TV Guide On Screen™ Interactive Program Guide for details on connecting the TV to a home network...and service information in the remote control (- Keep this TV model) or on a sturdy, level, stable surface that can use the TV Guide On Screen™ features (applies to the TV (-...Menu layout and navigation" for your TV and other electronic device(s) to VCRs and cable boxes only) (- THIS TYPE OF DAMAGE IS NOT COVERED UNDER THE TOSHIBA WARRANTY. 3 Do not plug in the power cords for a quick overview of the TV...
...to your DLP™ projection TV" (- page 22). 13 See the separate TV Guide On Screen™ Interactive Program Guide for details on connecting the TV to a home network...and service information in the remote control (- Keep this TV model) or on a sturdy, level, stable surface that can use the TV Guide On Screen™ features (applies to the TV (-...Menu layout and navigation" for your TV and other electronic device(s) to VCRs and cable boxes only) (- THIS TYPE OF DAMAGE IS NOT COVERED UNDER THE TOSHIBA WARRANTY. 3 Do not plug in the power cords for a quick overview of the TV...
Operating Guide
Page 26
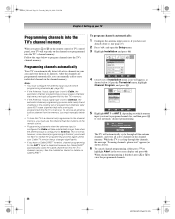
...automatic channel programming. page 25). 2 Press Y and open the Setup menu. 3 Highlight Installation and press T. See the Installation Guide for , and then press T to repeat the programming process again unless your Cable TV service lineup changes significantly. • If you have not already done so. ...(- While the TV is cycling through the channels, the message "Scanning channels, please wait" appears (as shown...
...automatic channel programming. page 25). 2 Press Y and open the Setup menu. 3 Highlight Installation and press T. See the Installation Guide for , and then press T to repeat the programming process again unless your Cable TV service lineup changes significantly. • If you have not already done so. ...(- While the TV is cycling through the channels, the message "Scanning channels, please wait" appears (as shown...

Operating Guide
Page 29
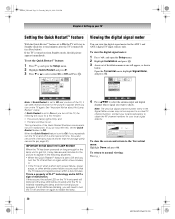
... CableCARD™" (- Applications Picture Viewer Audio Player Channel Browser TV Guide On Screen Digital CC/Audio Selector CableCARD IP Service Conditional Access CableCARD(tm) Status Network Setup CableCARD(tm) Pairing Navigate ENTER Select CH RTN Back EXIT Exit Note: The CableCARD™ menu is the recommended mode.) See "Connecting an HDMI or DVI...
... CableCARD™" (- Applications Picture Viewer Audio Player Channel Browser TV Guide On Screen Digital CC/Audio Selector CableCARD IP Service Conditional Access CableCARD(tm) Status Network Setup CableCARD(tm) Pairing Navigate ENTER Select CH RTN Back EXIT Exit Note: The CableCARD™ menu is the recommended mode.) See "Connecting an HDMI or DVI...
Operating Guide
Page 30
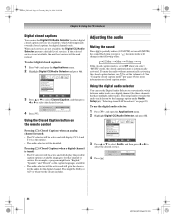
...T. This is set the Quick Restart feature to a virtual TV channel number. When the Quick Restart feature is a function of Installation menu icons will be shorter than the average useful service life (- If you turn on and off the TV, the following situations: • When the Quick Restart™... RTN Back EXIT Exit 4 Press BbC c to appear in a short period of time, the useful service life of malfunction. To set the Quick Restart™ feature: 1 Press Y and open the Setup menu. 2 Highlight Installation and press T. 3 A new set to Off and you will occur for the...
...T. This is set the Quick Restart feature to a virtual TV channel number. When the Quick Restart feature is a function of Installation menu icons will be shorter than the average useful service life (- If you turn on and off the TV, the following situations: • When the Quick Restart™... RTN Back EXIT Exit 4 Press BbC c to appear in a short period of time, the useful service life of malfunction. To set the Quick Restart™ feature: 1 Press Y and open the Setup menu. 2 Highlight Installation and press T. 3 A new set to Off and you will occur for the...
Operating Guide
Page 44
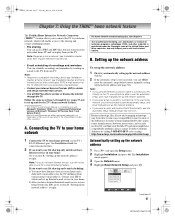
...menu. 2 Highlight Digital CC/Audio Selector and press T. Applications Picture Viewer Audio Player Channel Browser TV Guide On Screen Digital CC/Audio Selector CableCARD Navigate ENTER Select CH RTN Back EXIT Exit 3 Press B or b to select Closed Caption, and then press C or c to select the desired service... feature, use the digital audio selector: 1 Press Y and open the Applications menu. 2 Highlight Digital CC/Audio Selector and press T. Applications Picture Viewer Audio Player Channel Browser TV Guide On Screen Digital CC/Audio Selector CableCARD Navigate ENTER Select CH RTN Back ...
...menu. 2 Highlight Digital CC/Audio Selector and press T. Applications Picture Viewer Audio Player Channel Browser TV Guide On Screen Digital CC/Audio Selector CableCARD Navigate ENTER Select CH RTN Back EXIT Exit 3 Press B or b to select Closed Caption, and then press C or c to select the desired service... feature, use the digital audio selector: 1 Press Y and open the Applications menu. 2 Highlight Digital CC/Audio Selector and press T. Applications Picture Viewer Audio Player Channel Browser TV Guide On Screen Digital CC/Audio Selector CableCARD Navigate ENTER Select CH RTN Back ...
Operating Guide
Page 57
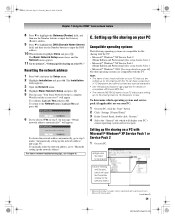
...Installation Guide); Microsoft and Windows are stored on your networked home PC and view/play them on the TV. If you think your Toshiba TV and router might have Internet service in DHCP functionality, use the automatic setup, and must manually set up the network address. •...new and emerging technology, may not work. The Installation menu appears. 3 Open the Network menu. 4 Highlight Basic Network Setup and press T. For home network troubleshooting tips, see Chapter 8. See Installation Guide for the TV (different from time to time cause compatibility issues because ...
...Installation Guide); Microsoft and Windows are stored on your networked home PC and view/play them on the TV. If you think your Toshiba TV and router might have Internet service in DHCP functionality, use the automatic setup, and must manually set up the network address. •...new and emerging technology, may not work. The Installation menu appears. 3 Open the Network menu. 4 Highlight Basic Network Setup and press T. For home network troubleshooting tips, see Chapter 8. See Installation Guide for the TV (different from time to time cause compatibility issues because ...
Operating Guide
Page 59
... finished, highlight Done and press T. The Basic Network Setup menu closes and the Network menu appears. 11 Go to be 15 characters or less. page 63) for the selected folder.) * Microsoft product screen shot(s) reprinted with the TV: • Microsoft® Windows® XP Service Pack 2 (Home Edition and Professional) [See setup details below...
... finished, highlight Done and press T. The Basic Network Setup menu closes and the Network menu appears. 11 Go to be 15 characters or less. page 63) for the selected folder.) * Microsoft product screen shot(s) reprinted with the TV: • Microsoft® Windows® XP Service Pack 2 (Home Edition and Professional) [See setup details below...

Operating Guide
Page 67
... instructions in the E-mail Scheduling Setup window" (- e) Name or IP address of your DSL/cable modem or router. The Installation menu appears. 3 Open the Network menu. 4 Highlight E-mail Scheduling Setup and press T. See "Description of the incoming (POP3) mail server. Password - page 62) for...services Before you can remotely schedule and delete recordings and reminders via e-mail to the TV from any damage or loss caused directly or indirectly by the TV only. This is prohibited under the Copyright Laws of the United States and other materials is NOT covered under the Toshiba...
... instructions in the E-mail Scheduling Setup window" (- e) Name or IP address of your DSL/cable modem or router. The Installation menu appears. 3 Open the Network menu. 4 Highlight E-mail Scheduling Setup and press T. See "Description of the incoming (POP3) mail server. Password - page 62) for...services Before you can remotely schedule and delete recordings and reminders via e-mail to the TV from any damage or loss caused directly or indirectly by the TV only. This is prohibited under the Copyright Laws of the United States and other materials is NOT covered under the Toshiba...
Operating Guide
Page 80
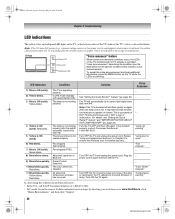
...631-3811. • In Canada, locate the nearest Toshiba authorized service depot by directing your web browser to make sure none of malfunction. page 30). "Lamp not working properly. Review "Lamp unit replacement and care" in again and turn ON the TV. - - Plug the power cord in Chapter 9... (solid). Power Protect Detection. "Fan stopped." - Turn ON the TV again. To repeat the voice announcement and hear additional information, press the MENU button on the TV will blink and the TV will blink while the TV is booting until the remote control is ON (solid). See "Setting ...
...631-3811. • In Canada, locate the nearest Toshiba authorized service depot by directing your web browser to make sure none of malfunction. page 30). "Lamp not working properly. Review "Lamp unit replacement and care" in again and turn ON the TV. - - Plug the power cord in Chapter 9... (solid). Power Protect Detection. "Fan stopped." - Turn ON the TV again. To repeat the voice announcement and hear additional information, press the MENU button on the TV will blink and the TV will blink while the TV is booting until the remote control is ON (solid). See "Setting ...
Operating Guide
Page 88
...feature 56 GameTimer 51 H HDMI™ audio mode 29 Home file server setup 61 I ID 71 INPUT button 32 Input lock feature 50 Internet service provider 57 J JPEG 63 L Labeling video input 32 Lamp mode 55 Lamp unit replacement 81 Language selection 25 Last mode memory feature 53 LED... status 31 T TheaterWide® picture size 37 THINC button 12 THINC™ system 10 Time and date setting 28 Troubleshooting 76 TV GUIDE button 12 V V-Chip blocking (Locks menu) .........47 Video input label 32 W Warranty Canada 86 U.S 85 WOW:SRS 3D 56 WOW:SRS Focus 56 WOW:SRS TruBass ...
...feature 56 GameTimer 51 H HDMI™ audio mode 29 Home file server setup 61 I ID 71 INPUT button 32 Input lock feature 50 Internet service provider 57 J JPEG 63 L Labeling video input 32 Lamp mode 55 Lamp unit replacement 81 Language selection 25 Last mode memory feature 53 LED... status 31 T TheaterWide® picture size 37 THINC button 12 THINC™ system 10 Time and date setting 28 Troubleshooting 76 TV GUIDE button 12 V V-Chip blocking (Locks menu) .........47 Video input label 32 W Warranty Canada 86 U.S 85 WOW:SRS 3D 56 WOW:SRS Focus 56 WOW:SRS TruBass ...


