Printable Spec Sheet
Page 2
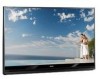
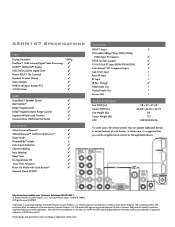
... Remote* ✓ Channel Browser™ and Favorite Browser™ ✓ Game Mode ✓ TheaterWide® Modes 5 Auto Aspect Detection ✓ Channel Labeling ✓ Input Labeling ✓ Sleep... HD Component Inputs 2 Side S+AV Input 1 Rear AV Input 1 RF Input 1 IR Pass Through ✓ Fixed Audio Out 1 Optical Audio Out 1 Service Port 1 Product & Packaging Unit WHD (in.) ... in which case, it is a registered trademark of Toshiba America Consumer Products, L.L.C. 65HM167 Specifications Video Display Resolution PixelPure™ 14-Bit Internal ...
... Remote* ✓ Channel Browser™ and Favorite Browser™ ✓ Game Mode ✓ TheaterWide® Modes 5 Auto Aspect Detection ✓ Channel Labeling ✓ Input Labeling ✓ Sleep... HD Component Inputs 2 Side S+AV Input 1 Rear AV Input 1 RF Input 1 IR Pass Through ✓ Fixed Audio Out 1 Optical Audio Out 1 Service Port 1 Product & Packaging Unit WHD (in.) ... in which case, it is a registered trademark of Toshiba America Consumer Products, L.L.C. 65HM167 Specifications Video Display Resolution PixelPure™ 14-Bit Internal ...
Service Manual
Page 4
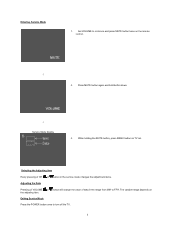
Set VOLUME to FFH. Selecting the Adjusting Item Every pressing of CH or button in the service mode changes the adjustment items. Adjusting the Data Pressing of VOLUME or button will change the value of data in the range from 00H to ... and press MUTE button twice on the remote control. Ļ 2. Press MUTE button again and hold button down. Ļ Service Mode display 3. While holding the MUTE button, press MENU button on the adjusting item. Exiting Service Mode Press the POWER button once to turn off the TV. 3 The variable range depends on TV set. Entering Service Mode 1.
Set VOLUME to FFH. Selecting the Adjusting Item Every pressing of CH or button in the service mode changes the adjustment items. Adjusting the Data Pressing of VOLUME or button will change the value of data in the range from 00H to ... and press MUTE button twice on the remote control. Ļ 2. Press MUTE button again and hold button down. Ļ Service Mode display 3. While holding the MUTE button, press MENU button on the adjusting item. Exiting Service Mode Press the POWER button once to turn off the TV. 3 The variable range depends on TV set. Entering Service Mode 1.
Owners Manual
Page 6
...Mode feature and is a projection lamp unit with a limited service life. You can , in rare instances, result in screen brightness when this occurs, the yellow LED on again within a few minutes; "Voice announce" feature When certain non-standard conditions occur, the LEDs on the TV will blink and the TV...information, press the MENU button on pages 63-65). 2) When the lamp mode is set the Power-On Mode feature to Low Power, every time the TV is possible, although unlikely, that a limited number of the TV front indicate your TV's current status. however, an occasional pixel (...
...Mode feature and is a projection lamp unit with a limited service life. You can , in rare instances, result in screen brightness when this occurs, the yellow LED on again within a few minutes; "Voice announce" feature When certain non-standard conditions occur, the LEDs on the TV will blink and the TV...information, press the MENU button on pages 63-65). 2) When the lamp mode is set the Power-On Mode feature to Low Power, every time the TV is possible, although unlikely, that a limited number of the TV front indicate your TV's current status. however, an occasional pixel (...
Owners Manual
Page 32
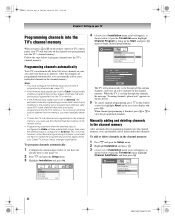
... programming, press O on the remote control (or highlight Abort in the channel memory After automatically programming channels into the TV's channel memory. Setup Installation Sleep Timer PC Settings Power-On Mode Fast 4 (A new set of Channels Found - 73 Scanning Digital Channels Found Channel - 118 Abort The...to program channels into the channel memory, you should not have not already done so (- To add or delete channels in your Cable TV service lineup changes significantly. 50HM67_EN.book Page 32 Thursday, March 29, 2007 11:28 AM Chapter 5: Setting up the Start, and press...
... programming, press O on the remote control (or highlight Abort in the channel memory After automatically programming channels into the TV's channel memory. Setup Installation Sleep Timer PC Settings Power-On Mode Fast 4 (A new set of Channels Found - 73 Scanning Digital Channels Found Channel - 118 Abort The...to program channels into the channel memory, you should not have not already done so (- To add or delete channels in your Cable TV service lineup changes significantly. 50HM67_EN.book Page 32 Thursday, March 29, 2007 11:28 AM Chapter 5: Setting up the Start, and press...
Owners Manual
Page 35
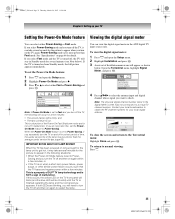
... will occur for the lamp unit to Fast and you turn off the TV, it may take several minutes (see Note below . Power-Saving mode saves more power than the average useful service life (- or • If the TV is set of the lamp may not correspond to restart the lamp. To...to Power-Saving, if you do not prefer this occurs, the yellow LED on from Standby mode, the full picture appears immediately. If you repeatedly turn the TV off in a short period of time, the useful service life of Installation menu icons will appear, as shown below ). Open the Terrestrial menu, ...
... will occur for the lamp unit to Fast and you turn off the TV, it may take several minutes (see Note below . Power-Saving mode saves more power than the average useful service life (- or • If the TV is set of the lamp may not correspond to restart the lamp. To...to Power-Saving, if you do not prefer this occurs, the yellow LED on from Standby mode, the full picture appears immediately. If you repeatedly turn the TV off in a short period of time, the useful service life of Installation menu icons will appear, as shown below ). Open the Terrestrial menu, ...

Owners Manual
Page 46
...CC Selector and press T. Adjusting the audio Muting the sound Press W to the current Base CC Mode setting. If the selected service is automatically activated. Each time you press W, the mute mode will be used instead. Using the digital audio selector You can use the Digital Audio Selector to ... 29, 2007 11:28 AM Chapter 6: Using the TV's features CC Selector You can use the CC Selector to temporarily override the default analog caption mode (set in the following order: 1/2 Mute Mute Volume If the closed caption mode is set the volume to 0. Preferences CC Selector Base...
...CC Selector and press T. Adjusting the audio Muting the sound Press W to the current Base CC Mode setting. If the selected service is automatically activated. Each time you press W, the mute mode will be used instead. Using the digital audio selector You can use the Digital Audio Selector to ... 29, 2007 11:28 AM Chapter 6: Using the TV's features CC Selector You can use the CC Selector to temporarily override the default analog caption mode (set in the following order: 1/2 Mute Mute Volume If the closed caption mode is set the volume to 0. Preferences CC Selector Base...
Owners Manual
Page 60
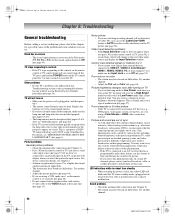
... 2007 11:28 AM Chapter 8: Troubleshooting General troubleshooting Before calling a service technician, please check this issue. page 45). TV stops responding to controls • If the TV stops responding to the controls on the remote control or TV control panel and you are using a ColorStream or HDMI video connection instead... is set the lamp mode to Low Power, each time you turn off the TV, press and hold the POWER button on the remote control is connected to the picture. - Set the closed caption feature is not a sign of this happens. pages 63-65). Try another channel. ...
... 2007 11:28 AM Chapter 8: Troubleshooting General troubleshooting Before calling a service technician, please check this issue. page 45). TV stops responding to controls • If the TV stops responding to the controls on the remote control or TV control panel and you are using a ColorStream or HDMI video connection instead... is set the lamp mode to Low Power, each time you turn off the TV, press and hold the POWER button on the remote control is connected to the picture. - Set the closed caption feature is not a sign of this happens. pages 63-65). Try another channel. ...
Owners Manual
Page 62
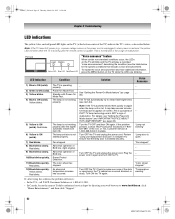
...of BUS line. To repeat the voice announcement and hear additional information, press the MENU button on -screen. Power-On Mode Fast. Note: If the TV is powered off and then quickly on again when the lamp unit is hot, it may take several minutes for the ... the nearest Toshiba authorized service depot by directing your web browser to ensure that include a voice announcement). 50HM67_EN.book Page 62 Thursday, March 29, 2007 11:28 AM Chapter 8: Troubleshooting LED indications The yellow, blue, and red/green LED lights on the TV will blink and the TV will play ...
...of BUS line. To repeat the voice announcement and hear additional information, press the MENU button on -screen. Power-On Mode Fast. Note: If the TV is powered off and then quickly on again when the lamp unit is hot, it may take several minutes for the ... the nearest Toshiba authorized service depot by directing your web browser to ensure that include a voice announcement). 50HM67_EN.book Page 62 Thursday, March 29, 2007 11:28 AM Chapter 8: Troubleshooting LED indications The yellow, blue, and red/green LED lights on the TV will blink and the TV will play ...
Owners Manual
Page 71
... 48 DVD player connection 16 DVI connection 19 Dynamic contrast 56 F Features, TV 9 Front of the TV 11 G Game Mode feature 59 H HDMI audio mode 34 HDMI cable 13 HDMI™ connection 19 I INFO button 55 INPUT button 37 Installation, care, and service 3 Installation, setup 10 Integrated digital tuning 9 IR blaster 17 IR OUT connection...
... 48 DVD player connection 16 DVI connection 19 Dynamic contrast 56 F Features, TV 9 Front of the TV 11 G Game Mode feature 59 H HDMI audio mode 34 HDMI cable 13 HDMI™ connection 19 I INFO button 55 INPUT button 37 Installation, care, and service 3 Installation, setup 10 Integrated digital tuning 9 IR blaster 17 IR OUT connection...


