Service Manual
Page 4
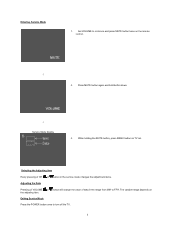
... the Adjusting Item Every pressing of CH or button in the service mode changes the adjustment items. Adjusting the Data Pressing of VOLUME or button will change the value of data in the range from 00H to turn off the TV. 3 The variable range depends on the remote control. Ļ 2. Set VOLUME... to minimum and press MUTE button twice on the adjusting item. While holding the MUTE button, press MENU button on TV set.
... the Adjusting Item Every pressing of CH or button in the service mode changes the adjustment items. Adjusting the Data Pressing of VOLUME or button will change the value of data in the range from 00H to turn off the TV. 3 The variable range depends on the remote control. Ļ 2. Set VOLUME... to minimum and press MUTE button twice on the adjusting item. While holding the MUTE button, press MENU button on TV set.
Owners Manual
Page 6
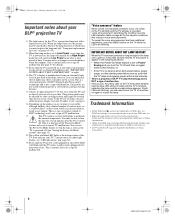
...Lamp unit replacement and care" on pages 63-65). 2) When the lamp mode is set to Low Power, every time the TV is powered on the media you are registered .... To repeat the voice announcement and hear additional information, press the MENU button on the screen, which time you turn the TV off . Saving and you must replace the lamp unit (- If...projection TV 1) The light source for the picture to obtain full brightness (- however, an occasional pixel (dot of light) may take several minutes for several minutes after a short period of it is a projection lamp unit with a limited service...
...Lamp unit replacement and care" on pages 63-65). 2) When the lamp mode is set to Low Power, every time the TV is powered on the media you are registered .... To repeat the voice announcement and hear additional information, press the MENU button on the screen, which time you turn the TV off . Saving and you must replace the lamp unit (- If...projection TV 1) The light source for the picture to obtain full brightness (- however, an occasional pixel (dot of light) may take several minutes for several minutes after a short period of it is a projection lamp unit with a limited service...
Owners Manual
Page 10
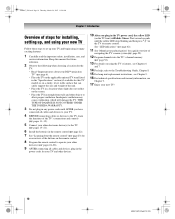
...TOSHIBA WARRANTY. 3 Do not plug in the TV power cord, the yellow LED (on the TV front) will damage the TV. Wait several seconds until AFTER you plug in any power cords until the yellow LED stops blinking and then press p on using the TV... 22). 7 See "Learning about your DLP® projection TV" (- page 62). 11 See "Menu layout and navigation" for the TV: • Read "Important notes about the remote control...TV and begin using its many exciting features. 1 Carefully read the important safety, installation, care, and service information. page 29). 12 Program channels into the TV...
...TOSHIBA WARRANTY. 3 Do not plug in the TV power cord, the yellow LED (on the TV front) will damage the TV. Wait several seconds until AFTER you plug in any power cords until the yellow LED stops blinking and then press p on using the TV... 22). 7 See "Learning about your DLP® projection TV" (- page 62). 11 See "Menu layout and navigation" for the TV: • Read "Important notes about the remote control...TV and begin using its many exciting features. 1 Carefully read the important safety, installation, care, and service information. page 29). 12 Program channels into the TV...
Owners Manual
Page 12
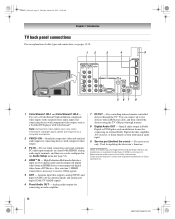
... analog (NTSC) and digital (ATSC) off-air antenna signals and analog and digital Cable TV (QAM) signals. 6 Fixed Audio OUT - Note: Component video cables carry only video information... video inputs (with standard stereo audio inputs) for connecting devices with component video output, such as a Toshiba DVD player with ColorStream®. page 54). 4 HDMI™ IN - Also see pages 13-21....OUT - Optical audio output in the Audio Setup menu (- Two sets of cable types and connections, see item 3. For service use when connecting a personal computer. High-Definition Multimedia...
... analog (NTSC) and digital (ATSC) off-air antenna signals and analog and digital Cable TV (QAM) signals. 6 Fixed Audio OUT - Note: Component video cables carry only video information... video inputs (with standard stereo audio inputs) for connecting devices with component video output, such as a Toshiba DVD player with ColorStream®. page 54). 4 HDMI™ IN - Also see pages 13-21....OUT - Optical audio output in the Audio Setup menu (- Two sets of cable types and connections, see item 3. For service use when connecting a personal computer. High-Definition Multimedia...
Owners Manual
Page 32
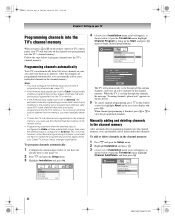
... (- Setup Installation Sleep Timer PC Settings Power-On Mode Fast 4 (A new set of Installation menu icons will stop only on the channels you programmed into the TV's channel memory. Installation Terrestrial Input Configuration Channel Program Channel Add/Delete Signal Meter Start ANT Cable ... To program channels automatically: 1 Configure the antenna input source, if you have to repeat the programming process again unless your Cable TV service lineup changes significantly. Manually adding and deleting channels in its memory. 50HM67_EN.book Page 32 Thursday, March 29, 2007 11:28 ...
... (- Setup Installation Sleep Timer PC Settings Power-On Mode Fast 4 (A new set of Installation menu icons will stop only on the channels you programmed into the TV's channel memory. Installation Terrestrial Input Configuration Channel Program Channel Add/Delete Signal Meter Start ANT Cable ... To program channels automatically: 1 Configure the antenna input source, if you have to repeat the programming process again unless your Cable TV service lineup changes significantly. Manually adding and deleting channels in its memory. 50HM67_EN.book Page 32 Thursday, March 29, 2007 11:28 ...
Owners Manual
Page 35
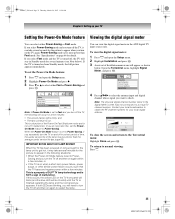
... feature to run. Power-Saving mode saves more power than the average useful service life (- Contact your TV Setting the Power-On Mode feature You can select either Fast or Power-Saving and press T. If the TV is on when a short-term power failure, power surge, or other similar... O. 35 HM67 (E/F) Web 213:276 If this , set to select either Power-Saving or Fast mode. To return to the Terrestrial menu: Highlight Done and press T. Open the Terrestrial menu, highlight Signal Meter, and press T. To set the Power-On Mode feature: 1 Press Y and open the Setup...
... feature to run. Power-Saving mode saves more power than the average useful service life (- Contact your TV Setting the Power-On Mode feature You can select either Fast or Power-Saving and press T. If the TV is on when a short-term power failure, power surge, or other similar... O. 35 HM67 (E/F) Web 213:276 If this , set to select either Power-Saving or Fast mode. To return to the Terrestrial menu: Highlight Done and press T. Open the Terrestrial menu, highlight Signal Meter, and press T. To set the Power-On Mode feature: 1 Press Y and open the Setup...

Owners Manual
Page 46
..., 2007 11:28 AM Chapter 6: Using the TV's features CC Selector You can use the CC Selector to temporarily override the default analog caption mode (set the volume to 0. If the selected service is not available, the next best service will change in Base CC Mode) for a ...: 1 Press Y and open the Audio menu. 2 Highlight Digital Audio Selector and press T. You can use the digital audio selector: 1 Press Y and open the Preferences menu. 2 Highlight CC Selector and press T. To use the Digital Audio Selector to select the desired service. See "Using the closed caption modes. ...
..., 2007 11:28 AM Chapter 6: Using the TV's features CC Selector You can use the CC Selector to temporarily override the default analog caption mode (set the volume to 0. If the selected service is not available, the next best service will change in Base CC Mode) for a ...: 1 Press Y and open the Audio menu. 2 Highlight Digital Audio Selector and press T. You can use the digital audio selector: 1 Press Y and open the Preferences menu. 2 Highlight CC Selector and press T. To use the Digital Audio Selector to select the desired service. See "Using the closed caption modes. ...
Owners Manual
Page 62
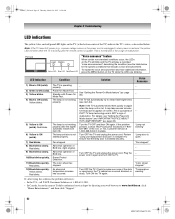
... Fast. Fan stopped. This is a property of DLP® TV lamp technology and is open." Turn OFF the TV and unplug the power cord. Turn ON the TV again. To repeat the voice announcement and hear additional information, press the MENU button on -screen. Power-On Mode Fast. Yellow blinks. The...power cord. This is normal and is installed securely. or TCL Customer Service at 1-800-631-3811. • In Canada, locate the nearest Toshiba authorized service depot by directing your web browser to www.toshiba.ca; Note: If the TV is powered off and then quickly on again when the lamp unit is...
... Fast. Fan stopped. This is a property of DLP® TV lamp technology and is open." Turn OFF the TV and unplug the power cord. Turn ON the TV again. To repeat the voice announcement and hear additional information, press the MENU button on -screen. Power-On Mode Fast. Yellow blinks. The...power cord. This is normal and is installed securely. or TCL Customer Service at 1-800-631-3811. • In Canada, locate the nearest Toshiba authorized service depot by directing your web browser to www.toshiba.ca; Note: If the TV is powered off and then quickly on again when the lamp unit is...
Owners Manual
Page 71
...23 Programming 26 Reset Factory Defaults 36 S Safety 2 SAP sound 47 Satellite receiver connection 16 Scroll settings 42 Selecting Menu Language 31 Service 4 Side panel control 11 Sleep timer 54 Specifications 66 StableSound 48 Stereo sound 47 SurfLock 40 S-video cable 13 System... status 36 T TheaterWide® picture size 41 Troubleshooting 60 TV status information 55 V V-Chip blocking (Locks menu) .........49 VCR connection 14,...
...23 Programming 26 Reset Factory Defaults 36 S Safety 2 SAP sound 47 Satellite receiver connection 16 Scroll settings 42 Selecting Menu Language 31 Service 4 Side panel control 11 Sleep timer 54 Specifications 66 StableSound 48 Stereo sound 47 SurfLock 40 S-video cable 13 System... status 36 T TheaterWide® picture size 41 Troubleshooting 60 TV status information 55 V V-Chip blocking (Locks menu) .........49 VCR connection 14,...


