

Operation Guide
Page 1
...satellite provider. HM116_EN.book Page 1 Monday, June 19, 2006 7:30 PM Integrated High Definition DLP™ Projection Television HIGH-DEFINITION TELEVISION 62HM116 IMPORTANT NOTE Before connecting, operating, or adjusting this TV. For details, see page 7. For details, please contact your TV. Model ... appear on page 2. © 2006 TOSHIBA CORPORATION All Rights Reserved RICA CONSUMER PR O 14001 FILE No. IS For an overview of malfunction. Record these numbers whenever you communicate with your new TV, see "IMPORTANT NOTICE ABOUT HOT LAMP RESTART" on -screen. Note: To ...
...satellite provider. HM116_EN.book Page 1 Monday, June 19, 2006 7:30 PM Integrated High Definition DLP™ Projection Television HIGH-DEFINITION TELEVISION 62HM116 IMPORTANT NOTE Before connecting, operating, or adjusting this TV. For details, see page 7. For details, please contact your TV. Model ... appear on page 2. © 2006 TOSHIBA CORPORATION All Rights Reserved RICA CONSUMER PR O 14001 FILE No. IS For an overview of malfunction. Record these numbers whenever you communicate with your new TV, see "IMPORTANT NOTICE ABOUT HOT LAMP RESTART" on -screen. Note: To ...

Operation Guide
Page 4
... Important notes about your DLP™ projection TV 2 Trademark Information 3 Chapter 1: Introduction 6 Welcome to Toshiba 6 Features of your new TV 6 Overview of steps for installing, setting up, and using your new TV 7 TV front and side panel controls and connections 8 TV back panel connections 9 Chapter 2: Using... contrast 54 Using CableClear® digital noise reduction 54 Using MPEG noise reduction 55 Selecting the color temperature 55 Selecting the lamp mode 55 Using the Game Mode feature 56 Using the advanced audio settings features 56 Using the SRS WOW™ surround...
... Important notes about your DLP™ projection TV 2 Trademark Information 3 Chapter 1: Introduction 6 Welcome to Toshiba 6 Features of your new TV 6 Overview of steps for installing, setting up, and using your new TV 7 TV front and side panel controls and connections 8 TV back panel connections 9 Chapter 2: Using... contrast 54 Using CableClear® digital noise reduction 54 Using MPEG noise reduction 55 Selecting the color temperature 55 Selecting the lamp mode 55 Using the Game Mode feature 56 Using the advanced audio settings features 56 Using the SRS WOW™ surround...

Operation Guide
Page 7
...2006 7:30 PM Chapter 1: Introduction Overview of steps for installing, setting up, and using your new TV Follow these steps to set up and using the TV Guide On Screen™ system (...Program channels into the TV's channel memory (- THIS TYPE OF DAMAGE IS NOT COVERED UNDER THE TOSHIBA WARRANTY. 3 Do not plug in any power cords until the yellow LED stops blinking and then... VCR and/or Cable box (if applicable) to the Troubleshooting Guide, Chapter 8. 18 For lamp unit replacement instructions, see Chapter 9. 19 For technical specifications and warranty information, see Chapter 9. 20 Enjoy...
...2006 7:30 PM Chapter 1: Introduction Overview of steps for installing, setting up, and using your new TV Follow these steps to set up and using the TV Guide On Screen™ system (...Program channels into the TV's channel memory (- THIS TYPE OF DAMAGE IS NOT COVERED UNDER THE TOSHIBA WARRANTY. 3 Do not plug in any power cords until the yellow LED stops blinking and then... VCR and/or Cable box (if applicable) to the Troubleshooting Guide, Chapter 8. 18 For lamp unit replacement instructions, see Chapter 9. 19 For technical specifications and warranty information, see Chapter 9. 20 Enjoy...

Operation Guide
Page 30
...close the screen and return to run. To set the Quick Restart™ feature: 1 Press Y and open the Setup menu. 2 Highlight Installation and press T. 3 A new set of DLP™ technology and is on from Standby mode, the full picture appears immediately. To view the digital signal meter: 1 Press Y and open...Highlight Done and press T. or • If the TV is NOT a sign of the Quick Restart Shutdown mode and is finished restarting the lamp and the normal picture appears. This is a function of malfunction. If this , set the Quick Restart feature to Off. Contact your local ...
...close the screen and return to run. To set the Quick Restart™ feature: 1 Press Y and open the Setup menu. 2 Highlight Installation and press T. 3 A new set of DLP™ technology and is on from Standby mode, the full picture appears immediately. To view the digital signal meter: 1 Press Y and open...Highlight Done and press T. or • If the TV is NOT a sign of the Quick Restart Shutdown mode and is finished restarting the lamp and the normal picture appears. This is a function of malfunction. If this , set the Quick Restart feature to Off. Contact your local ...
Operation Guide
Page 54
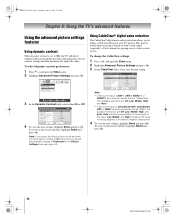
... or Off. \ Advanced Picture Settings ANT 1 Dynamic Contrast CableClear MPEG Noise Reduction Color Temperature Lamp Mode GCaomloer Maondeagement On Auto Low Cool Low Power Off Reset Done 4 To save the new settings, highlight Done and press T. Auto will display the text "DNR." This may be useful...factory defaults, highlight Reset and press T. 54 HM116 (E/F) Web 213:276 Advanced Picture Settings Dynamic Contrast CableClear MPEG Noise Reduction Color Temperature Lamp Mode Game Mode Reset On Auto Low Cool Low Power Off Done ANT 1 Note: • If the current input is ColorStream ...
... or Off. \ Advanced Picture Settings ANT 1 Dynamic Contrast CableClear MPEG Noise Reduction Color Temperature Lamp Mode GCaomloer Maondeagement On Auto Low Cool Low Power Off Reset Done 4 To save the new settings, highlight Done and press T. Auto will display the text "DNR." This may be useful...factory defaults, highlight Reset and press T. 54 HM116 (E/F) Web 213:276 Advanced Picture Settings Dynamic Contrast CableClear MPEG Noise Reduction Color Temperature Lamp Mode Game Mode Reset On Auto Low Cool Low Power Off Done ANT 1 Note: • If the current input is ColorStream ...

Operation Guide
Page 55
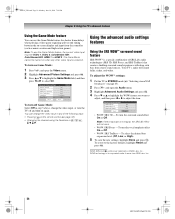
...selected when this happens. Advanced Picture Settings Dynamic Contrast CableClear MPEG Noise Reduction Color Temperature Lamp Mode Game Mode Reset On Auto Low Cool Low Power Off Done ANT 1 4 To save the new settings, highlight Done and press T. Note: If you set picture modes (Sports, Standard... Low, Middle or High. Advanced Picture Settings Dynamic Contrast CableClear MPEG Noise Reduction Color Temperature Lamp Mode Game Mode On Auto Low Cool Low Power Off ANT 1 Reset Done 4 To save the new settings, highlight Done and press T. To revert to the factory defaults, highlight Reset and...
...selected when this happens. Advanced Picture Settings Dynamic Contrast CableClear MPEG Noise Reduction Color Temperature Lamp Mode Game Mode Reset On Auto Low Cool Low Power Off Done ANT 1 4 To save the new settings, highlight Done and press T. Note: If you set picture modes (Sports, Standard... Low, Middle or High. Advanced Picture Settings Dynamic Contrast CableClear MPEG Noise Reduction Color Temperature Lamp Mode Game Mode On Auto Low Cool Low Power Off ANT 1 Reset Done 4 To save the new settings, highlight Done and press T. To revert to the factory defaults, highlight Reset and...
Operation Guide
Page 56
..., rich bass from SRS Labs, Inc. 56 HM116 (E/F) Web 213:276 To select the desired bass expansion level (Off, Low, or High). 5 To save the new settings, highlight Done and press T. HM116_EN.book Page 56 Monday, June 19, 2006 7:30 PM Chapter 6: Using the TV's advanced features Using the Game Mode... can change the video input, or turn the surround sound effect On or Off. Advanced Picture Settings Dynamic Contrast CableClear MPEG Noise Reduction Color Temperature Lamp Mode Game Mode Reset Video 1 On Auto Low Cool Low Power On Done To turn off and then on page 45). 2 Press Y and open the...
..., rich bass from SRS Labs, Inc. 56 HM116 (E/F) Web 213:276 To select the desired bass expansion level (Off, Low, or High). 5 To save the new settings, highlight Done and press T. HM116_EN.book Page 56 Monday, June 19, 2006 7:30 PM Chapter 6: Using the TV's advanced features Using the Game Mode... can change the video input, or turn the surround sound effect On or Off. Advanced Picture Settings Dynamic Contrast CableClear MPEG Noise Reduction Color Temperature Lamp Mode Game Mode Reset Video 1 On Auto Low Cool Low Power On Done To turn off and then on page 45). 2 Press Y and open the...
Operation Guide
Page 82
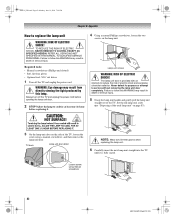
... its purpose or attempt to follow this WARNING may result in death or serious injury. TV back Lamp unit door detail NOTE: Wear soft, lint-free gloves when replacing the lamp unit. 6 Carefully insert the new lamp unit straight into the TV until it . 4 Using a manual Phillips screwdriver, loosen the two screws on the...
... its purpose or attempt to follow this WARNING may result in death or serious injury. TV back Lamp unit door detail NOTE: Wear soft, lint-free gloves when replacing the lamp unit. 6 Carefully insert the new lamp unit straight into the TV until it . 4 Using a manual Phillips screwdriver, loosen the two screws on the...

Operation Guide
Page 83
... lamp life may not turn on the left side of the lamp unit door inside the TV cabinet opening in the empty box from the new unit. • Keep the lamp ...unit out of reach of the following conditions exist, turn off the TV, unplug the power cord, and repeat steps 1-9 to ensure that may be flammable at least one (1) hour, such chemicals may be shortened. 8 Reattach the lamp... at 1-800-631-3811. Insert the hooks inside the opening . CAUTION: Always handle the lamp unit with a lint-free lens cleaning cloth (such as excessive mechanical abuse or handling by...
... lamp life may not turn on the left side of the lamp unit door inside the TV cabinet opening in the empty box from the new unit. • Keep the lamp ...unit out of reach of the following conditions exist, turn off the TV, unplug the power cord, and repeat steps 1-9 to ensure that may be flammable at least one (1) hour, such chemicals may be shortened. 8 Reattach the lamp... at 1-800-631-3811. Insert the hooks inside the opening . CAUTION: Always handle the lamp unit with a lint-free lens cleaning cloth (such as excessive mechanical abuse or handling by...
Operation Guide
Page 85
... whatsoever. DURING THIS PERIOD, TACP WILL, AT TACP'S OPTION, EXCHANGE A DEFECTIVE LAMP UNIT WITH A NEW OR REFURBISHED LAMP UNIT WITHOUT CHARGE TO YOU. The lamp unit is needed: (1) To find the nearest TACP Authorized Service Station, visit TACP's website at www.tacp.toshiba.com/service or contact TACP's Consumer Solution Center toll free at 1-800...
... whatsoever. DURING THIS PERIOD, TACP WILL, AT TACP'S OPTION, EXCHANGE A DEFECTIVE LAMP UNIT WITH A NEW OR REFURBISHED LAMP UNIT WITHOUT CHARGE TO YOU. The lamp unit is needed: (1) To find the nearest TACP Authorized Service Station, visit TACP's website at www.tacp.toshiba.com/service or contact TACP's Consumer Solution Center toll free at 1-800...
Operation Guide
Page 87
...setup 62 I ID 71 INPUT button 32 Input lock feature 50 Internet service provider 57 J JPEG 63 L Labeling video input 32 Lamp mode 55 Lamp unit replacement 81 Language selection 25 Last mode memory feature 53 LED indications 80 LOCKS menu Channels, blocking 49 Enable rating blocking 48... New PIN code 47 Panel lock 51 Unlocking programs temporarily ... 50 Video inputs, locking 50 Locks menu 47 M Menu system 22 MODE ...
...setup 62 I ID 71 INPUT button 32 Input lock feature 50 Internet service provider 57 J JPEG 63 L Labeling video input 32 Lamp mode 55 Lamp unit replacement 81 Language selection 25 Last mode memory feature 53 LED indications 80 LOCKS menu Channels, blocking 49 Enable rating blocking 48... New PIN code 47 Panel lock 51 Unlocking programs temporarily ... 50 Video inputs, locking 50 Locks menu 47 M Menu system 22 MODE ...


