User Manual
Page 1
...please contact your TV antenna installer, cable provider, or satellite provider. © 2011 TOSHIBA CORPORATION All Rights Reserved Owner's Record The model number and serial number are on the back and side of steps for setting up your TV. Refer to these numbers in the spaces below. Integrated High De...finition LCD Television 46UL610U 55UL610U 65UL610U For an overview of your new TV, see page 12. Note: To display...
...please contact your TV antenna installer, cable provider, or satellite provider. © 2011 TOSHIBA CORPORATION All Rights Reserved Owner's Record The model number and serial number are on the back and side of steps for setting up your TV. Refer to these numbers in the spaces below. Integrated High De...finition LCD Television 46UL610U 55UL610U 65UL610U For an overview of your new TV, see page 12. Note: To display...
User Manual
Page 2
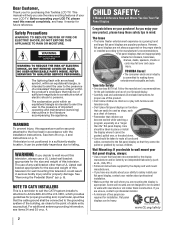
...cause injury. NOTE TO CATV INSTALLERS This is committed to the flat panel displays are required for future reference. p. 6). TOSHIBA Cares! • The consumer electronics industry is a reminder to call the CATV system installer's attention to place or install the ...NOT fit all instructions supplied by curious children. WARNING To prevent injury, this television could result in accordance with furniture and television sets. • Don't place flat panel display. • Carefully read this television. The use of your LCD TV, please...
...cause injury. NOTE TO CATV INSTALLERS This is committed to the flat panel displays are required for future reference. p. 6). TOSHIBA Cares! • The consumer electronics industry is a reminder to call the CATV system installer's attention to place or install the ...NOT fit all instructions supplied by curious children. WARNING To prevent injury, this television could result in accordance with furniture and television sets. • Don't place flat panel display. • Carefully read this television. The use of your LCD TV, please...
User Manual
Page 5
...SPACERS. 1) Unplug and remove any kind into the TV cabinet slots. 40) During a lightning storm, do not touch the connecting cables or TV set. 41) For added protection of your LCD TV, always use a UL Listed wall bracket appropriate for long periods of the TV. 5) Always use...wall bracket. 4) Make sure to dangerous voltage or other hazards. If these sounds become frequent or continuous, unplug the power cord and contact a Toshiba Authorized Service Provider. 44) WARNING: RISK OF SERIOUS PERSONAL INJURY OR EQUIPMENT DAMAGE! These actions will damage internal parts. 39) WARNING: RISK ...
...SPACERS. 1) Unplug and remove any kind into the TV cabinet slots. 40) During a lightning storm, do not touch the connecting cables or TV set. 41) For added protection of your LCD TV, always use a UL Listed wall bracket appropriate for long periods of the TV. 5) Always use...wall bracket. 4) Make sure to dangerous voltage or other hazards. If these sounds become frequent or continuous, unplug the power cord and contact a Toshiba Authorized Service Provider. 44) WARNING: RISK OF SERIOUS PERSONAL INJURY OR EQUIPMENT DAMAGE! These actions will damage internal parts. 39) WARNING: RISK ...
User Manual
Page 7
... Class B digital apparatus complies with Part 15 of the FCC Rules. Federal Communications Commission Statement FCC Compliance Statement Toshiba television models 46UL610U, 55UL610U, and 65UL610U comply with Canadian ICES-003. The device could void the user's authority to operate this device.... information to transmit, or operational failure. The ideal viewing distance should be installed and operated with FCC radiation exposure limits set forth for an uncontrolled environment. The party responsible for compliance to these rules is not possible. This equipment generates, uses...
... Class B digital apparatus complies with Part 15 of the FCC Rules. Federal Communications Commission Statement FCC Compliance Statement Toshiba television models 46UL610U, 55UL610U, and 65UL610U comply with Canadian ICES-003. The device could void the user's authority to operate this device.... information to transmit, or operational failure. The ideal viewing distance should be installed and operated with FCC radiation exposure limits set forth for an uncontrolled environment. The party responsible for compliance to these rules is not possible. This equipment generates, uses...

User Manual
Page 8
...of LCD Display technology and are registered U.S. Industry Canada Statement This device complies with IC RSS-102 radiation exposure limits set the Auto Brightness Sensor to the following symptoms are technical limitations of malfunction; Selection of information to operate this television ...meet ENERGY STAR® requirements. For more information, see p. 57. therefore, Toshiba is not responsible for an uncontrolled environment. The afterimage is not permanent and will disappear in a short period of time. 2) ...
...of LCD Display technology and are registered U.S. Industry Canada Statement This device complies with IC RSS-102 radiation exposure limits set the Auto Brightness Sensor to the following symptoms are technical limitations of malfunction; Selection of information to operate this television ...meet ENERGY STAR® requirements. For more information, see p. 57. therefore, Toshiba is not responsible for an uncontrolled environment. The afterimage is not permanent and will disappear in a short period of time. 2) ...

User Manual
Page 10
...Using Channel Return 43 Using SurfLock 43 Selecting the video input to view 43 Using closed captions 44 Analog CC mode 44 Digital CC settings 44 Setting the PIN code 45 Entering a new PIN code 45 Changing or deleting your PIN code 45 Forgotten PIN code 45 Using parental ... by rating (V-Chip 45 Downloading an additional rating system 46 Displaying ratings 47 Unlocking programs 47 Locking specific channels 47 Locking video input 47 Setting a time limit for games 48 Locking the control panel 48 Using HDMI® CEC Control 48 Controlling HDMI® CEC playback devices 49...
...Using Channel Return 43 Using SurfLock 43 Selecting the video input to view 43 Using closed captions 44 Analog CC mode 44 Digital CC settings 44 Setting the PIN code 45 Entering a new PIN code 45 Changing or deleting your PIN code 45 Forgotten PIN code 45 Using parental ... by rating (V-Chip 45 Downloading an additional rating system 46 Displaying ratings 47 Unlocking programs 47 Locking specific channels 47 Locking video input 47 Setting a time limit for games 48 Locking the control panel 48 Using HDMI® CEC Control 48 Controlling HDMI® CEC playback devices 49...
User Manual
Page 11
...99 Limited Canadian Warranty for Toshiba Brand Flat Panel Televisions 100 Limited Canadian Warranty for LCD Televisions 98 Limited United States Warranty Product - Test Pattern 60 RGB Filter 60 White Balance 60 Resetting to the factory default 61 Locking the picture settings 61 Adjusting the audio ... Dynamic Volume 62 Using advanced sound features 63 Using surround sound 63 Chapter 8: Advanced features 64 Using your home network 64 Setting up the Network 65 Wireless Setup 65 Advanced Network Setup 67 Network Connection Test 68 Using the software keyboard 68 Performing a ...
...99 Limited Canadian Warranty for Toshiba Brand Flat Panel Televisions 100 Limited Canadian Warranty for LCD Televisions 98 Limited United States Warranty Product - Test Pattern 60 RGB Filter 60 White Balance 60 Resetting to the factory default 61 Locking the picture settings 61 Adjusting the audio ... Dynamic Volume 62 Using advanced sound features 63 Using surround sound 63 Chapter 8: Advanced features 64 Using your home network 64 Setting up the Network 65 Wireless Setup 65 Advanced Network Setup 67 Network Connection Test 68 Using the software keyboard 68 Performing a ...
User Manual
Page 12
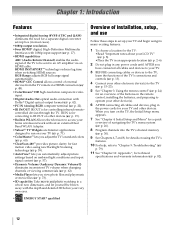
... 12 p. 8). • Place the TV in the power cords for your TV (- When you automatically adjust picture settings based on your TV and other electronic device(s) to set -top box (in most cases). •1080p output resolution. •Four HDMI® digital, High-Definition Multimedia ... 1080p input support (- Chapter 1: Introduction Features •Integrated digital tuning (8VSB ATSC and QAM) eliminates the need for a separate digital converter set up your TV and begin using its many exciting features. 1 To choose a location for the TV: • Read "Important notes about your...
... 12 p. 8). • Place the TV in the power cords for your TV (- When you automatically adjust picture settings based on your TV and other electronic device(s) to set -top box (in most cases). •1080p output resolution. •Four HDMI® digital, High-Definition Multimedia ... 1080p input support (- Chapter 1: Introduction Features •Integrated digital tuning (8VSB ATSC and QAM) eliminates the need for a separate digital converter set up your TV and begin using its many exciting features. 1 To choose a location for the TV: • Read "Important notes about your...

User Manual
Page 16
... basic and premium cable channels: Turn on the satellite receiver. The unauthorized recording, use, distribution, or revision of the United States and other materials is set to civil and criminal liability. 16 Use the satellite receiver's controls to select ColorStream HD1. Chapter 2: Connecting your TV Connecting to select ANT/CABLE. Press...
... basic and premium cable channels: Turn on the satellite receiver. The unauthorized recording, use, distribution, or revision of the United States and other materials is set to civil and criminal liability. 16 Use the satellite receiver's controls to select ColorStream HD1. Chapter 2: Connecting your TV Connecting to select ANT/CABLE. Press...
User Manual
Page 17
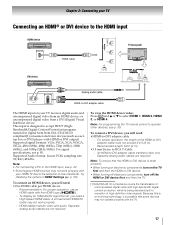
... player with the HDMI Logo ( ). - To connect a DVI device, you will need : •HDMI-to accept HDCP (HighBandwidth Digital-Content Protection) program material in HDMI Settings (- Recomended length: 6.6 ft (2 m). •3.5 mm Stereo to -DVI adapter cable transfers video only. This input is reset properly: • When turning on electronic components, turn...
... player with the HDMI Logo ( ). - To connect a DVI device, you will need : •HDMI-to accept HDCP (HighBandwidth Digital-Content Protection) program material in HDMI Settings (- Recomended length: 6.6 ft (2 m). •3.5 mm Stereo to -DVI adapter cable transfers video only. This input is reset properly: • When turning on electronic components, turn...

User Manual
Page 19
... mounting tape. Chapter 2: Connecting your device. p. 15) •Other cables as required to connect the device(s) to operate other devices" (- p. 17-18) To set the IR OUT mode: 1 > Settings > PREFERENCES > IR Control. 2 Press C or c to remotely operate many infrared remote-controlled devices enclosed in a similar manner. If you do not have a second...
... mounting tape. Chapter 2: Connecting your device. p. 15) •Other cables as required to connect the device(s) to operate other devices" (- p. 17-18) To set the IR OUT mode: 1 > Settings > PREFERENCES > IR Control. 2 Press C or c to remotely operate many infrared remote-controlled devices enclosed in a similar manner. If you do not have a second...
User Manual
Page 20
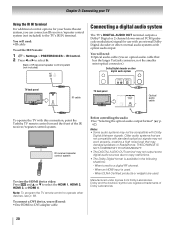
...digital RF channel. - p. 62). When tuned to select the HDMI 1, HDMI 2, HDMI 3, or HDMI 4. You will need : •IR cable To set the IR IN mode: 1 > Settings > PREFERENCES > IR Control. 2 Press C or c to operate other external audio systems with optical audio input. Note: • Some audio systems may ...Audio IN TV back panel IR cable TV back panel Optical audio cable To operate the TV with this connection, point the Toshiba TV remote control toward the front of the IR receiver/repeater control system. Manufactured under license from Dolby Laboratories. Older audio ...
...digital RF channel. - p. 62). When tuned to select the HDMI 1, HDMI 2, HDMI 3, or HDMI 4. You will need : •IR cable To set the IR IN mode: 1 > Settings > PREFERENCES > IR Control. 2 Press C or c to operate other external audio systems with optical audio input. Note: • Some audio systems may ...Audio IN TV back panel IR cable TV back panel Optical audio cable To operate the TV with this connection, point the Toshiba TV remote control toward the front of the IR receiver/repeater control system. Manufactured under license from Dolby Laboratories. Older audio ...

User Manual
Page 22
... Ground 15 NC * NC=Not connected Connection to the TV's HDMI terminal You will need : If your PC with the TV" (- For signal specifications, see "Setting the PC audio" (- For configuration, see p. 84. For configuration, see p. 85. name Pin Signal No. For signal specifications, see... cable Supported signal formats: VGA, SVGA, XGA, WXGA, SXGA, 480i (60Hz), 480p (60Hz), 720p (60Hz), 1080i (60Hz), and 1080p (24Hz/60Hz). To use a PC: • Set the monitor output resolution on the TV and hear the sound from the TV's speakers. name Pin Signal No. Connecting to the TV's PC IN...
... Ground 15 NC * NC=Not connected Connection to the TV's HDMI terminal You will need : If your PC with the TV" (- For signal specifications, see "Setting the PC audio" (- For configuration, see p. 84. For configuration, see p. 85. name Pin Signal No. For signal specifications, see... cable Supported signal formats: VGA, SVGA, XGA, WXGA, SXGA, 480i (60Hz), 480p (60Hz), 720p (60Hz), 1080i (60Hz), and 1080p (24Hz/60Hz). To use a PC: • Set the monitor output resolution on the TV and hear the sound from the TV's speakers. name Pin Signal No. Connecting to the TV's PC IN...

User Manual
Page 25
...;TV Widgets user interface (- Displays the Favorites Browser (- Opens the closed caption selector (- Selects the audio mode. When the Auto Input feature is set, you press a key for a function that is not available. 25 Reduces or turns off . p. 61). Accesses the main TV menu system ... level. Cycles through programmed channels. Freezes the picture (- Changes the picture mode to 3D, or Native mode (- Then the keypad blinks 3 times. Sets the remote control mode to the last viewed channel or source (- Returns to control the device: TV, CABLE/SAT, BD/DVD, or AUX. p....
...;TV Widgets user interface (- Displays the Favorites Browser (- Opens the closed caption selector (- Selects the audio mode. When the Auto Input feature is set, you press a key for a function that is not available. 25 Reduces or turns off . p. 61). Accesses the main TV menu system ... level. Cycles through programmed channels. Freezes the picture (- Changes the picture mode to 3D, or Native mode (- Then the keypad blinks 3 times. Sets the remote control mode to the last viewed channel or source (- Returns to control the device: TV, CABLE/SAT, BD/DVD, or AUX. p....

User Manual
Page 26
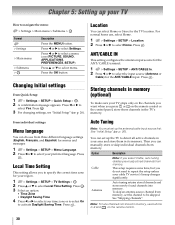
... However, if you do not finish Initial Setup, the Initial Setup screen will appear. Please confirm the connection with Tuner Input. "Setting the Channel Tuning Mode" on or reset the TV, the Initial Setup window will appear every time you do not want to skip this step...for normal home use. p. 30). • does not work until Menu Language, Time Zone, and Location have been set. 1 Menu Language Quick Setup Menu Language English 2 Time Zone Local Time Setting Time Zone Daylight Saving Time Select a language. Eastern Off Select On or Off. Press . To select Cable: ANT/CABLE...
... However, if you do not finish Initial Setup, the Initial Setup screen will appear. Please confirm the connection with Tuner Input. "Setting the Channel Tuning Mode" on or reset the TV, the Initial Setup window will appear every time you do not want to skip this step...for normal home use. p. 30). • does not work until Menu Language, Time Zone, and Location have been set. 1 Menu Language Quick Setup Menu Language English 2 Time Zone Local Time Setting Time Zone Daylight Saving Time Select a language. Eastern Off Select On or Off. Press . To select Cable: ANT/CABLE...
User Manual
Page 27
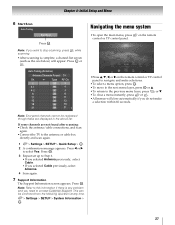
... selection within 60 seconds. Chapter 4: Initial Setup and Menu 6 Start Scan Auto Tuning Start Scan Press . on the remote Picture Sound Applications Settings Preferences Setup •Press B, b, C, or c on the remote control or TV control panel to this information if there is complete, ...instantly, press or . •All menus will appear. Press . Press C or c to the antenna or cable box directly and scan again. 1 > Settings > SETUP > Quick Setup > . If some channels are displayed in the above list. Press . Auto Tuning (Antenna) Antenna Channels Found: 14 Ch. ...
... selection within 60 seconds. Chapter 4: Initial Setup and Menu 6 Start Scan Auto Tuning Start Scan Press . on the remote Picture Sound Applications Settings Preferences Setup •Press B, b, C, or c on the remote control or TV control panel to this information if there is complete, ...instantly, press or . •All menus will appear. Press . Press C or c to the antenna or cable box directly and scan again. 1 > Settings > SETUP > Quick Setup > . If some channels are displayed in the above list. Press . Auto Tuning (Antenna) Antenna Channels Found: 14 Ch. ...

User Manual
Page 28
... (illustrated below), press on the remote control or TV control panel. 1st Layer 2nd Layer 3rd Layer Page Network Media Player Wallpaper Timer Settings NET TV Network Setup Wireless Information Photo Movie Music On Timer Sleep Timer Game Timer PICTURE SOUND 69 65 66 (Device select) 76 (...Setup HDMI-CEC Control Setup Network Setup Netflix Setup VUDU Deactivation Wallpaper Setup Channel Browser Setup PIN Setting Parental Control and Locks Display Settings AV Connection Auto Input IR Control Energy Saving Settings HDMI Information Display POWER LED Page 71 69 73 41 42 51 52 39- 40 48 65...
... (illustrated below), press on the remote control or TV control panel. 1st Layer 2nd Layer 3rd Layer Page Network Media Player Wallpaper Timer Settings NET TV Network Setup Wireless Information Photo Movie Music On Timer Sleep Timer Game Timer PICTURE SOUND 69 65 66 (Device select) 76 (...Setup HDMI-CEC Control Setup Network Setup Netflix Setup VUDU Deactivation Wallpaper Setup Channel Browser Setup PIN Setting Parental Control and Locks Display Settings AV Connection Auto Input IR Control Energy Saving Settings HDMI Information Display POWER LED Page 71 69 73 41 42 51 52 39- 40 48 65...

User Manual
Page 29
Quick menu Item 3D Settings PICTURE Picture Mode Repeat SOUND Background Music Speakers HDMI-CEC Player Control Interval Time Device Information Wireless Information Page 38-39 54-61 57 75, ... Note: Quick menu items differ depending on the current mode. Chapter 4: Initial Setup and Menu 1st Layer Settings 2nd Layer SETUP 3rd Layer Menu Language ANT/CABLE In Auto Tuning Manual Tuning TV Settings Quick Setup Location Software Upgrade Software Licenses System Information Reset TV Page 30 30 30 31 30, 31...
Quick menu Item 3D Settings PICTURE Picture Mode Repeat SOUND Background Music Speakers HDMI-CEC Player Control Interval Time Device Information Wireless Information Page 38-39 54-61 57 75, ... Note: Quick menu items differ depending on the current mode. Chapter 4: Initial Setup and Menu 1st Layer Settings 2nd Layer SETUP 3rd Layer Menu Language ANT/CABLE In Auto Tuning Manual Tuning TV Settings Quick Setup Location Software Upgrade Software Licenses System Information Reset TV Page 30 30 30 31 30, 31...
User Manual
Page 30
...Press . p. 26). Then you select Cable, auto tuning deletes previously stored channels from three different language settings (English, Français, and Español) for menus and messages 1 > Settings > SETUP > Menu Language. 2 Press C or c to select your TV How to specify the...in your area and store them in memory, use , select Home. 1 > Settings > SETUP > Location. 2 Press C or c to repeat the setup unless your region. 1 > Settings > SETUP > TV Settings > . Local Time Setting This setting allows you do not need to select Home. This setup requires some time, ...
...Press . p. 26). Then you select Cable, auto tuning deletes previously stored channels from three different language settings (English, Français, and Español) for menus and messages 1 > Settings > SETUP > Menu Language. 2 Press C or c to select your TV How to specify the...in your area and store them in memory, use , select Home. 1 > Settings > SETUP > Location. 2 Press C or c to repeat the setup unless your region. 1 > Settings > SETUP > TV Settings > . Local Time Setting This setting allows you do not need to select Home. This setup requires some time, ...
User Manual
Page 31
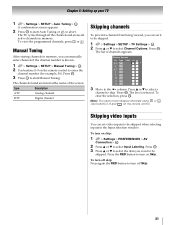
... to enter the channel number (for example, 56). Type ATV DTV Description Analog channel. OK The list of the screen. The box is known. 1 > Settings > SETUP > Manual Tuning > . on the remote control to start Manual Tuning. Press . Press . Type Label 5-1 DTV 6 ATV 6-1 DTV 8 ATV... ATV 11 ATV 12 ATV 3 Move to select Input Labeling. OK Note: You cannot tune skipped channels using CH or . To turn on skip: 1 > Settings > PREFERENCES > AV Connection > . OK 2 Press B or b to the 8 column. Press . Channel Options Ch. OK 2 Use buttons 0-9 on the...
... to enter the channel number (for example, 56). Type ATV DTV Description Analog channel. OK The list of the screen. The box is known. 1 > Settings > SETUP > Manual Tuning > . on the remote control to start Manual Tuning. Press . Press . Type Label 5-1 DTV 6 ATV 6-1 DTV 8 ATV... ATV 11 ATV 12 ATV 3 Move to select Input Labeling. OK Note: You cannot tune skipped channels using CH or . To turn on skip: 1 > Settings > PREFERENCES > AV Connection > . OK 2 Press B or b to the 8 column. Press . Channel Options Ch. OK 2 Use buttons 0-9 on the...


