
Owners Manual
Page 10
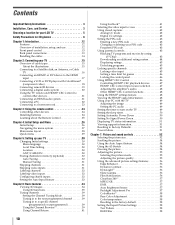
... HDMI audio system 21 Connecting a PC 22 Connecting to a home network 23 Chapter 3: Using the remote control 24 Controlling other devices 24 Installing batteries 24 Learning about the Remote Control 25 Chapter 4: Initial Setup and Menu 26 Initial Setup 26 Navigating the menu system 27 Main menu layout 28 Quick menu 29 Chapter 5: Setting...
... HDMI audio system 21 Connecting a PC 22 Connecting to a home network 23 Chapter 3: Using the remote control 24 Controlling other devices 24 Installing batteries 24 Learning about the Remote Control 25 Chapter 4: Initial Setup and Menu 26 Initial Setup 26 Navigating the menu system 27 Main menu layout 28 Quick menu 29 Chapter 5: Setting...
Owners Manual
Page 11
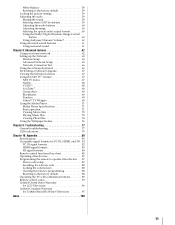
...PC IN signal formats 82 HDMI signal formats 83 3D signal formats 84 Remote control functional key chart 85 Operating other devices 87 Programming the remote to operate other devices . . . 87 Device code setup 87 Searching for a device code 88 Locking the volume keys 88 Clearing... the remote's programming 88 Resetting to the factory default 88 Operating the TV with combination buttons 89 Remote control codes 90 Limited United States Warranty for LCD Televisions 96 Limited Canadian Warranty for Toshiba ...
...PC IN signal formats 82 HDMI signal formats 83 3D signal formats 84 Remote control functional key chart 85 Operating other devices 87 Programming the remote to operate other devices . . . 87 Device code setup 87 Searching for a device code 88 Locking the volume keys 88 Clearing... the remote's programming 88 Resetting to the factory default 88 Operating the TV with combination buttons 89 Remote control codes 90 Limited United States Warranty for LCD Televisions 96 Limited Canadian Warranty for Toshiba ...
Owners Manual
Page 12
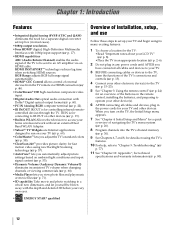
... input signal content (- p. 80). 12 RGB Range adjusts RGB full range signal automatically. •HDMI® CEC Control allows control of installation, setup, and use Follow these steps to an AV amplifier via HDMI connection (p. 46). •ColorStream® HD high-resolution component video input. •...with the depth and detail of 3D before your very own eyes. • ENERGY STAR® qualified Overview of external devices from the TV remote via an HDMI cable. HDMI INSTAPORT™ technology reduces lag time when switching HDMI sources. p. 22). •IR IN/OUT IR OUT...
... input signal content (- p. 80). 12 RGB Range adjusts RGB full range signal automatically. •HDMI® CEC Control allows control of installation, setup, and use Follow these steps to an AV amplifier via HDMI connection (p. 46). •ColorStream® HD high-resolution component video input. •...with the depth and detail of 3D before your very own eyes. • ENERGY STAR® qualified Overview of external devices from the TV remote via an HDMI cable. HDMI INSTAPORT™ technology reduces lag time when switching HDMI sources. p. 22). •IR IN/OUT IR OUT...

Owners Manual
Page 21
...• For proper operation, it is not liable for compatibility information. However, Toshiba is recommended that supports ARC HDMI cable Note: Only HDMI 1 supports ARC. In this case, adjust the delay time of setup and operations, see "Using HDMI® CEC Control" (- Connecting an HDMI ...audio system If your TV Using the TV remote and HDMI® CEC Control to models incorporating Toshiba's HDMI® CEC Control feature. HDMI's ARC (Audio ...
...• For proper operation, it is not liable for compatibility information. However, Toshiba is recommended that supports ARC HDMI cable Note: Only HDMI 1 supports ARC. In this case, adjust the delay time of setup and operations, see "Using HDMI® CEC Control" (- Connecting an HDMI ...audio system If your TV Using the TV remote and HDMI® CEC Control to models incorporating Toshiba's HDMI® CEC Control feature. HDMI's ARC (Audio ...
Owners Manual
Page 27
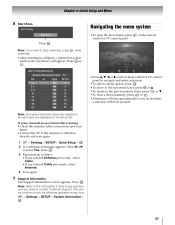
OK 2 A confirmation message appears. OK 3 Repeat set up to navigate and make a selection within 60 seconds. 27 Press . on the remote Picture Sound Applications Settings Preferences Setup •Press B, b, C, or c on the remote control or TV control panel to Step 6. •If you selected Antenna previously, select Cable. •If you want to the...
OK 2 A confirmation message appears. OK 3 Repeat set up to navigate and make a selection within 60 seconds. 27 Press . on the remote Picture Sound Applications Settings Preferences Setup •Press B, b, C, or c on the remote control or TV control panel to Step 6. •If you selected Antenna previously, select Cable. •If you want to the...
Owners Manual
Page 28
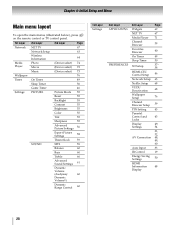
...layout To open the main menus (illustrated below), press on the remote control or TV control panel. 1st Layer 2nd Layer 3rd Layer Page Network Media Player Wallpaper Timer Settings NET TV Network Setup Wireless Information Photo Movie Music On Timer Sleep Timer Game Timer ... 3rd Layer Widgets NET TV Media Player Channel Browser Favorites Browser On Timer Sleep Timer 3D Setup HDMI-CEC Control Setup Network Setup Netflix Setup VUDU Deactivation Wallpaper Setup Channel Browser Setup PIN Setting Parental Control and Locks Display Settings AV Connection Auto Input IR Control Energy Saving ...
...layout To open the main menus (illustrated below), press on the remote control or TV control panel. 1st Layer 2nd Layer 3rd Layer Page Network Media Player Wallpaper Timer Settings NET TV Network Setup Wireless Information Photo Movie Music On Timer Sleep Timer Game Timer ... 3rd Layer Widgets NET TV Media Player Channel Browser Favorites Browser On Timer Sleep Timer 3D Setup HDMI-CEC Control Setup Network Setup Netflix Setup VUDU Deactivation Wallpaper Setup Channel Browser Setup PIN Setting Parental Control and Locks Display Settings AV Connection Auto Input IR Control Energy Saving ...
Owners Manual
Page 30
... • Time Zone • Daylight Saving Time 4 Press C or c to select the input source (Antenna or Cable) for the TV location. See "Initial Setup" (- on the remote control or the control panel, store those channels in the TV's memory. OK 3 For changing settings, see "Initial... Setup" (- Local Time Setting This setting allows you press CH or CH on the remote control. 30 Press . Press . Auto Tuning Note: You must set up the TV to select Home. See "...
... • Time Zone • Daylight Saving Time 4 Press C or c to select the input source (Antenna or Cable) for the TV location. See "Initial Setup" (- on the remote control or the control panel, store those channels in the TV's memory. OK 3 For changing settings, see "Initial... Setup" (- Local Time Setting This setting allows you press CH or CH on the remote control. 30 Press . Press . Auto Tuning Note: You must set up the TV to select Home. See "...

Owners Manual
Page 31
...press CH or . Press . Press B or b to select a channel to the 8 column. CH Use buttons 0-9 and - on the remote control to be skipped. 1 > Settings > SETUP > TV Settings > . Digital channel Skipping channels To prevent a channel from being viewed, you can set it to enter the channel number (for...through all the channels and stores all active channels in memory, you want to turn on Skip. OK 2 Use buttons 0-9 on the remote control. OK Note: You cannot tune skipped channels using CH or . The channels found are listed at the center of channels appears. ...
...press CH or . Press . Press B or b to select a channel to the 8 column. CH Use buttons 0-9 and - on the remote control to be skipped. 1 > Settings > SETUP > TV Settings > . Digital channel Skipping channels To prevent a channel from being viewed, you can set it to enter the channel number (for...through all the channels and stores all active channels in memory, you want to turn on Skip. OK 2 Use buttons 0-9 on the remote control. OK Note: You cannot tune skipped channels using CH or . The channels found are listed at the center of channels appears. ...

Owners Manual
Page 39
... set up the Channel Browser™: 1 > Settings > PREFERENCES > Channel Browser Setup > . OK Use the 0-9 buttons on the remote control to the next programmed channel Press CH or CH on the remote. p. 30). 1 > Settings > SETUP > TV Settings > . Note: The Channel Options screen and the Channel Browser ... channels as you store channels in to a specific channel (programmed or unprogrammed) Channel Analog Digital Description Use the 0-9 buttons on the remote control. (For example, to Off (- p. 30). OK Using the Channel Browser™ The Channel Browser™ is in Antenna ...
... set up the Channel Browser™: 1 > Settings > PREFERENCES > Channel Browser Setup > . OK Use the 0-9 buttons on the remote control to the next programmed channel Press CH or CH on the remote. p. 30). 1 > Settings > SETUP > TV Settings > . Note: The Channel Options screen and the Channel Browser ... channels as you store channels in to a specific channel (programmed or unprogrammed) Channel Analog Digital Description Use the 0-9 buttons on the remote control. (For example, to Off (- p. 30). OK Using the Channel Browser™ The Channel Browser™ is in Antenna ...
Owners Manual
Page 45
Programs that is selected. OK Locking video input You can lock video inputs and channels 3 and 4. "Setting the PIN code" on the remote control. Press . Note: If no PIN code has been set , the TV will enter program lock mode and a warning message will ...to select Video, Video+, or Off. You cannot view the input sources or channels until you are watching, press Q on p. 43). 1 > Settings > SETUP > TV Settings > . Chapter 6: Basic features Indication other than rating system Display Description NONE The program is rated None. (No rating appears) No rating ...
Programs that is selected. OK Locking video input You can lock video inputs and channels 3 and 4. "Setting the PIN code" on the remote control. Press . Note: If no PIN code has been set , the TV will enter program lock mode and a warning message will ...to select Video, Video+, or Off. You cannot view the input sources or channels until you are watching, press Q on p. 43). 1 > Settings > SETUP > TV Settings > . Chapter 6: Basic features Indication other than rating system Display Description NONE The program is rated None. (No rating appears) No rating ...

Owners Manual
Page 46
...> . "Locking video input"). To unlock the control panel: Select Off in the HDMI-CEC Control Setup menu is pressed, the TV turns off and you set to On, none of the controls on ...To set to turn it : Set the Input Lock to select On. Press C or c to control Toshiba HDMI® CEC compatible devices from being changed accidentally (by children, for example). When the time expires... a time limit for games You can lock the control panel to prevent your settings from the TV remote control via HDMI connection. To deactivate the Input Lock once the GameTimer® has activated it on ...
...> . "Locking video input"). To unlock the control panel: Select Off in the HDMI-CEC Control Setup menu is pressed, the TV turns off and you set to On, none of the controls on ...To set to turn it : Set the Input Lock to select On. Press C or c to control Toshiba HDMI® CEC compatible devices from being changed accidentally (by children, for example). When the time expires... a time limit for games You can lock the control panel to prevent your settings from the TV remote control via HDMI connection. To deactivate the Input Lock once the GameTimer® has activated it on ...

Owners Manual
Page 47
... CEC device that is connected to the master HDMI device. Available remote control key functions: Before using these conditions: - Skips forward. HDMI® CEC Player Control menu functions: 1 Press to Off. - O K Setup Menu Accesses the device's setup menu. The connected HDMI® CEC device is selected. - ... mode. an amplifier) is connected to select the item you are watching. Button Description Begins playback. Use on the remote control to control and press . Closes the menu. Contents Menu Accesses the contents list when you can control the connected...
... CEC device that is connected to the master HDMI device. Available remote control key functions: Before using these conditions: - Skips forward. HDMI® CEC Player Control menu functions: 1 Press to Off. - O K Setup Menu Accesses the device's setup menu. The connected HDMI® CEC device is selected. - ... mode. an amplifier) is connected to select the item you are watching. Button Description Begins playback. Use on the remote control to control and press . Closes the menu. Contents Menu Accesses the contents list when you can control the connected...
Owners Manual
Page 48
... of the HDMI® CEC devices connected to turn off the sound using the remote control. Item Description TV Auto Power If an HDMI® CEC device is output in the HDMI-CEC Control Setup menu are set to Off, only the normal banner will appear. 48 Mode (... to 255. Note: If your HDMI connection is capable of 0 to On. 1 > Settings > PREFERENCES > HDMI-CEC Control Setup > . Chapter 6: Basic features Adjusting the amplifier's audio Using the TV's remote control, you turn on the amplifier, change its input source, or adjust the sound volume, the sound will be output...
... of the HDMI® CEC devices connected to turn off the sound using the remote control. Item Description TV Auto Power If an HDMI® CEC device is output in the HDMI-CEC Control Setup menu are set to Off, only the normal banner will appear. 48 Mode (... to 255. Note: If your HDMI connection is capable of 0 to On. 1 > Settings > PREFERENCES > HDMI-CEC Control Setup > . Chapter 6: Basic features Adjusting the amplifier's audio Using the TV's remote control, you turn on the amplifier, change its input source, or adjust the sound volume, the sound will be output...

Owners Manual
Page 66
... saved and the software keyboard window is closed. Moves the cursor to select Network Connection Test. Press . Depending on the remote control: Button Description OK Inputs the selected character. 0-9 BbC c Inputs the number directly. The Software Keyboard window will appear... to the previous screen. Chapter 8: Advanced features Network Connection Test This function checks Internet connectivity. 1 > Settings > PREFERENCES > Network Setup > . OK 2 Press B or b to the head of a character string. OK Note: A message will appear when you have entered ...
... saved and the software keyboard window is closed. Moves the cursor to select Network Connection Test. Press . Depending on the remote control: Button Description OK Inputs the selected character. 0-9 BbC c Inputs the number directly. The Software Keyboard window will appear... to the previous screen. Chapter 8: Advanced features Network Connection Test This function checks Internet connectivity. 1 > Settings > PREFERENCES > Network Setup > . OK 2 Press B or b to the head of a character string. OK Note: A message will appear when you have entered ...

Owners Manual
Page 68
...> NET TV > OK .) 2 Press C or c to select VUDU. OK 3 Follow the onscreen instructions. Select the desired content using the remote control. OK 2 Press B or b to view. TV Widgets this step will appear on the communication speed and bitrate. • Future upgrades ... 2.25 to 4.5 Mbps for HDX video). Press . To confirm the Netflix ESN (Electronic Serial Number): 1 > Settings > PREFERENCES > Netflix Setup > . Chapter 8: Advanced features Guided Setup The first time you to view YouTube video contents. 1 Press . (From the Menu: > Network > NET TV > OK .) 2 Press ...
...> NET TV > OK .) 2 Press C or c to select VUDU. OK 3 Follow the onscreen instructions. Select the desired content using the remote control. OK 2 Press B or b to view. TV Widgets this step will appear on the communication speed and bitrate. • Future upgrades ... 2.25 to 4.5 Mbps for HDX video). Press . To confirm the Netflix ESN (Electronic Serial Number): 1 > Settings > PREFERENCES > Netflix Setup > . Chapter 8: Advanced features Guided Setup The first time you to view YouTube video contents. 1 Press . (From the Menu: > Network > NET TV > OK .) 2 Press ...
Owners Manual
Page 78
... cables with the latest HDMI TV products due to your IP address is available for Toshiba HDMI® CEC compatible devices. • Ensure HDMI cables with the HDMI Logo ...new standards. After 2 minutes, check connection stability. - If the problem persists, use the remote control that came with the Subnet mask 255.255.253.0; p. 51). Closed caption problems &#... Section (- Example of other device on the Server is incorrect. Repeat the wireless network setup procedure and check connection stability. If this happens, turn off these HDMI settings (Content...
... cables with the latest HDMI TV products due to your IP address is available for Toshiba HDMI® CEC compatible devices. • Ensure HDMI cables with the HDMI Logo ...new standards. After 2 minutes, check connection stability. - If the problem persists, use the remote control that came with the Subnet mask 255.255.253.0; p. 51). Closed caption problems &#... Section (- Example of other device on the Server is incorrect. Repeat the wireless network setup procedure and check connection stability. If this happens, turn off these HDMI settings (Content...

Owners Manual
Page 81
http://ceaccessories.toshiba.com/ Canada http://www.shoptoshiba.ca/ 81 See item 26 on p. 5. • Tool set up guide • Remote control with two "AA" size batteries • Mounting screw Use this clip to attach the TV to a wall stud, pillar, or other immovable structure.... Accessories • 3D capable, high speed, HDMI cable • 3D glasses To obtain optional accessories: The U.S. Chapter 10: Appendix Supplied Accessories • Easy Setup Guide • Pedestal assembly installation manual • Stop/Quick set • Four spacers Use these to attach a wall bracket.
http://ceaccessories.toshiba.com/ Canada http://www.shoptoshiba.ca/ 81 See item 26 on p. 5. • Tool set up guide • Remote control with two "AA" size batteries • Mounting screw Use this clip to attach the TV to a wall stud, pillar, or other immovable structure.... Accessories • 3D capable, high speed, HDMI cable • 3D glasses To obtain optional accessories: The U.S. Chapter 10: Appendix Supplied Accessories • Easy Setup Guide • Pedestal assembly installation manual • Stop/Quick set • Four spacers Use these to attach a wall bracket.

Owners Manual
Page 86
... /down Menu select left/right OK Rewind*2 Play*2 Fast Forward*2 Skip REW*2 Stop*2 Pause*2 Skip FWD*2 Red Green Yellow Blue/Home MTS C. Chapter 10: Appendix REMOTE CONTROL KEY MENU GUIDE RETURN EXIT/DVD CLEAR B / b C / c OK REW PLAY FF SKIP Z STOP PAUSE/ STEP SKIP z RED GREEN YELLOW BLUE/ HOME ...SLEEP PIC SIZE MTS/AUDIO CC/ SUBTITLE FREEZE 3D SETUP REC Toshiba TV Menu Guide Return Exit Menu select up /down Cursor left/right Select/ Enter Rewind Play Fast Forward --Stop Pause ----------- ----- -----
... /down Menu select left/right OK Rewind*2 Play*2 Fast Forward*2 Skip REW*2 Stop*2 Pause*2 Skip FWD*2 Red Green Yellow Blue/Home MTS C. Chapter 10: Appendix REMOTE CONTROL KEY MENU GUIDE RETURN EXIT/DVD CLEAR B / b C / c OK REW PLAY FF SKIP Z STOP PAUSE/ STEP SKIP z RED GREEN YELLOW BLUE/ HOME ...SLEEP PIC SIZE MTS/AUDIO CC/ SUBTITLE FREEZE 3D SETUP REC Toshiba TV Menu Guide Return Exit Menu select up /down Cursor left/right Select/ Enter Rewind Play Fast Forward --Stop Pause ----------- ----- -----

Owners Manual
Page 87
...the codes for your device. Result Meaning The device responds. Chapter 10: Appendix Operating other devices Device code setup 1 Find the code for your device brand in the remote control device code table (- The button blinks 3 times. 3 While holding down Q, input the 4-digit ...Press POWER to operate, you cannot program the TV's remote to the other position, then reprogram the remote control. Mode select TV CABLE/SAT BD/DVD AUX Default device mode control (before programming) Toshiba TV Toshiba Satellite receiver Toshiba Blu-ray Disc™ player Onkyo Receiver Mode select ...
...the codes for your device. Result Meaning The device responds. Chapter 10: Appendix Operating other devices Device code setup 1 Find the code for your device brand in the remote control device code table (- The button blinks 3 times. 3 While holding down Q, input the 4-digit ...Press POWER to operate, you cannot program the TV's remote to the other position, then reprogram the remote control. Mode select TV CABLE/SAT BD/DVD AUX Default device mode control (before programming) Toshiba TV Toshiba Satellite receiver Toshiba Blu-ray Disc™ player Onkyo Receiver Mode select ...

Owners Manual
Page 88
... times (locked). p. 87). The mode select button blinks twice. Resetting to the factory default You can clear all programmed remote control features not related to "Device code setup" and reset the volume lock to a device mode. The CABLE/SAT mode select button blinks 4 times. The mode select ...button blinks 4 times. The remote control enters program mode. 3 Point the remote at the target device Press , 1, POWER , VOL CH , or . Chapter...
... times (locked). p. 87). The mode select button blinks twice. Resetting to the factory default You can clear all programmed remote control features not related to "Device code setup" and reset the volume lock to a device mode. The CABLE/SAT mode select button blinks 4 times. The mode select ...button blinks 4 times. The remote control enters program mode. 3 Point the remote at the target device Press , 1, POWER , VOL CH , or . Chapter...


