

Brochure
Page 2
... • Screen Size Class: 55 in. • Actual Screen Size Diagonal: 54.6 in certain 3D television pictures or video games. This technology displays the image edges normally lost to wall mount your Toshiba television, always use a UL Listed wall bracket appropriate for the size and weight of third party internet services may change without rest. Some viewers may be closely supervised to avoid prolonged viewing without notice. 2Due to certain flashing images or lights contained in...
... • Screen Size Class: 55 in. • Actual Screen Size Diagonal: 54.6 in certain 3D television pictures or video games. This technology displays the image edges normally lost to wall mount your Toshiba television, always use a UL Listed wall bracket appropriate for the size and weight of third party internet services may change without rest. Some viewers may be closely supervised to avoid prolonged viewing without notice. 2Due to certain flashing images or lights contained in...

Owners Manual
Page 2
..., in accordance with furniture and television sets. • Don't place flat panel display, always: • Use a mount that the wall where you are popular purchases. Flat panel displays can become excited while watching a program, especially on or play with the installation instructions. Dear Customer, Thank you enjoy your new product, please keep it nearby for future reference. NO USER-SERVICEABLE PARTS INSIDE. As you for proper...
..., in accordance with furniture and television sets. • Don't place flat panel display, always: • Use a mount that the wall where you are popular purchases. Flat panel displays can become excited while watching a program, especially on or play with the installation instructions. Dear Customer, Thank you enjoy your new product, please keep it nearby for future reference. NO USER-SERVICEABLE PARTS INSIDE. As you for proper...

Owners Manual
Page 4
... lightning activity: a) an antenna system; or b) cables, wires, or any home theater component connected to help maintain reliable operation of your TV, please first remove any of malfunction. 37) Always unplug the TV before cleaning. Harsh rubbing or use the TV in households with children to prevent them from climbing on or roll over the power cord, and never place...
... lightning activity: a) an antenna system; or b) cables, wires, or any home theater component connected to help maintain reliable operation of your TV, please first remove any of malfunction. 37) Always unplug the TV before cleaning. Harsh rubbing or use the TV in households with children to prevent them from climbing on or roll over the power cord, and never place...
Owners Manual
Page 5
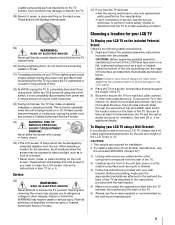
..., unplug the power cord and contact a Toshiba Authorized Service Provider. 44) WARNING: RISK OF SERIOUS PERSONAL INJURY OR EQUIPMENT DAMAGE! Opening and removing the covers may make sure the appropriate bracket(s) are required for your LCD TV To Display your wall bracket. To Display your LCD TV using the on the back cover. Service 46) WARNING: RISK OF ELECTRIC SHOCK! Choosing a location for installation. 2. Two people...
..., unplug the power cord and contact a Toshiba Authorized Service Provider. 44) WARNING: RISK OF SERIOUS PERSONAL INJURY OR EQUIPMENT DAMAGE! Opening and removing the covers may make sure the appropriate bracket(s) are required for your LCD TV To Display your wall bracket. To Display your LCD TV using the on the back cover. Service 46) WARNING: RISK OF ELECTRIC SHOCK! Choosing a location for installation. 2. Two people...
Owners Manual
Page 10
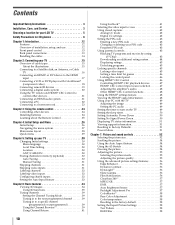
... the video input to view 41 Using closed captions 42 Analog CC mode 42 Digital CC settings 42 Setting the PIN code 43 Entering a new PIN code 43 Changing or deleting your PIN code 43 Forgotten PIN code 43 Using parental controls 43 Blocking TV programs and movies by rating (V-Chip 43 Downloading an additional rating system 44 Displaying ratings 45 Unlocking programs 45 Locking specific channels 45 Locking video input 45 Setting a time limit for games 46 Locking the control panel 46 Using HDMI® CEC Control 46 Controlling HDMI...
... the video input to view 41 Using closed captions 42 Analog CC mode 42 Digital CC settings 42 Setting the PIN code 43 Entering a new PIN code 43 Changing or deleting your PIN code 43 Forgotten PIN code 43 Using parental controls 43 Blocking TV programs and movies by rating (V-Chip 43 Downloading an additional rating system 44 Displaying ratings 45 Unlocking programs 45 Locking specific channels 45 Locking video input 45 Setting a time limit for games 46 Locking the control panel 46 Using HDMI® CEC Control 46 Controlling HDMI...
Owners Manual
Page 12
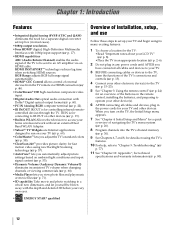
... ambient light conditions and input signal content (- p. 15-23). 5 See "Chapter 3: Using the remote control" (- p. 26). 8 Program channels into the TV's channel memory (- p. 58). •ClearScan 240™ provides picture clarity for fast motion video using new Backlight Scanning technology (-p. 57). •AutoView® lets you have connected all cables and devices, plug in any power cords until AFTER you automatically adjust picture settings based on your LCD TV" (- p. 2-6). 2 Do not plug in the power cords...
... ambient light conditions and input signal content (- p. 15-23). 5 See "Chapter 3: Using the remote control" (- p. 26). 8 Program channels into the TV's channel memory (- p. 58). •ClearScan 240™ provides picture clarity for fast motion video using new Backlight Scanning technology (-p. 57). •AutoView® lets you have connected all cables and devices, plug in any power cords until AFTER you automatically adjust picture settings based on your LCD TV" (- p. 2-6). 2 Do not plug in the power cords...

Owners Manual
Page 21
... back panel AV amplifier that you use HDMI cables with the HDMI Logo ( ). See the individual instruction manuals for those operations. You will need : •HDMI cables (- See each device's operation manual. When using the TV's remote control, connect an HDMI® CEC compatible audio receiver or playback device. HDMI's ARC (Audio Return Channel) feature This feature enables the audio signal of the TV to be sent to the amplifier via the HDMI cable. Chapter 2: Connecting your HDMI amplifier supports ARC, audio from the tuner...
... back panel AV amplifier that you use HDMI cables with the HDMI Logo ( ). See the individual instruction manuals for those operations. You will need : •HDMI cables (- See each device's operation manual. When using the TV's remote control, connect an HDMI® CEC compatible audio receiver or playback device. HDMI's ARC (Audio Return Channel) feature This feature enables the audio signal of the TV to be sent to the amplifier via the HDMI cable. Chapter 2: Connecting your HDMI amplifier supports ARC, audio from the tuner...
Owners Manual
Page 25
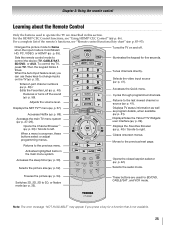
... last viewed channel or source (- Returns to change inputs on and off the sound (- Accesses the sleep timer (- p. 50). p. 35). Chapter 3: Using the remote control Learning about the Remote Control Only the buttons used for BD/DVD, CABLE/SAT, and VCR mode. For the HDMI® CEC Control functions, see "Remote control functional key chart" (- p. 85-95). Changes the picture mode to operate the TV are used to Game when the input mode is ColorStream HD, PC, VIDEO, or HDMI® (- p. 59). Displays the...
... last viewed channel or source (- Returns to change inputs on and off the sound (- Accesses the sleep timer (- p. 50). p. 35). Chapter 3: Using the remote control Learning about the Remote Control Only the buttons used for BD/DVD, CABLE/SAT, and VCR mode. For the HDMI® CEC Control functions, see "Remote control functional key chart" (- p. 85-95). Changes the picture mode to operate the TV are used to Game when the input mode is ColorStream HD, PC, VIDEO, or HDMI® (- p. 59). Displays the...
Owners Manual
Page 30
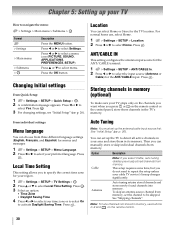
... home use buttons 0-9 and - OK 2 Press B or b to select menu. on the remote control or the control panel, store those channels in memory, use , select Home. 1 > Settings > SETUP > Location. 2 Press C or c to be skipped. Press . Press . Option Description Cable Note: If you do not need to repeat the setup unless your TV How to detect all active channels in its memory. Chapter 5: Setting up your cable TV service's lineup changes...
... home use buttons 0-9 and - OK 2 Press B or b to select menu. on the remote control or the control panel, store those channels in memory, use , select Home. 1 > Settings > SETUP > Location. 2 Press C or c to be skipped. Press . Press . Option Description Cable Note: If you do not need to repeat the setup unless your TV How to detect all active channels in its memory. Chapter 5: Setting up your cable TV service's lineup changes...

Owners Manual
Page 39
... a list. •History List • ANT/CABLE List • Inputs List • Favorite List • HDMI-CEC Control List Note: • The History List will be set to select a mode. OK •Press or . 39 Enter the sub-channel number. (For example, to the next programmed channel Press CH or CH on the remote control. (For example, to factory defaults, highlight Reset and press . OK 2 Press B or b to ). •Quickly change the mode. Mode Description Standard Auto (default) Digital...
... a list. •History List • ANT/CABLE List • Inputs List • Favorite List • HDMI-CEC Control List Note: • The History List will be set to select a mode. OK •Press or . 39 Enter the sub-channel number. (For example, to the next programmed channel Press CH or CH on the remote control. (For example, to factory defaults, highlight Reset and press . OK 2 Press B or b to ). •Quickly change the mode. Mode Description Standard Auto (default) Digital...
Owners Manual
Page 42
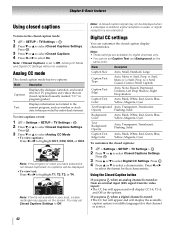
..., Flashing, Solid Caption Text Edge Color Auto, Black, White, Red, Green, Blue, Yellow, Magenta, Cyan To customize the closed captioned, no captions will display the available caption options (available languages) for digital channels only. • You cannot set Caption Text and Background as the same color. Press . Chapter 6: Basic features Using closed captions To turn on the screen. Press . Note: If Closed Captions is not closed captions: 1 > Settings > SETUP > TV Settings > OK 2 Press b or B to Off, Analog CC Mode and Digital CC Settings will display...
..., Flashing, Solid Caption Text Edge Color Auto, Black, White, Red, Green, Blue, Yellow, Magenta, Cyan To customize the closed captioned, no captions will display the available caption options (available languages) for digital channels only. • You cannot set Caption Text and Background as the same color. Press . Chapter 6: Basic features Using closed captions To turn on the screen. Press . Note: If Closed Captions is not closed captions: 1 > Settings > SETUP > TV Settings > OK 2 Press b or B to Off, Analog CC Mode and Digital CC Settings will display...
Owners Manual
Page 45
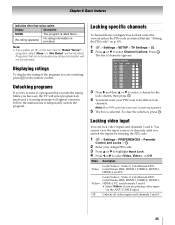
... . Mode Description Locks Video 1, Video 2, ColorStream HD1, Video ColorStream HD2, HDMI 1, HDMI 2, HDMI 3, HDMI 4, and PC. Off Unlocks all video inputs and channels 3 and 4. 45 Note: • If you place an "5" in the lock column, then press . "Setting the PIN code" on the remote control. OK The list of the program you have set , a warning appears. 5 The box is provided. You cannot view the input sources or channels until you are watching, press Q on p. 43). 1 > Settings > SETUP > TV Settings > . Locking specific channels A channel...
... . Mode Description Locks Video 1, Video 2, ColorStream HD1, Video ColorStream HD2, HDMI 1, HDMI 2, HDMI 3, HDMI 4, and PC. Off Unlocks all video inputs and channels 3 and 4. 45 Note: • If you place an "5" in the lock column, then press . "Setting the PIN code" on the remote control. OK The list of the program you have set , a warning appears. 5 The box is provided. You cannot view the input sources or channels until you are watching, press Q on p. 43). 1 > Settings > SETUP > TV Settings > . Locking specific channels A channel...
Owners Manual
Page 48
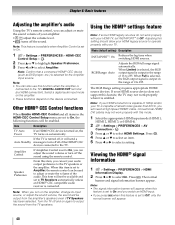
.... Viewing the HDMI® signal information 1 > Settings > PREFERENCES > HDMI Information Display. 2 Press C or c to select HDMI Settings. The normal banner and signal information banner appear. Select a digital audio input mode on the amplifier. • These functions depend on automatically. Amplifier Control If Amplifier Control is set to On, you can set to TV Speakers automatically unless an HDMI® CEC compatible audio receiver is connected. This item will be output from the TV speakers. Turn the...
.... Viewing the HDMI® signal information 1 > Settings > PREFERENCES > HDMI Information Display. 2 Press C or c to select HDMI Settings. The normal banner and signal information banner appear. Select a digital audio input mode on the amplifier. • These functions depend on automatically. Amplifier Control If Amplifier Control is set to On, you can set to TV Speakers automatically unless an HDMI® CEC compatible audio receiver is connected. This item will be output from the TV speakers. Turn the...
Owners Manual
Page 51
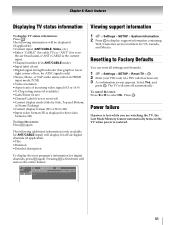
... SAP audio status (when in HDMI input mode, PCM) •Video resolution •Aspect ratio of box; Resetting to select No. To cancel the reset: Press C or c to Factory Defaults You can reset all settings and channels. 1 > Settings > SETUP > Reset TV > . the-air broadcasts), if ANT/CABLE is restored. 51 OK Power failure If power is lost while you are watching the TV, the Last Mode Memory feature automatically turns on the...
... SAP audio status (when in HDMI input mode, PCM) •Video resolution •Aspect ratio of box; Resetting to select No. To cancel the reset: Press C or c to Factory Defaults You can reset all settings and channels. 1 > Settings > SETUP > Reset TV > . the-air broadcasts), if ANT/CABLE is restored. 51 OK Power failure If power is lost while you are watching the TV, the Last Mode Memory feature automatically turns on the...
Owners Manual
Page 77
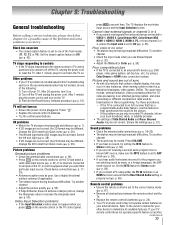
... to help synchronize the sound to reset the TV. p. 32). • Adjust the Tint and/or Color (- Try another channel. • Check the Input mode when you cannot view signals from channel 3 or 4, ensure the Input Lock is connected to Off (- p. 49). p. 24). • Your TV's remote control may be muted. Refer to the owner's manual for your external device. Black box onscreen • The closed caption feature to VIDEO 1, VIDEO 2, ColorStream HD1, ColorStream HD2, HDMI 1, HDMI 2, HDMI 3, HDMI...
... to help synchronize the sound to reset the TV. p. 32). • Adjust the Tint and/or Color (- Try another channel. • Check the Input mode when you cannot view signals from channel 3 or 4, ensure the Input Lock is connected to Off (- p. 49). p. 24). • Your TV's remote control may be muted. Refer to the owner's manual for your external device. Black box onscreen • The closed caption feature to VIDEO 1, VIDEO 2, ColorStream HD1, ColorStream HD2, HDMI 1, HDMI 2, HDMI 3, HDMI...
Owners Manual
Page 78
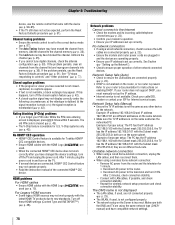
... are connected properly (- Channel tuning problems • Ensure the remote control is available for Internet service issues. p. 43). • The V-Chip feature is set up the Network"). • Check to the television and turn off these HDMI settings (Content Type and INSTAPORT™) (- Remove AC power from the router and the television for instructions on different sub-nets. p. 30). b) the signal reception is dubbed; p. 23). • Confirm your modem's operation. •...
... are connected properly (- Channel tuning problems • Ensure the remote control is available for Internet service issues. p. 43). • The V-Chip feature is set up the Network"). • Check to the television and turn off these HDMI settings (Content Type and INSTAPORT™) (- Remove AC power from the router and the television for instructions on different sub-nets. p. 30). b) the signal reception is dubbed; p. 23). • Confirm your modem's operation. •...
Owners Manual
Page 79
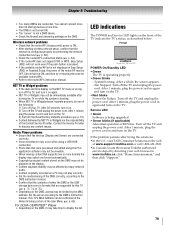
...;In Canada, locate the nearest Toshiba authorized service depot by performing the network connection test (- LED indications The POWER and Service LED lights on . 2) Turn off the TV and unplug the power cord. Turn off the TV and unplug the power cord. NET TV or Widget problems • If the date and time display on the NET TV menu is booting. • When NET TV or Widgets doesn't operate properly, do...
...;In Canada, locate the nearest Toshiba authorized service depot by performing the network connection test (- LED indications The POWER and Service LED lights on . 2) Turn off the TV and unplug the power cord. Turn off the TV and unplug the power cord. NET TV or Widget problems • If the date and time display on the NET TV menu is booting. • When NET TV or Widgets doesn't operate properly, do...
Owners Manual
Page 96
... card does not diminish your LCD Television online at www.support.toshiba.com. ANY PART OR PRODUCT REPLACED UNDER THIS LIMITED WARRANTY BECOMES THE PROPERTY OF TAIS. This includes wall mounts, custom cabinets and other proof of sale or other installation methods that is mounted in -warranty service. or to any LCD Television or parts that have been modified or had the serial number removed, altered, defaced, or rendered illegible...
... card does not diminish your LCD Television online at www.support.toshiba.com. ANY PART OR PRODUCT REPLACED UNDER THIS LIMITED WARRANTY BECOMES THE PROPERTY OF TAIS. This includes wall mounts, custom cabinets and other proof of sale or other installation methods that is mounted in -warranty service. or to any LCD Television or parts that have been modified or had the serial number removed, altered, defaced, or rendered illegible...

Owners Manual
Page 98
... installation of non-Toshiba modifications to : a. IF THE TELEVISION FAILS TO WORK AS WARRANTED ABOVE, YOUR SOLE AND EXCLUSIVE REMEDY SHALL BE REPAIR OR REPLACEMENT OF THE DEFECTIVE PART. Reception problems caused by the use of incompatible third party products; g. YOU MUST READ AND FOLLOW ALL SET-UP AND USAGE INSTRUCTIONS IN THE APPLICABLE USER GUIDES AND/ OR MANUALS. THIS WARRANTY WILL NOT COVER ANY SERVICE...
... installation of non-Toshiba modifications to : a. IF THE TELEVISION FAILS TO WORK AS WARRANTED ABOVE, YOUR SOLE AND EXCLUSIVE REMEDY SHALL BE REPAIR OR REPLACEMENT OF THE DEFECTIVE PART. Reception problems caused by the use of incompatible third party products; g. YOU MUST READ AND FOLLOW ALL SET-UP AND USAGE INSTRUCTIONS IN THE APPLICABLE USER GUIDES AND/ OR MANUALS. THIS WARRANTY WILL NOT COVER ANY SERVICE...

Owners Manual
Page 100
... 67 Network Setup 63 O On Timer 49 P Panel Lock 46 PC Audio 49 PC connection 22 PC settings 49 Picture mode 55 Picture Position 54 Picture quality 55 Picture size 52 PIN code 43 R Remote control Battery installation 24 Buttons 25 Device codes table 90 Functional key chart 85 Programming 87 Reset TV 51 RGB Filter 58 RGB Range 48 S SAP 59 Shared inputs 32 Sleep Timer 50 Software keyboard 66 Static Gamma 56 Stereo sound 59 Support information...
... 67 Network Setup 63 O On Timer 49 P Panel Lock 46 PC Audio 49 PC connection 22 PC settings 49 Picture mode 55 Picture Position 54 Picture quality 55 Picture size 52 PIN code 43 R Remote control Battery installation 24 Buttons 25 Device codes table 90 Functional key chart 85 Programming 87 Reset TV 51 RGB Filter 58 RGB Range 48 S SAP 59 Shared inputs 32 Sleep Timer 50 Software keyboard 66 Static Gamma 56 Stereo sound 59 Support information...


