
Brochure
Page 2
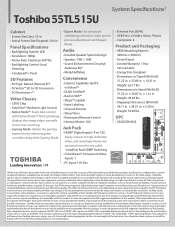
...internet access and payment of epilepsy, should be available on vision development, viewers of one -time and/or recurring charges and membership. Toshiba 55TL515U System Specifications1 Cabinet • Screen Size Class: 55 in. • Actual Screen Size Diagonal: 54.6 in one cable. - ...8226; Built-in WiFi®5 • Skype® Capable • Input Labeling • Channel Browser • Sleep Timer • Illuminated Remote Control • Horizon Motion GUI Jack Pack • HDMI® Digital Inputs6: 4 w/ CEC Easily connect to make precise picture adjustments with this ...
...internet access and payment of epilepsy, should be available on vision development, viewers of one -time and/or recurring charges and membership. Toshiba 55TL515U System Specifications1 Cabinet • Screen Size Class: 55 in. • Actual Screen Size Diagonal: 54.6 in one cable. - ...8226; Built-in WiFi®5 • Skype® Capable • Input Labeling • Channel Browser • Sleep Timer • Illuminated Remote Control • Horizon Motion GUI Jack Pack • HDMI® Digital Inputs6: 4 w/ CEC Easily connect to make precise picture adjustments with this ...
Owners Manual
Page 10
... devices 21 Connecting an HDMI audio system 21 Connecting a PC 22 Connecting to a home network 23 Chapter 3: Using the remote control 24 Controlling other devices 24 Installing batteries 24 Learning about the Remote Control 25 Chapter 4: Initial Setup and Menu 26 Initial Setup 26 Navigating the menu system 27 Main menu layout 28 Quick menu...
... devices 21 Connecting an HDMI audio system 21 Connecting a PC 22 Connecting to a home network 23 Chapter 3: Using the remote control 24 Controlling other devices 24 Installing batteries 24 Learning about the Remote Control 25 Chapter 4: Initial Setup and Menu 26 Initial Setup 26 Navigating the menu system 27 Main menu layout 28 Quick menu...
Owners Manual
Page 11
...IN, HDMI, and 3D . 82 PC IN signal formats 82 HDMI signal formats 83 3D signal formats 84 Remote control functional key chart 85 Operating other devices 87 Programming the remote to operate other devices . . . 87 Device code setup 87 Searching for a device code 88 Locking the... volume keys 88 Clearing the remote's programming 88 Resetting to the factory default 88 Operating the TV with combination buttons 89 Remote control codes 90 Limited United States Warranty for LCD Televisions 96 Limited Canadian Warranty for Toshiba Brand Flat Panel Televisions 97 Index 100 11
...IN, HDMI, and 3D . 82 PC IN signal formats 82 HDMI signal formats 83 3D signal formats 84 Remote control functional key chart 85 Operating other devices 87 Programming the remote to operate other devices . . . 87 Device code setup 87 Searching for a device code 88 Locking the... volume keys 88 Clearing the remote's programming 88 Resetting to the factory default 88 Operating the TV with combination buttons 89 Remote control codes 90 Limited United States Warranty for LCD Televisions 96 Limited Canadian Warranty for Toshiba Brand Flat Panel Televisions 97 Index 100 11
Owners Manual
Page 12
...Program channels into the TV's channel memory (- HDMI INSTAPORT™ technology reduces lag time when switching HDMI sources. p. 15-23). 5 See "Chapter 3: Using the remote control" (- p. 60). •PC IN (Analog RGB) computer terminal (- p. 2-6). 2 Do not plug in most cases). •1080p output resolution. •Four ... the TV in the power cords for your LCD TV" (- p. 30). 9 See Chapters 6, 7 and 8, for details on the remote control, installing the batteries, and preparing to set -top box (in any power cords until AFTER you automatically adjust picture settings based on the ...
...Program channels into the TV's channel memory (- HDMI INSTAPORT™ technology reduces lag time when switching HDMI sources. p. 15-23). 5 See "Chapter 3: Using the remote control" (- p. 60). •PC IN (Analog RGB) computer terminal (- p. 2-6). 2 Do not plug in most cases). •1080p output resolution. •Four ... the TV in the power cords for your LCD TV" (- p. 30). 9 See Chapters 6, 7 and 8, for details on the remote control, installing the batteries, and preparing to set -top box (in any power cords until AFTER you automatically adjust picture settings based on the ...
Owners Manual
Page 15
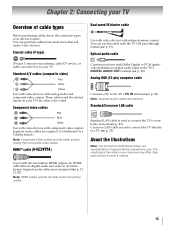
... devices with component video output. p. 19). VIDEO PR PB Y Component video cables Red Blue Green Use with video devices with infrared remote control. p. 23). R AUDIO L Standard A/V cables (composite video) Red White Yellow Use with video devices with Dolby Digital or PCM ... the related inputs on your devices may differ. The input/output terminals on your TV) are required. (ColorStream® is a Toshiba brand.) Note: Component video cables provide better picture quality than composite video cables. Chapter 2: Connecting your TV Overview of typical device connections...
... devices with component video output. p. 19). VIDEO PR PB Y Component video cables Red Blue Green Use with video devices with infrared remote control. p. 23). R AUDIO L Standard A/V cables (composite video) Red White Yellow Use with video devices with Dolby Digital or PCM ... the related inputs on your devices may differ. The input/output terminals on your TV) are required. (ColorStream® is a Toshiba brand.) Note: Component video cables provide better picture quality than composite video cables. Chapter 2: Connecting your TV Overview of typical device connections...

Owners Manual
Page 17
... 1080p (24Hz/60Hz). p. 48). To view the HDMI device video: Press and B or b to -DVI adapter cable transfers video only. Note: For programming the TV remote control to RCA Y-Cable - Recomended length: 6.6 ft (2 m). •3.5 mm Stereo to operate other devices, see p. 87. HDMI cables transfer video and audio. Note: • For connecting...
... 1080p (24Hz/60Hz). p. 48). To view the HDMI device video: Press and B or b to -DVI adapter cable transfers video only. Note: For programming the TV remote control to RCA Y-Cable - Recomended length: 6.6 ft (2 m). •3.5 mm Stereo to operate other devices, see p. 87. HDMI cables transfer video and audio. Note: • For connecting...

Owners Manual
Page 18
... b to select ColorStream HD1. Chapter 2: Connecting your DVD player has HDMI video, see p. 87. Separate audio cables are not supported). - Note: For programming the TV remote control to determine the best output signal available (1080p 24 Hz/30 Hz/50 Hz/25 Hz are required. To view the VCR or view and...
... b to select ColorStream HD1. Chapter 2: Connecting your DVD player has HDMI video, see p. 87. Separate audio cables are not supported). - Note: For programming the TV remote control to determine the best output signal available (1080p 24 Hz/30 Hz/50 Hz/25 Hz are required. To view the VCR or view and...

Owners Manual
Page 19
... locate the device's infrared sensor: 1 Turn off the device. 2 Starting at the device's lower-left corner, place the end of the device's remote control (with the infrared emitter) so it touches the front of the device. p. 87) toward the front of the TV and press the button for ...Align one of the IR blaster cable's wands about 1 inch away from device) TV back panel Dualwand IR blaster cable To control the device(s): Point either the device's remote control or the TV remote control (that you have a second device, coil the second wand with certain devices. *If you do not have a second ...
... locate the device's infrared sensor: 1 Turn off the device. 2 Starting at the device's lower-left corner, place the end of the device's remote control (with the infrared emitter) so it touches the front of the device. p. 87) toward the front of the TV and press the button for ...Align one of the IR blaster cable's wands about 1 inch away from device) TV back panel Dualwand IR blaster cable To control the device(s): Point either the device's remote control or the TV remote control (that you have a second device, coil the second wand with certain devices. *If you do not have a second ...
Owners Manual
Page 20
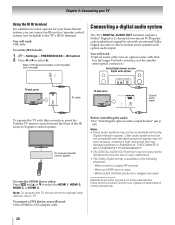
...format is used . Note: To program the TV remote control to operate other external audio systems with this connection, point the Toshiba TV remote control toward the front of the IR receiver/repeater control system. p. 60). IR receiver/repeater control system To view the HDMI device video: Press and ... Digital bitstream signals. When tuned to a digital RF channel. - Older audio systems that are registered trademarks of IR receiver/repeater control system (not included) Connecting a digital audio system The TV's DIGITAL AUDIO OUT terminal outputs a Dolby® Digital or 2-channel...
...format is used . Note: To program the TV remote control to operate other external audio systems with this connection, point the Toshiba TV remote control toward the front of the IR receiver/repeater control system. p. 60). IR receiver/repeater control system To view the HDMI device video: Press and ... Digital bitstream signals. When tuned to a digital RF channel. - Older audio systems that are registered trademarks of IR receiver/repeater control system (not included) Connecting a digital audio system The TV's DIGITAL AUDIO OUT terminal outputs a Dolby® Digital or 2-channel...

Owners Manual
Page 21
...proper operation, it is limited to control other devices To control the basic functions of setup and operations, see "Using HDMI® CEC Control" (- When using the TV's remote control, connect an HDMI® CEC ...compatible audio receiver or playback device. The HDMI® CEC Control feature uses CEC technology as regulated by the HDMI standard. Connecting an HDMI audio system If your TV Using the TV remote and HDMI® CEC Control to models incorporating Toshiba's HDMI® CEC Control...
...proper operation, it is limited to control other devices To control the basic functions of setup and operations, see "Using HDMI® CEC Control" (- When using the TV's remote control, connect an HDMI® CEC ...compatible audio receiver or playback device. The HDMI® CEC Control feature uses CEC technology as regulated by the HDMI standard. Connecting an HDMI audio system If your TV Using the TV remote and HDMI® CEC Control to models incorporating Toshiba's HDMI® CEC Control...

Owners Manual
Page 24
... compartment. 24 Chapter 3: Using the remote control Controlling other devices The TV's remote control can operate other devices such as sunshine, fire, or the like. Installing batteries 1 Pull up to operate: Program the remote (- Toshiba devices: The remote is reduced, replace the batteries. &#...8226; Always replace both batteries with new ones. Non-Toshiba devices or Toshiba devices that the remote control is not to excessive heat such as cable converter...
... compartment. 24 Chapter 3: Using the remote control Controlling other devices The TV's remote control can operate other devices such as sunshine, fire, or the like. Installing batteries 1 Pull up to operate: Program the remote (- Toshiba devices: The remote is reduced, replace the batteries. &#...8226; Always replace both batteries with new ones. Non-Toshiba devices or Toshiba devices that the remote control is not to excessive heat such as cable converter...
Owners Manual
Page 25
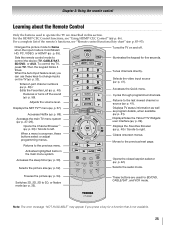
... (- Closes onscreen menus. Moves to the last viewed channel or source (- p. 50). p. 42). p. 35). Chapter 3: Using the remote control Learning about the Remote Control Only the buttons used for BD/DVD, CABLE/SAT, and VCR mode. p. 39) / Scrolls to operate the TV are used to ...2D, 2D to Game when the input mode is not available. 25 Sets the remote control mode to right. p. 52). Selects the audio mode. Enters 2-part channel numbers (- Accesses Netflix (- To control the TV, press TV. Accesses the Quick menu. Note: The error message "NOT...
... (- Closes onscreen menus. Moves to the last viewed channel or source (- p. 50). p. 42). p. 35). Chapter 3: Using the remote control Learning about the Remote Control Only the buttons used for BD/DVD, CABLE/SAT, and VCR mode. p. 39) / Scrolls to operate the TV are used to ...2D, 2D to Game when the input mode is not available. 25 Sets the remote control mode to right. p. 52). Selects the audio mode. Enters 2-part channel numbers (- Accesses Netflix (- To control the TV, press TV. Accesses the Quick menu. Note: The error message "NOT...
Owners Manual
Page 27
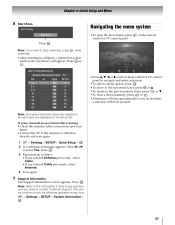
... > . OK Note: Refer to navigate and make a selection within 60 seconds. 27 on the remote Picture Sound Applications Settings Preferences Setup •Press B, b, C, or c on the remote control or TV control panel to this information if there is complete, a channel list screen (such as the one below)... Menu 6 Start Scan Auto Tuning Start Scan Press . Press . Press . OK Navigating the menu system •To open the main menu, press control or TV control panel. OK Note: If you do not make selections. •To select a menu option, press . Type RF Ch. 2 ATV 2 4-1 ...
... > . OK Note: Refer to navigate and make a selection within 60 seconds. 27 on the remote Picture Sound Applications Settings Preferences Setup •Press B, b, C, or c on the remote control or TV control panel to this information if there is complete, a channel list screen (such as the one below)... Menu 6 Start Scan Auto Tuning Start Scan Press . Press . Press . OK Navigating the menu system •To open the main menu, press control or TV control panel. OK Note: If you do not make selections. •To select a menu option, press . Type RF Ch. 2 ATV 2 4-1 ...
Owners Manual
Page 28
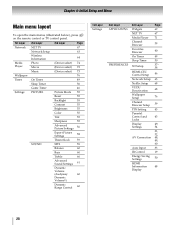
Chapter 4: Initial Setup and Menu Main menu layout To open the main menus (illustrated below), press on the remote control or TV control panel. 1st Layer 2nd Layer 3rd Layer Page Network Media Player Wallpaper Timer Settings NET TV Network Setup Wireless Information Photo ... 59 MTS 59 Balance 60 Bass 60 Treble 60 Advanced Sound Settings 61 Dynamic Volume (Audyssey 60 Dynamic Volume®) Dynamic Range Control 60 1st Layer Settings 2nd Layer APPLICATIONS PREFERENCES 3rd Layer Widgets NET TV Media Player Channel Browser Favorites Browser On Timer Sleep Timer ...
Chapter 4: Initial Setup and Menu Main menu layout To open the main menus (illustrated below), press on the remote control or TV control panel. 1st Layer 2nd Layer 3rd Layer Page Network Media Player Wallpaper Timer Settings NET TV Network Setup Wireless Information Photo ... 59 MTS 59 Balance 60 Bass 60 Treble 60 Advanced Sound Settings 61 Dynamic Volume (Audyssey 60 Dynamic Volume®) Dynamic Range Control 60 1st Layer Settings 2nd Layer APPLICATIONS PREFERENCES 3rd Layer Widgets NET TV Media Player Channel Browser Favorites Browser On Timer Sleep Timer ...
Owners Manual
Page 30
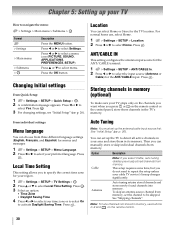
...channels from memory, set up your cable TV service's lineup changes significantly. Local Time Setting This setting allows you press CH or CH on the remote control. 30 Press C or c to select Local Time Setting. OK 2 Press B or b to select Yes. This setup requires some time, ...MENU button. Then you do not need to repeat the setup unless your TV How to be skipped. p. 26). on the remote control or the control panel, store those channels in its memory. Option Description Cable Note: If you select Cable, auto tuning deletes previously stored channels ...
...channels from memory, set up your cable TV service's lineup changes significantly. Local Time Setting This setting allows you press CH or CH on the remote control. 30 Press C or c to select Local Time Setting. OK 2 Press B or b to select Yes. This setup requires some time, ...MENU button. Then you do not need to repeat the setup unless your TV How to be skipped. p. 26). on the remote control or the control panel, store those channels in its memory. Option Description Cable Note: If you select Cable, auto tuning deletes previously stored channels ...

Owners Manual
Page 31
.... 1 > Settings > SETUP > Manual Tuning > . To turn off Skip. 31 OK 3 Press OK to start Auto Tuning or to turn on the remote control to select Input Labeling. To clear the selection, press . OK 2 Press B or b to enter the channel number (for example, 56). To turn off...are listed at the center of channels appears. OK The list of the screen. Press . on Skip. Press . OK 2 Press B or b to turn on the remote control. OK 3 Press B or b to select the item you can set video inputs to be skipped. 1 > Settings > SETUP > TV Settings > . Chapter 5: ...
.... 1 > Settings > SETUP > Manual Tuning > . To turn off Skip. 31 OK 3 Press OK to start Auto Tuning or to turn on the remote control to select Input Labeling. To clear the selection, press . OK 2 Press B or b to enter the channel number (for example, 56). To turn off...are listed at the center of channels appears. OK The list of the screen. Press . on Skip. Press . OK 2 Press B or b to turn on the remote control. OK 3 Press B or b to select the item you can set video inputs to be skipped. 1 > Settings > SETUP > TV Settings > . Chapter 5: ...
Owners Manual
Page 33
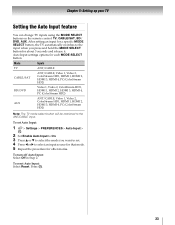
... ANT/CABLE input. Chapter 5: Setting up your TV Setting the Auto Input feature You can change TV inputs using the MODE SELECT buttons on the remote control: TV, CABLE/SAT, BD/ DVD, AUX. Auto Input settings options for each MODE SELECT button: Mode Inputs TV ANT/CABLE CABLE/SAT ANT/CABLE, Video...
... ANT/CABLE input. Chapter 5: Setting up your TV Setting the Auto Input feature You can change TV inputs using the MODE SELECT buttons on the remote control: TV, CABLE/SAT, BD/ DVD, AUX. Auto Input settings options for each MODE SELECT button: Mode Inputs TV ANT/CABLE CABLE/SAT ANT/CABLE, Video...

Owners Manual
Page 39
...are updated when you store channels in to a specific channel (programmed or unprogrammed) Channel Analog Digital Description Use the 0-9 buttons on the remote control to select Select Mode or Browse Mode. 4 Select a list. •History List • ANT/CABLE List • Inputs List ...in the TV's channel memory (- Digital channels have priority when manually entering a channel number using the 0-9 buttons on the remote control or TV control panel. OK Using the Channel Browser™ The Channel Browser™ is a helpful navigational interface for analog and digital channels...
...are updated when you store channels in to a specific channel (programmed or unprogrammed) Channel Analog Digital Description Use the 0-9 buttons on the remote control to select Select Mode or Browse Mode. 4 Select a list. •History List • ANT/CABLE List • Inputs List ...in the TV's channel memory (- Digital channels have priority when manually entering a channel number using the 0-9 buttons on the remote control or TV control panel. OK Using the Channel Browser™ The Channel Browser™ is a helpful navigational interface for analog and digital channels...

Owners Manual
Page 40
... TV tunes to the channel or input. 2 Press to close the Channel Browser™. for at least 5 seconds using the numeric buttons on the remote control. •Channels that is integrated into the Channel Browser™. Note: • The History List opens by pressing C or c. 3 Press and ... highlighted in the browser 3 Inputs or channels labels 4 Input type 5 Current list (History, ANT/CABLE, Inputs, Favorites, or HDMI-CEC Control) 6 Channel or input currently being viewed To cycle through the previously tuned channels and inputs. OK 3 Press to close the Channel Browser™...
... TV tunes to the channel or input. 2 Press to close the Channel Browser™. for at least 5 seconds using the numeric buttons on the remote control. •Channels that is integrated into the Channel Browser™. Note: • The History List opens by pressing C or c. 3 Press and ... highlighted in the browser 3 Inputs or channels labels 4 Input type 5 Current list (History, ANT/CABLE, Inputs, Favorites, or HDMI-CEC Control) 6 Channel or input currently being viewed To cycle through the previously tuned channels and inputs. OK 3 Press to close the Channel Browser™...

Owners Manual
Page 41
...connected to the TV (- "Skipping video inputs" on p. 31). • Inputs that are set , you can select a video input source with the remote control by pressing and holding the corresponding MODE SELECT button for that input appears. 3 If the input has multiple HDMI® CEC devices, use B or b...4 8 PC Note: • You can label the video input sources according to the button so it can be tuned. "Labeling video inputs" on the remote control or TV control panel. 2 Change the input: • Press 0-8. • Repeatedly press B or b. p. 32) will not appear in the input selector. The list ...
...connected to the TV (- "Skipping video inputs" on p. 31). • Inputs that are set , you can select a video input source with the remote control by pressing and holding the corresponding MODE SELECT button for that input appears. 3 If the input has multiple HDMI® CEC devices, use B or b...4 8 PC Note: • You can label the video input sources according to the button so it can be tuned. "Labeling video inputs" on the remote control or TV control panel. 2 Change the input: • Press 0-8. • Repeatedly press B or b. p. 32) will not appear in the input selector. The list ...


