
Brochure
Page 2
...8226; Built-in WiFi®5 • Skype® Capable • Input Labeling • Channel Browser • Sleep Timer • Illuminated Remote Control • Horizon Motion GUI Jack Pack • HDMI® Digital Inputs6: 4 w/ CEC Easily connect to experience the full suggested capabilities ... • Expert Mode: Use advanced calibrating controls to health issues associated with viewing in certain 3D television pictures or video games. Toshiba 55TL515U System Specifications1 Cabinet • Screen Size Class: 55 in. • Actual Screen Size Diagonal: 54.6 in . Care should ...
...8226; Built-in WiFi®5 • Skype® Capable • Input Labeling • Channel Browser • Sleep Timer • Illuminated Remote Control • Horizon Motion GUI Jack Pack • HDMI® Digital Inputs6: 4 w/ CEC Easily connect to experience the full suggested capabilities ... • Expert Mode: Use advanced calibrating controls to health issues associated with viewing in certain 3D television pictures or video games. Toshiba 55TL515U System Specifications1 Cabinet • Screen Size Class: 55 in. • Actual Screen Size Diagonal: 54.6 in . Care should ...
Owners Manual
Page 10
...to the HDMI input 17 Connecting a VCR or DVD player with ColorStream® (component video 18 Connecting remote IR devices 19 Connecting a digital audio system 20 Using the TV remote and HDMI® CEC Control to control other devices 21 Connecting an HDMI audio system 21 Connecting a ...PC 22 Connecting to a home network 23 Chapter 3: Using the remote control 24 Controlling other devices 24 Installing batteries 24 Learning about the Remote Control 25 Chapter 4: Initial Setup and Menu 26 Initial Setup 26 Navigating the menu system 27 Main menu...
...to the HDMI input 17 Connecting a VCR or DVD player with ColorStream® (component video 18 Connecting remote IR devices 19 Connecting a digital audio system 20 Using the TV remote and HDMI® CEC Control to control other devices 21 Connecting an HDMI audio system 21 Connecting a ...PC 22 Connecting to a home network 23 Chapter 3: Using the remote control 24 Controlling other devices 24 Installing batteries 24 Learning about the Remote Control 25 Chapter 4: Initial Setup and Menu 26 Initial Setup 26 Navigating the menu system 27 Main menu...
Owners Manual
Page 11
...IN, HDMI, and 3D . 82 PC IN signal formats 82 HDMI signal formats 83 3D signal formats 84 Remote control functional key chart 85 Operating other devices 87 Programming the remote to operate other devices . . . 87 Device code setup 87 Searching for a device code 88 Locking the... volume keys 88 Clearing the remote's programming 88 Resetting to the factory default 88 Operating the TV with combination buttons 89 Remote control codes 90 Limited United States Warranty for LCD Televisions 96 Limited Canadian Warranty for Toshiba Brand Flat Panel Televisions 97 Index 100 11
...IN, HDMI, and 3D . 82 PC IN signal formats 82 HDMI signal formats 83 3D signal formats 84 Remote control functional key chart 85 Operating other devices 87 Programming the remote to operate other devices . . . 87 Device code setup 87 Searching for a device code 88 Locking the... volume keys 88 Clearing the remote's programming 88 Resetting to the factory default 88 Operating the TV with combination buttons 89 Remote control codes 90 Limited United States Warranty for LCD Televisions 96 Limited Canadian Warranty for Toshiba Brand Flat Panel Televisions 97 Index 100 11
Owners Manual
Page 12
... To choose a location for the TV: • Read "Important notes about your TV (- p. 15-23). 5 See "Chapter 3: Using the remote control" (- When you automatically adjust picture settings based on other electronic device(s) to an AV amplifier via HDMI connection (p. 46). •ColorStream®...the depth and detail of 3D before your very own eyes. • ENERGY STAR® qualified Overview of external devices from the TV remote via an HDMI cable. p. 55). •Dynamic Volume (Audyssey Dynamic Volume®) eliminates inconsistent TV volume when changing channels or viewing ...
... To choose a location for the TV: • Read "Important notes about your TV (- p. 15-23). 5 See "Chapter 3: Using the remote control" (- When you automatically adjust picture settings based on other electronic device(s) to an AV amplifier via HDMI connection (p. 46). •ColorStream®...the depth and detail of 3D before your very own eyes. • ENERGY STAR® qualified Overview of external devices from the TV remote via an HDMI cable. p. 55). •Dynamic Volume (Audyssey Dynamic Volume®) eliminates inconsistent TV volume when changing channels or viewing ...
Owners Manual
Page 13
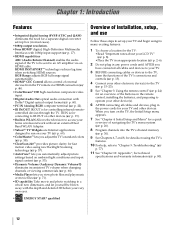
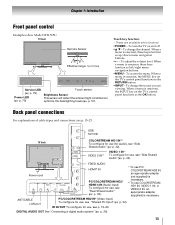
p. 79) Power LED (- USB terminal TV back COLORSTREAM HD1 IN** To configure for use , see p. 15-23. TV front Remote Sensor Effective range: 16.4 ft (5m) Service LED (- Touch key function: - When a menu is onscreen, these keys function as the OK button. To change the ...
p. 79) Power LED (- USB terminal TV back COLORSTREAM HD1 IN** To configure for use , see p. 15-23. TV front Remote Sensor Effective range: 16.4 ft (5m) Service LED (- Touch key function: - When a menu is onscreen, these keys function as the OK button. To change the ...
Owners Manual
Page 15
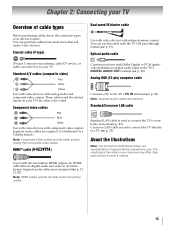
... IR blaster cable Use with video devices with devices built-in its native format. HDMI® cable ( ) Use it with infrared remote control. Separate audio cables are required. Note: Separate audio cables are not required (- Standard/Crossover LAN cable Standard LAN cable is used... to connect the TV directly to the TV's PC IN terminal (- Crossover LAN cable is a Toshiba brand.) Note: Component video cables provide better picture quality than composite video cables. These cables (and the related inputs on your TV. p. ...
... IR blaster cable Use with video devices with devices built-in its native format. HDMI® cable ( ) Use it with infrared remote control. Separate audio cables are required. Note: Separate audio cables are not required (- Standard/Crossover LAN cable Standard LAN cable is used... to connect the TV directly to the TV's PC IN terminal (- Crossover LAN cable is a Toshiba brand.) Note: Component video cables provide better picture quality than composite video cables. These cables (and the related inputs on your TV. p. ...

Owners Manual
Page 17
.../60Hz). To connect an HDMI device, you need a High Speed HDMI cable. A conventional HDMI/DVI cable may not work properly. - Note: For programming the TV remote control to operate other devices, see p. 83. Recomended length: 6.6 ft (2 m). •3.5 mm Stereo to -DVI adapter cable transfers video only. To display an 1080p/60...
.../60Hz). To connect an HDMI device, you need a High Speed HDMI cable. A conventional HDMI/DVI cable may not work properly. - Note: For programming the TV remote control to operate other devices, see p. 83. Recomended length: 6.6 ft (2 m). •3.5 mm Stereo to -DVI adapter cable transfers video only. To display an 1080p/60...

Owners Manual
Page 18
.../25 Hz are required. You can use , distribution, or revision of television programs, videotapes, DVDs, and other devices, see p. 17. Note: For programming the TV remote control to operate other materials is required. You can connect the component video cables from the DVD player to display Progressive (480p, 720p, 1080p) and...
.../25 Hz are required. You can use , distribution, or revision of television programs, videotapes, DVDs, and other devices, see p. 17. Note: For programming the TV remote control to operate other materials is required. You can connect the component video cables from the DVD player to display Progressive (480p, 720p, 1080p) and...

Owners Manual
Page 19
...sensor on the front of IR-controlled audio device (for example) Infrared sensor IR blaster cable wand (approx.1 inch from the remote control through feature does not support all IRcontrolled devices. Front of IR-controlled DVD player (for example) Front of the device and...for the desired function. Press POWER. (Do not use the TV's IR OUT terminal to operate the device; - If you previously programmed to remotely operate many infrared remote-controlled devices enclosed in a similar manner. p. 17-18) To set the IR OUT mode: 1 > Settings > PREFERENCES > IR Control. ...
...sensor on the front of IR-controlled audio device (for example) Infrared sensor IR blaster cable wand (approx.1 inch from the remote control through feature does not support all IRcontrolled devices. Front of IR-controlled DVD player (for example) Front of the device and...for the desired function. Press POWER. (Do not use the TV's IR OUT terminal to operate the device; - If you previously programmed to remotely operate many infrared remote-controlled devices enclosed in a similar manner. p. 17-18) To set the IR OUT mode: 1 > Settings > PREFERENCES > IR Control. ...
Owners Manual
Page 20
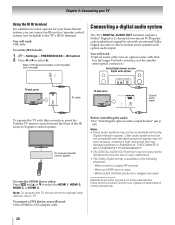
... IN LR Optical Audio IN TV back panel IR cable TV back panel Optical audio cable To operate the TV with this connection, point the Toshiba TV remote control toward the front of the IR receiver/repeater control system. p. 60). Note: • Some audio systems may not output some digital audio sources... HDMI 4. When tuned to operate other external audio systems with an external Dolby Digital decoder or other devices, see p. 87. Note: To program the TV remote control to a digital RF channel. -
... IN LR Optical Audio IN TV back panel IR cable TV back panel Optical audio cable To operate the TV with this connection, point the Toshiba TV remote control toward the front of the IR receiver/repeater control system. p. 60). Note: • Some audio systems may not output some digital audio sources... HDMI 4. When tuned to operate other external audio systems with an external Dolby Digital decoder or other devices, see p. 87. Note: To program the TV remote control to a digital RF channel. -

Owners Manual
Page 21
...174; CEC Control feature uses CEC technology as regulated by the HDMI standard. Connecting an HDMI audio system If your TV Using the TV remote and HDMI® CEC Control to the device you will need : •HDMI cables (- Audio receiver Playback device (HDMI® CEC...For proper operation, it is recommended that supports ARC HDMI cable Note: Only HDMI 1 supports ARC. However, Toshiba is limited to the amplifier via the HDMI cable. When using the TV's remote control, connect an HDMI® CEC compatible audio receiver or playback device. p. 46). •Configure the ...
...174; CEC Control feature uses CEC technology as regulated by the HDMI standard. Connecting an HDMI audio system If your TV Using the TV remote and HDMI® CEC Control to the device you will need : •HDMI cables (- Audio receiver Playback device (HDMI® CEC...For proper operation, it is recommended that supports ARC HDMI cable Note: Only HDMI 1 supports ARC. However, Toshiba is limited to the amplifier via the HDMI cable. When using the TV's remote control, connect an HDMI® CEC compatible audio receiver or playback device. p. 46). •Configure the ...

Owners Manual
Page 24
... a designated disposal area. • Always consider the environment when disposing of time. Chapter 3: Using the remote control Controlling other devices The TV's remote control can operate other devices such as sunshine, fire, or the like. Toshiba devices: The remote is not programmed to be used batteries together. • Always remove batteries from leaking into...
... a designated disposal area. • Always consider the environment when disposing of time. Chapter 3: Using the remote control Controlling other devices The TV's remote control can operate other devices such as sunshine, fire, or the like. Toshiba devices: The remote is not programmed to be used batteries together. • Always remove batteries from leaking into...
Owners Manual
Page 25
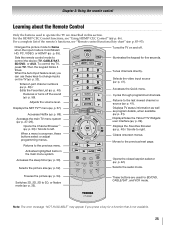
...(- p. 85-95). Accesses Netflix (- Tunes channels directly. Displays the Favorites Browser (- Opens the closed caption selector (- p. 52). p. 35). Sets the remote control mode to the previous/next page. To control the TV, press TV. p. 33). p. 68). Opens the Channel Browser™ (- p. 41). Accesses... HD, PC, VIDEO, or HDMI® (- p. 67). These buttons are described in the main menu system. For a complete list of the remote's functions, see "Using HDMI® CEC Control" (- p. 59). p. 39) / Scrolls to 3D, or Native mode (- Displays TV status ...
...(- p. 85-95). Accesses Netflix (- Tunes channels directly. Displays the Favorites Browser (- Opens the closed caption selector (- p. 52). p. 35). Sets the remote control mode to the previous/next page. To control the TV, press TV. p. 33). p. 68). Opens the Channel Browser™ (- p. 41). Accesses... HD, PC, VIDEO, or HDMI® (- p. 67). These buttons are described in the main menu system. For a complete list of the remote's functions, see "Using HDMI® CEC Control" (- p. 59). p. 39) / Scrolls to 3D, or Native mode (- Displays TV status ...
Owners Manual
Page 27
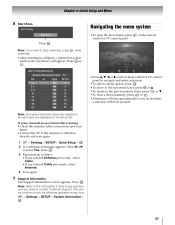
.../cable connections, and scan again. •Connect the TV to navigate and make a selection within 60 seconds. 27 on the remote Picture Sound Applications Settings Preferences Setup •Press B, b, C, or c on the remote control or TV control panel to the antenna or cable box directly and scan again. 1 > Settings > SETUP > Quick Setup...
.../cable connections, and scan again. •Connect the TV to navigate and make a selection within 60 seconds. 27 on the remote Picture Sound Applications Settings Preferences Setup •Press B, b, C, or c on the remote control or TV control panel to the antenna or cable box directly and scan again. 1 > Settings > SETUP > Quick Setup...
Owners Manual
Page 28
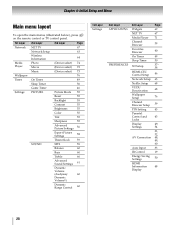
Chapter 4: Initial Setup and Menu Main menu layout To open the main menus (illustrated below), press on the remote control or TV control panel. 1st Layer 2nd Layer 3rd Layer Page Network Media Player Wallpaper Timer Settings NET TV Network Setup Wireless Information Photo ...
Chapter 4: Initial Setup and Menu Main menu layout To open the main menus (illustrated below), press on the remote control or TV control panel. 1st Layer 2nd Layer 3rd Layer Page Network Media Player Wallpaper Timer Settings NET TV Network Setup Wireless Information Photo ...
Owners Manual
Page 30
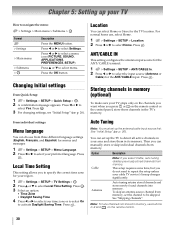
... the TV to navigate the menu: > Settings > Main menu > Submenu > OK Format > Settings > Main menu > Submenu > OK Description Press the MENU button. p. 26). on the remote control or the control panel, store those channels in its memory. Press . Antenna Auto tuning retains stored channels and stores newly found channels into memory... Time Setting This setting allows you do not need to select Home. Press . Option Description Cable Note: If you press CH or CH on the remote control. 30 To skip an antenna source channel from memory.
... the TV to navigate the menu: > Settings > Main menu > Submenu > OK Format > Settings > Main menu > Submenu > OK Description Press the MENU button. p. 26). on the remote control or the control panel, store those channels in its memory. Press . Antenna Auto tuning retains stored channels and stores newly found channels into memory... Time Setting This setting allows you do not need to select Home. Press . Option Description Cable Note: If you press CH or CH on the remote control. 30 To skip an antenna source channel from memory.

Owners Manual
Page 31
... on skip: 1 > Settings > PREFERENCES > AV Connection > . OK 3 Press OK to start Auto Tuning or to turn on the remote control to skip. The channels found are listed at the center of channels appears. Channel Options Ch. To clear the selection, press . Press... . Digital channel Skipping channels To prevent a channel from being viewed, you can set video inputs to start Manual Tuning. Press OK . To turn on the remote control. Press . OK The list of the screen. OK A confirmation screen appears. 2 Press OK to be skipped. 1 > Settings > SETUP > TV...
... on skip: 1 > Settings > PREFERENCES > AV Connection > . OK 3 Press OK to start Auto Tuning or to turn on the remote control to skip. The channels found are listed at the center of channels appears. Channel Options Ch. To clear the selection, press . Press... . Digital channel Skipping channels To prevent a channel from being viewed, you can set video inputs to start Manual Tuning. Press OK . To turn on the remote control. Press . OK The list of the screen. OK A confirmation screen appears. 2 Press OK to be skipped. 1 > Settings > SETUP > TV...
Owners Manual
Page 33
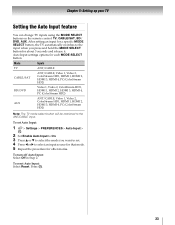
... Input: Select Reset. Chapter 5: Setting up your TV Setting the Auto Input feature You can change TV inputs using the MODE SELECT buttons on the remote control: TV, CABLE/SAT, BD/ DVD, AUX. OK 2 Set Enable Auto Input to On. 3 Press B or b to select the mode you press and hold the...
... Input: Select Reset. Chapter 5: Setting up your TV Setting the Auto Input feature You can change TV inputs using the MODE SELECT buttons on the remote control: TV, CABLE/SAT, BD/ DVD, AUX. OK 2 Set Enable Auto Input to On. 3 Press B or b to select the mode you press and hold the...

Owners Manual
Page 39
... mode. You can only tune digital channels. 3 Press C or c to enter the major channel number. OK Use the 0-9 buttons on the remote control to select a mode. Mode Description Standard Auto (default) Digital You can tune both analog and digital channels normally. To tune analog channels, ...List. Note: To use CH / CH if available. Digital channels have priority when manually entering a channel number using the 0-9 buttons on the remote control or TV control panel. Note: This feature does not work unless you select one to tune to Antenna (- Tuning in Antenna mode. ...
... mode. You can only tune digital channels. 3 Press C or c to enter the major channel number. OK Use the 0-9 buttons on the remote control to select a mode. Mode Description Standard Auto (default) Digital You can tune both analog and digital channels normally. To tune analog channels, ...List. Note: To use CH / CH if available. Digital channels have priority when manually entering a channel number using the 0-9 buttons on the remote control or TV control panel. Note: This feature does not work unless you select one to tune to Antenna (- Tuning in Antenna mode. ...

Owners Manual
Page 40
... can quickly create a favorite channels/inputs list that is tuned, the Channel Browser™ adds it to the beginning of the Favorites list on the remote control. •Channels that is turned off, pressing will not display the Favorites Browser. • Pressing opens the Channel Browser™ Favorites list regardless of...
... can quickly create a favorite channels/inputs list that is tuned, the Channel Browser™ adds it to the beginning of the Favorites list on the remote control. •Channels that is turned off, pressing will not display the Favorites Browser. • Pressing opens the Channel Browser™ Favorites list regardless of...


