User Manual
Page 8
...8226; This product contains Adobe® Flash® Player software under license from Dolby Laboratories. Together, these technologies ensure you enjoy your audio experience as much as your video. • Manufactured under license from Microsoft Licensing, GP. • THIS PRODUCT IS LICENSED UNDER THE...OR SHALL BE IMPLIED FOR ANY OTHER USE. All rights reserved. in the United States and other countries. • MPEG Layer-3 audio coding technology licensed from Fraunhofer IIS and Thomson. • DLNA®, DLNA® Certification Logo, and DLNA CERTIFIED™ are ...
...8226; This product contains Adobe® Flash® Player software under license from Dolby Laboratories. Together, these technologies ensure you enjoy your audio experience as much as your video. • Manufactured under license from Microsoft Licensing, GP. • THIS PRODUCT IS LICENSED UNDER THE...OR SHALL BE IMPLIED FOR ANY OTHER USE. All rights reserved. in the United States and other countries. • MPEG Layer-3 audio coding technology licensed from Fraunhofer IIS and Thomson. • DLNA®, DLNA® Certification Logo, and DLNA CERTIFIED™ are ...
User Manual
Page 9
... 39 Using HDMI® CEC Control 39 Controlling HDMI® CEC playback devices 40 HDMI® CEC Control input source selection 40 Adjusting the amplifier's audio 41 Other HDMI® CEC Control functions 41 Using the HDMI® settings feature 41 Viewing the HDMI® signal information 41 Using your PC... with the TV 42 Adjusting the image 42 Setting the PC audio 42 Setting the timer to turn on the TV 42 Setting the sleep timer 43 Setting Automatic Power Down 43 Setting No Signal Power Down...
... 39 Using HDMI® CEC Control 39 Controlling HDMI® CEC playback devices 40 HDMI® CEC Control input source selection 40 Adjusting the amplifier's audio 41 Other HDMI® CEC Control functions 41 Using the HDMI® settings feature 41 Viewing the HDMI® signal information 41 Using your PC... with the TV 42 Adjusting the image 42 Setting the PC audio 42 Setting the timer to turn on the TV 42 Setting the sleep timer 43 Setting Automatic Power Down 43 Setting No Signal Power Down...
User Manual
Page 10
Selecting stereo/SAP broadcasts 52 Adjusting the audio balance 53 Adjusting the range 53 Selecting the optical audio output format 53 Using the Dolby® Digital Dynamic Range Control feature 53 Using Audyssey Dynamic Volume 53 Using advanced sound features 54 Using surround ... default 80 Operating the TV with combination buttons 81 Remote control codes 82 Limited United States Warranty for LCD Televisions 88 Limited Canadian Warranty for Toshiba Brand Flat Panel Televisions 89 Index 92 10
Selecting stereo/SAP broadcasts 52 Adjusting the audio balance 53 Adjusting the range 53 Selecting the optical audio output format 53 Using the Dolby® Digital Dynamic Range Control feature 53 Using Audyssey Dynamic Volume 53 Using advanced sound features 54 Using surround ... default 80 Operating the TV with combination buttons 81 Remote control codes 82 Limited United States Warranty for LCD Televisions 88 Limited Canadian Warranty for Toshiba Brand Flat Panel Televisions 89 Index 92 10
User Manual
Page 11
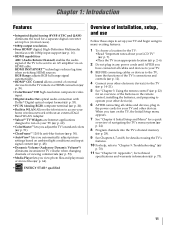
... music or movie files (- p. 20). •Built-in an appropriate location (- p. 16). •HDMI capabilities ARC (Audio Return Channel) enables the audio signal of the TV to be sent to an AV amplifier via HDMI connection (p. 39). •ColorStream® HD high-...resolution component video input. •Digital Audio Out optical audio connection with 1080p input support (- p. 73). 11 Chapter 1: Introduction Features •Integrated digital tuning (8VSB ATSC and QAM) eliminates...
... music or movie files (- p. 20). •Built-in an appropriate location (- p. 16). •HDMI capabilities ARC (Audio Return Channel) enables the audio signal of the TV to be sent to an AV amplifier via HDMI connection (p. 39). •ColorStream® HD high-...resolution component video input. •Digital Audio Out optical audio connection with 1080p input support (- p. 73). 11 Chapter 1: Introduction Features •Integrated digital tuning (8VSB ATSC and QAM) eliminates...
User Manual
Page 12
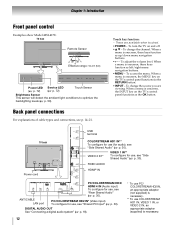
... menu navigation buttons. • MENU - p. 30). ANT/CABLE LAN port PC/COLORSTREAM HD2 IN* (Video input) To configure for audio), see "Side Shared Audio" (- Chapter 1: Introduction Front panel control Examples show Model 42SL417U. To change the source you are available when touched. • POWER ...When a menu is onscreen, the MENU key on and off. • B b - p. 72) (- To change the channel. FIXED AUDIO HDMI® IN PC/COLORSTREAM HD2/ HDMI 4 IN (Audio input) To configure for use , see "Shared PC Input" (- These are viewing. p. 30). VIDEO 2 IN** VIDEO 1 IN**...
... menu navigation buttons. • MENU - p. 30). ANT/CABLE LAN port PC/COLORSTREAM HD2 IN* (Video input) To configure for audio), see "Side Shared Audio" (- Chapter 1: Introduction Front panel control Examples show Model 42SL417U. To change the source you are available when touched. • POWER ...When a menu is onscreen, the MENU key on and off. • B b - p. 72) (- To change the channel. FIXED AUDIO HDMI® IN PC/COLORSTREAM HD2/ HDMI 4 IN (Audio input) To configure for use , see "Shared PC Input" (- These are viewing. p. 30). VIDEO 2 IN** VIDEO 1 IN**...
User Manual
Page 14
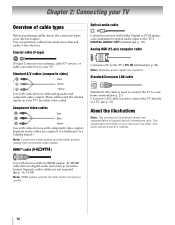
...) Connects your antenna, cable TV service, or cable converter box to your home network (- Note: Separate audio cables are required. (ColorStream® is a Toshiba brand.) Note: Component video cables provide better picture quality than composite video cables. Crossover LAN cable is used... to connect the TV directly to the TV's DIGITAL AUDIO OUT terminal (- Separate audio cables are required. p. 21). The...
...) Connects your antenna, cable TV service, or cable converter box to your home network (- Note: Separate audio cables are required. (ColorStream® is a Toshiba brand.) Note: Component video cables provide better picture quality than composite video cables. Crossover LAN cable is used... to connect the TV directly to the TV's DIGITAL AUDIO OUT terminal (- Separate audio cables are required. p. 21). The...
User Manual
Page 15
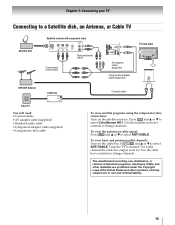
... a Satellite dish, an Antenna, or Cable TV Satellite dish Satellite receiver with component video Y PB PR AUDIO OUT L Satellite COMPONENT VIDEO VIDEO R IN OUT Standard audio cable Component video cable TV back panel AV adapter cable (supplied) Component adapter cable (supplied) VHF/UHF ...TV Cable box CH 3 CH 4 IN OUT You will need: •Coaxial cables •AV adapter cable (supplied) •Standard audio cable •Component adapter cable (supplied) •Component video cable Coaxial cable To view satellite programs using the component video connections: Turn on...
... a Satellite dish, an Antenna, or Cable TV Satellite dish Satellite receiver with component video Y PB PR AUDIO OUT L Satellite COMPONENT VIDEO VIDEO R IN OUT Standard audio cable Component video cable TV back panel AV adapter cable (supplied) Component adapter cable (supplied) VHF/UHF ...TV Cable box CH 3 CH 4 IN OUT You will need: •Coaxial cables •AV adapter cable (supplied) •Standard audio cable •Component adapter cable (supplied) •Component video cable Coaxial cable To view satellite programs using the component video connections: Turn on...
User Manual
Page 16
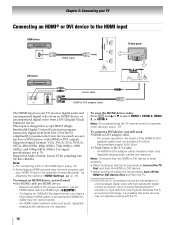
...device is reset properly: • When turning on electronic components, turn off electronic components, turn on your TV receives digital audio and uncompressed digital video from an HDMI device, or uncompressed digital video from EIA/CEA-861-D compliant[1] consumer electronic devices (...adapter cable must not exceed 9.8 ft (3m). Recommendation: For proper operation, use an HDMI cable with the TV. 16 Separate analog audio cables are required. Note: For programming the TV remote control to accept HDCP (HighBandwidth Digital-Content Protection) program material in HDMI Settings....
...device is reset properly: • When turning on electronic components, turn off electronic components, turn on your TV receives digital audio and uncompressed digital video from an HDMI device, or uncompressed digital video from EIA/CEA-861-D compliant[1] consumer electronic devices (...adapter cable must not exceed 9.8 ft (3m). Recommendation: For proper operation, use an HDMI cable with the TV. 16 Separate analog audio cables are required. Note: For programming the TV remote control to accept HDCP (HighBandwidth Digital-Content Protection) program material in HDMI Settings....
User Manual
Page 17
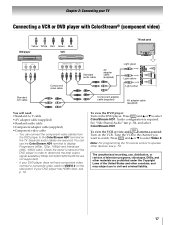
... video) Y W R G B Yellow White Red Green Blue DVD player VCR TV back panel VIDEO AUDIO L R Y W R Standard A/V cable W Y COMPONENT VIDEO Y PB PR AUDIO OUT L R G B R W R Standard audio cable Component video cable W R AV adapter cable (supplied) Light green Light yellow Light yellow R B...) AV adapter cable (supplied) R You will need: •Standard A/V cable •AV adapter cable (supplied) •Standard audio cable •Component adapter cable (supplied) •Component video cable - You can use , distribution, or revision of television programs,...
... video) Y W R G B Yellow White Red Green Blue DVD player VCR TV back panel VIDEO AUDIO L R Y W R Standard A/V cable W Y COMPONENT VIDEO Y PB PR AUDIO OUT L R G B R W R Standard audio cable Component video cable W R AV adapter cable (supplied) Light green Light yellow Light yellow R B...) AV adapter cable (supplied) R You will need: •Standard A/V cable •AV adapter cable (supplied) •Standard audio cable •Component adapter cable (supplied) •Component video cable - You can use , distribution, or revision of television programs,...
User Manual
Page 18
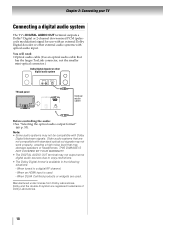
...with Dolby Digital bitstream signals. Dolby and the double-D symbol are used . - Chapter 2: Connecting your TV Connecting a digital audio system The TV's DIGITAL AUDIO OUT terminal outputs a Dolby® Digital or 2-channel down-mixed PCM (pulsecode modulation) signal for use with an external ...Dolby Digital decoder or other digital audio system LINE IN LR Optical Audio IN TV back panel Optical audio cable Before controlling the audio: •See "Selecting the optical audio output format" (- THIS DAMAGE IS NOT COVERED BY YOUR WARRANTY. •...
...with Dolby Digital bitstream signals. Dolby and the double-D symbol are used . - Chapter 2: Connecting your TV Connecting a digital audio system The TV's DIGITAL AUDIO OUT terminal outputs a Dolby® Digital or 2-channel down-mixed PCM (pulsecode modulation) signal for use with an external ...Dolby Digital decoder or other digital audio system LINE IN LR Optical Audio IN TV back panel Optical audio cable Before controlling the audio: •See "Selecting the optical audio output format" (- THIS DAMAGE IS NOT COVERED BY YOUR WARRANTY. •...
User Manual
Page 19
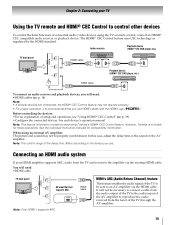
... operations, see "Using HDMI® CEC Control" (- Note: This feature is not liable for compatibility information. However, Toshiba is limited to reproduce the audio received from the tuner of the AV amplifier to models incorporating Toshiba's HDMI® CEC Control feature. You will need : •HDMI cable TV back panel AV amplifier that...
... operations, see "Using HDMI® CEC Control" (- Note: This feature is not liable for compatibility information. However, Toshiba is limited to reproduce the audio received from the tuner of the AV amplifier to models incorporating Toshiba's HDMI® CEC Control feature. You will need : •HDMI cable TV back panel AV amplifier that...
User Manual
Page 20
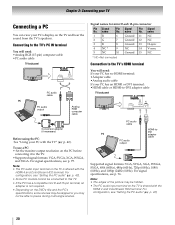
... (60Hz), 1080i (60Hz), and 1080p (24Hz/60Hz). Chapter 2: Connecting your TV Connecting a PC You can view your PC with the TV" (- Note: • The PC audio input terminal on the TV is shared with the HDMI 4 and ColorStream HD2 terminal. name Pin Signal No. name 1 R 2 G 3 B 4 NC * 5 NC 6 Ground...HDMI-to the TV's PC IN terminal You will need: •Analog RGB (15-pin) computer cable •PC audio cable TV back panel PC audio cable PC PC audio output Analog RGB computer cable Conversion adapter (if necessary) Before using the PC: See "Using your PC's display on ...
... (60Hz), 1080i (60Hz), and 1080p (24Hz/60Hz). Chapter 2: Connecting your TV Connecting a PC You can view your PC with the TV" (- Note: • The PC audio input terminal on the TV is shared with the HDMI 4 and ColorStream HD2 terminal. name Pin Signal No. name 1 R 2 G 3 B 4 NC * 5 NC 6 Ground...HDMI-to the TV's PC IN terminal You will need: •Analog RGB (15-pin) computer cable •PC audio cable TV back panel PC audio cable PC PC audio output Analog RGB computer cable Conversion adapter (if necessary) Before using the PC: See "Using your PC's display on ...
User Manual
Page 23
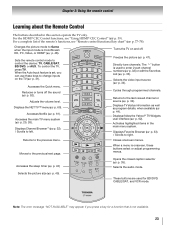
... Browser (- Returns to the last viewed channel or source (- Closes onscreen menus. Moves to the previous/next page. Accesses the sleep timer (- p. 35). Selects the audio mode. p. 45). Note: The error message "NOT AVAILABLE" may appear if you can use these buttons select or adjust programming menus.
... Browser (- Returns to the last viewed channel or source (- Closes onscreen menus. Moves to the previous/next page. Accesses the sleep timer (- p. 35). Selects the audio mode. p. 45). Note: The error message "NOT AVAILABLE" may appear if you can use these buttons select or adjust programming menus.
User Manual
Page 30
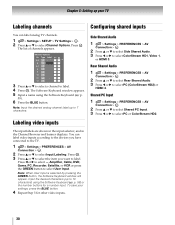
...the Software Keyboard (- OK 2 Press B or b to select ColorStream HD1, Video 1, or HDMI 3. OK 2 Press B or b to select Rear Shared Audio. 3 Press C or c to 7 characters. Input the desired characters (up your settings, press the BLUE button. 4 Repeat Step 3 for a number input... Game, PC, Recorder, Satellite, or VCR or press the GREEN button to the TV. 1 > Settings > PREFERENCES > AV Connection > . Rear Shared Audio 1 > Settings > PREFERENCES > AV Connection > . Labeling video inputs The input labels are shown in the input selector, and in the Channel Browser and...
...the Software Keyboard (- OK 2 Press B or b to select ColorStream HD1, Video 1, or HDMI 3. OK 2 Press B or b to select Rear Shared Audio. 3 Press C or c to 7 characters. Input the desired characters (up your settings, press the BLUE button. 4 Repeat Step 3 for a number input... Game, PC, Recorder, Satellite, or VCR or press the GREEN button to the TV. 1 > Settings > PREFERENCES > AV Connection > . Rear Shared Audio 1 > Settings > PREFERENCES > AV Connection > . Labeling video inputs The input labels are shown in the input selector, and in the Channel Browser and...
User Manual
Page 41
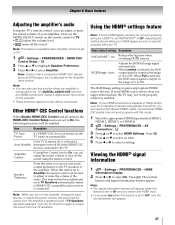
... selected for the Amplifier input source. Using the HDMI® settings feature Note: If some HDMI legacy sources do not work properly with your audio output preference to the TV speakers or the amplifier. RGB Range: Auto Adjusts the RGB full range signal automatically. If your amplifier. OK 3...using the remote control. This item will be output from the TV speakers. Note: When you turn off , it is capable of the audio. The normal banner and signal information banner appear. Note: This feature is available when Amplifier Control is set INSTAPORT™ to Off. Select ...
... selected for the Amplifier input source. Using the HDMI® settings feature Note: If some HDMI legacy sources do not work properly with your audio output preference to the TV speakers or the amplifier. RGB Range: Auto Adjusts the RGB full range signal automatically. If your amplifier. OK 3...using the remote control. This item will be output from the TV speakers. Note: When you turn off , it is capable of the audio. The normal banner and signal information banner appear. Note: This feature is available when Amplifier Control is set INSTAPORT™ to Off. Select ...
User Manual
Page 42
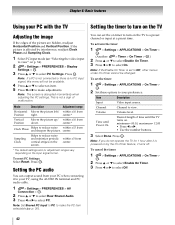
...APPLICATIONS > On Timer > . Press . This is disrupted momentarily when adjusting the PC settings. Press . OK 2 Press B or b to select Rear Shared Audio. 3 Press C or c to view. "Selecting the video input to view" on the TV to your preference: Item Description Input Video input source. Setting the... timer to turn on p. 34). 2 > Settings > PREFERENCES > Display Settings > . OK Setting the PC audio You can set the on timer to turn on the input signal format. To set to make adjustments. Note: Set Shared PC Input to...
...APPLICATIONS > On Timer > . Press . This is disrupted momentarily when adjusting the PC settings. Press . OK 2 Press B or b to select Rear Shared Audio. 3 Press C or c to view. "Selecting the video input to view" on the TV to your preference: Item Description Input Video input source. Setting the... timer to turn on p. 34). 2 > Settings > PREFERENCES > Display Settings > . OK Setting the PC audio You can set the on timer to turn on the input signal format. To set to make adjustments. Note: Set Shared PC Input to...
User Manual
Page 44
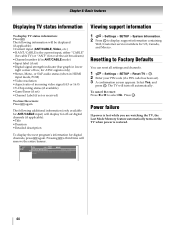
... support information 1 > Settings > SETUP > System Information. 2 Press OK to select No. Pressing Q a third time will display for ATSC signals only) •Stereo, Mono, or SAP audio status (when in lower right corner of incoming video signal (4:3 or 16:9) •V-Chip rating status (if available) •GameTimer (if set) •Channel Label...
... support information 1 > Settings > SETUP > System Information. 2 Press OK to select No. Pressing Q a third time will display for ATSC signals only) •Stereo, Mono, or SAP audio status (when in lower right corner of incoming video signal (4:3 or 16:9) •V-Chip rating status (if available) •GameTimer (if set) •Channel Label...
User Manual
Page 52
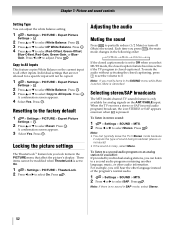
...Copy to All Inputs This feature copies White Balance on the ANT/CABLE input. Press . When the TV receives a stereo or SAP (second audio program) broadcast, the icon STEREO or SAP appears onscreen when Q is set the volume to 0. Press . Press . Press . These ...Press C or c to select On. OK A confirmation screen appears. 3 Select Yes. OK 2 Press B or b to select 2P White Balance. To mute the audio without activating the closed -captioned. Press . Press . OK 3 Press B or b to select White Balance. Individual settings that affect the picture's display. Note: If...
...Copy to All Inputs This feature copies White Balance on the ANT/CABLE input. Press . When the TV receives a stereo or SAP (second audio program) broadcast, the icon STEREO or SAP appears onscreen when Q is set the volume to 0. Press . Press . Press . These ...Press C or c to select On. OK A confirmation screen appears. 3 Select Yes. OK 2 Press B or b to select 2P White Balance. To mute the audio without activating the closed -captioned. Press . Press . OK 3 Press B or b to select White Balance. Individual settings that affect the picture's display. Note: If...
User Manual
Page 53
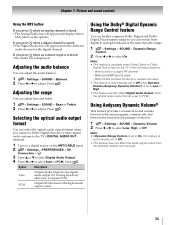
...2 Press C or c to select On. otherwise, it is automatically set to On, this feature is being broadcast; OK 3 Press B or b to select Digital Audio Output. 4 Press C or c to a digital RF channel. - Note: • This feature is available when Dolby Digital or Dolby Digital Plus is tuned: &#...8226;The Analog Audio bar will appear and offer different audio choices for the digital channel. When tuned to select Auto or PCM. Chapter 7: Picture and sound controls Using the MTS button ...
...2 Press C or c to select On. otherwise, it is automatically set to On, this feature is being broadcast; OK 3 Press B or b to select Digital Audio Output. 4 Press C or c to a digital RF channel. - Note: • This feature is available when Dolby Digital or Dolby Digital Plus is tuned: &#...8226;The Analog Audio bar will appear and offer different audio choices for the digital channel. When tuned to select Auto or PCM. Chapter 7: Picture and sound controls Using the MTS button ...
User Manual
Page 54
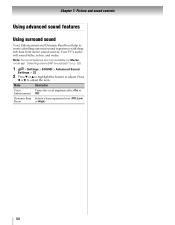
... with deep, rich bass from stereo sound sources. Selects a bass expansion level (Off, Low, or High). 54 Press C or c to adjust the item. Your TV's audio will sound fuller, richer, and wider.
... with deep, rich bass from stereo sound sources. Selects a bass expansion level (Off, Low, or High). 54 Press C or c to adjust the item. Your TV's audio will sound fuller, richer, and wider.


