Owner's Manual - English
Page 2
... situated on or play with the Toshiba stand listed below. Tune Into Safety One size does NOT fit all! Do not allow children to the presence of important operating and maintenance (servicing) instructions in severe burns. DO NOT OPEN. ALLOW THE LAMP TO COOL FOR AT LEAST ONE (1) HOUR BEFORE REPLACING IT. Dispose of the picture, at which provides guidelines for your...
... situated on or play with the Toshiba stand listed below. Tune Into Safety One size does NOT fit all! Do not allow children to the presence of important operating and maintenance (servicing) instructions in severe burns. DO NOT OPEN. ALLOW THE LAMP TO COOL FOR AT LEAST ONE (1) HOUR BEFORE REPLACING IT. Dispose of the picture, at which provides guidelines for your...
Owner's Manual - English
Page 4
... with , such as directly in the colors and/or brightness of the picture, at which time you use or user settings. Never spill liquids or push objects of reflections while viewing the TV. 30) Always unplug the TV before cleaning. The length of the TV. Care For better performance and safer operation of your TOSHIBA TV, follow this happens, turn off . Care (continued from previous column...
... with , such as directly in the colors and/or brightness of the picture, at which time you use or user settings. Never spill liquids or push objects of reflections while viewing the TV. 30) Always unplug the TV before cleaning. The length of the TV. Care For better performance and safer operation of your TOSHIBA TV, follow this happens, turn off . Care (continued from previous column...
Owner's Manual - English
Page 5
... "Setting the Quick Restart™ feature" on page 56. 8) The green and red LED lights on page 125 for details. 9) Every time the TV power cord is finished restarting the lamp and the normal picture appears. This is normal and is not a sign of malfunction. 10) When connecting an external A/V device, if you will be a slight delay between the equipment and the receiver. • Connect...
... "Setting the Quick Restart™ feature" on page 56. 8) The green and red LED lights on page 125 for details. 9) Every time the TV power cord is finished restarting the lamp and the normal picture appears. This is normal and is not a sign of malfunction. 10) When connecting an external A/V device, if you will be a slight delay between the equipment and the receiver. • Connect...
Owner's Manual - English
Page 6
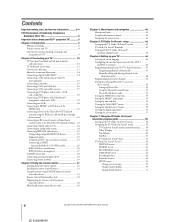
...; audio mode 55 Setting the time and date 55 Viewing the CableCARD™ menu 56 Setting the Quick Restart™ feature 56 Viewing the digital signal meter 57 Viewing the system status 57 Chapter 7: Using the TV Guide On Screen® interactive program guide 58 Setting up the TV Guide On Screen® system 58 Navigating the TV Guide On Screen® system 59 TV Guide On Screen® remote control functions ......... 59 Video Window 60 Panel Menus 60 Info Box 61 TV Guide...
...; audio mode 55 Setting the time and date 55 Viewing the CableCARD™ menu 56 Setting the Quick Restart™ feature 56 Viewing the digital signal meter 57 Viewing the system status 57 Chapter 7: Using the TV Guide On Screen® interactive program guide 58 Setting up the TV Guide On Screen® system 58 Navigating the TV Guide On Screen® system 59 TV Guide On Screen® remote control functions ......... 59 Video Window 60 Panel Menus 60 Info Box 61 TV Guide...
Owner's Manual - English
Page 7
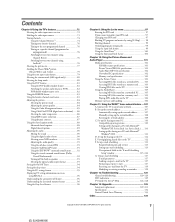
... PIN code 97 Blocking TV programs and movies by rating (V-Chip) ......... 98 Blocking channels 99 Unlocking programs temporarily 99 Using the input lock feature 99 Using the GameTimer 100 Using the front panel lock feature 100 Chapter 10: Using the Picture Viewer and Audio Player 101 Media specifications 101 File/folder name specifications 101 Picture Viewer/JPEG file specifications 101 Audio Player/MP3 file specifications 102 Networked PC specifications 102 Memory card specifications 102 Using the Picture Viewer 103 Accessing...
... PIN code 97 Blocking TV programs and movies by rating (V-Chip) ......... 98 Blocking channels 99 Unlocking programs temporarily 99 Using the input lock feature 99 Using the GameTimer 100 Using the front panel lock feature 100 Chapter 10: Using the Picture Viewer and Audio Player 101 Media specifications 101 File/folder name specifications 101 Picture Viewer/JPEG file specifications 101 Audio Player/MP3 file specifications 102 Networked PC specifications 102 Memory card specifications 102 Using the Picture Viewer 103 Accessing...
Owner's Manual - English
Page 9
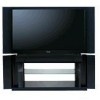
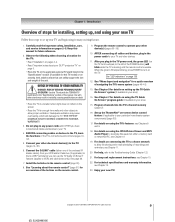
... the green LED stops blinking, press POWER to VCRs and cable boxes only). See Chapter 7 for an overview of the buttons on the remote control. 9. Program channels into the TV's channel memory (page 47). 16. All rights reserved. 9 Use this manual. Connect your other device(s) (pages 33-39). 10. See "Learning about your DLP™ projection TV" on page 5. • Place the TV on the applicable optional TV stand listed in the "Specifications" section...
... the green LED stops blinking, press POWER to VCRs and cable boxes only). See Chapter 7 for an overview of the buttons on the remote control. 9. Program channels into the TV's channel memory (page 47). 16. All rights reserved. 9 Use this manual. Connect your other device(s) (pages 33-39). 10. See "Learning about your DLP™ projection TV" on page 5. • Place the TV on the applicable optional TV stand listed in the "Specifications" section...

Owner's Manual - English
Page 40
.... / 5 sec. / 10 sec. / 15 sec. / 20 sec. ➞ AVHD Skip Time ➞ 1 min. / 3 min. / 5 min. / 15 min. ➞ Gray Level ➞ 1 / 2 / 3 ➞ Quick Restart ➞ Off / On Applications TV Guide On Screen Audio Player Picture Viewer Digital CC/Audio Selector CableCARD Navigate Select CH RTN Back EXIT Exit Note: The menu backgrounds may sometimes appear black, depending on the remote control or TV front panel.
.... / 5 sec. / 10 sec. / 15 sec. / 20 sec. ➞ AVHD Skip Time ➞ 1 min. / 3 min. / 5 min. / 15 min. ➞ Gray Level ➞ 1 / 2 / 3 ➞ Quick Restart ➞ Off / On Applications TV Guide On Screen Audio Player Picture Viewer Digital CC/Audio Selector CableCARD Navigate Select CH RTN Back EXIT Exit Note: The menu backgrounds may sometimes appear black, depending on the remote control or TV front panel.

Owner's Manual - English
Page 45
... you turn on using your TV screen is correct for VCR connection instructions. 4. If the information on -screen instructions. In order to receive regular program listing updates, remember to do not unplug the power cord). Did your Cable or over-the-air video signal. Leave the TV in standby mode when it ON. 3. Use the x • buttons to Off. 6. Screen 22: Congratulations! You have a Cable box connected, leave it is not in use (but leaving the power cord plugged...
... you turn on using your TV screen is correct for VCR connection instructions. 4. If the information on -screen instructions. In order to receive regular program listing updates, remember to do not unplug the power cord). Did your Cable or over-the-air video signal. Leave the TV in standby mode when it ON. 3. Use the x • buttons to Off. 6. Screen 22: Congratulations! You have a Cable box connected, leave it is not in use (but leaving the power cord plugged...
Owner's Manual - English
Page 55
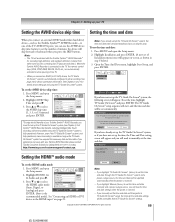
... obtain the time and date. To set of Installation menu icons will skip forward or backward when you press the SKIP buttons. Highlight HDMI 1 (or Installation Auto 2) Audio and press •. When the Symbio AVHD Recorder is connected to the TV, the remote control keys (LIVE, STOP, REW, PAUSE, PLAY, etc.) are automatically activated to select the HDMI audio mode (Auto, Digital, or PC Settings HDMI 1 Audio HDMI 2 Audio Slide Show Interval Auto Auto Auto 2 Sec...
... obtain the time and date. To set of Installation menu icons will skip forward or backward when you press the SKIP buttons. Highlight HDMI 1 (or Installation Auto 2) Audio and press •. When the Symbio AVHD Recorder is connected to the TV, the remote control keys (LIVE, STOP, REW, PAUSE, PLAY, etc.) are automatically activated to select the HDMI audio mode (Auto, Digital, or PC Settings HDMI 1 Audio HDMI 2 Audio Slide Show Interval Auto Auto Auto 2 Sec...

Owner's Manual - English
Page 58
... on-screen assisted setup-Quickly and easily set up the TV Guide On Screen® system Follow these instructions to operate. Note: Over-the-air or cable access to open the Setup menu. 2. Highlight Installation and then press ENTER to stations carrying TV Guide On Screen® data is responsible for the TV Guide On Screen® system to set the reminder. • Recording-Easily schedule recording of TV listings and view program information...
... on-screen assisted setup-Quickly and easily set up the TV Guide On Screen® system Follow these instructions to operate. Note: Over-the-air or cable access to open the Setup menu. 2. Highlight Installation and then press ENTER to stations carrying TV Guide On Screen® data is responsible for the TV Guide On Screen® system to set the reminder. • Recording-Easily schedule recording of TV listings and view program information...

Owner's Manual - English
Page 75
... icon flashing green. To save your entries, highlight Reset and press ENTER. or b) you would like to set as Home using the CH yz buttons or the FAV CH yz buttons on the remote control. Channels that input if one had already been started ; Tune the TV to the channel you will clear the channel history for all three channel histories (ANT 1, ANT 2, and Cable Box). • Removing...
... icon flashing green. To save your entries, highlight Reset and press ENTER. or b) you would like to set as Home using the CH yz buttons or the FAV CH yz buttons on the remote control. Channels that input if one had already been started ; Tune the TV to the channel you will clear the channel history for all three channel histories (ANT 1, ANT 2, and Cable Box). • Removing...

Owner's Manual - English
Page 80
... signal; 3:2 pulldown processed) from a DVD player connected to the VIDEO 1, VIDEO 2, ColorStream HD1/HD2 (component video), or HDMI inputs on the TV, smoother motion can select either High Bright or Low Power lamp mode. • High Bright mode is useful when additional picture brightness is not a sign of malfunction. 80 Copyright © 2005 TOSHIBA CORPORATION. To set the Cinema Mode to Low Power, each time you turn on page 129-131. Press MENU and open the Video menu. 2. See "Lamp unit replacement...
... signal; 3:2 pulldown processed) from a DVD player connected to the VIDEO 1, VIDEO 2, ColorStream HD1/HD2 (component video), or HDMI inputs on the TV, smoother motion can select either High Bright or Low Power lamp mode. • High Bright mode is useful when additional picture brightness is not a sign of malfunction. 80 Copyright © 2005 TOSHIBA CORPORATION. To set the Cinema Mode to Low Power, each time you turn on page 129-131. Press MENU and open the Video menu. 2. See "Lamp unit replacement...
Owner's Manual - English
Page 120
... video cable and an S-video cable to the same set to the TV's output and input connections at the same time (Chapter 2). Use a highly directional outdoor antenna (if applicable). • The station may take several minutes for the picture to be poor. To receive video from channels 3 or 4, make sure the TV/VCR button on the remote control is plugged in the TV picture (page 86). For details, see Chapter 2. • Antenna reception may need...
... video cable and an S-video cable to the same set to the TV's output and input connections at the same time (Chapter 2). Use a highly directional outdoor antenna (if applicable). • The station may take several minutes for the picture to be poor. To receive video from channels 3 or 4, make sure the TV/VCR button on the remote control is plugged in the TV picture (page 86). For details, see Chapter 2. • Antenna reception may need...
Owner's Manual - English
Page 121
... not a sign of malfunction. will display on-screen until the picture appears, or the green LED will switch to Low Power mode in the Audio Setup menu is set correctly (page 93). • If you are not receiving a second audio program from the channel list (page 48) and reprogram channels into the channel memory (page 47). Replace the batteries (page 33). • Your TV remote control may not operate certain features on your other...
... not a sign of malfunction. will display on-screen until the picture appears, or the green LED will switch to Low Power mode in the Audio Setup menu is set correctly (page 93). • If you are not receiving a second audio program from the channel list (page 48) and reprogram channels into the channel memory (page 47). Replace the batteries (page 33). • Your TV remote control may not operate certain features on your other...
Owner's Manual - English
Page 125
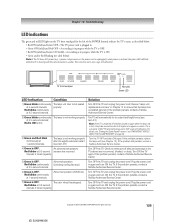
... power cord. If the problem persists, contact a Toshiba Authorized Service Center. 7) Green is NOT a sign of malfunction. Review "Lamp unit replacement and care" in Chapter 13 to appear on-screen. Abnormal operation (including cooling fan stop). Turn OFF the TV and unplug the power cord. Plug the power cord in progress while the TV is installed securely. TV/VIDEO EXIT CHANNEL VOLUME MENU POWER TV front touchpad Red LED Green LED LED Indication Condition Solution 1) Green blinks continuously The lamp unit door is ON (solid). 3) Green and Red blink...
... power cord. If the problem persists, contact a Toshiba Authorized Service Center. 7) Green is NOT a sign of malfunction. Review "Lamp unit replacement and care" in Chapter 13 to appear on-screen. Abnormal operation (including cooling fan stop). Turn OFF the TV and unplug the power cord. Plug the power cord in progress while the TV is installed securely. TV/VIDEO EXIT CHANNEL VOLUME MENU POWER TV front touchpad Red LED Green LED LED Indication Condition Solution 1) Green blinks continuously The lamp unit door is ON (solid). 3) Green and Red blink...
Owner's Manual - English
Page 127
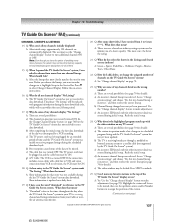
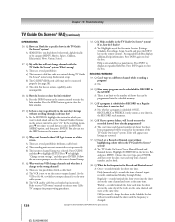
... Service Bar. If the connection includes stereo cables with cable box to make adjustments. What does that entry was unable to the TV Guide On Screen system. A: See "Change channel display" on the wrong number? b) Channel lineup changes have the memory capacity to be replaced with the video window on a daily basis. 19. Use the "Change channel display" feature to it, highlight Setup in reference to receive program listings during initial setup. Press SPLIT to turn additional channels...
... Service Bar. If the connection includes stereo cables with cable box to make adjustments. What does that entry was unable to the TV Guide On Screen system. A: See "Change channel display" on the wrong number? b) Channel lineup changes have the memory capacity to be replaced with the video window on a daily basis. 19. Use the "Change channel display" feature to it, highlight Setup in reference to receive program listings during initial setup. Press SPLIT to turn additional channels...
Owner's Manual - English
Page 128
... incorrect cable box code was not connected or set by category (HDTV, Movies, Sports, Children, Educational, News, Variety, Series). 27. b) The VCR and/or cable box are restored. 37. A: Yes. Help is scheduled ONCE, REGULARLY, or WEEKLY, it count as one time. A: No. 34. A: No, whether a program is also available in a panel menu. Highlight SCHEDULE in the TV Guide On Screen® system? Q: My cable box will not change...
... incorrect cable box code was not connected or set by category (HDTV, Movies, Sports, Children, Educational, News, Variety, Series). 27. b) The VCR and/or cable box are restored. 37. A: Yes. Help is scheduled ONCE, REGULARLY, or WEEKLY, it count as one time. A: No. 34. A: No, whether a program is also available in a panel menu. Highlight SCHEDULE in the TV Guide On Screen® system? Q: My cable box will not change...
Owner's Manual - English
Page 129
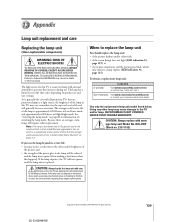
... REMOVE TV COVERS, EXCEPT AS SPECIFIED HEREIN. The light source for this TV was designed for the periods and to the extent set , which may break, exposing sharp edges or pinch points. The lamp unit in this TV is approximately 8,000 hours in Low Power mode and approximately 6,000 hours in the colors and/or brightness of time than the average useful service period. Visit www.tacp.toshiba...
... REMOVE TV COVERS, EXCEPT AS SPECIFIED HEREIN. The light source for this TV was designed for the periods and to the extent set , which may break, exposing sharp edges or pinch points. The lamp unit in this TV is approximately 8,000 hours in Low Power mode and approximately 6,000 hours in the colors and/or brightness of time than the average useful service period. Visit www.tacp.toshiba...
Owner's Manual - English
Page 133
... OR LIMITATION OF INCIDENTAL OR CONSEQUENTIAL DAMAGES. Owner's Manual and Product Registration Read this owner's manual thoroughly before operating this warranty. Reception problems caused by inadequate antenna systems, misaligned satellite dishes, cable television distribution, VCRs, DVD players/recorders, personal computer level IEEE1394 devices, and any other proof of purchase. (2) All warranty servicing of this DLP™ Television must be commenced to implied warranties arising...
... OR LIMITATION OF INCIDENTAL OR CONSEQUENTIAL DAMAGES. Owner's Manual and Product Registration Read this owner's manual thoroughly before operating this warranty. Reception problems caused by inadequate antenna systems, misaligned satellite dishes, cable television distribution, VCRs, DVD players/recorders, personal computer level IEEE1394 devices, and any other proof of purchase. (2) All warranty servicing of this DLP™ Television must be commenced to implied warranties arising...

Owner's Manual - English
Page 135
... Optical audio cable 13 Optical audio output format 93 Panel lock 100 Password 108 PC connection 29 PC setting 95 Picture adjustments: CableClear®/DNR (digital noise reduction) 86 Color Management 85 Color temperature 86 Dynamic Contrast 87 MPEG noise reduction 87 Picture mode 84 Picture quality 84 Picture-out-picture (POP): FAV SCAN button 83 SPLIT button 81 Picture scroll 79 Picture size selection 77 Picture viewer 102 POWER button 10, 31, 36 Quick Restart™ 56 R RECALL button 96 Remote control: Battery installation 33 Device code...
... Optical audio cable 13 Optical audio output format 93 Panel lock 100 Password 108 PC connection 29 PC setting 95 Picture adjustments: CableClear®/DNR (digital noise reduction) 86 Color Management 85 Color temperature 86 Dynamic Contrast 87 MPEG noise reduction 87 Picture mode 84 Picture quality 84 Picture-out-picture (POP): FAV SCAN button 83 SPLIT button 81 Picture scroll 79 Picture size selection 77 Picture viewer 102 POWER button 10, 31, 36 Quick Restart™ 56 R RECALL button 96 Remote control: Battery installation 33 Device code...


