
Owner's Manual - English
Page 4
...always unplug the power cord and disconnect the antenna from the TV if you sit too far to projection TVs only.] If the air temperature rises suddenly (for example, when the TV is first delivered), condensation may form on the TV screen for long periods of time. 32) During normal use... 120 VAC, 60 Hz power source only. 25) Always make the picture appear distorted or the color appear faded. Turn the TV off . Never attempt to a Toshiba Authorized Service Center. Never spill liquids or push objects of any home theater component connected to provide adequate protection against voltage ...
...always unplug the power cord and disconnect the antenna from the TV if you sit too far to projection TVs only.] If the air temperature rises suddenly (for example, when the TV is first delivered), condensation may form on the TV screen for long periods of time. 32) During normal use... 120 VAC, 60 Hz power source only. 25) Always make the picture appear distorted or the color appear faded. Turn the TV off . Never attempt to a Toshiba Authorized Service Center. Never spill liquids or push objects of any home theater component connected to provide adequate protection against voltage ...
Owner's Manual - English
Page 7
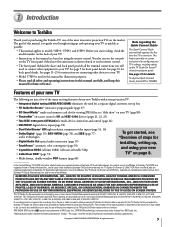
...new TV The following are just a few of the many exciting features of your new Toshiba widescreen projection TV: • Integrated digital tuning (8VSB ATSC/QAM) eliminates the need to connect other devices to your TV.... This manual applies to models 51H93, 57H93, and 65H93. IN NO EVENT SHALL GEMSTAR-TV GUIDE INTERNATIONAL, INC., AND/OR ITS RELATED AFFILIATES, AND/OR TOSHIBA AMERICA CONSUMER PRODUCTS BE LIABLE ...RELATING TO THE TV GUIDE ON SCREEN SYSTEM. The TV Guide On Screen and VCR Plus+ systems are protected by one of its affiliates. SRS WOW technology is turned on -screen control...
...new TV The following are just a few of the many exciting features of your new Toshiba widescreen projection TV: • Integrated digital tuning (8VSB ATSC/QAM) eliminates the need to connect other devices to your TV.... This manual applies to models 51H93, 57H93, and 65H93. IN NO EVENT SHALL GEMSTAR-TV GUIDE INTERNATIONAL, INC., AND/OR ITS RELATED AFFILIATES, AND/OR TOSHIBA AMERICA CONSUMER PRODUCTS BE LIABLE ...RELATING TO THE TV GUIDE ON SCREEN SYSTEM. The TV Guide On Screen and VCR Plus+ systems are protected by one of its affiliates. SRS WOW technology is turned on -screen control...

Owner's Manual - English
Page 8
... below). All rights reserved. For technical specifications, see page 93. 22. Consider the following when selecting a location for your new TV! 8 Copyright © 2003 TOSHIBA CORPORATION. TV back panel ANT( 75 ) G-LINK DVI/HDCP IN 8. Install the batteries in your other device(s). 14. BEFORE connecting cables or...27-33). 13. Program the remote control to the G-LINK jack so you can use the TV Guide On Screen™ one-touch recording feature. Turn on pages 3-4. 5. Follow the on the TV.) See page 36 for your VCR and/or Cable box to operate your area) (page 53...
... below). All rights reserved. For technical specifications, see page 93. 22. Consider the following when selecting a location for your new TV! 8 Copyright © 2003 TOSHIBA CORPORATION. TV back panel ANT( 75 ) G-LINK DVI/HDCP IN 8. Install the batteries in your other device(s). 14. BEFORE connecting cables or...27-33). 13. Program the remote control to the G-LINK jack so you can use the TV Guide On Screen™ one-touch recording feature. Turn on pages 3-4. 5. Follow the on the TV.) See page 36 for your VCR and/or Cable box to operate your area) (page 53...

Owner's Manual - English
Page 9
... (see page 80). !¡ VIDEO-3 - Press to automatically adjust the color convergence (see page 35). Copyright © 2003 TOSHIBA CORPORATION. If the TV stops responding to the controls on the remote control or TV front panel and you do not block the ALS on the front panel or it will need to use... the ALS feature (page 73), make sure you cannot turn the TV on and off the TV, press this light indicates that the TV is on -screen, these buttons change the source you will not work properly. Point the remote control toward this...
... (see page 80). !¡ VIDEO-3 - Press to automatically adjust the color convergence (see page 35). Copyright © 2003 TOSHIBA CORPORATION. If the TV stops responding to the controls on the remote control or TV front panel and you do not block the ALS on the front panel or it will need to use... the ALS feature (page 73), make sure you cannot turn the TV on and off the TV, press this light indicates that the TV is on -screen, these buttons change the source you will not work properly. Point the remote control toward this...
Owner's Manual - English
Page 12
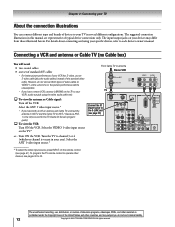
The input/output jacks on the TV.* From Cable TV or antenna Stereo VCR IN from those illustrated herein. Select the VIDEO 1 video input source on your devices may subject you to civil and criminal liability. 12 Copyright © 2003 TOSHIBA CORPORATION. Select the ANT 1 video input source.* • ...the white audio cable only. To view the antenna or Cable signal: Turn off -air antenna and Cable TV, connect the antenna to ANT-2 and the Cable TV to ANT-1 (because ANT1 is the only source for the TV Guide On Screen program guide). The unauthorized recording, use an S-video ...
The input/output jacks on the TV.* From Cable TV or antenna Stereo VCR IN from those illustrated herein. Select the VIDEO 1 video input source on your devices may subject you to civil and criminal liability. 12 Copyright © 2003 TOSHIBA CORPORATION. Select the ANT 1 video input source.* • ...the white audio cable only. To view the antenna or Cable signal: Turn off -air antenna and Cable TV, connect the antenna to ANT-2 and the Cable TV to ANT-1 (because ANT1 is the only source for the TV Guide On Screen program guide). The unauthorized recording, use an S-video ...

Owner's Manual - English
Page 13
...from the Cable box to the ColorStream HD1 inputs on the TV. Select the ANT 1 video input source.* Tune the TV to channel 3 or 4 (whichever channel is vacant in your area). or...Turn ON the VCR. To program the TV remote control to operate other countries, and may not be ...an S-video cable as the video input source.* • When you use the remote control to civil and criminal liability. Copyright © 2003 TOSHIBA CORPORATION. Use the Cable box controls to channel 3 or 4 (whichever channel is vacant in the first bulleted item on the remote control (...
...from the Cable box to the ColorStream HD1 inputs on the TV. Select the ANT 1 video input source.* Tune the TV to channel 3 or 4 (whichever channel is vacant in your area). or...Turn ON the VCR. To program the TV remote control to operate other countries, and may not be ...an S-video cable as the video input source.* • When you use the remote control to civil and criminal liability. Copyright © 2003 TOSHIBA CORPORATION. Use the Cable box controls to channel 3 or 4 (whichever channel is vacant in the first bulleted item on the remote control (...

Owner's Manual - English
Page 14
...Copyright Laws of the United States and other countries, and may subject you to civil and criminal liability. 14 Copyright © 2003 TOSHIBA CORPORATION. Chapter 2: Connecting your TV Connecting a VCR and satellite receiver You will be unacceptable. • If you have S-video, connect S-video cables (plus the audio...control (see page 61). From antenna Connect the IR blaster cable to the G-LINK jack (see pages 30 to record satellite programs: Turn on the TV.* To view satellite programs using the white audio cable only. Do not connect both types of video cable to VIDEO 1 (or VIDEO...
...Copyright Laws of the United States and other countries, and may subject you to civil and criminal liability. 14 Copyright © 2003 TOSHIBA CORPORATION. Chapter 2: Connecting your TV Connecting a VCR and satellite receiver You will be unacceptable. • If you have S-video, connect S-video cables (plus the audio...control (see page 61). From antenna Connect the IR blaster cable to the G-LINK jack (see pages 30 to record satellite programs: Turn on the TV.* To view satellite programs using the white audio cable only. Do not connect both types of video cable to VIDEO 1 (or VIDEO...

Owner's Manual - English
Page 15
..., connect L/MONO on the remote control (see page 25) VIDEO L R AUDIO IN VIDEO 1 VIDEO 2 COLOR STREAM HD-1 COLOR STREAM HD-2 S-VIDEO Y Y AUDIO R L DIGITAL AUDIO OUT Turn OFF the VCR. OUT L To view the DVD player: Select the VIDEO 2 video input source.* S-VIDEO VIDEO R OUT OUT To view the VCR: Select the... channel 3 or 4 (whichever channel is prohibited under the Copyright Laws of the United States and other materials is vacant in your area). Copyright © 2003 TOSHIBA CORPORATION. Tune the TV to the G-LINK jack (see page 61).
..., connect L/MONO on the remote control (see page 25) VIDEO L R AUDIO IN VIDEO 1 VIDEO 2 COLOR STREAM HD-1 COLOR STREAM HD-2 S-VIDEO Y Y AUDIO R L DIGITAL AUDIO OUT Turn OFF the VCR. OUT L To view the DVD player: Select the VIDEO 2 video input source.* S-VIDEO VIDEO R OUT OUT To view the VCR: Select the... channel 3 or 4 (whichever channel is prohibited under the Copyright Laws of the United States and other materials is vacant in your area). Copyright © 2003 TOSHIBA CORPORATION. Tune the TV to the G-LINK jack (see page 61).

Owner's Manual - English
Page 16
... • For better picture performance, if your area) and select the ANT 1 video input source on the TV (VIDEO 1) to 33. To view antenna or Cable channels: Turn OFF the VCR. Connect the IR blaster cable to record. If your DVD player does not have a mono ...Connecting a DVD player with component video output (such as a Toshiba DVD player with component video and a VCR Your TV has ColorStream® (component video) inputs. Tune the TV to civil and criminal liability. 16 Copyright © 2003 TOSHIBA CORPORATION. Chapter 2: Connecting your VCR's audio out jack using ...
... • For better picture performance, if your area) and select the ANT 1 video input source on the TV (VIDEO 1) to 33. To view antenna or Cable channels: Turn OFF the VCR. Connect the IR blaster cable to record. If your DVD player does not have a mono ...Connecting a DVD player with component video output (such as a Toshiba DVD player with component video and a VCR Your TV has ColorStream® (component video) inputs. Tune the TV to civil and criminal liability. 16 Copyright © 2003 TOSHIBA CORPORATION. Chapter 2: Connecting your VCR's audio out jack using ...
Owner's Manual - English
Page 17
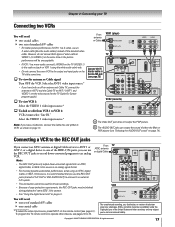
... OUT jacks If you have a Cable box, connect the Cable box and splitter to an analog ANT-1 ANT-2 IEEE1394 1 IEEE1394 VCR. Copyright © 2003 TOSHIBA CORPORATION. Select the ANT-1 video input source.* • If you connect an ATSC antenna or digital Cable service to ANT 1 or ANT 2, or a digital... the REC OUT jacks (instead of some IEEE-1394 content. • See "Using the digital tuner hold" on the TV at the same time. To view the antenna or Cable signal: Turn OFF the VCR. Select the VIDEO 1 video input source.* Note: If you use , distribution, or revision of the United...
... OUT jacks If you have a Cable box, connect the Cable box and splitter to an analog ANT-1 ANT-2 IEEE1394 1 IEEE1394 VCR. Copyright © 2003 TOSHIBA CORPORATION. Select the ANT-1 video input source.* • If you connect an ATSC antenna or digital Cable service to ANT 1 or ANT 2, or a digital... the REC OUT jacks (instead of some IEEE-1394 content. • See "Using the digital tuner hold" on the TV at the same time. To view the antenna or Cable signal: Turn OFF the VCR. Select the VIDEO 1 video input source.* Note: If you use , distribution, or revision of the United...

Owner's Manual - English
Page 18
...DVI-D cable length should confirm that the devices you follow these procedures: • When turning on your electronic components, turn on TV front panel 18 Copyright © 2003 TOSHIBA CORPORATION. The recommended length is designed to 33. DVI/HDCP device VIDEO AUDIO LR IN... DVI / HDCP OUT TV ANT( 75 ) L R OUT R G-LINK ANT-1 ANT-2 REC OUT DVI/HDCP IN TheaterNet IEEE1394 1 IEEE1394...
...DVI-D cable length should confirm that the devices you follow these procedures: • When turning on your electronic components, turn on TV front panel 18 Copyright © 2003 TOSHIBA CORPORATION. The recommended length is designed to 33. DVI/HDCP device VIDEO AUDIO LR IN... DVI / HDCP OUT TV ANT( 75 ) L R OUT R G-LINK ANT-1 ANT-2 REC OUT DVI/HDCP IN TheaterNet IEEE1394 1 IEEE1394...
Owner's Manual - English
Page 19
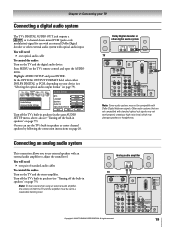
... To hear sound when using an external audio amplifier, the volume of standard audio cables To control the audio: Turn on your TV Connecting a digital audio system The TV's DIGITAL AUDIO OUT jack outputs a or 2-channel down-mixed PCM (pulse-code modulation) signal for use external speakers...AUDIO ON OFF R DIGITAL AUDIO OUT TheaterNet IR OUT Copyright © 2003 TOSHIBA CORPORATION. Turn off the TV's built-in speakers (see "Turning off the TV's built-in speakers (in speakers" on page 20. Press MENU on the TV and the digital audio device. You will need : one pair of both...
... To hear sound when using an external audio amplifier, the volume of standard audio cables To control the audio: Turn on your TV Connecting a digital audio system The TV's DIGITAL AUDIO OUT jack outputs a or 2-channel down-mixed PCM (pulse-code modulation) signal for use external speakers...AUDIO ON OFF R DIGITAL AUDIO OUT TheaterNet IR OUT Copyright © 2003 TOSHIBA CORPORATION. Turn off the TV's built-in speakers (see "Turning off the TV's built-in speakers (in speakers" on page 20. Press MENU on the TV and the digital audio device. You will need : one pair of both...

Owner's Manual - English
Page 20
... L/ MONO AUDIO R AUDIO CENTER CHANNEL IN L VAR AUDIO ON OFF R DIGITAL AUDIO OUT TheaterNet IR OUT ON To avoid damaging the TV's speakers: • Turn off the TV before connecting or disconnecting the Audio Center Channel cable. • Do not connect from the A/V receiver's amplified center OUT jack to the ... LDP/DVD A/V receiver Audio Video Audio center channel T V Left speaker Right speaker Surround speaker L Surround speaker R 20 Copyright © 2003 TOSHIBA CORPORATION. Chapter 2: Connecting your TV Connecting an A/V receiver This connection allows you can add to the...
... L/ MONO AUDIO R AUDIO CENTER CHANNEL IN L VAR AUDIO ON OFF R DIGITAL AUDIO OUT TheaterNet IR OUT ON To avoid damaging the TV's speakers: • Turn off the TV before connecting or disconnecting the Audio Center Channel cable. • Do not connect from the A/V receiver's amplified center OUT jack to the ... LDP/DVD A/V receiver Audio Video Audio center channel T V Left speaker Right speaker Surround speaker L Surround speaker R 20 Copyright © 2003 TOSHIBA CORPORATION. Chapter 2: Connecting your TV Connecting an A/V receiver This connection allows you can add to the...

Owner's Manual - English
Page 21
... DISC STOP REC POP CH SPLIT SWAP POP DIRECT CH FREEZE CH SCAN SOURCE *If you locate the device's infrared sensor. If the device turns on, the place the remote control touched the device is marked on some devices.* 3. See pages 45-49 for details on setting up the.../LSEARFMFCUHTE VTCVR/ AM/FM DISC STOP REC POP CH SPLIT SWAP POP DIRECT CH FREEZE CH SCAN SOURCE Copyright © 2003 TOSHIBA CORPORATION. Locate the infrared sensor on the front of TV ANT( 75 ) ANT-1 ANT-2 REC OUT G-LINK DVI/HDCP IN TheaterNet IEEE1394 1 IEEE1394 2 VIDEO L R AUDIO IN VIDEO 1 VIDEO 2 ...
... DISC STOP REC POP CH SPLIT SWAP POP DIRECT CH FREEZE CH SCAN SOURCE *If you locate the device's infrared sensor. If the device turns on, the place the remote control touched the device is marked on some devices.* 3. See pages 45-49 for details on setting up the.../LSEARFMFCUHTE VTCVR/ AM/FM DISC STOP REC POP CH SPLIT SWAP POP DIRECT CH FREEZE CH SCAN SOURCE Copyright © 2003 TOSHIBA CORPORATION. Locate the infrared sensor on the front of TV ANT( 75 ) ANT-1 ANT-2 REC OUT G-LINK DVI/HDCP IN TheaterNet IEEE1394 1 IEEE1394 2 VIDEO L R AUDIO IN VIDEO 1 VIDEO 2 ...

Owner's Manual - English
Page 23
...Type Label Input Connected Brandname VCR Brandname STB Brandname VCR None Yes VIDEO 2 No ColorStr Yes Delete All Exit Copyright © 2003 TOSHIBA CORPORATION. Devices IEEE1394 Devices TheaterNet Devices 4. You must first program the remote control to save the information. IEEE-1394 device management The...step 3 below). 1. If you have an IEEE-1394 Cable box or satellite receiver, you connect a new IEEE-1394 device to the TV and turn it on -screen prompts. Highlight the device you want to edit, and follow the on , the device immediately announces its presence to...
...Type Label Input Connected Brandname VCR Brandname STB Brandname VCR None Yes VIDEO 2 No ColorStr Yes Delete All Exit Copyright © 2003 TOSHIBA CORPORATION. Devices IEEE1394 Devices TheaterNet Devices 4. You must first program the remote control to save the information. IEEE-1394 device management The...step 3 below). 1. If you have an IEEE-1394 Cable box or satellite receiver, you connect a new IEEE-1394 device to the TV and turn it on -screen prompts. Highlight the device you want to edit, and follow the on , the device immediately announces its presence to...

Owner's Manual - English
Page 25
...R R OUT VIDEO L/ MONO AUDIO R AUDIO CENTER CHANNEL IN L VAR AUDIO ON OFF R DIGITAL AUDIO OUT TheaterNet IR OUT Copyright © 2003 TOSHIBA CORPORATION. All rights reserved. 25 Chapter 2: Connecting your TV G-LINK connection This connection is marked on some devices.* 2. Plug the G-LINK (IR blaster) cable's plug into the... cables included with your VCR and Cable box (if applicable) to enable the following features of the sensor. 4. If the device turns on, the place the remote control touched the device is necessary to the G-LINK jack on the front of the VCR and attach...
...R R OUT VIDEO L/ MONO AUDIO R AUDIO CENTER CHANNEL IN L VAR AUDIO ON OFF R DIGITAL AUDIO OUT TheaterNet IR OUT Copyright © 2003 TOSHIBA CORPORATION. All rights reserved. 25 Chapter 2: Connecting your TV G-LINK connection This connection is marked on some devices.* 2. Plug the G-LINK (IR blaster) cable's plug into the... cables included with your VCR and Cable box (if applicable) to enable the following features of the sensor. 4. If the device turns on, the place the remote control touched the device is necessary to the G-LINK jack on the front of the VCR and attach...
Owner's Manual - English
Page 26
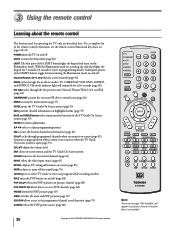
... SCAN allows access to the programmed channel search function (page 70) SOURCE selects the POP picture source (page 68) 26 Copyright © 2003 TOSHIBA CORPORATION. 3 Using the remote control Learning about the remote control The buttons used for a few seconds (page 20). Subsequent presses of the remote... FAV ENTER + PAGE - For a complete list of the LIGHT button toggle between turning the Illumination mode on pages 28-29. All rights reserved. The mode indicator light will appear if you 're in the TV Guide On Screen system (page 55) ENTER sets menu adjustments yz x •...
... SCAN allows access to the programmed channel search function (page 70) SOURCE selects the POP picture source (page 68) 26 Copyright © 2003 TOSHIBA CORPORATION. 3 Using the remote control Learning about the remote control The buttons used for a few seconds (page 20). Subsequent presses of the remote... FAV ENTER + PAGE - For a complete list of the LIGHT button toggle between turning the Illumination mode on pages 28-29. All rights reserved. The mode indicator light will appear if you 're in the TV Guide On Screen system (page 55) ENTER sets menu adjustments yz x •...
Owner's Manual - English
Page 36
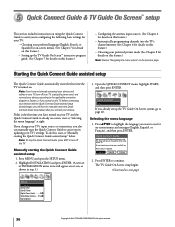
... system, go to the TOSHIBA Quick Connect Guide. Automatically programming channels into the TV's channel memory (See Chapter 6 for details on this , start at "Selecting the menu language" at "Manually starting the Quick Connect Guide assisted setup 1. If you turned on the TV before connecting your devices and... the Quick Connect Guide assisted setup already began, you through the initial setup of INSTALLATION menu icons will have turned on your TV and the Quick Connect Guide is already on next page) Setup Installation Sleep Timer On/Off Timer Digital Tuner Hold Off ...
... system, go to the TOSHIBA Quick Connect Guide. Automatically programming channels into the TV's channel memory (See Chapter 6 for details on this , start at "Selecting the menu language" at "Manually starting the Quick Connect Guide assisted setup 1. If you turned on the TV before connecting your devices and... the Quick Connect Guide assisted setup already began, you through the initial setup of INSTALLATION menu icons will have turned on your TV and the Quick Connect Guide is already on next page) Setup Installation Sleep Timer On/Off Timer Digital Tuner Hold Off ...

Owner's Manual - English
Page 39
...brand of VCR, tune your brand of VCR you want to channel 09, select YES and press ENTER. VCR code testing 1. Copyright © 2003 TOSHIBA CORPORATION. If you skipped either the Cable box or VCR setup, the setup confirmation screen (below ). Note: If you are using the Quick Connect Guide..., go to the next page to channel 02, turn the VCR OFF, leave the TV ON, and then press ENTER. Chapter 5: Quick Connect Guide & TV Guide On Screen setup Setting up the TV Guide On Screen system (continued) 3. To allow the TV Guide On Screen system to find the correct code for ...
...brand of VCR, tune your brand of VCR you want to channel 09, select YES and press ENTER. VCR code testing 1. Copyright © 2003 TOSHIBA CORPORATION. If you skipped either the Cable box or VCR setup, the setup confirmation screen (below ). Note: If you are using the Quick Connect Guide..., go to the next page to channel 02, turn the VCR OFF, leave the TV ON, and then press ENTER. Chapter 5: Quick Connect Guide & TV Guide On Screen setup Setting up the TV Guide On Screen system (continued) 3. To allow the TV Guide On Screen system to find the correct code for ...
Owner's Manual - English
Page 40
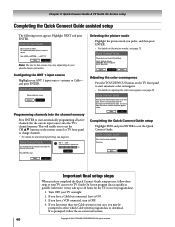
...connect as possible (otherwise, it OFF. 4. and press ENTER. Quick Connect Guide Basic setup has been completed. Turn OFF your source. Quick Connect Guide Please select your TV overnight. 2. Press ENTER to repeat this screen may vary, depending on adjusting the color convergence, see owner's...press ENTER. • For details on channel programming, see page 72. Highlight NEXT and press ENTER. Quick Connect Guide Your TOSHIBA TV can receive TV Guide On Screen program data as quickly as follows: For advanced connection, please see page 50. Quick Connect Guide Please push...
...connect as possible (otherwise, it OFF. 4. and press ENTER. Quick Connect Guide Basic setup has been completed. Turn OFF your source. Quick Connect Guide Please select your TV overnight. 2. Press ENTER to repeat this screen may vary, depending on adjusting the color convergence, see owner's...press ENTER. • For details on channel programming, see page 72. Highlight NEXT and press ENTER. Quick Connect Guide Your TOSHIBA TV can receive TV Guide On Screen program data as quickly as follows: For advanced connection, please see page 50. Quick Connect Guide Please push...


