

User Guide
Page 2
... life" flat panel display. CHILD SAFETY: It Makes A Difference How and Where You Use Your Flat Panel Display Congratulations on page 4. However, flat panel displays are not always supported on the proper stands or installed according to the manufacturer's recommendations. • Flat panel displays that has been Listed by an independent laboratory (such as UL, CSA, ETL) and is appropriate for the size and weight of this television, always use a mounting bracket that...
... life" flat panel display. CHILD SAFETY: It Makes A Difference How and Where You Use Your Flat Panel Display Congratulations on page 4. However, flat panel displays are not always supported on the proper stands or installed according to the manufacturer's recommendations. • Flat panel displays that has been Listed by an independent laboratory (such as UL, CSA, ETL) and is appropriate for the size and weight of this television, always use a mounting bracket that...
User Guide
Page 3
... a toxic liquid. Installation, Care, and Service Installation Follow these instructions. 3) Heed all warnings. 4) Follow all times. • Keep the product away from direct sunlight, fire or a heat source such as power-supply cord or plug is dropped and the cabinet or enclosure surface has been damaged or the TV does not operate normally, take the following precautions: • ALWAYS turn off the...
... a toxic liquid. Installation, Care, and Service Installation Follow these instructions. 3) Heed all warnings. 4) Follow all times. • Keep the product away from direct sunlight, fire or a heat source such as power-supply cord or plug is dropped and the cabinet or enclosure surface has been damaged or the TV does not operate normally, take the following precautions: • ALWAYS turn off the...
User Guide
Page 5
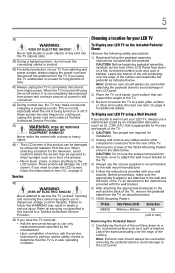
... to wall mount your TV from lightning and power surges, always unplug the power cord and disconnect the antenna from the rear of the TV. 3) Remove the screws of the LCD Panel face down on the LCD screen. Failure to follow the instructions in the table below . When the TV is appropriate for additional details. CAUTION: Before beginning pedestal assembly, carefully lay the front of the VESA Mounting Pattern...
... to wall mount your TV from lightning and power surges, always unplug the power cord and disconnect the antenna from the rear of the TV. 3) Remove the screws of the LCD Panel face down on the LCD screen. Failure to follow the instructions in the table below . When the TV is appropriate for additional details. CAUTION: Before beginning pedestal assembly, carefully lay the front of the VESA Mounting Pattern...
User Guide
Page 6
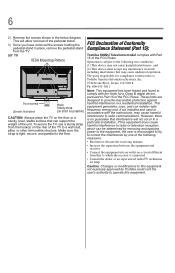
... (Part 15): Toshiba 50M2U Television model complies with the instructions, may cause undesired operation. Make sure the strap is tight, secure, and parallel to provide reasonable protection against harmful interference in a particular installation. These limits are designed to the floor. However, there is encouraged to try to correct the interference by removing and applying power to the equipment, the user is...
... (Part 15): Toshiba 50M2U Television model complies with the instructions, may cause undesired operation. Make sure the strap is tight, secure, and parallel to provide reasonable protection against harmful interference in a particular installation. These limits are designed to the floor. However, there is encouraged to try to correct the interference by removing and applying power to the equipment, the user is...

User Guide
Page 7
... Premium Television™ are registered U.S. Changing Picture Settings may not work with this television meet ENERGY STAR® requirements. Note: Interactive video games that earn the ENERGY STAR prevent green house gas emissions by meeting strict guidelines set by small speakers and drivers. and/or Toshiba Corporation. •Audyssey EQ® provides clear, accurate, and natural sound right out of light) that remove the acoustical problems caused...
... Premium Television™ are registered U.S. Changing Picture Settings may not work with this television meet ENERGY STAR® requirements. Note: Interactive video games that earn the ENERGY STAR prevent green house gas emissions by meeting strict guidelines set by small speakers and drivers. and/or Toshiba Corporation. •Audyssey EQ® provides clear, accurate, and natural sound right out of light) that remove the acoustical problems caused...
User Guide
Page 10
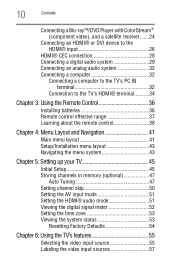
... 41 Setup/Installation menu layout 43 Navigating the menu system 43 Chapter 5: Setting up your TV 45 Initial Setup 45 Storing channels in memory (optional 47 Auto Tuning 47 Setting channel skip 50 Setting the AV input mode 51 Setting the HDMI® audio mode 51 Viewing the digital signal meter 52 Setting the time zone 53 Viewing the system status 53 Resetting Factory Defaults 54 Chapter 6: Using the TV's features 55 Selecting the video input source 55 Labeling the video input sources...
... 41 Setup/Installation menu layout 43 Navigating the menu system 43 Chapter 5: Setting up your TV 45 Initial Setup 45 Storing channels in memory (optional 47 Auto Tuning 47 Setting channel skip 50 Setting the AV input mode 51 Setting the HDMI® audio mode 51 Viewing the digital signal meter 52 Setting the time zone 53 Viewing the system status 53 Resetting Factory Defaults 54 Chapter 6: Using the TV's features 55 Selecting the video input source 55 Labeling the video input sources...
User Guide
Page 13
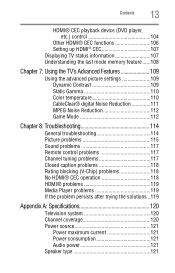
... 111 MPEG Noise Reduction 112 Game Mode 112 Chapter 8: Troubleshooting 114 General troubleshooting 114 Picture problems 115 Sound problems 117 Remote control problems 117 Channel tuning problems 117 Closed caption problems 118 Rating blocking (V-Chip) problems 118 No HDMI® CEC operation 118 HDMI® problems 119 Media Player problems 119 If the problem persists after trying the solutions ..119 Appendix A: Specifications 120 Television system 120 Channel coverage 120 Power source 121 Power maximum current 121 Power consumption 121 Audio power 121 Speaker type 121
... 111 MPEG Noise Reduction 112 Game Mode 112 Chapter 8: Troubleshooting 114 General troubleshooting 114 Picture problems 115 Sound problems 117 Remote control problems 117 Channel tuning problems 117 Closed caption problems 118 Rating blocking (V-Chip) problems 118 No HDMI® CEC operation 118 HDMI® problems 119 Media Player problems 119 If the problem persists after trying the solutions ..119 Appendix A: Specifications 120 Television system 120 Channel coverage 120 Power source 121 Power maximum current 121 Power consumption 121 Audio power 121 Speaker type 121
User Guide
Page 19
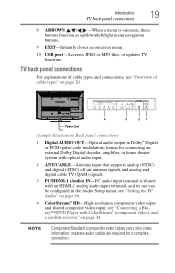
... receiver" on page 20. HGRD500000I IN VIDEO/COLOR STREAM HD Y/VIDEO Power Cord 4 3 21 (Sample Illustration) Back panel connections 1 Digital AUDIO OUT-Optical audio output in the Audio Setup menu, see "Setting the PC Audio" on page 94. 4 ColorStream® HD-High-resolution component video input and shared composite video input, see "Overview of cable types and connections, see "Connecting a Bluray™/DVD Player with an HDMI-1 analog audio input terminal, and its use can be configured in Dolby® Digital or PCM (pulse-code modulation) format for...
... receiver" on page 20. HGRD500000I IN VIDEO/COLOR STREAM HD Y/VIDEO Power Cord 4 3 21 (Sample Illustration) Back panel connections 1 Digital AUDIO OUT-Optical audio output in the Audio Setup menu, see "Setting the PC Audio" on page 94. 4 ColorStream® HD-High-resolution component video input and shared composite video input, see "Overview of cable types and connections, see "Connecting a Bluray™/DVD Player with an HDMI-1 analog audio input terminal, and its use can be configured in Dolby® Digital or PCM (pulse-code modulation) format for...

User Guide
Page 23
... camcorder video. Select VIDEO input source on the TV.* To view basic and premium cable channels: Turn Off the VCR. Use the cable box controls to change channels. Select the ANT/CABLE video input source on the TV. When you may not be able to use ColorStream® HD or Video, switch AV input mode appropriately. Connecting Your TV 23 Connecting a VCR, antenna, cable TV, or camcorder Connecting a VCR, antenna, cable TV, or camcorder Camcorder AUDIO OUT L R VIDEO TV back panel IN VIDEO/COLOR STREAM...
... camcorder video. Select VIDEO input source on the TV.* To view basic and premium cable channels: Turn Off the VCR. Use the cable box controls to change channels. Select the ANT/CABLE video input source on the TV. When you may not be able to use ColorStream® HD or Video, switch AV input mode appropriately. Connecting Your TV 23 Connecting a VCR, antenna, cable TV, or camcorder Connecting a VCR, antenna, cable TV, or camcorder Camcorder AUDIO OUT L R VIDEO TV back panel IN VIDEO/COLOR STREAM...
User Guide
Page 25
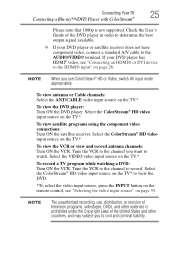
... the remote control, see "Connecting an HDMI® or DVI device to watch. Tune the VCR to the channel to the AUDIO/VIDEO terminal. If your DVD player or satellite receiver does not have component video, connect a standard A/V cable to record. Check the User's Guide of the DVD player in order to determine the best output signal available. ❖ If your DVD player has HDMI® video, see "Selecting the video input source" on the TV.* To view the DVD player: Turn...
... the remote control, see "Connecting an HDMI® or DVI device to watch. Tune the VCR to the channel to the AUDIO/VIDEO terminal. If your DVD player or satellite receiver does not have component video, connect a standard A/V cable to record. Check the User's Guide of the DVD player in order to determine the best output signal available. ❖ If your DVD player has HDMI® video, see "Selecting the video input source" on the TV.* To view the DVD player: Turn...

User Guide
Page 29
... operation, it is recommended that are connected, HDMI® CEC Control feature may not work properly depending on page 106. ❖ The connected devices must also be configured. Connecting a digital audio system The TV's DIGITAL AUDIO OUT terminal outputs a Dolby® Digital or 2-channel down-mixed PCM (pulse-code modulation) signal for use an HDMI® cable with optical audio input. However, Toshiba is limited to the individual instruction manuals for those operations. Connecting Your TV 29 Connecting a digital audio...
... operation, it is recommended that are connected, HDMI® CEC Control feature may not work properly depending on page 106. ❖ The connected devices must also be configured. Connecting a digital audio system The TV's DIGITAL AUDIO OUT terminal outputs a Dolby® Digital or 2-channel down-mixed PCM (pulse-code modulation) signal for use an HDMI® cable with optical audio input. However, Toshiba is limited to the individual instruction manuals for those operations. Connecting Your TV 29 Connecting a digital audio...

User Guide
Page 43
... System Status Item Input Configuration Channel Program Channel Options Time Zone Signal Meter System Information Option Opens the Input Configuration menu Start Scan > Scans for new channels on ANT/CABLE Opens the Skip/Lock Channel menu Eastern/Newfoundland/Atlantic/Hawaii/ Alaska/Pacific/Mountain/Central Opens the Signal Meter menu Opens the System Information screen Navigating the menu system You can use the buttons on the remote control or TV control panel to access and navigate your...
... System Status Item Input Configuration Channel Program Channel Options Time Zone Signal Meter System Information Option Opens the Input Configuration menu Start Scan > Scans for new channels on ANT/CABLE Opens the Skip/Lock Channel menu Eastern/Newfoundland/Atlantic/Hawaii/ Alaska/Pacific/Mountain/Central Opens the Signal Meter menu Opens the System Information screen Navigating the menu system You can use the buttons on the remote control or TV control panel to access and navigate your...

User Guide
Page 45
... Menu Language field, press the ( / arrow) buttons to select your desired time zone, using the ( / arrow) buttons and press the ENTER button. The ANT/CABLE In setup window appears. 4 Press the ( / arrow) buttons to select the input source (Cable or Antenna), and then press ENTER. 5 Press the ENTER button to select Home, and then press the ENTER button. Chapter 5 Setting up your TV Initial Setup When you turn...
... Menu Language field, press the ( / arrow) buttons to select your desired time zone, using the ( / arrow) buttons and press the ENTER button. The ANT/CABLE In setup window appears. 4 Press the ( / arrow) buttons to select the input source (Cable or Antenna), and then press ENTER. 5 Press the ENTER button to select Home, and then press the ENTER button. Chapter 5 Setting up your TV Initial Setup When you turn...

User Guide
Page 51
... channel list while programming channels, you can remove the unwanted encrypted (non-viewable) channel while you are channel surfing. however, they can set the HDMI® audio mode: 1 Press the MENU button and open the Sound menu. 2 Highlight Audio Setup, and then press the ENTER button. 3 Press the ( / arrow) buttons to select HDMI 1 Audio, and then press the ( / arrow) buttons to select the HDMI 1 audio mode (Auto, Digital, or Analog). (Auto is accidentally added to remove the unnecessary channel from the channel list. Setting...
... channel list while programming channels, you can remove the unwanted encrypted (non-viewable) channel while you are channel surfing. however, they can set the HDMI® audio mode: 1 Press the MENU button and open the Sound menu. 2 Highlight Audio Setup, and then press the ENTER button. 3 Press the ( / arrow) buttons to select HDMI 1 Audio, and then press the ( / arrow) buttons to select the HDMI 1 audio mode (Auto, Digital, or Analog). (Auto is accidentally added to remove the unnecessary channel from the channel list. Setting...

User Guide
Page 52
... "Auto." If PC Audio is set to "No" the HDMI 1 Audio setting changes to "Digital" and is grayed out in the ANT/CABLE digital TV input source only. To view the digital signal meter: 1 Press the MENU button and open the Setup menu. If not, the TV will be output. 4 To save the setting, highlight Done, and then press the ENTER button. Viewing the digital signal meter You can view the digital signal meter in the menu. When viewing the HDMI 1 input, analog audio...
... "Auto." If PC Audio is set to "No" the HDMI 1 Audio setting changes to "Digital" and is grayed out in the ANT/CABLE digital TV input source only. To view the digital signal meter: 1 Press the MENU button and open the Setup menu. If not, the TV will be output. 4 To save the setting, highlight Done, and then press the ENTER button. Viewing the digital signal meter You can view the digital signal meter in the menu. When viewing the HDMI 1 input, analog audio...

User Guide
Page 82
... the Sound menu. 2 Highlight Audio Setup, and then press the ENTER button. 3 In the Optical Output Format field, select either Compressed or Standard. When Standard is tuned to a digital RF channel with minimal compression. 4 To save the new settings, highlight Done, and then press the ENTER button. To reset the settings to the factory defaults, highlight Reset, and then press the ENTER button. To reset the settings to the factory defaults, highlight Reset...
... the Sound menu. 2 Highlight Audio Setup, and then press the ENTER button. 3 In the Optical Output Format field, select either Compressed or Standard. When Standard is tuned to a digital RF channel with minimal compression. 4 To save the new settings, highlight Done, and then press the ENTER button. To reset the settings to the factory defaults, highlight Reset, and then press the ENTER button. To reset the settings to the factory defaults, highlight Reset...

User Guide
Page 95
...; Maximum photo size: 6 MB ❖ Maximum number of analog audio inputs, the PC Audio menu setting influences the HDMI 1 Audio menu setting. NOTE Because the PC and HDMI 1 inputs share the same set to "No" the HDMI 1 Audio setting changes to select No or Yes. ❖ Yes: When viewing the PC input, the audio from 8 to "Digital" and is set of files: 500/folder ❖ Maximum photo resolution: 4096 x 4096 pixels Music Player specifications: ❖ File format: MP3...
...; Maximum photo size: 6 MB ❖ Maximum number of analog audio inputs, the PC Audio menu setting influences the HDMI 1 Audio menu setting. NOTE Because the PC and HDMI 1 inputs share the same set to "No" the HDMI 1 Audio setting changes to select No or Yes. ❖ Yes: When viewing the PC input, the audio from 8 to "Digital" and is set of files: 500/folder ❖ Maximum photo resolution: 4096 x 4096 pixels Music Player specifications: ❖ File format: MP3...

User Guide
Page 114
Black box on the remote control or TV control panel and you cause a static discharge when touching the TV and the TV fails to normal operation. 114 TV stops responding to Off, see "Using closed captions" on the TV control panel for the problem you begin to one minute, and then plug the TV back into the AC wall outlet. If the TV does not power off...
Black box on the remote control or TV control panel and you cause a static discharge when touching the TV and the TV fails to normal operation. 114 TV stops responding to Off, see "Using closed captions" on the TV control panel for the problem you begin to one minute, and then plug the TV back into the AC wall outlet. If the TV does not power off...

User Guide
Page 115
... an analog channel (off-air broadcast or Cable TV), you can set to Off, see "Using the Locks menu" on the TV. Use a highly directional outdoor antenna (if applicable). Press the INPUT button on the remote control or on the TV and select a valid video input source, see "Selecting the video input source" on page 109. Adjust the picture quality, see "Using the advanced picture settings" on page 55. Cannot view external signals or channel 3 or 4. Troubleshooting Picture problems 115 Other problems...
... an analog channel (off-air broadcast or Cable TV), you can set to Off, see "Using the Locks menu" on the TV. Use a highly directional outdoor antenna (if applicable). Press the INPUT button on the remote control or on the TV and select a valid video input source, see "Selecting the video input source" on page 109. Adjust the picture quality, see "Using the advanced picture settings" on page 55. Cannot view external signals or channel 3 or 4. Troubleshooting Picture problems 115 Other problems...

User Guide
Page 130
... program ratings displaying 88 unlocking programs 90 Q quick setup ANT/CABLE IN 46 menu language 46 R rating system 87 downloading additional 86 S safety icons 15 scrolling TheaterWide® picture 70 specifications acceptable signal formats 122 audio power 121 channel coverage 120 ColorStream® HD input 121 Digital audio output 122 dimensions 122 HDMI® input 121 HDMI® signal formats 123 mass (weight) 122 operating conditions 122 PC IN signal formats 122 PC input 122 power consumption 121 power maximum current 121 power source 121 speaker type...
... program ratings displaying 88 unlocking programs 90 Q quick setup ANT/CABLE IN 46 menu language 46 R rating system 87 downloading additional 86 S safety icons 15 scrolling TheaterWide® picture 70 specifications acceptable signal formats 122 audio power 121 channel coverage 120 ColorStream® HD input 121 Digital audio output 122 dimensions 122 HDMI® input 121 HDMI® signal formats 123 mass (weight) 122 operating conditions 122 PC IN signal formats 122 PC input 122 power consumption 121 power maximum current 121 power source 121 speaker type...


