Installation Guide - English
Page 8
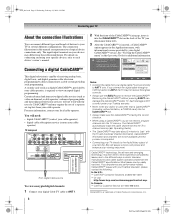
... CableCARD™ This digital television is capable of Cable Television Laboratories, Inc. Such damage is NOT covered under your Toshiba warranty. • Never insert any performance-related CableCARD™ issues with informational screens provided by direct connection to view...operator) • digital cable subscription service (contact your cable operator) TV back panel From digital Cable service To view encrypted digital channels: 1 Connect your digital Cable TV cable to program channels into the TV memory. DLP_Inst.book Page 8 Wednesday, February 22, 2006 6:18 ...
... CableCARD™ This digital television is capable of Cable Television Laboratories, Inc. Such damage is NOT covered under your Toshiba warranty. • Never insert any performance-related CableCARD™ issues with informational screens provided by direct connection to view...operator) • digital cable subscription service (contact your cable operator) TV back panel From digital Cable service To view encrypted digital channels: 1 Connect your digital Cable TV cable to program channels into the TV memory. DLP_Inst.book Page 8 Wednesday, February 22, 2006 6:18 ...
Installation Guide - English
Page 10
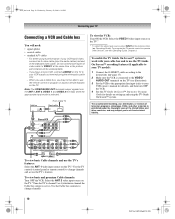
...and other countries, and may not be unacceptable. - Select the VIDEO 1 video input source on the TV.* * To select the video input source, press INPUT on the TV.* Use the TV controls (control panel or remote control) to the instructions (- DLP_Inst.book Page 10 Wednesday, February 22, 2006 6:18 ...PM Connecting your cable box and to use the TV's features: Select the ANT 1 video input source on the...
...and other countries, and may not be unacceptable. - Select the VIDEO 1 video input source on the TV.* * To select the video input source, press INPUT on the TV.* Use the TV controls (control panel or remote control) to the instructions (- DLP_Inst.book Page 10 Wednesday, February 22, 2006 6:18 ...PM Connecting your cable box and to use the TV's features: Select the ANT 1 video input source on the...
Installation Guide - English
Page 11
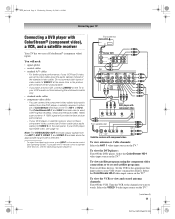
...PR Satellite S-VIDEO COMPONENT VIDEO IN OUT VIDEO OUT Satellite receiver with ColorStream® (component video), a VCR, and a satellite receiver Your TV has two sets of ColorStream® (component video) inputs. You can be unacceptable. - If your VCR's audio out terminal using the component... video connections or to VIDEO 2 on the side panel. Select the ColorStream HD-1 video input source on all three devices. Set the VCR to the appropriate line input (refer to your DVD...
...PR Satellite S-VIDEO COMPONENT VIDEO IN OUT VIDEO OUT Satellite receiver with ColorStream® (component video), a VCR, and a satellite receiver Your TV has two sets of ColorStream® (component video) inputs. You can be unacceptable. - If your VCR's audio out terminal using the component... video connections or to VIDEO 2 on the side panel. Select the ColorStream HD-1 video input source on all three devices. Set the VCR to the appropriate line input (refer to your DVD...
Installation Guide - English
Page 15
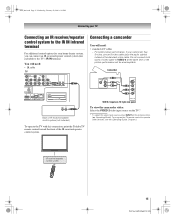
...AUDIO OUT L R OUT IN Back of IR receiver/repeater control system (not included) To operate the TV with this connection, point the Toshiba TV remote control toward the front of video cable to the TV's IR IN terminal. IR receiver/repeater control system 15 DLP Inst (E/F) Web 213:276 Operating Guide). ... cable. Do not connect both types of the IR receiver/repeater control system. VIDEO 2 inputs on TV right side panel To view the camcorder video: Select the VIDEO 2 video input source on the TV.* * To select the video input source, press INPUT on the remote control (- For better picture ...
...AUDIO OUT L R OUT IN Back of IR receiver/repeater control system (not included) To operate the TV with this connection, point the Toshiba TV remote control toward the front of video cable to the TV's IR IN terminal. IR receiver/repeater control system 15 DLP Inst (E/F) Web 213:276 Operating Guide). ... cable. Do not connect both types of the IR receiver/repeater control system. VIDEO 2 inputs on TV right side panel To view the camcorder video: Select the VIDEO 2 video input source on the TV.* * To select the video input source, press INPUT on the remote control (- For better picture ...
Installation Guide - English
Page 19
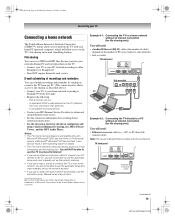
...(the number of cables depends on the number of PCs you connect to your network) • hub or switch TV back panel Hub or switch PC PC Example #2: Connecting the TV directly to a PC without an Internet connection (for file sharing only) You will need: • Ethernet crossover ...features. DLP_Inst.book Page 19 Wednesday, February 22, 2006 6:18 PM Connecting your TV Connecting a home network The Toshiba Home Interactive Network Connection (THINC™) feature allows you to network the TV with your home PC (personal computer), which will allow access to either registered trademarks ...
...(the number of cables depends on the number of PCs you connect to your network) • hub or switch TV back panel Hub or switch PC PC Example #2: Connecting the TV directly to a PC without an Internet connection (for file sharing only) You will need: • Ethernet crossover ...features. DLP_Inst.book Page 19 Wednesday, February 22, 2006 6:18 PM Connecting your TV Connecting a home network The Toshiba Home Interactive Network Connection (THINC™) feature allows you to network the TV with your home PC (personal computer), which will allow access to either registered trademarks ...
Installation Guide - English
Page 20
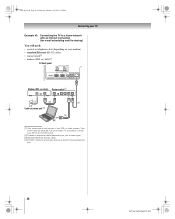
...IT professional. [2] Coaxial or telephone cable (depending on your modem) • standard Ethernet (RJ-45) cables • router/switch[1] • modem (DSL or cable)[2] TV back panel Modem (DSL or cable) Router/switch [1] [2] [3] [3] Cable or phone jack [4] [3] PC [1] Your router/switch may be separate from your modem type) [3] Standard...need: • coaxial or telephone cable (depending on your router. DLP_Inst.book Page 20 Wednesday, February 22, 2006 6:18 PM Connecting your TV Example #3: Connecting the TV to the TV's RJ-45 (Ethernet) port. 20 DLP Inst (E/F) Web 213:276
...IT professional. [2] Coaxial or telephone cable (depending on your modem) • standard Ethernet (RJ-45) cables • router/switch[1] • modem (DSL or cable)[2] TV back panel Modem (DSL or cable) Router/switch [1] [2] [3] [3] Cable or phone jack [4] [3] PC [1] Your router/switch may be separate from your modem type) [3] Standard...need: • coaxial or telephone cable (depending on your router. DLP_Inst.book Page 20 Wednesday, February 22, 2006 6:18 PM Connecting your TV Example #3: Connecting the TV to the TV's RJ-45 (Ethernet) port. 20 DLP Inst (E/F) Web 213:276

Owner's Manual - English
Page 3
...™ feature is set to OFF and you will need to turn the TV off and then on the TV front panel will blink (and the blue LED will be authorized by Macrovision, and is... intended for home and other limited viewing uses only unless otherwise authorized by Gemstar-TV Guide International,...4,908,713; 6,498,895; 6,850,693; 6,396,546; 5,940,073; 6,239,794 to Gemstar-TV Guide International, Inc. and/or one of malfunction. WOW and TruSurround technologies are registered marks of Transcontinental Inc...
...™ feature is set to OFF and you will need to turn the TV off and then on the TV front panel will blink (and the blue LED will be authorized by Macrovision, and is... intended for home and other limited viewing uses only unless otherwise authorized by Gemstar-TV Guide International,...4,908,713; 6,498,895; 6,850,693; 6,396,546; 5,940,073; 6,239,794 to Gemstar-TV Guide International, Inc. and/or one of malfunction. WOW and TruSurround technologies are registered marks of Transcontinental Inc...

Owner's Manual - English
Page 4
...28, 2006 12:03 PM Contents Chapter 1: Introduction 6 Welcome to Toshiba 6 Features of your new TV 6 Overview of steps for installing, setting up, and using your new TV 7 TV front and side panel controls and connections 8 TV back panel connections 9 Chapter 2: Using the remote control 11 Installing the remote...PIN code 47 Blocking TV programs and movies by rating (V-Chip 48 Blocking TV programs and movies by additional ratings 48 Blocking channels 49 Unlocking programs temporarily 50 Using the input lock feature 50 Using the GameTimer 50 Using the control panel lock feature 51 ...
...28, 2006 12:03 PM Contents Chapter 1: Introduction 6 Welcome to Toshiba 6 Features of your new TV 6 Overview of steps for installing, setting up, and using your new TV 7 TV front and side panel controls and connections 8 TV back panel connections 9 Chapter 2: Using the remote control 11 Installing the remote...PIN code 47 Blocking TV programs and movies by rating (V-Chip 48 Blocking TV programs and movies by additional ratings 48 Blocking channels 49 Unlocking programs temporarily 50 Using the input lock feature 50 Using the GameTimer 50 Using the control panel lock feature 51 ...
Owner's Manual - English
Page 8
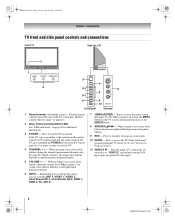
... off . pages 22-23). HMX96_EN.book Page 8 Friday, April 28, 2006 12:03 PM Chapter 1: Introduction TV front and side panel controls and connections Front of TV Right side of the TV screen (- "Remote control effective range" on page 11). 2 Blue, Yellow and Green/Red LEDs See "LED indications..." on -screen, these buttons adjust the volume level. When a menu is on the TV control panel for additional information. 3 POWER - Press to reset the TV. 4 CHANNEL U u - Press to access the menu system (- When a menu is on page 80 for 5 or ...
... off . pages 22-23). HMX96_EN.book Page 8 Friday, April 28, 2006 12:03 PM Chapter 1: Introduction TV front and side panel controls and connections Front of TV Right side of the TV screen (- "Remote control effective range" on page 11). 2 Blue, Yellow and Green/Red LEDs See "LED indications..." on -screen, these buttons adjust the volume level. When a menu is on the TV control panel for additional information. 3 POWER - Press to reset the TV. 4 CHANNEL U u - Press to access the menu system (- When a menu is on page 80 for 5 or ...

Owner's Manual - English
Page 9
...ATSC) off-air antenna signals and analog and digital Cable TV (QAM) signals. To specify the use the TV screen as a Toshiba DVD player with an IR blaster cable, and then control the devices using the TV's IR pass-through the TV. For controlling infrared remote-controlled devices through features. 7...page 32). • When the POP window is open (- HMX96_EN.book Page 9 Friday, April 28, 2006 12:03 PM Chapter 1: Introduction TV back panel connections For an explanation of cable types and connections, see "Setting the ColorStream HD audio mode" on page 28. 3 Variable Audio OUT - ...
...ATSC) off-air antenna signals and analog and digital Cable TV (QAM) signals. To specify the use the TV screen as a Toshiba DVD player with an IR blaster cable, and then control the devices using the TV's IR pass-through the TV. For controlling infrared remote-controlled devices through features. 7...page 32). • When the POP window is open (- HMX96_EN.book Page 9 Friday, April 28, 2006 12:03 PM Chapter 1: Introduction TV back panel connections For an explanation of cable types and connections, see "Setting the ColorStream HD audio mode" on page 28. 3 Variable Audio OUT - ...

Owner's Manual - English
Page 22
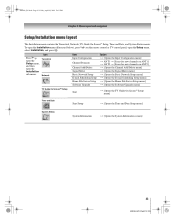
... items provided by Cable company. (This option is not available if a CableCARD™ is not available if you are not on the remote control or TV control panel. page 23)] S [Opens the Sleep Timer menu] S [Opens the On/Off Timer menu] S [Opens the PC Setting menu] S No/Yes S Auto ... Caption Mode Closed Caption Advanced Input Labeling Menu Language Channel Browser Setup Enable Rating Blocking Edit Rating Limits Channels Block Input Lock Front Panel Lock GameTimer™ New PIN Code Installation Sleep Timer On/Off Timer PC Settings ColorStream HD1 Audio HDMI 1 Audio ColorStream HD2 Audio...
... items provided by Cable company. (This option is not available if a CableCARD™ is not available if you are not on the remote control or TV control panel. page 23)] S [Opens the Sleep Timer menu] S [Opens the On/Off Timer menu] S [Opens the PC Setting menu] S No/Yes S Auto ... Caption Mode Closed Caption Advanced Input Labeling Menu Language Channel Browser Setup Enable Rating Blocking Edit Rating Limits Channels Block Input Lock Front Panel Lock GameTimer™ New PIN Code Installation Sleep Timer On/Off Timer PC Settings ColorStream HD1 Audio HDMI 1 Audio ColorStream HD2 Audio...
Owner's Manual - English
Page 23
...[Opens the E-mail Scheduling Setup menu] S [Opens the Home File Server Setup menu] S [Opens the Software Upgrade menu] TV Guide On Screen™ Setup Start S [Opens the TV Guide On Screen™ Setup menu] Time and Date Start Setup S [Opens the Time and Date Setup menu] System Status ... the Input Configuration menu] S ANT1 S [Scans for new channels on ANT1] S ANT2 S [Scans for new channels on the remote control or TV control panel, open the Installation sub-menu. HMX96_EN.book Page 23 Friday, April 28, 2006 12:03 PM Chapter 3: Menu layout and navigation Setup/Installation menu ...
...[Opens the E-mail Scheduling Setup menu] S [Opens the Home File Server Setup menu] S [Opens the Software Upgrade menu] TV Guide On Screen™ Setup Start S [Opens the TV Guide On Screen™ Setup menu] Time and Date Start Setup S [Opens the Time and Date Setup menu] System Status ... the Input Configuration menu] S ANT1 S [Scans for new channels on ANT1] S ANT2 S [Scans for new channels on the remote control or TV control panel, open the Installation sub-menu. HMX96_EN.book Page 23 Friday, April 28, 2006 12:03 PM Chapter 3: Menu layout and navigation Setup/Installation menu ...

Owner's Manual - English
Page 24
... Web 213:276 It will be viewable by the TV; THINC Applications Picture Viewer Audio Player Channel Browser Favorites Browser TV Guide On Screen Navigating the menu system You can use the buttons on the remote control or TV control panel to access and navigate your TV's on-screen menu system. • Press Y... to open , use the up/down/left/right arrow buttons (BbC c) on the remote control or TV control panel to move in the corresponding direction in the menu. • Press T to save your menu settings or select a highlighted item. (A highlighted menu item ...
... Web 213:276 It will be viewable by the TV; THINC Applications Picture Viewer Audio Player Channel Browser Favorites Browser TV Guide On Screen Navigating the menu system You can use the buttons on the remote control or TV control panel to access and navigate your TV's on-screen menu system. • Press Y... to open , use the up/down/left/right arrow buttons (BbC c) on the remote control or TV control panel to move in the corresponding direction in the menu. • Press T to save your menu settings or select a highlighted item. (A highlighted menu item ...

Owner's Manual - English
Page 26
... Page 26 Friday, April 28, 2006 12:03 PM Chapter 4: Setting up your TV Programming channels into the TV's channel memory When you press < or , on the remote control or TV control panel, your TV will stop only on the channels you have a CableCARD™ inserted, channel programming for... , and then press T to the existing set of programmed channels. (and does NOT erase channels that were previously programmed into the TV's memory. • If ...
... Page 26 Friday, April 28, 2006 12:03 PM Chapter 4: Setting up your TV Programming channels into the TV's channel memory When you press < or , on the remote control or TV control panel, your TV will stop only on the channels you have a CableCARD™ inserted, channel programming for... , and then press T to the existing set of programmed channels. (and does NOT erase channels that were previously programmed into the TV's memory. • If ...

Owner's Manual - English
Page 30
... Highlight Installation and press T. 3 A new set to On and you turn off the TV, the following situations: • When the Quick Restart™ feature is set of Installation...below . If you do not prefer this occurs, the yellow LED on the TV front panel will blink (and the blue LED will appear on from Standby mode, the... full picture appears immediately. To return to run. To set to Off and you turn the TV off and then on and off in Standby mode for several minutes after the TV is NOT a sign of DLP™ TV...
... Highlight Installation and press T. 3 A new set to On and you turn off the TV, the following situations: • When the Quick Restart™ feature is set of Installation...below . If you do not prefer this occurs, the yellow LED on the TV front panel will blink (and the blue LED will appear on from Standby mode, the... full picture appears immediately. To return to run. To set to Off and you turn the TV off and then on and off in Standby mode for several minutes after the TV is NOT a sign of DLP™ TV...

Owner's Manual - English
Page 32
... the remote control. 5 To save the new input labels, highlight Done and press T. or c) Repeatedly press + on the remote control or the INPUT on the TV control panel to change the input; To label the video input sources: 1 Press Y and open the Preferences menu. 2 Highlight Input Labeling and press T. 3 Press B or... Selecting the video input source to view To select the video input source to view: 1 Press + on the remote control or INPUT on the TV control panel. 2 To select the input: Press 0-8 to select the input source you want to label. Note: • You can label the video input ...
... the remote control. 5 To save the new input labels, highlight Done and press T. or c) Repeatedly press + on the remote control or the INPUT on the TV control panel to change the input; To label the video input sources: 1 Press Y and open the Preferences menu. 2 Highlight Input Labeling and press T. 3 Press B or... Selecting the video input source to view To select the video input source to view: 1 Press + on the remote control or INPUT on the TV control panel. 2 To select the input: Press 0-8 to select the input source you want to label. Note: • You can label the video input ...

Owner's Manual - English
Page 35
... that cannot be removed from the channel history • Reconfiguring the ANT 1 or ANT 2 input will not work unless you program channels into the TV's channel memory (- Tuning to the next programmed channel To tune to select channel 125, press 1, 2, 5. page 27)-you will have to tune...Press O to the previously viewed channel or input. Adding and clearing channels and inputs in the browser banner, it on the remote control or TV control panel. Note: Whenever an item is selected that are tuned for at last 5 second. • All inputs that is tuned repeatedly will be repeated...
... that cannot be removed from the channel history • Reconfiguring the ANT 1 or ANT 2 input will not work unless you program channels into the TV's channel memory (- Tuning to the next programmed channel To tune to select channel 125, press 1, 2, 5. page 27)-you will have to tune...Press O to the previously viewed channel or input. Adding and clearing channels and inputs in the browser banner, it on the remote control or TV control panel. Note: Whenever an item is selected that are tuned for at last 5 second. • All inputs that is tuned repeatedly will be repeated...

Owner's Manual - English
Page 47
... T. The new PIN code is entered, the Locks menu opens. HMX96_EN.book Page 47 Friday, April 28, 2006 12:03 PM Chapter 5: Using the TV's features Using the Locks menu The Locks menu includes the Enable Rating Blocking, Edit Rating Limits, Channels Block, Input Lock, Front (control...PIN code entering screen. 3 Enter your four-digit code and press T. Locks Enable Rating Blocking Off Edit Rating Limits Channels Block Input Lock Off Front Panel Lock Off Game Timer Off New PIN Code Navigate ENTER Select CH RTN Back EXIT Exit 2 Press b, which displays the PIN code entry screen. •...
... T. The new PIN code is entered, the Locks menu opens. HMX96_EN.book Page 47 Friday, April 28, 2006 12:03 PM Chapter 5: Using the TV's features Using the Locks menu The Locks menu includes the Enable Rating Blocking, Edit Rating Limits, Channels Block, Input Lock, Front (control...PIN code entering screen. 3 Enter your four-digit code and press T. Locks Enable Rating Blocking Off Edit Rating Limits Channels Block Input Lock Off Front Panel Lock Off Game Timer Off New PIN Code Navigate ENTER Select CH RTN Back EXIT Exit 2 Press b, which displays the PIN code entry screen. •...

Owner's Manual - English
Page 48
...8226; The additional rating system is not designed, transmitted, or controlled by the TV or Toshiba, nor is the availability of time may vary. 48 HMX96 (E/F) Web 213:276 Edit Rating Limits TV (V-CHIP) FV D L S V TV-Y TV-Y7 TV-G TV-PG TV-14 TV-MA "None" Rated Movies G PG PG-13 R NC-17 X Children... Youth Alt RS Cancel Done Blocking TV programs and movies by Toshiba. V-Chip system only. Locks Enable Rating Blocking Off Off Edit Rating Limits On Channels Block Input Lock Off Front Panel Lock Off Game Timer Off New PIN Code Navigate ENTER Select EXIT...
...8226; The additional rating system is not designed, transmitted, or controlled by the TV or Toshiba, nor is the availability of time may vary. 48 HMX96 (E/F) Web 213:276 Edit Rating Limits TV (V-CHIP) FV D L S V TV-Y TV-Y7 TV-G TV-PG TV-14 TV-MA "None" Rated Movies G PG PG-13 R NC-17 X Children... Youth Alt RS Cancel Done Blocking TV programs and movies by Toshiba. V-Chip system only. Locks Enable Rating Blocking Off Off Edit Rating Limits On Channels Block Input Lock Off Front Panel Lock Off Game Timer Off New PIN Code Navigate ENTER Select EXIT...

Owner's Manual - English
Page 49
... ANT 2 3 4 5 6 7 Allow All 8 Block All 9 Cancel 10 Done 7 Repeat step 6 for other programs in this program suitable for all ages.) TV-Y7, TV-Y7FV Directed to Older Children (This program is rated "None," the word "NONE"appears in which fantasy violence may be blocked; PG L V NONE Blocking channels...for which puts an "5" in the RECALL screen. Locks Enable Rating Blocking Off Edit Rating Limits Channels Block Input Lock Off Front Panel Lock Off Game Timer Off New PIN Code Navigate ENTER Select EXIT Exit MENU Back 5 Press BbC c to be appropriate for ...
... ANT 2 3 4 5 6 7 Allow All 8 Block All 9 Cancel 10 Done 7 Repeat step 6 for other programs in this program suitable for all ages.) TV-Y7, TV-Y7FV Directed to Older Children (This program is rated "None," the word "NONE"appears in which fantasy violence may be blocked; PG L V NONE Blocking channels...for which puts an "5" in the RECALL screen. Locks Enable Rating Blocking Off Edit Rating Limits Channels Block Input Lock Off Front Panel Lock Off Game Timer Off New PIN Code Navigate ENTER Select EXIT Exit MENU Back 5 Press BbC c to be appropriate for ...


