Owner's Manual - English
Page 44
.... You may take several minutes for details). Other problems • If your TV, make sure the lamp unit and lamp unit door are using a ColorStream or HDMI video connection instead. Also see IMPORTANT NOTICE ABOUT "HOT LAMP RESTART" (- page 30). • If you cannot view signals from external ... set -top box, etc.) try the control panel buttons. • If you have recently replaced the lamp unit, make sure you have not connected the same VCR to the TV's output and input connections at the same time (- page 2). For device connection details, see "LED indications" on...
.... You may take several minutes for details). Other problems • If your TV, make sure the lamp unit and lamp unit door are using a ColorStream or HDMI video connection instead. Also see IMPORTANT NOTICE ABOUT "HOT LAMP RESTART" (- page 30). • If you cannot view signals from external ... set -top box, etc.) try the control panel buttons. • If you have recently replaced the lamp unit, make sure you have not connected the same VCR to the TV's output and input connections at the same time (- page 2). For device connection details, see "LED indications" on...
Owner's Manual - English
Page 46
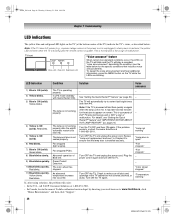
...lamp unit door is open." The color wheel has stopped. page 21). HM66_EN.book Page 46 Thursday, February 23, 2006 2:49 PM Chapter 7: Troubleshooting LED indications The yellow blue and red/green LED lights on the TV (at 1-800-631-3811. • In Canada, locate the nearest Toshiba...at 1-800-631-3811. "Fan stopped." - - Yellow blinks. 4) Yellow is operating properly. Condition The TV is ON (solid). This is normal and is installed securely. Review "Lamp unit replacement and care" in Chapter 8 to restart itself eight times (see "Setting the Quick Restart™ feature" and...
...lamp unit door is open." The color wheel has stopped. page 21). HM66_EN.book Page 46 Thursday, February 23, 2006 2:49 PM Chapter 7: Troubleshooting LED indications The yellow blue and red/green LED lights on the TV (at 1-800-631-3811. • In Canada, locate the nearest Toshiba...at 1-800-631-3811. "Fan stopped." - - Yellow blinks. 4) Yellow is operating properly. Condition The TV is ON (solid). This is normal and is installed securely. Review "Lamp unit replacement and care" in Chapter 8 to restart itself eight times (see "Setting the Quick Restart™ feature" and...
Owner's Manual - English
Page 48
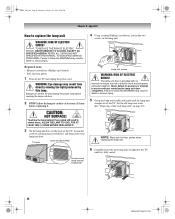
..., loosen the two screws on the back of the TV, loosen the screw by this lamp. Never defeat its purpose or attempt to replace the lamp unit WARNING: RISK OF ELECTRIC SHOCK! TV back Lamp unit door detail Loosen screw using manual screwdriver, and then remove the lamp unit door. Always turn off the TV and unplug the power cord.
..., loosen the two screws on the back of the TV, loosen the screw by this lamp. Never defeat its purpose or attempt to replace the lamp unit WARNING: RISK OF ELECTRIC SHOCK! TV back Lamp unit door detail Loosen screw using manual screwdriver, and then remove the lamp unit door. Always turn off the TV and unplug the power cord.

Owner's Manual - English
Page 49
... it with care. Lamp unit door 9 Replace the screw and tighten using manual screwdriver Lamp unit door NOTE: Make sure the lamp unit door is not allowed to www.toshiba.ca; Do not use manual Phillips screwdriver only) NOTE : Make sure the lamp unit and screws are installed correctly: • No picture • Dark picture • TV will not turn...
... it with care. Lamp unit door 9 Replace the screw and tighten using manual screwdriver Lamp unit door NOTE: Make sure the lamp unit door is not allowed to www.toshiba.ca; Do not use manual Phillips screwdriver only) NOTE : Make sure the lamp unit and screws are installed correctly: • No picture • Dark picture • TV will not turn...

Service Manual
Page 6
...brightness of the picture. however, if the lamp unit is generally the case with all projection TVs that can affect the useful service life of the quartz glass in the lamp will not operate until the lamp unit is a mercury lamp with care. TO REDUCE THE RISK OF ...ONE (1) HOUR BEFORE REPLACING IT. 2. Using a manual, slotted screwdriver, loosen the screw securing the lamp door and remove the door. 3. The strength of the lamp, your experience may rupture (often making a loud noise when this TV is replaced. Touching the lamp before opening the lamp unit door. REFER ALL SERVICING NOT...
...brightness of the picture. however, if the lamp unit is generally the case with all projection TVs that can affect the useful service life of the quartz glass in the lamp will not operate until the lamp unit is a mercury lamp with care. TO REDUCE THE RISK OF ...ONE (1) HOUR BEFORE REPLACING IT. 2. Using a manual, slotted screwdriver, loosen the screw securing the lamp door and remove the door. 3. The strength of the lamp, your experience may rupture (often making a loud noise when this TV is replaced. Touching the lamp before opening the lamp unit door. REFER ALL SERVICING NOT...

Service Manual
Page 7
... replacing the lamp unit. 5. Doing so may ignite. 6. Failure to cool for cleaning camera lenses or eyeglasses). Never touch the lamp unit glass or otherwise get it dirty, wipe it with any type of the lamp. WARNING: RISK OF ELECTRIC SHOCK! The lamp unit door is fully seated. Carefully insert the new lamp unit straight into the TV...
... replacing the lamp unit. 5. Doing so may ignite. 6. Failure to cool for cleaning camera lenses or eyeglasses). Never touch the lamp unit glass or otherwise get it dirty, wipe it with any type of the lamp. WARNING: RISK OF ELECTRIC SHOCK! The lamp unit door is fully seated. Carefully insert the new lamp unit straight into the TV...

Service Manual
Page 8
... pets. • Dispose of the following conditions exist, turn off the TV, unplug the power cord, and repeat steps 1-9 to www.toshiba.ca; The lamp unit in the TV cabinet. 8. Disposal of the door inside the opening in this TV was designed for safe replacement by directing your local authorities or the Electronic Industries Alliance (www.eiae...
... pets. • Dispose of the following conditions exist, turn off the TV, unplug the power cord, and repeat steps 1-9 to www.toshiba.ca; The lamp unit in the TV cabinet. 8. Disposal of the door inside the opening in this TV was designed for safe replacement by directing your local authorities or the Electronic Industries Alliance (www.eiae...

Service Manual
Page 11
Remove the light engine. 5. Lamp Fan Replacement 1. Remove screws 1, 2, and 3 securing the lamp fan cover and remove the lamp fan cover. 10 Reassemble the light engine by unscrewing as shown below. 6. Remove the door SW unit by following steps 1 - 7 in reverse. Disconnect the ballast cable and remove the ballast unit from the retaining clips 1 - 4. 7.
Remove the light engine. 5. Lamp Fan Replacement 1. Remove screws 1, 2, and 3 securing the lamp fan cover and remove the lamp fan cover. 10 Reassemble the light engine by unscrewing as shown below. 6. Remove the door SW unit by following steps 1 - 7 in reverse. Disconnect the ballast cable and remove the ballast unit from the retaining clips 1 - 4. 7.
Service Manual
Page 17
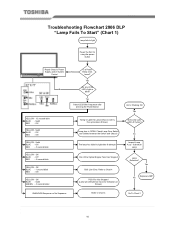
... BLUE - 1 second blink RED - Off YELLOW - Off BLUE - No Inspect Lamp Assy / Substitute Lamp Lamp Defective? Solid RED - Off RED - Yes Replace LAMP No Go To Chart 2 2007 Toshiba America Consumer Products, LLC. Off YELLOW - Solid GREEN - .5 second blinks UNKNOWN ...Sequence or No Sequence Trying to light Power the Set On using the power button Repair Chassis Power Supply and/or System Control No Is a Power No Relay Click heard? Check Lamp Door...
... BLUE - 1 second blink RED - Off YELLOW - Off BLUE - No Inspect Lamp Assy / Substitute Lamp Lamp Defective? Solid RED - Off RED - Yes Replace LAMP No Go To Chart 2 2007 Toshiba America Consumer Products, LLC. Off YELLOW - Solid GREEN - .5 second blinks UNKNOWN ...Sequence or No Sequence Trying to light Power the Set On using the power button Repair Chassis Power Supply and/or System Control No Is a Power No Relay Click heard? Check Lamp Door...


