Installation Guide - English
Page 13
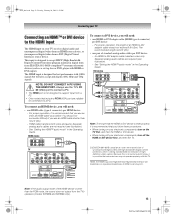
This input is not designed to support input from the TV's speakers (models 50HM66 and 56HM66 only). 13 DLP Inst (E/F) Web 213:276 Always use the TV's PC IN (VGA) port to connect a PC. • The HDMI port is designed to accept HDCP (High-Bandwidth Digital-Content Protection)... cable transfers both video and audio. DVI device VIDEO AUDIO L R IN IN DVI / HDCP OUT OUT L R TV Note: To ensure that the HDMI or DVI device is reset properly, it is possible that some devices may not operate properly with high-bandwidth digital content protection, which is recommended...
This input is not designed to support input from the TV's speakers (models 50HM66 and 56HM66 only). 13 DLP Inst (E/F) Web 213:276 Always use the TV's PC IN (VGA) port to connect a PC. • The HDMI port is designed to accept HDCP (High-Bandwidth Digital-Content Protection)... cable transfers both video and audio. DVI device VIDEO AUDIO L R IN IN DVI / HDCP OUT OUT L R TV Note: To ensure that the HDMI or DVI device is reset properly, it is possible that some devices may not operate properly with high-bandwidth digital content protection, which is recommended...
Installation Guide - English
Page 16
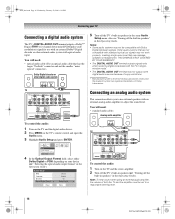
...sources because of copy restrictions. * Manufactured under license from Dolby Laboratories. Dolby and the double-D symbol are not compatible with the TV in speakers (- "Selecting the optical audio output format" in the Operating Guide). Audio Setup MTS Language Speakers Optical Output Format ...Stereo English On Dolby Digital Reset Done To control the audio: 1 Turn on your TV Connecting a digital audio system The TV's DIGITAL AUDIO OUT terminal outputs a Dolby®* Digital g or 2-channel down-mixed PCM ...
...sources because of copy restrictions. * Manufactured under license from Dolby Laboratories. Dolby and the double-D symbol are not compatible with the TV in speakers (- "Selecting the optical audio output format" in the Operating Guide). Audio Setup MTS Language Speakers Optical Output Format ...Stereo English On Dolby Digital Reset Done To control the audio: 1 Turn on your TV Connecting a digital audio system The TV's DIGITAL AUDIO OUT terminal outputs a Dolby®* Digital g or 2-channel down-mixed PCM ...

Owner's Manual - English
Page 5
... viewing (ANT 1, VIDEO 1, VIDEO 2, ColorStream HD-1, ColorStream HD-2, HDMI 1, HDMI 2, ANT 2). 7 *MENU (ENTER) - Point the remote control toward this area of TV 1 3 7* 2 4 10 8 5 6 9 Control panel Side panel 1 Remote sensor (behind the screen) - When a menu is on-screen, these buttons function as...-screen menu. 10 VIDEO-2 IN - Press to reset the TV. 4 CHANNEL U u - HM66_EN.book Page 5 Thursday, February 23, 2006 2:49 PM Chapter 1: Introduction TV front and side panel controls and connections Front of TV Right side of the TV screen. When a menu is on -screen, these ...
... viewing (ANT 1, VIDEO 1, VIDEO 2, ColorStream HD-1, ColorStream HD-2, HDMI 1, HDMI 2, ANT 2). 7 *MENU (ENTER) - Point the remote control toward this area of TV 1 3 7* 2 4 10 8 5 6 9 Control panel Side panel 1 Remote sensor (behind the screen) - When a menu is on-screen, these buttons function as...-screen menu. 10 VIDEO-2 IN - Press to reset the TV. 4 CHANNEL U u - HM66_EN.book Page 5 Thursday, February 23, 2006 2:49 PM Chapter 1: Introduction TV front and side panel controls and connections Front of TV Right side of the TV screen. When a menu is on -screen, these ...

Owner's Manual - English
Page 9
...control a cable converter box or satellite receiver; Note: Even after the TV remote control is not preprogrammed to operate, you must first program the remote control to recognize the device (if you have a non-Toshiba device or a Toshiba device that the remote control is programmed, it may not work on ...some DVD players). 8 ENTER Required by some satellite receivers and DVD players. 9 DVD CLEAR Press to reset the title and chapter number. 10 PLAY Begins ...
...control a cable converter box or satellite receiver; Note: Even after the TV remote control is not preprogrammed to operate, you must first program the remote control to recognize the device (if you have a non-Toshiba device or a Toshiba device that the remote control is programmed, it may not work on ...some DVD players). 8 ENTER Required by some satellite receivers and DVD players. 9 DVD CLEAR Press to reset the title and chapter number. 10 PLAY Begins ...
Owner's Manual - English
Page 18
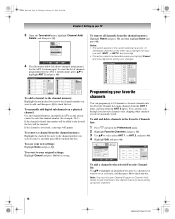
...as favorite channels into two Favorite Channel lists (nine channels from the ANT 1 input, and nine from the ANT 2 input). To save your TV 3 Open the Terrestrial menu, highlight Channel Add/ Delete, and then press T. Notes: • This action applies to select either ANT 1, or... box. Channel Add/Delete 2 2 - 1 2 - 2 3 4 5 6 7 7 - 1 8 Analog Digital Digital Analog Analog Digital Analog Analog Digital Analog ANT 1 ANT 2 Reset Cancel Done Programming your favorite channels You can then scan through your favorite channels only, skipping other input, highlight the input you want to add...
...as favorite channels into two Favorite Channel lists (nine channels from the ANT 1 input, and nine from the ANT 2 input). To save your TV 3 Open the Terrestrial menu, highlight Channel Add/ Delete, and then press T. Notes: • This action applies to select either ANT 1, or... box. Channel Add/Delete 2 2 - 1 2 - 2 3 4 5 6 7 7 - 1 8 Analog Digital Digital Analog Analog Digital Analog Analog Digital Analog ANT 1 ANT 2 Reset Cancel Done Programming your favorite channels You can then scan through your favorite channels only, skipping other input, highlight the input you want to add...

Owner's Manual - English
Page 19
...(1-9) to select your favorite channel lists: 1 Press Y and open the Preferences menu. 2 Highlight Favorite Channels and press T. 3 Highlight Edit and press T. 4 Highlight Reset and press T. 5 Highlight Done and press T. Edit Favorite Channels ANT 1 2 3 4 Only 9 favorite channels are allowed, please deselect other input. 19 HM66 ...desired channel. 1 CH 4-1 2 CH 4-2 3 CH 9 4 CH 10 5 CH 12 6 CH 17 7 CH 19 8 --9 --- Note: To tune your TV To delete the channel from the selected Favorite Channel list: Highlight a checked box and press T to uncheck it. HM66_EN.book Page 19 Thursday, February 23...
...(1-9) to select your favorite channel lists: 1 Press Y and open the Preferences menu. 2 Highlight Favorite Channels and press T. 3 Highlight Edit and press T. 4 Highlight Reset and press T. 5 Highlight Done and press T. Edit Favorite Channels ANT 1 2 3 4 Only 9 favorite channels are allowed, please deselect other input. 19 HM66 ...desired channel. 1 CH 4-1 2 CH 4-2 3 CH 9 4 CH 10 5 CH 12 6 CH 17 7 CH 19 8 --9 --- Note: To tune your TV To delete the channel from the selected Favorite Channel list: Highlight a checked box and press T to uncheck it. HM66_EN.book Page 19 Thursday, February 23...

Owner's Manual - English
Page 22
... open the Setup menu. 2 Highlight Installation and press T. After the TV turns off , unplug the TV power cord and then plug it back in again to Low Power mode. System Information System Information Product Information Brand: Toshiba Model: 50HM66 Software Version 2.2.26.0 Jan 24 2006 - 11:04:47 FW: 17...the restore process. To set the TV back to normal viewing: Press O. Restore Factory Defaults To restore all settings and channels to their factory default values: 1 Follow steps 1-3 above. 2 Press C c to scroll through the menu bar to complete the reset. To return to High Bright mode,...
... open the Setup menu. 2 Highlight Installation and press T. After the TV turns off , unplug the TV power cord and then plug it back in again to Low Power mode. System Information System Information Product Information Brand: Toshiba Model: 50HM66 Software Version 2.2.26.0 Jan 24 2006 - 11:04:47 FW: 17...the restore process. To set the TV back to normal viewing: Press O. Restore Factory Defaults To restore all settings and channels to their factory default values: 1 Follow steps 1-3 above. 2 Press C c to scroll through the menu bar to complete the reset. To return to High Bright mode,...

Owner's Manual - English
Page 23
...1 HDMI 2 ANT 2 DVD Cable Video Recorder Hide DTV Satellite/DSS -- To revert to the factory default labels, highlight Reset and press T. (continued) 23 HM66 (E/F) Web 213:276 Reset Done 4 Press C or c to select the desired label for that input to be "hidden" (- The current signal source... be "grayed out" in the Input selection screen, you can label the video input sources according to the specific devices you have connected to the TV (- Input Selection 0 ANT 1 1 Video 1 2 Video 2 3 ColorStream HD1 4 ColorStream HD2 5 HDMI 1 6 HDMI 2 7 ANT 2 ANT 1 0 - 7 / INPUT to Select Notes: ...
...1 HDMI 2 ANT 2 DVD Cable Video Recorder Hide DTV Satellite/DSS -- To revert to the factory default labels, highlight Reset and press T. (continued) 23 HM66 (E/F) Web 213:276 Reset Done 4 Press C or c to select the desired label for that input to be "hidden" (- The current signal source... be "grayed out" in the Input selection screen, you can label the video input sources according to the specific devices you have connected to the TV (- Input Selection 0 ANT 1 1 Video 1 2 Video 2 3 ColorStream HD1 4 ColorStream HD2 5 HDMI 1 6 HDMI 2 7 ANT 2 ANT 1 0 - 7 / INPUT to Select Notes: ...

Owner's Manual - English
Page 24
... viewed. • Quickly surf and tune your entries, highlight Done and press T. Channel Browser Setup Navigation History List ANT1 List ANT2 List Inputs List Reset Select Mode Power Off Clear(On) On On On Done 4 Press b to highlight History List field, then press C or c to select the ... factory defaults, highlight Reset and press T. 24 HM66 (E/F) Web 213:276 To return to Power Off Clear (On), the channels and inputs stored in a history list. To set -top box to tune). • Quickly change inputs from the Channel Browser™ banner (illustrated on the TV. Note: When History...
... viewed. • Quickly surf and tune your entries, highlight Done and press T. Channel Browser Setup Navigation History List ANT1 List ANT2 List Inputs List Reset Select Mode Power Off Clear(On) On On On Done 4 Press b to highlight History List field, then press C or c to select the ... factory defaults, highlight Reset and press T. 24 HM66 (E/F) Web 213:276 To return to Power Off Clear (On), the channels and inputs stored in a history list. To set -top box to tune). • Quickly change inputs from the Channel Browser™ banner (illustrated on the TV. Note: When History...

Owner's Manual - English
Page 27
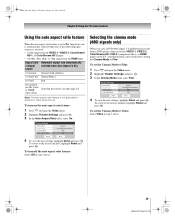
... view the hidden areas, see "Scrolling the TheaterWide® picture" (- Theater Settings Picture Size Picture Scroll Cinema Mode Auto Aspect Ratio Reset Natural -- The way the image displays in any purpose other countries, and may not be available for some program formats (it will ...on the remote control. 2 While the Picture Size screen is displayed close to civil and criminal liability. Conventional picture on a conventional TV screen Conventional picture in the Theater Settings menu. Some program formats will vary depending on the format of the program you are viewing....
... view the hidden areas, see "Scrolling the TheaterWide® picture" (- Theater Settings Picture Size Picture Scroll Cinema Mode Auto Aspect Ratio Reset Natural -- The way the image displays in any purpose other countries, and may not be available for some program formats (it will ...on the remote control. 2 While the Picture Size screen is displayed close to civil and criminal liability. Conventional picture on a conventional TV screen Conventional picture in the Theater Settings menu. Some program formats will vary depending on the format of the program you are viewing....

Owner's Manual - English
Page 28
...® picture sizes, the top and bottom edges of the picture (including subtitles or captions) may be hidden. To revert to the factory defaults, highlight Reset and press T. 28 HM66 (E/F) Web 213:276 A B C D E F G A B C D E F G TheaterWide 3 picture size example Full picture size (for 16:9 [480i, 480p] ...size example Notes: • If you are hidden. HM66_EN.book Page 28 Thursday, February 23, 2006 2:49 PM Chapter 5: Using the TV's basic features TheaterWide 3 picture size (for letter box programs with subtitles) • The picture is stretched wider to fill the width of...
...® picture sizes, the top and bottom edges of the picture (including subtitles or captions) may be hidden. To revert to the factory defaults, highlight Reset and press T. 28 HM66 (E/F) Web 213:276 A B C D E F G A B C D E F G TheaterWide 3 picture size example Full picture size (for 16:9 [480i, 480p] ...size example Notes: • If you are hidden. HM66_EN.book Page 28 Thursday, February 23, 2006 2:49 PM Chapter 5: Using the TV's basic features TheaterWide 3 picture size (for letter box programs with subtitles) • The picture is stretched wider to fill the width of...
Owner's Manual - English
Page 29
...480i signal; 3:2 pulldown processed) from the HDMI input. Theater Settings Picture Size Picture Scroll Cinema Mode Auto Aspect Ratio Natural -1 Film On Reset Done 4 To save the new settings, highlight Done and press T. Theater Settings Picture Size Picture Scroll -1 Cinema Mode Auto Aspect Ratio Natural Film... T. 3 In the Cinema Mode field, select Film. HM66_EN.book Page 29 Thursday, February 23, 2006 2:49 PM Chapter 5: Using the TV's basic features Using the auto aspect ratio feature When the auto aspect ratio feature is set to On, the picture size is automatically selected when...
...480i signal; 3:2 pulldown processed) from the HDMI input. Theater Settings Picture Size Picture Scroll Cinema Mode Auto Aspect Ratio Natural -1 Film On Reset Done 4 To save the new settings, highlight Done and press T. Theater Settings Picture Size Picture Scroll -1 Cinema Mode Auto Aspect Ratio Natural Film... T. 3 In the Cinema Mode field, select Film. HM66_EN.book Page 29 Thursday, February 23, 2006 2:49 PM Chapter 5: Using the TV's basic features Using the auto aspect ratio feature When the auto aspect ratio feature is set to On, the picture size is automatically selected when...

Owner's Manual - English
Page 30
... the Picture Settings menu. • If you have previously set the TV back to the factory defaults, highlight Reset and press T. Picture Settings Mode Contrast Brightness Color Tint Sharpness Reset Sports 100 50 50 0 50 Done ANT 1 Picture Settings Mode: Standard Mode Standard 4 To save ...the new settings, highlight Done and press T. To set the TV to Low Power mode. Picture Settings Mode Contrast Brightness Color Tint Sharpness Reset Sports 100 50 50 0 50 Done ANT 1 Picture Settings Mode: Preference Contrast 70 4 To save the new settings, ...
... the Picture Settings menu. • If you have previously set the TV back to the factory defaults, highlight Reset and press T. Picture Settings Mode Contrast Brightness Color Tint Sharpness Reset Sports 100 50 50 0 50 Done ANT 1 Picture Settings Mode: Standard Mode Standard 4 To save ...the new settings, highlight Done and press T. To set the TV to Low Power mode. Picture Settings Mode Contrast Brightness Color Tint Sharpness Reset Sports 100 50 50 0 50 Done ANT 1 Picture Settings Mode: Preference Contrast 70 4 To save the new settings, ...

Owner's Manual - English
Page 31
...closed captions: 1 Press Y and open the Preferences menu. 2 Highlight Closed Caption Mode and press c. 3 Press B or b to the factory defaults, highlight Reset and press T. Serif, Prof. w. Notes: • This feature is not closed captioned, no captions will display on-screen. • To view text: ... the closed caption display characteristics by individual stations). HM66_EN.book Page 31 Thursday, February 23, 2006 2:49 PM Chapter 5: Using the TV's basic features Using the closed caption mode The closed caption mode has two options: • Captions-An on-screen display of the...
...closed captions: 1 Press Y and open the Preferences menu. 2 Highlight Closed Caption Mode and press c. 3 Press B or b to the factory defaults, highlight Reset and press T. Serif, Prof. w. Notes: • This feature is not closed captioned, no captions will display on-screen. • To view text: ... the closed caption display characteristics by individual stations). HM66_EN.book Page 31 Thursday, February 23, 2006 2:49 PM Chapter 5: Using the TV's basic features Using the closed caption mode The closed caption mode has two options: • Captions-An on-screen display of the...

Owner's Manual - English
Page 33
...February 23, 2006 2:49 PM Chapter 5: Using the TV's basic features Selecting stereo/SAP broadcasts The multi-channel TV sound (MTS) feature allows you to Stereo mode. To reset the settings to the factory defaults, highlight Reset and press T. Audio Setup MTS Language Speakers Optical Output ...Format Stereo English On Dolby Digital Reset Done 4 To save the new ...
...February 23, 2006 2:49 PM Chapter 5: Using the TV's basic features Selecting stereo/SAP broadcasts The multi-channel TV sound (MTS) feature allows you to Stereo mode. To reset the settings to the factory defaults, highlight Reset and press T. Audio Setup MTS Language Speakers Optical Output ...Format Stereo English On Dolby Digital Reset Done 4 To save the new ...

Owner's Manual - English
Page 34
...TV speakers when you connect a Dolby Digital decoder or other digital audio system to the Optical Audio Out terminal on your audio adjustments to the following factory settings: Bass center (50) Treble center (50) Balance center (0) StableSound. . . Audio Settings Bass Treble Balance StableSound 100 100 0 On Reset ...feature to select the optical audio output format when you connect an audio system to your TV (- Audio Setup MTS Language Speakers Optical Output Format Stereo English On Dolby Digital Reset Done 4 To save the new settings, highlight Done and press T. To revert to...
...TV speakers when you connect a Dolby Digital decoder or other digital audio system to the Optical Audio Out terminal on your audio adjustments to the following factory settings: Bass center (50) Treble center (50) Balance center (0) StableSound. . . Audio Settings Bass Treble Balance StableSound 100 100 0 On Reset ...feature to select the optical audio output format when you connect an audio system to your TV (- Audio Setup MTS Language Speakers Optical Output Format Stereo English On Dolby Digital Reset Done 4 To save the new settings, highlight Done and press T. To revert to...
Owner's Manual - English
Page 41
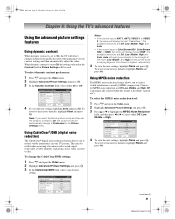
...Advanced Picture Settings Dynamic Contrast CableClear MPEG Noise Reduction Color Temperature Lamp Mode Game Mode On Auto Low Cool Low Power Off ANT 1 Reset Done 4 To save the new settings, highlight Done and press T. Advanced Picture Settings Dynamic Contrast CableClear MPEG Noise Reduction Color Temperature... dynamic contrast When dynamic contrast is set to On, the TV will display the text "CableClear." Choices for MPEG noise reduction are Off, Low, Middle, and High. To revert to the factory defaults, highlight Reset and press T. This may be used. Using CableClear®/DNR...
...Advanced Picture Settings Dynamic Contrast CableClear MPEG Noise Reduction Color Temperature Lamp Mode Game Mode On Auto Low Cool Low Power Off ANT 1 Reset Done 4 To save the new settings, highlight Done and press T. Advanced Picture Settings Dynamic Contrast CableClear MPEG Noise Reduction Color Temperature... dynamic contrast When dynamic contrast is set to On, the TV will display the text "CableClear." Choices for MPEG noise reduction are Off, Low, Middle, and High. To revert to the factory defaults, highlight Reset and press T. This may be used. Using CableClear®/DNR...

Owner's Manual - English
Page 42
...temperature: 1 Press Y and open the Video menu. 2 Highlight Advanced Picture Settings and press T. To revert to the factory defaults, highlight Reset and press T. Advanced Picture Settings Dynamic Contrast CableClear MPEG Noise Reduction Color Temperature Lamp Mode Game Mode On Auto Low Cool Low Power Off...T. To revert to the factory defaults, highlight Reset and press T. To select the lamp mode: 1 Press Y and open the Video menu. 2 Highlight Advanced Picture Settings and press T. 3 In the Color Temperature field, select the mode you turn on the TV, the lamp will start out in a bright...
...temperature: 1 Press Y and open the Video menu. 2 Highlight Advanced Picture Settings and press T. To revert to the factory defaults, highlight Reset and press T. Advanced Picture Settings Dynamic Contrast CableClear MPEG Noise Reduction Color Temperature Lamp Mode Game Mode On Auto Low Cool Low Power Off...T. To revert to the factory defaults, highlight Reset and press T. To select the lamp mode: 1 Press Y and open the Video menu. 2 Highlight Advanced Picture Settings and press T. 3 In the Color Temperature field, select the mode you turn on the TV, the lamp will start out in a bright...
Owner's Manual - English
Page 43
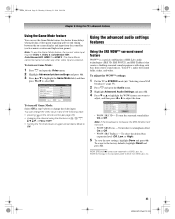
... • pressing + on when any of SRS Labs, Inc. Advanced Picture Settings Dynamic Contrast CableClear MPEG Noise Reduction Color Temperature Lamp Mode Game Mode Reset Video 1 On Auto Low Cool Low Power On Done To turn on Game Mode: 1 Press Y and open the Audio menu. 3 Highlight Advanced ...Press b or B to highlight the WOW feature you want to adjust, and then press C or c to select On. Your TV's audio will set Game Mode to the factory defaults, highlight Reset and press T. To turn the vocal emphasis effect On or Off. • WOW: SRS TruBass - Using the advanced audio settings...
... • pressing + on when any of SRS Labs, Inc. Advanced Picture Settings Dynamic Contrast CableClear MPEG Noise Reduction Color Temperature Lamp Mode Game Mode Reset Video 1 On Auto Low Cool Low Power On Done To turn on Game Mode: 1 Press Y and open the Audio menu. 3 Highlight Advanced ...Press b or B to highlight the WOW feature you want to adjust, and then press C or c to select On. Your TV's audio will set Game Mode to the factory defaults, highlight Reset and press T. To turn the vocal emphasis effect On or Off. • WOW: SRS TruBass - Using the advanced audio settings...
Owner's Manual - English
Page 44
... input source. Poor color or no device is set to one or more seconds to reset the TV. To receive video from channels 3 or 4, make sure you have two VCRs connected to your TV's problem is active, the VIDEO OUT terminal outputs blank video. Other problems • ... 2) at the same time (- Picture and sound are blinking • When certain non-standard conditions occur, the LEDs on the TV will blink and the TV will change in this Troubleshooting section or the recommended solution has not worked, use the Restore Factory Defaults procedure (- You may notice ...
... input source. Poor color or no device is set to one or more seconds to reset the TV. To receive video from channels 3 or 4, make sure you have two VCRs connected to your TV's problem is active, the VIDEO OUT terminal outputs blank video. Other problems • ... 2) at the same time (- Picture and sound are blinking • When certain non-standard conditions occur, the LEDs on the TV will blink and the TV will change in this Troubleshooting section or the recommended solution has not worked, use the Restore Factory Defaults procedure (- You may notice ...


