
User Manual
Page 2
...triangle is intended to alert the user to the presence of electric shock to wall mount your LCD TV, please read and understand all . TOSHIBA Cares! • The consumer electronics industry is appropriate. Tune Into Safety • One size does NOT fit all enclosed instructions for...Listed wall bracket appropriate for the size and weight of this television for wall mounting this manual completely, and keep these safety tips in serious bodily injury and/or property damage. This manual will help you enjoy your new LCD TV. The lightning flash with the installation instructions....
...triangle is intended to alert the user to the presence of electric shock to wall mount your LCD TV, please read and understand all . TOSHIBA Cares! • The consumer electronics industry is appropriate. Tune Into Safety • One size does NOT fit all enclosed instructions for...Listed wall bracket appropriate for the size and weight of this television for wall mounting this manual completely, and keep these safety tips in serious bodily injury and/or property damage. This manual will help you enjoy your new LCD TV. The lightning flash with the installation instructions....
User Manual
Page 5
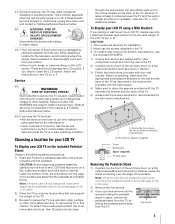
... for ventilation. Remove the four screws. (Do not use these sounds become frequent or continuous, unplug the power cord and contact a Toshiba Authorized Service Center. 42) WARNING: RISK OF SERIOUS PERSONAL INJURY OR EQUIPMENT DAMAGE! These actions will damage the LCD screen. Be sure... surface such as described in the instructions provided with the wall bracket. 4) Make sure to clean the LCD screen, follow this manual to a Toshiba Authorized Service Center. 45) If you have removed all servicing not specified in this WARNING may be used when removing the pedestal ...
... for ventilation. Remove the four screws. (Do not use these sounds become frequent or continuous, unplug the power cord and contact a Toshiba Authorized Service Center. 42) WARNING: RISK OF SERIOUS PERSONAL INJURY OR EQUIPMENT DAMAGE! These actions will damage the LCD screen. Be sure... surface such as described in the instructions provided with the wall bracket. 4) Make sure to clean the LCD screen, follow this manual to a Toshiba Authorized Service Center. 45) If you have removed all servicing not specified in this WARNING may be used when removing the pedestal ...
User Manual
Page 10
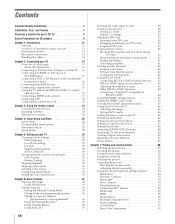
...Local Time Setting 29 Location 29 Smart Sound Equalizer 29 ANT/CABLE IN 29 Storing channels in memory (optional 29 Auto Tuning 29 Manual Tuning 30 Skipping channels 30 Skipping video inputs 30 Labeling video inputs 31 Configuring shared inputs 31 Setting the Auto Input feature 31 ... devices . . . . . 43 REGZA-LINK® input source selection 43 Adjusting the amplifier's audio 44 Other REGZA-LINK® functions 44 Connecting a Toshiba PC compatible to REGZA-LINK 44 Using the HDMI® settings feature 45 Setting the HDMI® audio mode 45 Viewing the HDMI® signal...
...Local Time Setting 29 Location 29 Smart Sound Equalizer 29 ANT/CABLE IN 29 Storing channels in memory (optional 29 Auto Tuning 29 Manual Tuning 30 Skipping channels 30 Skipping video inputs 30 Labeling video inputs 31 Configuring shared inputs 31 Setting the Auto Input feature 31 ... devices . . . . . 43 REGZA-LINK® input source selection 43 Adjusting the amplifier's audio 44 Other REGZA-LINK® functions 44 Connecting a Toshiba PC compatible to REGZA-LINK 44 Using the HDMI® settings feature 45 Setting the HDMI® audio mode 45 Viewing the HDMI® signal...
User Manual
Page 15
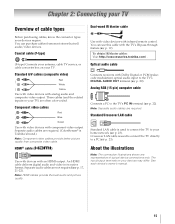
...-pin) computer cable Connects a PC to the TV's DIGITAL AUDIO OUT terminal (- Note: Separate audio cables are required. (ColorStream® is Toshiba's brand.) Note: Component video cables provide better picture quality than composite video cable. Coaxial cable (F-type) (F-type) Connects your antenna, cable TV...with infrared remote control. An HDMI cable delivers digital audio and video in its native format. p. 22). See each device's owner's manual. 15 Note: HDMI cables provide the best audio and picture quality. You can purchase cables from most stores that sell audio/video ...
...-pin) computer cable Connects a PC to the TV's DIGITAL AUDIO OUT terminal (- Note: Separate audio cables are required. (ColorStream® is Toshiba's brand.) Note: Component video cables provide better picture quality than composite video cable. Coaxial cable (F-type) (F-type) Connects your antenna, cable TV...with infrared remote control. An HDMI cable delivers digital audio and video in its native format. p. 22). See each device's owner's manual. 15 Note: HDMI cables provide the best audio and picture quality. You can purchase cables from most stores that sell audio/video ...
User Manual
Page 18
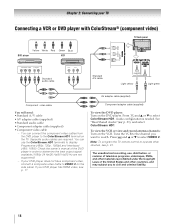
... the best output signal available (1080p 24 Hz/30 Hz/50 Hz/25 Hz are required. Separate audio cables are not supported). - Check the owner's manual of the United States and other materials is needed. If your TV Connecting a VCR or DVD player with ColorStream® (component video) Y W R G B DVD player Yellow...
... the best output signal available (1080p 24 Hz/30 Hz/50 Hz/25 Hz are required. Separate audio cables are not supported). - Check the owner's manual of the United States and other materials is needed. If your TV Connecting a VCR or DVD player with ColorStream® (component video) Y W R G B DVD player Yellow...
User Manual
Page 21
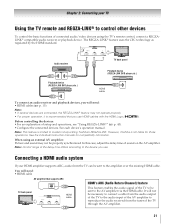
...'s operation manual. The REGZA-LINK® feature uses the CEC technology as regulated by the HDMI standard. Note: This feature is limited to the device you use HDMI cables with the HDMI Logo ( ). Note: Control range of the delay time differs according to models incorporating Toshiba's REGZA-... TV remote and REGZA-LINK® to the amplifier over the existing HDMI cable. p. 43). •Configure the connected devices. However, Toshiba is not liable for compatibility information. Chapter 2: Connecting your HDMI amplifier supports ARC, audio from the TV can be sent to control other...
...'s operation manual. The REGZA-LINK® feature uses the CEC technology as regulated by the HDMI standard. Note: This feature is limited to the device you use HDMI cables with the HDMI Logo ( ). Note: Control range of the delay time differs according to models incorporating Toshiba's REGZA-... TV remote and REGZA-LINK® to the amplifier over the existing HDMI cable. p. 43). •Configure the connected devices. However, Toshiba is not liable for compatibility information. Chapter 2: Connecting your HDMI amplifier supports ARC, audio from the TV can be sent to control other...

User Manual
Page 28
... 19 Energy Saving Settings 47 Blue Screen 48 28 Icon SETUP Item HDMI Information Display POWER LED Dimmer Menu Language ANT/CABLE In Auto Tuning Manual Tuning TV Settings Quick Setup Location Software Upgrade Software Licences System Information Reset TV Page 45 48 29 29 29 30 29, 30, 36, 38...
... 19 Energy Saving Settings 47 Blue Screen 48 28 Icon SETUP Item HDMI Information Display POWER LED Dimmer Menu Language ANT/CABLE In Auto Tuning Manual Tuning TV Settings Quick Setup Location Software Upgrade Software Licences System Information Reset TV Page 45 48 29 29 29 30 29, 30, 36, 38...

User Manual
Page 29
... screen. OK To revert the selection or adjustment to select Yes. Storing channels in memory (optional) To make your region. 1 Y > SETUP > TV Settings > . You can manually store or skip individual channels from three different languages (English, Français and Español) for the TV installation. 1 Y > SOUND > Advanced Sound Settings...
... screen. OK To revert the selection or adjustment to select Yes. Storing channels in memory (optional) To make your region. 1 Y > SETUP > TV Settings > . You can manually store or skip individual channels from three different languages (English, Français and Español) for the TV installation. 1 Y > SOUND > Advanced Sound Settings...
User Manual
Page 30
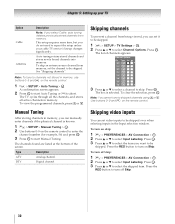
Auto tuning retains stored channels and stores newly found are listed at the bottom of channels appears. See "Skipping channels". Manual Tuning After storing channels in the Input selection window. Press . To clear the selection, press . Use buttons 0-9 and = on skip: 1 Y > PREFERENCES >...30 Type ATV DTV Description Analog channel. OK 2 Press B or b to channels not stored in memory. OK The box is known. 1 Y > SETUP > Manual Tuning > . Note: To tune to select Channel Options. OK 3 Press OK to be skipped. OK The list of the screen. OK 3 Press B or ...
Auto tuning retains stored channels and stores newly found are listed at the bottom of channels appears. See "Skipping channels". Manual Tuning After storing channels in the Input selection window. Press . To clear the selection, press . Use buttons 0-9 and = on skip: 1 Y > PREFERENCES >...30 Type ATV DTV Description Analog channel. OK 2 Press B or b to channels not stored in memory. OK The box is known. 1 Y > SETUP > Manual Tuning > . Note: To tune to select Channel Options. OK 3 Press OK to be skipped. OK The list of the screen. OK 3 Press B or ...
User Manual
Page 32
...If you use 3D glasses: Please refer to see the display on the frequency of 3D programming should be difficult to the 3D glasses' instruction manual. Precautions for daily use another light. (It is not recommended to the possible impact on IR communication: • Do not block the IR ..., etc. • Use the 3D glasses in the following temperature range; Children may not see the following (which are not included): •Compatible Toshiba 3D glasses (FPT-AG01U*). •Compatible 3D playback device or 3D source. •3D capable HDMI cable. Use the TV and 3D glasses in ...
...If you use 3D glasses: Please refer to see the display on the frequency of 3D programming should be difficult to the 3D glasses' instruction manual. Precautions for daily use another light. (It is not recommended to the possible impact on IR communication: • Do not block the IR ..., etc. • Use the 3D glasses in the following temperature range; Children may not see the following (which are not included): •Compatible Toshiba 3D glasses (FPT-AG01U*). •Compatible 3D playback device or 3D source. •3D capable HDMI cable. Use the TV and 3D glasses in ...
User Manual
Page 33
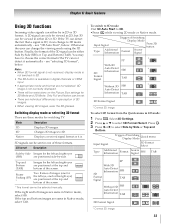
... images. 2D Changes 3D images to 3D. •Press while viewing 2D mode or Native mode. Trigger of the screen. * This format cannot be selected manually. Select 3D Settings. 2 Press B or b to select Side by Side (SBS) or Top and Bottom (TAB). If the right and left images are same in...
... images. 2D Changes 3D images to 3D. •Press while viewing 2D mode or Native mode. Trigger of the screen. * This format cannot be selected manually. Select 3D Settings. 2 Press B or b to select Side by Side (SBS) or Top and Bottom (TAB). If the right and left images are same in...

User Manual
Page 36
Digital channels have priority when manually entering a channel number using the 0-9 buttons on the remote control to select channel 125, press 1, 2, 5.) Press . Press O. The History List clears. Press the dash (=) button. ...
Digital channels have priority when manually entering a channel number using the 0-9 buttons on the remote control to select channel 125, press 1, 2, 5.) Press . Press O. The History List clears. Press the dash (=) button. ...

User Manual
Page 61
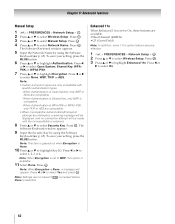
...PREFERENCES > Network Setup > . Press C or c to select Wired or Wireless. 4 If you select Wireless, see step 4 and 5 in the manual of security easily. Press . WPS will automatically configure all settings) Easy Setup using AP's notification information) Network Name, Authentication, and Encryption are not ...Done is a standard designed to select Easy Setup. OK 6 Following the onscreen instruction, push the appropriate button on the label or in Manual Setup (- OK Note: Check the MAC address on your setting, press the BLUE button. OK 2 Press B or b to highlight Network...
...PREFERENCES > Network Setup > . Press C or c to select Wired or Wireless. 4 If you select Wireless, see step 4 and 5 in the manual of security easily. Press . WPS will automatically configure all settings) Easy Setup using AP's notification information) Network Name, Authentication, and Encryption are not ...Done is a standard designed to select Easy Setup. OK 6 Following the onscreen instruction, push the appropriate button on the label or in Manual Setup (- OK Note: Check the MAC address on your setting, press the BLUE button. OK 2 Press B or b to highlight Network...
User Manual
Page 62
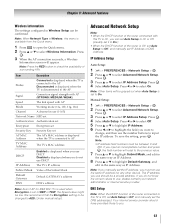
... TKIP or AES. OK The Software Keyboard window appears. 5 Input the Network Name by using the Software Keyboard (- Press C or c to select Manual Setup. Press OK . p. 65). Note: This item is grayed out when Encryption is available. 11 Select Done. Press C or c to select..., only WEP is compatible. -When Authentication is resolved. 8 Press B or b to On, these features are not saved if Done is selected. Chapter 8: Advanced features Manual Setup 1 Y > PREFERENCES > Network Setup > . Note: When Encryption is set to select Security Key. Press . OK 2 Press B or b to select Network ...
... TKIP or AES. OK The Software Keyboard window appears. 5 Input the Network Name by using the Software Keyboard (- Press C or c to select Manual Setup. Press OK . p. 65). Note: This item is grayed out when Encryption is available. 11 Select Done. Press C or c to select..., only WEP is compatible. -When Authentication is resolved. 8 Press B or b to On, these features are not saved if Done is selected. Chapter 8: Advanced features Manual Setup 1 Y > PREFERENCES > Network Setup > . Note: When Encryption is set to select Security Key. Press . OK 2 Press B or b to select Network ...
User Manual
Page 63
... Encryption set Security Key Security Key set AP MAC Address The AP's MAC address is displayed when the TV is connected to the AP. Press . Manual Setup: 1 Y > PREFERENCES > Network Setup > . Press C or c to select Off. 5 Press B or b to highlight IP Address. 6 Press C or c to highlight the field...set it to On.) • When the DHCP function of the router connected to this TV is Off, set Auto Setup to Off, and manually set the DNS address(es). Item Description Status Connected is displayed when the TV is connected to select Advanced Network Setup. Press . OK 4 ...
... Encryption set Security Key Security Key set AP MAC Address The AP's MAC address is displayed when the TV is connected to the AP. Press . Manual Setup: 1 Y > PREFERENCES > Network Setup > . Press C or c to select Off. 5 Press B or b to highlight IP Address. 6 Press C or c to highlight the field...set it to On.) • When the DHCP function of the router connected to this TV is Off, set Auto Setup to Off, and manually set the DNS address(es). Item Description Status Connected is displayed when the TV is connected to select Advanced Network Setup. Press . OK 4 ...
User Manual
Page 64
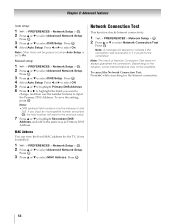
... B or b to select DNS Setup. Press . Depending on the situation, some Internet features may not be completed. OK 3 Press B or b to select Advanced Network Setup. Manual setup: 1 Y > PREFERENCES > Network Setup > . OK 3 Press B or b to select Network Connection Test. If you want to change, and then use the number buttons to indicate...
... B or b to select DNS Setup. Press . Depending on the situation, some Internet features may not be completed. OK 3 Press B or b to select Advanced Network Setup. Manual setup: 1 Y > PREFERENCES > Network Setup > . OK 3 Press B or b to select Network Connection Test. If you want to change, and then use the number buttons to indicate...
User Manual
Page 72
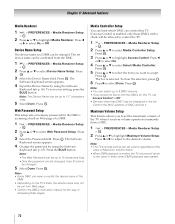
... 5 Press B or b to select the item you would not like to set it receives volume operation commands from Web page. • Confirm the DMCs instruction manual for the way of a DMR. 1 Y > PREFERENCES > Media Renderer Setup > . Confirm the MAC address of DMC and set the maximum volume of Maximum Volume Setup. •...
... 5 Press B or b to select the item you would not like to set it receives volume operation commands from Web page. • Confirm the DMCs instruction manual for the way of a DMR. 1 Y > PREFERENCES > Media Renderer Setup > . Confirm the MAC address of DMC and set the maximum volume of Maximum Volume Setup. •...
User Manual
Page 73
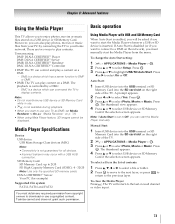
...; Player DMS: DLNA CERTIFIED™ Server DMR: DLNA CERTIFIED™ Renderer DMC: DLNA CERTIFIED™ Controller •DMP: The TV can start the Media Player manually. "Media Renderer" on a DMS. - DLNA CERTIFIED™ Server: Your PC (for all devices. • Incorrect behavior may occur with USB and SD Memory ...Card When Auto Start is enabled, you will return to the last-viewed channel or video input. 73 Toshiba cannot and does not grant such permission. OK 3 Press B or b to select Yes. OK 3 Press B or b to select USB device or SD Memory ...
...; Player DMS: DLNA CERTIFIED™ Server DMR: DLNA CERTIFIED™ Renderer DMC: DLNA CERTIFIED™ Controller •DMP: The TV can start the Media Player manually. "Media Renderer" on a DMS. - DLNA CERTIFIED™ Server: Your PC (for all devices. • Incorrect behavior may occur with USB and SD Memory ...Card When Auto Start is enabled, you will return to the last-viewed channel or video input. 73 Toshiba cannot and does not grant such permission. OK 3 Press B or b to select Yes. OK 3 Press B or b to select USB device or SD Memory ...
User Manual
Page 81
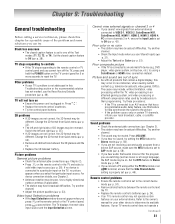
... broadcasts, video games, DVDs). Sound problems • Check the antenna/cable connections (- p. 58). • If you select that particular input source. Refer to the owner's manual for 5 or more seconds to one of sync • As with all obstructions between the remote control and the TV. • Replace the remote control...
... broadcasts, video games, DVDs). Sound problems • Check the antenna/cable connections (- p. 58). • If you select that particular input source. Refer to the owner's manual for 5 or more seconds to one of sync • As with all obstructions between the remote control and the TV. • Replace the remote control...
User Manual
Page 82
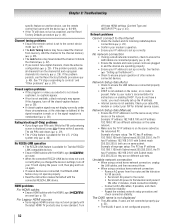
... HDMI Logo ( ) are on different sub-nets. p. 91). • The Auto Tuning feature may not operate properly. • Read the instruction manual furnished with the latest HDMI TV products due to ensure the LAN cables are connected, the REGZA-LINK feature may have blocked the channel. p. 29...-network connection: - p. 23). • Ensure the modem and router power cords are plugged in and the devices are used , is available for Toshiba REGZA- Remove AC power from the router and the television for 30 seconds. • Reconnect AC power to the router. • Reconnect AC power...
... HDMI Logo ( ) are on different sub-nets. p. 91). • The Auto Tuning feature may not operate properly. • Read the instruction manual furnished with the latest HDMI TV products due to ensure the LAN cables are connected, the REGZA-LINK feature may have blocked the channel. p. 29...-network connection: - p. 23). • Ensure the modem and router power cords are plugged in and the devices are used , is available for Toshiba REGZA- Remove AC power from the router and the television for 30 seconds. • Reconnect AC power to the router. • Reconnect AC power...


