User Manual
Page 2
... stands or installed according to the manufacturer's recommendations. • Flat panel displays that children can be of sufficient magnitude to constitute a risk of electric shock to persons. NO USER-SERVICEABLE PARTS INSIDE. This manual will help you are unsure, contact a professional installer. • A minimum of two people are not always supported on a "larger than a UL Listed wall bracket appropriate for the size and weight of this television for wall mounting...
... stands or installed according to the manufacturer's recommendations. • Flat panel displays that children can be of sufficient magnitude to constitute a risk of electric shock to persons. NO USER-SERVICEABLE PARTS INSIDE. This manual will help you are unsure, contact a professional installer. • A minimum of two people are not always supported on a "larger than a UL Listed wall bracket appropriate for the size and weight of this television for wall mounting...
User Manual
Page 4
...antenna system is subject to wear or abuse. 30) Never overload wall outlets and extension cords. 31) Always operate this product, never place or store the TV in a room whose temperature is tight, secure, and parallel to rest on the cabinet. This is thundering, do not touch the connecting cables or apparatus. (continued) A hard...with , such as insecticide on or roll over the power cord, and never place the TV where the power cord is properly grounded to drapes, curtains, or walls; Gently wipe the display panel surface (the TV screen) using a dry, soft cloth only (cotton, flannel, ...
...antenna system is subject to wear or abuse. 30) Never overload wall outlets and extension cords. 31) Always operate this product, never place or store the TV in a room whose temperature is tight, secure, and parallel to rest on the cabinet. This is thundering, do not touch the connecting cables or apparatus. (continued) A hard...with , such as insecticide on or roll over the power cord, and never place the TV where the power cord is properly grounded to drapes, curtains, or walls; Gently wipe the display panel surface (the TV screen) using a dry, soft cloth only (cotton, flannel, ...
User Manual
Page 5
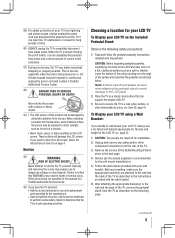
... component connectors from the rear of the TV. 3) Remove the screws of the VESA Mounting Pattern show in the next page. 4) Always use , the TV may make sure the appropriate bracket(s) are required for your LCD TV To Display your LCD TV on or off switch, it is turned off using a Wall Bracket: If you decide to service the TV yourself. Never attempt to wall mount your LCD TV, always use only replacement parts...
... component connectors from the rear of the TV. 3) Remove the screws of the VESA Mounting Pattern show in the next page. 4) Always use , the TV may make sure the appropriate bracket(s) are required for your LCD TV To Display your LCD TV on or off switch, it is turned off using a Wall Bracket: If you decide to service the TV yourself. Never attempt to wall mount your LCD TV, always use only replacement parts...

User Manual
Page 9
... Setup 34 Quick Setup from the SETUP menu 34 Selecting the menu language 34 Configuring the antenna input source for the ANT/CABLE terminal 34 Programming channels into the TV's channel memory............34 Programming channels automatically 35 Setting channel skip 35 Setting AV Input mode 36 Setting the HDMI® audio mode 36 Viewing the digital signal meter 36 Setting the time zone 37 Viewing the system status 37 Chapter 6: Using the TV's features 38 Selecting the video input source to view 38 Labeling the video input sources...
... Setup 34 Quick Setup from the SETUP menu 34 Selecting the menu language 34 Configuring the antenna input source for the ANT/CABLE terminal 34 Programming channels into the TV's channel memory............34 Programming channels automatically 35 Setting channel skip 35 Setting AV Input mode 36 Setting the HDMI® audio mode 36 Viewing the digital signal meter 36 Setting the time zone 37 Viewing the system status 37 Chapter 6: Using the TV's features 38 Selecting the video input source to view 38 Labeling the video input sources...

User Manual
Page 14
... connecting an external Dolby Digital decoder, amplifier, A/V receiver, or home theater system with optical audio input. 8無 USB port - Note: Component / Standard (composite) video cables carry only video information; To access photo or music files with USB device, or using WLAN with HDMI-1 analog audio input terminals, and their use when connecting a personal computer. 3無 PC/HDMI-1 (AUDIO) IN - Optical audio output in the Audio Setup menu ( page 54). 4無 HDMI® IN - LAN port is necessary to your home network. Power Cord 6無 VIDEO / COLOR...
... connecting an external Dolby Digital decoder, amplifier, A/V receiver, or home theater system with optical audio input. 8無 USB port - Note: Component / Standard (composite) video cables carry only video information; To access photo or music files with USB device, or using WLAN with HDMI-1 analog audio input terminals, and their use when connecting a personal computer. 3無 PC/HDMI-1 (AUDIO) IN - Optical audio output in the Audio Setup menu ( page 54). 4無 HDMI® IN - LAN port is necessary to your home network. Power Cord 6無 VIDEO / COLOR...
User Manual
Page 15
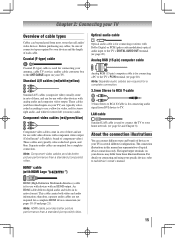
... herein. Component video cables (red/green/blue) Component video cables come in several different configurations. HDMI® cable (with an HDMI output. Note: HDMI cable provides better picture performance than a standard (composite) video. These cables (and the related inputs on your TV. An HDMI cable delivers digital audio and video in this manual are for connecting a PC to the TV's PC IN terminal ( page 20). Chapter 2: Connecting your TV Overview of cable types Cables can connect different types and brands...
... herein. Component video cables (red/green/blue) Component video cables come in several different configurations. HDMI® cable (with an HDMI output. Note: HDMI cable provides better picture performance than a standard (composite) video. These cables (and the related inputs on your TV. An HDMI cable delivers digital audio and video in this manual are for connecting a PC to the TV's PC IN terminal ( page 20). Chapter 2: Connecting your TV Overview of cable types Cables can connect different types and brands...
User Manual
Page 20
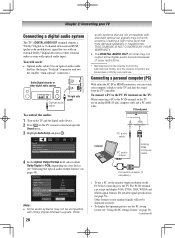
... digital audio system Optical audio cable TV right side panel To control the audio: 1無 Turn on the TV and the digital audio device. 2無 Press on the TV's remote control and open the Sound menu. 3無 Highlight Audio Setup and press . 4無 In the Optical Output Format field, select either the PC IN or HDMI connection, you can accept and display VGA, SVGA, XGA, WXGA and SXGA signal formats. You will not be compatible with optical audio input...
... digital audio system Optical audio cable TV right side panel To control the audio: 1無 Turn on the TV and the digital audio device. 2無 Press on the TV's remote control and open the Sound menu. 3無 Highlight Audio Setup and press . 4無 In the Optical Output Format field, select either the PC IN or HDMI connection, you can accept and display VGA, SVGA, XGA, WXGA and SXGA signal formats. You will not be compatible with optical audio input...
User Manual
Page 25
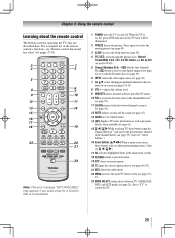
... "Arrow buttons.") 16無 Arrow buttons (pqtu) When a menu is on, the green LED indicator on -screen ( pages 34-35). 8無 VOL + - Set to "TV" to control the TV. 25 A Note: The error message "NOT AVAILABLE" may appear if you press a key for operating the TV only are described here. Chapter 3: Using the remote control Learning about the remote control The buttons used to tune digital channels (...
... "Arrow buttons.") 16無 Arrow buttons (pqtu) When a menu is on, the green LED indicator on -screen ( pages 34-35). 8無 VOL + - Set to "TV" to control the TV. 25 A Note: The error message "NOT AVAILABLE" may appear if you press a key for operating the TV only are described here. Chapter 3: Using the remote control Learning about the remote control The buttons used to tune digital channels (...
User Manual
Page 31
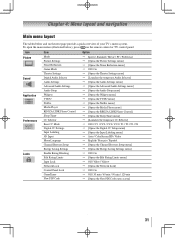
... below and on the remote control or TV control panel. Icon Picture Sound Application Preferences Locks Item Mode Picture Settings Noise Reduction Game Mode Theater Settings Digital Audio Selector Audio Settings Advanced Audio Settings Audio Setup Widgets VUDU Netflix Media Player REGZA-LINK Player Control Sleep Timer CC Selector Base CC Mode Digital CC Settings Input Labeling AV Input Menu Language Channel Browser Setup Energy Saving Settings Enable Rating Blocking Edit Rating Limits Input Lock Network Lock Control Panel Lock GameTimer New PIN Code Option Sports / Standard...
... below and on the remote control or TV control panel. Icon Picture Sound Application Preferences Locks Item Mode Picture Settings Noise Reduction Game Mode Theater Settings Digital Audio Selector Audio Settings Advanced Audio Settings Audio Setup Widgets VUDU Netflix Media Player REGZA-LINK Player Control Sleep Timer CC Selector Base CC Mode Digital CC Settings Input Labeling AV Input Menu Language Channel Browser Setup Energy Saving Settings Enable Rating Blocking Edit Rating Limits Input Lock Network Lock Control Panel Lock GameTimer New PIN Code Option Sports / Standard...

User Manual
Page 32
... menu] [Start] [Scans for new channels on ANT/CABLE] [Opens the Skip / Lock Channel menu] Standard / Auto / Digital Eastern / Newfoundland / Atlantic / Hawaii / Alaska / Pacific / Mountain / Central [Opens the Signal Meter menu] [Opens the System Information screen] Connective Information [Opens the Connective Information screen] 32 Chapter 4: Menu layout and navigation Icon Setup Item Installation REGZA-LINK Setup Network Setup VUDU Deactivation Netflix Deactivation PC Settings Quick Setup Software Upgrade...
... menu] [Start] [Scans for new channels on ANT/CABLE] [Opens the Skip / Lock Channel menu] Standard / Auto / Digital Eastern / Newfoundland / Atlantic / Hawaii / Alaska / Pacific / Mountain / Central [Opens the Signal Meter menu] [Opens the System Information screen] Connective Information [Opens the Connective Information screen] 32 Chapter 4: Menu layout and navigation Icon Setup Item Installation REGZA-LINK Setup Network Setup VUDU Deactivation Netflix Deactivation PC Settings Quick Setup Software Upgrade...
User Manual
Page 34
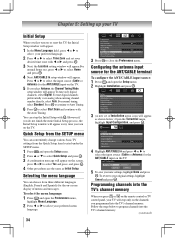
.... Programming channels into the TV's channel memory When you press or on the remote control or TV control panel, your TV will stop the Initial Setup with the Auto Tuning. To tune digital channels preferentially over analog when entering channel number directly, select Auto. Quick Setup from the SETUP menu You can conveniently change various basic TV settings from three different languages (English, French and Spanish) for the ANT/CABLE input on -screen display of Installation menu...
.... Programming channels into the TV's channel memory When you press or on the remote control or TV control panel, your TV will stop the Initial Setup with the Auto Tuning. To tune digital channels preferentially over analog when entering channel number directly, select Auto. Quick Setup from the SETUP menu You can conveniently change various basic TV settings from three different languages (English, French and Spanish) for the ANT/CABLE input on -screen display of Installation menu...
User Manual
Page 36
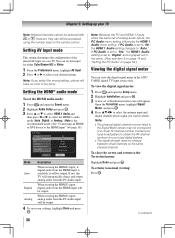
... can still be output. 4無 To save your TV. Setting the HDMI® audio mode To set the HDMI audio mode: 1無 Press and open the Setup menu. 2無 Highlight Installation and press . 3無 A new set to "No," the HDMI 1 Audio setting changes to select the antenna input and digital channel whose signal you select the wrong setting, picture will be fuzzy. Analog When viewing the HDMI 1 input, analog audio from the PC Audio input. Open the Terrestrial menu, highlight Signal Meter, and press...
... can still be output. 4無 To save your TV. Setting the HDMI® audio mode To set the HDMI audio mode: 1無 Press and open the Setup menu. 2無 Highlight Installation and press . 3無 A new set to "No," the HDMI 1 Audio setting changes to select the antenna input and digital channel whose signal you select the wrong setting, picture will be fuzzy. Analog When viewing the HDMI 1 input, analog audio from the PC Audio input. Open the Terrestrial menu, highlight Signal Meter, and press...
User Manual
Page 47
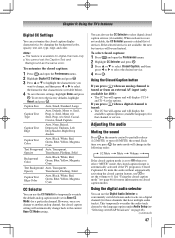
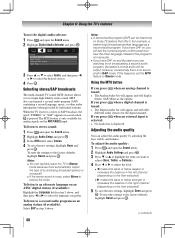
... Edge Color Auto, Black, White, Red, Green, Blue, Yellow, Magenta, Cyan CC Selector You can customize the closed caption services (if available). To mute the audio without automatically activating the closed caption modes. Chapter 6: Using the TV's features Digital CC Settings You can use the CC Selector to temporarily override the default analog caption mode (set in the following order: 1/2 Mute Mute Volume If the closed caption mode is set to Off when you change to another analog channel, the closed captions...
... Edge Color Auto, Black, White, Red, Green, Blue, Yellow, Magenta, Cyan CC Selector You can customize the closed caption services (if available). To mute the audio without automatically activating the closed caption modes. Chapter 6: Using the TV's features Digital CC Settings You can use the CC Selector to temporarily override the default analog caption mode (set in the following order: 1/2 Mute Mute Volume If the closed caption mode is set to Off when you change to another analog channel, the closed captions...
User Manual
Page 48
... an analog channel is displayed. If this happens, set the MTS feature to the factory defaults, highlight Reset and press . (continued) If you press when an external input is selected: • No Audio bar is tuned: • The Analog Audio bar will appear and will be heard only on those TV stations that offer it will automatically output the type of the program's normal audio. •...
... an analog channel is displayed. If this happens, set the MTS feature to the factory defaults, highlight Reset and press . (continued) If you press when an external input is selected: • No Audio bar is tuned: • The Analog Audio bar will appear and will be heard only on those TV stations that offer it will automatically output the type of the program's normal audio. •...

User Manual
Page 49
... optical audio output format when you cannot remember your four-digit code and press . To revert to the factory defaults, highlight Reset and press . Using the Locks menu The Locks menu includes the Enable Rating Blocking, Edit Rating Limits, Input Lock, Front (Control) Panel Lock, GameTimer, and New PIN Code features. Entering the PIN code 1無 Press and highlight the Locks menu icon. 2無 Press , which displays the PIN code entry screen. • The Lock System screen...
... optical audio output format when you cannot remember your four-digit code and press . To revert to the factory defaults, highlight Reset and press . Using the Locks menu The Locks menu includes the Enable Rating Blocking, Edit Rating Limits, Input Lock, Front (Control) Panel Lock, GameTimer, and New PIN Code features. Entering the PIN code 1無 Press and highlight the Locks menu icon. 2無 Press , which displays the PIN code entry screen. • The Lock System screen...

User Manual
Page 54
....1 File format: JPEG Maximum photo size: 6 MB Maximum number of files: 500 / folder Maximum photo resolution: 4096 x 4096 pixels Best photo resolution: 1920 x 1080 pixels Music Player specifications: File format: MP3 Sampling frequency: 16 kHz, 22.05 kHz, 24 kHz, 32 kHz, 44.1 kHz, 48 kHz Bit rate: from 8 to 320 kbps Maximum number of analog audio inputs, the PC Audio menu setting influences the HDMI 1 Audio menu setting. A message...
....1 File format: JPEG Maximum photo size: 6 MB Maximum number of files: 500 / folder Maximum photo resolution: 4096 x 4096 pixels Best photo resolution: 1920 x 1080 pixels Music Player specifications: File format: MP3 Sampling frequency: 16 kHz, 22.05 kHz, 24 kHz, 32 kHz, 44.1 kHz, 48 kHz Bit rate: from 8 to 320 kbps Maximum number of analog audio inputs, the PC Audio menu setting influences the HDMI 1 Audio menu setting. A message...

User Manual
Page 59
... of analog channel (no signal is detected. Rewinds/reverses. Note: • These functions depend on the remote control to TV. Note: • Default setting is set the MODE SELECT switch on the devices that uses CEC technology and allows you to control Toshiba REGZA-LINK compatible devices from the TV remote via HDMI connection ( pages 18-19). pqtu Navigate contents menu, etc. Returns to the previous menu. Root Menu Accesses...
... of analog channel (no signal is detected. Rewinds/reverses. Note: • These functions depend on the remote control to TV. Note: • Default setting is set the MODE SELECT switch on the devices that uses CEC technology and allows you to control Toshiba REGZA-LINK compatible devices from the TV remote via HDMI connection ( pages 18-19). pqtu Navigate contents menu, etc. Returns to the previous menu. Root Menu Accesses...
User Manual
Page 74
...; Internet service is the same as the networked PC's. You cannot connect more formats are played. •• Copyright protection contents stored in Easy Setup (PIN) or Assisted Setup, the power of the DLNA server and the USB storage device are formats that the wireless constitution was processed and edited by using the same network type (DHCP/manual) and have a router, you do not have compatible network settings. •...
...; Internet service is the same as the networked PC's. You cannot connect more formats are played. •• Copyright protection contents stored in Easy Setup (PIN) or Assisted Setup, the power of the DLNA server and the USB storage device are formats that the wireless constitution was processed and edited by using the same network type (DHCP/manual) and have a router, you do not have compatible network settings. •...
User Manual
Page 77
... following all of the operating instructions in this manual, review the section entitled "Concierge" located on our Customer Support Web site "www.tacp.toshiba. DURING THIS PERIOD, TACP WILL, AT TACP'S SOLE DESCRETION, REPAIR OR REPLACE A DEFECTIVE PART/PRODUCT WITH A NEW OR REFURBISHED PART/PRODUCT WITHOUT CHARGE TO YOU FOR PARTS OR LABOR. Your Responsibility Read the owner's manual thoroughly before operating this LCD Television and connected equipment;
... following all of the operating instructions in this manual, review the section entitled "Concierge" located on our Customer Support Web site "www.tacp.toshiba. DURING THIS PERIOD, TACP WILL, AT TACP'S SOLE DESCRETION, REPAIR OR REPLACE A DEFECTIVE PART/PRODUCT WITH A NEW OR REFURBISHED PART/PRODUCT WITHOUT CHARGE TO YOU FOR PARTS OR LABOR. Your Responsibility Read the owner's manual thoroughly before operating this LCD Television and connected equipment;

User Manual
Page 78
... your LCD Television will enable TCL to service the Television; This includes wall mounts, custom cabinets and other than those authorized by the simultaneous use of antenna systems are effective only if the Television is hereby limited to ninety (90) days from the date of this LCD Television. Labour charges for set installation, setup, adjustment of customer controls, and installation or repair of incompatible third party products; Replacement of...
... your LCD Television will enable TCL to service the Television; This includes wall mounts, custom cabinets and other than those authorized by the simultaneous use of antenna systems are effective only if the Television is hereby limited to ninety (90) days from the date of this LCD Television. Labour charges for set installation, setup, adjustment of customer controls, and installation or repair of incompatible third party products; Replacement of...


