User Manual
Page 4
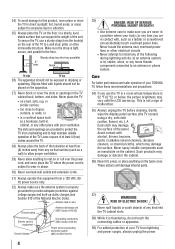
..., always unplug the power Never locate the antenna near overhead power lines or other immovable structure. Gently wipe the display panel surface (the TV screen) using a dry, soft cloth (cotton, flannel, etc.). Avoid contact with , such as a ladder or screwdriver) can support the weight ..., acidic or alkaline solvent cleaners, abrasive cleaners, or chemical cloths, which may damage the surface. Care For better performance and safer operation of your TOSHIBA TV, follow these recommendations and precautions: 34) If you are never in a room whose temperature is 32 °F (0 °C) or below...
..., always unplug the power Never locate the antenna near overhead power lines or other immovable structure. Gently wipe the display panel surface (the TV screen) using a dry, soft cloth (cotton, flannel, etc.). Avoid contact with , such as a ladder or screwdriver) can support the weight ..., acidic or alkaline solvent cleaners, abrasive cleaners, or chemical cloths, which may damage the surface. Care For better performance and safer operation of your TOSHIBA TV, follow these recommendations and precautions: 34) If you are never in a room whose temperature is 32 °F (0 °C) or below...
User Manual
Page 5
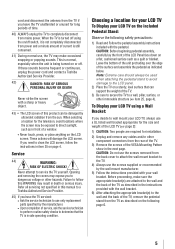
... 4. If these sounds become frequent or continuous, unplug the power cord and contact a Toshiba Authorized Service Provider. 42) DANGER: RISK OF SERIOUS PERSONAL INJURY OR DEATH! Never strike the screen with the pedestal. Service 44) WARNING: RISK OF ELECTRIC SHOCK! CAUTION: Before beginning ...precautions: 1) Read and Follow the pedestal assembly instructions included with a sharp or heavy object. 43) • The LCD screen of this manual to a Toshiba Authorized Service Provider. 45) If you have the TV serviced: • Ask the service technician to dangerous voltage or other...
... 4. If these sounds become frequent or continuous, unplug the power cord and contact a Toshiba Authorized Service Provider. 42) DANGER: RISK OF SERIOUS PERSONAL INJURY OR DEATH! Never strike the screen with the pedestal. Service 44) WARNING: RISK OF ELECTRIC SHOCK! CAUTION: Before beginning ...precautions: 1) Read and Follow the pedestal assembly instructions included with a sharp or heavy object. 43) • The LCD screen of this manual to a Toshiba Authorized Service Provider. 45) If you have the TV serviced: • Ask the service technician to dangerous voltage or other...

User Manual
Page 7
.... • Increase the separation between the equipment and the receiver. • Connect the equipment into an outlet on the screen if a fixed, nonmoving image is : Toshiba America Information Systems, Inc. 9740 Irvine Blvd.; Products that may not work with this equipment. To ensure your LCD TV ... following symptoms are technical limitations of LCD Display technology and are registered U.S. FCC Declaration of Conformity Compliance Statement (Part 15): Toshiba 40SL412U, 46SL412U, 55SL412U, and 55S41U Television models comply with Part 15 of precision technology;
.... • Increase the separation between the equipment and the receiver. • Connect the equipment into an outlet on the screen if a fixed, nonmoving image is : Toshiba America Information Systems, Inc. 9740 Irvine Blvd.; Products that may not work with this equipment. To ensure your LCD TV ... following symptoms are technical limitations of LCD Display technology and are registered U.S. FCC Declaration of Conformity Compliance Statement (Part 15): Toshiba 40SL412U, 46SL412U, 55SL412U, and 55S41U Television models comply with Part 15 of precision technology;
User Manual
Page 11
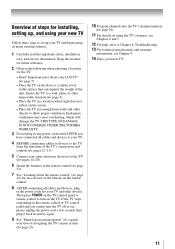
...TV to a wall, pillar, or other immovable structure ( page 4). • Place the TV in a location where light does not reflect on the screen. • Place the TV far enough from walls and other objects to Chapter 8: Troubleshooting. 13 For technical specifications and warranty information, see Chapters 6 and ... Enjoy your new TV! 11 Inadequate ventilation may cause overheating, which will damage the TV. THIS TYPE OF DAMAGE IS NOT COVERED UNDER THE TOSHIBA WARRANTY. 3 Do not plug in any power cords until AFTER you cannot turn on the floor or a sturdy, level, stable surface that ...
...TV to a wall, pillar, or other immovable structure ( page 4). • Place the TV in a location where light does not reflect on the screen. • Place the TV far enough from walls and other objects to Chapter 8: Troubleshooting. 13 For technical specifications and warranty information, see Chapters 6 and ... Enjoy your new TV! 11 Inadequate ventilation may cause overheating, which will damage the TV. THIS TYPE OF DAMAGE IS NOT COVERED UNDER THE TOSHIBA WARRANTY. 3 Do not plug in any power cords until AFTER you cannot turn on the floor or a sturdy, level, stable surface that ...
User Manual
Page 12
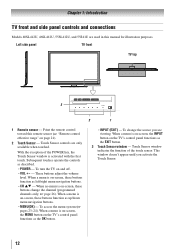
...system ( pages 23-24). To change the channel (programmed channels only; page 26). MENU(OK) - When a menu is on-screen, these buttons function as the EXIT button. 3無 Touch Sensor window - Point the remote control toward this manual for illustration purposes. POWER - When...CH VOL 3 2 1 1無 Remote sensor - Chapter 1: Introduction TV front and side panel controls and connections Models 40SL412U, 46SL412U, 55SL412U, and 55S41U are used in this remote sensor ( "Remote control effective range" on page 21). 2無 Touch Sensor -
...system ( pages 23-24). To change the channel (programmed channels only; page 26). MENU(OK) - When a menu is on-screen, these buttons function as the EXIT button. 3無 Touch Sensor window - Point the remote control toward this manual for illustration purposes. POWER - When...CH VOL 3 2 1 1無 Remote sensor - Chapter 1: Introduction TV front and side panel controls and connections Models 40SL412U, 46SL412U, 55SL412U, and 55S41U are used in this remote sensor ( "Remote control effective range" on page 21). 2無 Touch Sensor -
User Manual
Page 20
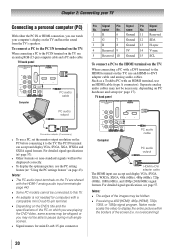
... the monitor output resolution on page 43). Note: •• The PC audio input terminals on the DVD's title and the specifications of the screen (i.e. name Pin Signal No. TV back panel Computer PC audio cable PC audio output Pin Signal No. TV back panel Conversion adapter (if necessary)... skipped or you can accept and display VGA, SVGA, XGA, WXGA and SXGA signal formats. For detailed signal specifications, see page 57. Such as a Toshiba PC with a DVI terminal to the HDMI terminal on the TV, use an HDMI cable (type A connector). name 1R 6 Ground 11 Reserved 2G 7...
... the monitor output resolution on page 43). Note: •• The PC audio input terminals on the DVD's title and the specifications of the screen (i.e. name Pin Signal No. TV back panel Computer PC audio cable PC audio output Pin Signal No. TV back panel Conversion adapter (if necessary)... skipped or you can accept and display VGA, SVGA, XGA, WXGA and SXGA signal formats. For detailed signal specifications, see page 57. Such as a Toshiba PC with a DVI terminal to the HDMI terminal on the TV, use an HDMI cable (type A connector). name 1R 6 Ground 11 Reserved 2G 7...

User Manual
Page 22
.... 14無 INFO displays TV status information as well as program details, when available ( pages 49-50). 15無 EXIT closes on-screen menus. 16無 ENTER activates highlighted items in the main menu system. 17無 CH RTN returns to the last viewed channel or source (&#... the sleep timer ( page 47). 6無 FREEZE freezes the picture. Note: The error message "NOT AVAILABLE" may appear if you to control Toshiba REGZA-LINK compatible devices via HDMI connection ( Page 48, REGZA-LINK playback device control). 21無 STOP Stops the tape or DVD. 22無...
.... 14無 INFO displays TV status information as well as program details, when available ( pages 49-50). 15無 EXIT closes on-screen menus. 16無 ENTER activates highlighted items in the main menu system. 17無 CH RTN returns to the last viewed channel or source (&#... the sleep timer ( page 47). 6無 FREEZE freezes the picture. Note: The error message "NOT AVAILABLE" may appear if you to control Toshiba REGZA-LINK compatible devices via HDMI connection ( Page 48, REGZA-LINK playback device control). 21無 STOP Stops the tape or DVD. 22無...
User Manual
Page 23
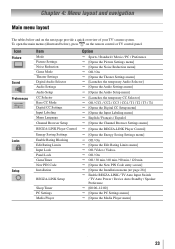
... menu] Off / Video / Video+ Off / On Off / 30 min / 60 min / 90 min / 120 min [Opens the New PIN Code entry screen] [Opens the Installation menu ( page 28)] Enable REGZA-LINK / TV Auto Input Switch / TV Auto Power / Device Auto Standby / Speaker Preference ...
... menu] Off / Video / Video+ Off / On Off / 30 min / 60 min / 90 min / 120 min [Opens the New PIN Code entry screen] [Opens the Installation menu ( page 28)] Enable REGZA-LINK / TV Auto Input Switch / TV Auto Power / Device Auto Standby / Speaker Preference ...
User Manual
Page 24
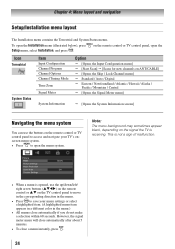
... menu] Standard / Auto / Digital Eastern / Newfoundland / Atlantic / Hawaii / Alaska / Pacific / Mountain / Central [Opens the Signal Meter menu] [Opens the System Information screen] Navigating the menu system You can use the buttons on the signal the TV is opened, use the up/down/left/ right arrow buttons (pqtu...
... menu] Standard / Auto / Digital Eastern / Newfoundland / Atlantic / Hawaii / Alaska / Pacific / Mountain / Central [Opens the Signal Meter menu] [Opens the System Information screen] Navigating the menu system You can use the buttons on the signal the TV is opened, use the up/down/left/ right arrow buttons (pqtu...

User Manual
Page 25
... channels preferentially over analog when entering channel number directly, select Auto. You can choose from three different languages (English, French, and Spanish) for the on-screen display of Installation menu icons will appear, as shown below. For normal tuning, select Standard. Selecting the menu language You can stop the Initial Setup...
... channels preferentially over analog when entering channel number directly, select Auto. You can choose from three different languages (English, French, and Spanish) for the on-screen display of Installation menu icons will appear, as shown below. For normal tuning, select Standard. Selecting the menu language You can stop the Initial Setup...
User Manual
Page 27
... you unlock them. ( Page 42 Locking channels) To manually add digital subchannels on a physical channel: Use the Channel Numbers and the Dash ( ) on the screen to remove the unnecessary channel from the channel memory: If an encrypted channel is found , a message will appear. Note: Skipped channels cannot be output. To...
... you unlock them. ( Page 42 Locking channels) To manually add digital subchannels on a physical channel: Use the Channel Numbers and the Dash ( ) on the screen to remove the unnecessary channel from the channel memory: If an encrypted channel is found , a message will appear. Note: Skipped channels cannot be output. To...

User Manual
Page 28
...your local digital stations. • The signal strength does not change between virtual channels on the same physical channel. To close the screen and return to the Installation menu: Highlight Done and press . A new set the time zone: 1無 From the Setup menu,... highlight Installation and press . To close the screen and return to the Terrestrial menu: Highlight Done and press . This feature will appear. 2無 Highlight Time Zone, and press . 3無 ...
...your local digital stations. • The signal strength does not change between virtual channels on the same physical channel. To close the screen and return to the Installation menu: Highlight Done and press . A new set the time zone: 1無 From the Setup menu,... highlight Installation and press . To close the screen and return to the Terrestrial menu: Highlight Done and press . This feature will appear. 2無 Highlight Time Zone, and press . 3無 ...
User Manual
Page 29
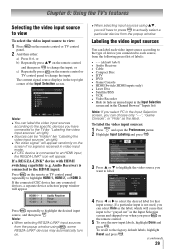
... label each video input source according to the type of device you connected to each source, from the following preset list of the Input Selection screen. 3 6 Note: ••You can be "grayed out" in video input mode. ••If CEC device is received in the Input Selection... screen and skipped over when you will appear randomly on the remote or TV control panel repeatedly to label. or c) Repeatedly press on the remote control ...
... label each video input source according to the type of device you connected to each source, from the following preset list of the Input Selection screen. 3 6 Note: ••You can be "grayed out" in video input mode. ••If CEC device is received in the Input Selection... screen and skipped over when you will appear randomly on the remote or TV control panel repeatedly to label. or c) Repeatedly press on the remote control ...
User Manual
Page 30
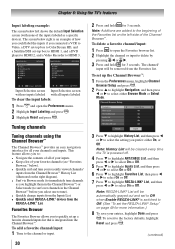
.... (See "To set -top box to HDMI 1, and a DVD player to HDMI 2, and a Video Recorder to HDMI 3. 3 6 Input Selection screen Input Selection screen with no inputs labeled with none of the inputs labeled as you highlight them in the Channel Browser™) or Select mode (to surf... Browser," below). • Quickly surf and tune your entries, highlight Done and press . Chapter 6: Using the TV's features Input labeling example: The screen below left side of the Channel Browser™. To delete a favorite channel/input: 1無 Press to open the Preferences menu. 2無 Highlight Input ...
.... (See "To set -top box to HDMI 1, and a DVD player to HDMI 2, and a Video Recorder to HDMI 3. 3 6 Input Selection screen Input Selection screen with no inputs labeled with none of the inputs labeled as you highlight them in the Channel Browser™) or Select mode (to surf... Browser," below). • Quickly surf and tune your entries, highlight Done and press . Chapter 6: Using the TV's features Input labeling example: The screen below left side of the Channel Browser™. To delete a favorite channel/input: 1無 Press to open the Preferences menu. 2無 Highlight Input ...

User Manual
Page 33
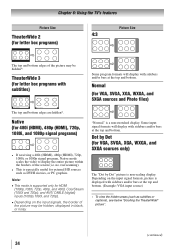
...to its original proportion, but not stretched taller. (for about 2 seconds until the message "Memorized" appears on-screen. The TV will return to fill the width of the screen but the left and right edges are stretched wider to select the desired picture size setting. 3無 Highlight Done...in Full or 4:3 picture size. Using these functions to the button, so you press , the memorized channel will be "grayed out" in the Picture Size screen). Picture Size Full (for 16:9 [480i, 480p] source programs only) If receiving a squeezed 4:3 format program, the picture is open , you can ...
...to its original proportion, but not stretched taller. (for about 2 seconds until the message "Memorized" appears on-screen. The TV will return to fill the width of the screen but the left and right edges are stretched wider to select the desired picture size setting. 3無 Highlight Done...in Full or 4:3 picture size. Using these functions to the button, so you press , the memorized channel will be "grayed out" in the Picture Size screen). Picture Size Full (for 16:9 [480i, 480p] source programs only) If receiving a squeezed 4:3 format program, the picture is open , you can ...
User Manual
Page 34
... HD sources such as subtitles or captions), see below "Scrolling the TheaterWide® picture". (continued) 34 Depending on the input signals, the border of the screen (i.e. no overscanning). • This is displayed with sidebars and/or bars at the top and bottom. Native (for 480i (HDMI), 480p (HDMI), 720p, 1080i, and...
... HD sources such as subtitles or captions), see below "Scrolling the TheaterWide® picture". (continued) 34 Depending on the input signals, the border of the screen (i.e. no overscanning). • This is displayed with sidebars and/or bars at the top and bottom. Native (for 480i (HDMI), 480p (HDMI), 720p, 1080i, and...

User Manual
Page 36
...2無 Press or to select the desired closed captioned (usually marked "CC" in program guides). • Text-An on -screen display of the dialogue, narration, and sound effects of information not related to 0. (Settings are stored in memory.) Using the closed caption mode Base ...closed captions The closed caption mode has two options: • Captions-An on -screen display of TV programs and videos that you adjusted are closed caption mode and press . • To view captions: Highlight CC1, CC2, ...
...2無 Press or to select the desired closed captioned (usually marked "CC" in program guides). • Text-An on -screen display of the dialogue, narration, and sound effects of information not related to 0. (Settings are stored in memory.) Using the closed caption mode Base ...closed captions The closed caption mode has two options: • Captions-An on -screen display of TV programs and videos that you adjusted are closed caption mode and press . • To view captions: Highlight CC1, CC2, ...

User Manual
Page 37
... only. ••You cannot set the Caption Text and Background as the same color. To customize the closed captioned, no captions will display on screen. w/o Serif, Casual, Cursive, Small Capitals Caption Text Edge Auto, None, Raised, Depressed, Uniform, Left Drop Shadow, Right Drop Shadow Caption Text Color Auto, Black, White... can use the CC Selector to select the desired service. 4無 Press . 37 If this happens, set in your area, a black rectangle may appear on -screen. • To view text: Highlight T1, T2, T3, or T4. Serif, Prop.
... only. ••You cannot set the Caption Text and Background as the same color. To customize the closed captioned, no captions will display on screen. w/o Serif, Casual, Cursive, Small Capitals Caption Text Edge Auto, None, Raised, Depressed, Uniform, Left Drop Shadow, Right Drop Shadow Caption Text Color Auto, Black, White... can use the CC Selector to select the desired service. 4無 Press . 37 If this happens, set in your area, a black rectangle may appear on -screen. • To view text: Highlight T1, T2, T3, or T4. Serif, Prop.

User Manual
Page 38
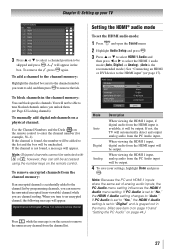
... no sound at all in SAP mode. When the TV receives a stereo or SAP broadcast, the symbol " " or word "SAP" appears on-screen when 38 is only available for those TV stations that have multiple audio tracks). To reset the settings to Stereo mode. To listen to adjust...). ••If the stereo sound is not broadcasting a second audio program, the station's normal audio will see the current program on the screen but hear the other audio information (when provided by the language option under Audio Setup ( "Selecting stereo/SAP broadcasts"). Using the digital audio...
... no sound at all in SAP mode. When the TV receives a stereo or SAP broadcast, the symbol " " or word "SAP" appears on-screen when 38 is only available for those TV stations that have multiple audio tracks). To reset the settings to Stereo mode. To listen to adjust...). ••If the stereo sound is not broadcasting a second audio program, the station's normal audio will see the current program on the screen but hear the other audio information (when provided by the language option under Audio Setup ( "Selecting stereo/SAP broadcasts"). Using the digital audio...
User Manual
Page 39
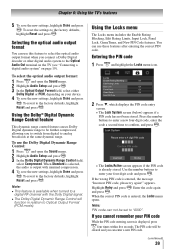
... Entering the PIN code 1無 Press and highlight the Locks menu icon. 2無 Press , which displays the PIN code entry screen. • The Lock System screen (below) appears if a PIN code has not been stored. appears. To revert to the factory defaults, highlight Reset and press . ... Dolby Digital Dynamic Range Control field, select Compressed. The PIN code will function in relation to confirm, and press . • The Locks/Active screen appears if the PIN code is displayed, press four times within five seconds. Chapter 6: Using the TV's features 5無 To save the new...
... Entering the PIN code 1無 Press and highlight the Locks menu icon. 2無 Press , which displays the PIN code entry screen. • The Lock System screen (below) appears if a PIN code has not been stored. appears. To revert to the factory defaults, highlight Reset and press . ... Dolby Digital Dynamic Range Control field, select Compressed. The PIN code will function in relation to confirm, and press . • The Locks/Active screen appears if the PIN code is displayed, press four times within five seconds. Chapter 6: Using the TV's features 5無 To save the new...


