
Owners Manual
Page 2
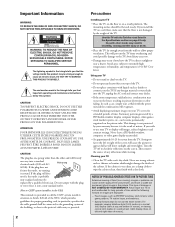
.... Turn the TV off to the left and right sides of time while the following formats or images are displayed: - Then remove the source of the cabinet. Cleaning your TV to wipe the cabinet clean, then finish with a soft, dry cloth. Never use your TV • Clean the TV with a dry cloth. NOTICE OF POSSIBLE ADVERSE EFFECTS ON TV PICTURE TUBE Extensive viewing of fixed (non-moving) images or...
.... Turn the TV off to the left and right sides of time while the following formats or images are displayed: - Then remove the source of the cabinet. Cleaning your TV to wipe the cabinet clean, then finish with a soft, dry cloth. Never use your TV • Clean the TV with a dry cloth. NOTICE OF POSSIBLE ADVERSE EFFECTS ON TV PICTURE TUBE Extensive viewing of fixed (non-moving) images or...
Owners Manual
Page 3
... volume lock feature (993 16 Operational feature reset (980 16 Device code table 17-20 Learning about the remote control 21 Setting up your TV 22 Learning about the menu system 22 Changing the on-screen display language 23 Selecting the antenna input 23 Adding channels to the TV's memory 24 Programming channels automatically 24 Adding and erasing channels manually 25 Changing channels 25 Adjusting the color convergence 26 Using the TV's features 28 Adjusting the channel settings 28 Switching between two channels...
... volume lock feature (993 16 Operational feature reset (980 16 Device code table 17-20 Learning about the remote control 21 Setting up your TV 22 Learning about the menu system 22 Changing the on-screen display language 23 Selecting the antenna input 23 Adding channels to the TV's memory 24 Programming channels automatically 24 Adding and erasing channels manually 25 Changing channels 25 Adjusting the color convergence 26 Using the TV's features 28 Adjusting the channel settings 28 Switching between two channels...
Owners Manual
Page 4
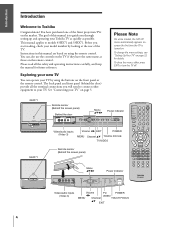
... Toshiba Congratulations! Exploring your new TV You can also use the controls on the TV if they have purchased one of this manual are based on using the buttons on . To close the menu, either press EXIT or turn the TV off. 43HX71 53HX71 Remote sensor (Behind the screen panel) Behind the door S-VIDEO VIDEO-3 IN AUDIO VIDEO L/MONO R CH MENU VOL CH Menu yzx • Power indicator VOL EXIT T V / V I D E O TOUCH FOCUS POWER Video/audio inputs (Video 3) Volume x • EXIT POWER MENU Channel...
... Toshiba Congratulations! Exploring your new TV You can also use the controls on the TV if they have purchased one of this manual are based on using the buttons on . To close the menu, either press EXIT or turn the TV off. 43HX71 53HX71 Remote sensor (Behind the screen panel) Behind the door S-VIDEO VIDEO-3 IN AUDIO VIDEO L/MONO R CH MENU VOL CH Menu yzx • Power indicator VOL EXIT T V / V I D E O TOUCH FOCUS POWER Video/audio inputs (Video 3) Volume x • EXIT POWER MENU Channel...

Owners Manual
Page 5
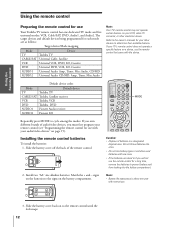
... time. S-video cables can only be used with S-video compatible components. • ColorStream™ cables come in sets of audio cables (one single audio cable for a mono VCR) • one video cable (one S-video cable for an S-VHS VCR) From Cable Box or Antenna Stereo VCR VIDEO AUDIO LR IN OUT OUT to TV IN from one audio cable. If you have an S-VHS VCR, use : yellow for video and red and white for audio. Introduction Connecting your TV Using the Remote Control Setting up your TV Connecting...
... time. S-video cables can only be used with S-video compatible components. • ColorStream™ cables come in sets of audio cables (one single audio cable for a mono VCR) • one video cable (one S-video cable for an S-VHS VCR) From Cable Box or Antenna Stereo VCR VIDEO AUDIO LR IN OUT OUT to TV IN from one audio cable. If you have an S-VHS VCR, use : yellow for video and red and white for audio. Introduction Connecting your TV Using the Remote Control Setting up your TV Connecting...

Owners Manual
Page 6
... S-video cable (in your area), and use a converter box with your TV, the remote control will not operate some features, such as programming your favorite channels, labeling channels, and locking channels. When you use a converter box with your favorite channels, labeling channels, and locking channels. You will need : • three coaxial cables • one pair of a regular video cable. If you use the converter box to watch and record basic and premium cable channels, watch basic and premium cable channels. TV From Cable S-VIDEO AUDIO CENTER CHANNEL...
... S-video cable (in your area), and use a converter box with your TV, the remote control will not operate some features, such as programming your favorite channels, labeling channels, and locking channels. When you use a converter box with your favorite channels, labeling channels, and locking channels. You will need : • three coaxial cables • one pair of a regular video cable. If you use the converter box to watch and record basic and premium cable channels, watch basic and premium cable channels. TV From Cable S-VIDEO AUDIO CENTER CHANNEL...

Owners Manual
Page 8
... DVD player;see notes at the same time. Y PB PR S-VIDEO COMPONENT VIDEO VIDEO OUT AUDIO OUT L L R R DVD Player with component video Setting up your TV Using the TV's Features Appendix Index 8 Caution: The unauthorized recording of television programs, videotapes, and other materials may infringe upon the provisions of ColorStream component video cables (one S-video cable for a mono VCR) • two video cables • one set the VCR to Line IN. Introduction Connecting your TV Using the Remote Control Connecting a DVD player...
... DVD player;see notes at the same time. Y PB PR S-VIDEO COMPONENT VIDEO VIDEO OUT AUDIO OUT L L R R DVD Player with component video Setting up your TV Using the TV's Features Appendix Index 8 Caution: The unauthorized recording of television programs, videotapes, and other materials may infringe upon the provisions of ColorStream component video cables (one S-video cable for a mono VCR) • two video cables • one set the VCR to Line IN. Introduction Connecting your TV Using the Remote Control Connecting a DVD player...

Owners Manual
Page 9
... L AUDIO R PR R R COLOR VIDEO-1 VIDEO-2 STREAM AUDIO HD 1 IN IN AUDIO OUT AUDIO PR R COLOR STREAM HD 2 IN ANT-2 Note: For the highest possible picture quality, you must use the S-video connections (both S-Video and ColorStream cables between the TV and DTV receiver. see notes at the same time. To record from the DTV receiver, set the VCR to Line IN. Your TV has ColorStream component video inputs. Caution: The unauthorized recording of television programs...
... L AUDIO R PR R R COLOR VIDEO-1 VIDEO-2 STREAM AUDIO HD 1 IN IN AUDIO OUT AUDIO PR R COLOR STREAM HD 2 IN ANT-2 Note: For the highest possible picture quality, you must use the S-video connections (both S-Video and ColorStream cables between the TV and DTV receiver. see notes at the same time. To record from the DTV receiver, set the VCR to Line IN. Your TV has ColorStream component video inputs. Caution: The unauthorized recording of television programs...

Owners Manual
Page 11
Adjust the volume for the center channel speakers using an external audio amplifier, the volume of both the TV and the amplifier must be set the Audio Center Channel ON/OFF switch to enhance your TV's sound. You will need : • one pair of audio cables Note: To hear sound when using the center level control on the A/V receiver. If you have a system with Dolby Pro Logic® surround sound, you can add to...
Adjust the volume for the center channel speakers using an external audio amplifier, the volume of both the TV and the amplifier must be set the Audio Center Channel ON/OFF switch to enhance your TV's sound. You will need : • one pair of audio cables Note: To hear sound when using the center level control on the A/V receiver. If you have a system with Dolby Pro Logic® surround sound, you can add to...
Owners Manual
Page 12
.... Install two "AA" size alkaline batteries. Setting up your TV Using the TV's Features Appendix Index 3. Default device codes Mode Default device TV Toshiba TV CABLE/SAT Toshiba Satellite receiver VCR Toshiba VCR DVD Toshiba DVD AUDIO1 Pioneer Audio receiver AUDIO2 Pioneer LD MODE Repeatedly press MODE to the remote control until the lock snaps. 12 Match the + and - Slide the battery cover back on to cycle among the modes. signs on the batteries to the owner's manuals for...
.... Install two "AA" size alkaline batteries. Setting up your TV Using the TV's Features Appendix Index 3. Default device codes Mode Default device TV Toshiba TV CABLE/SAT Toshiba Satellite receiver VCR Toshiba VCR DVD Toshiba DVD AUDIO1 Pioneer Audio receiver AUDIO2 Pioneer LD MODE Repeatedly press MODE to the remote control until the lock snaps. 12 Match the + and - Slide the battery cover back on to cycle among the modes. signs on the batteries to the owner's manuals for...
Owners Manual
Page 13
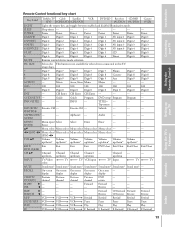
...8 Digit 8 9 Digit 9 Digit 9 Digit 9 Digit 9 Digit 9 Aux Digit 9 Digit 9 ACTION --- Audio --- --- --- Guide Guide Program DVD setup Program Program --- Top menu FAVORITE/ Favorite CH --- x •/(FAV) x • Menu select/ Menu select Menu select Menu select Menu select --- --- --- (FAV) x • VOL yz Volume Volume Volume Volume Volume Volume Volume --up/down* up/down* up/down* up/down* up/down* up/down INPUT TV/Video select TV TV VCR input TV Input TV TV MUTE Sound mute* Sound mute* Sound mute* Sound mute* Sound mute* Sound mute* Sound mute* --- Channel...
...8 Digit 8 9 Digit 9 Digit 9 Digit 9 Digit 9 Digit 9 Aux Digit 9 Digit 9 ACTION --- Audio --- --- --- Guide Guide Program DVD setup Program Program --- Top menu FAVORITE/ Favorite CH --- x •/(FAV) x • Menu select/ Menu select Menu select Menu select Menu select --- --- --- (FAV) x • VOL yz Volume Volume Volume Volume Volume Volume Volume --up/down* up/down* up/down* up/down* up/down* up/down INPUT TV/Video select TV TV VCR input TV Input TV TV MUTE Sound mute* Sound mute* Sound mute* Sound mute* Sound mute* Sound mute* Sound mute* --- Channel...

Owners Manual
Page 21
... the PIP/double-window picture source (page 32) CT-90047 21 Index Appendix Using the TV's Features Setting up your TV Using the Remote Control Connecting your TV Introduction Channel Numbers (0-9, 100) allow direct access to channels (page 25) MODE cycles through programmed channels (page 25) VOL yz adjusts the volume level EXIT exits the programming menus (page 22) INPUT selects the video input source (page 44) MUTE mutes the sound (page 47) RECALL displays on-screen information...
... the PIP/double-window picture source (page 32) CT-90047 21 Index Appendix Using the TV's Features Setting up your TV Using the Remote Control Connecting your TV Introduction Channel Numbers (0-9, 100) allow direct access to channels (page 25) MODE cycles through programmed channels (page 25) VOL yz adjusts the volume level EXIT exits the programming menus (page 22) INPUT selects the video input source (page 44) MUTE mutes the sound (page 47) RECALL displays on-screen information...

Owners Manual
Page 22
... CH LOCK V I DEO LOCK FRONT PANEL LOCK NEW P I N CODE OFF OFF OFF : SELECT EXIT : END 43HX71 TV front panel CH MENU VOL VOL EXIT TV/VIDEO TOUCH FOCUS PO CH MENU yzx • EXIT 53HX71 MENU VOL CH EXIT VOL TV/VIDEO TOUCH FOCUS CH POWER MENU yzx • EXIT MENU/ENTER yzx • EXIT Note: You can access the menu with the buttons on the TV using the remote control. 1. Press x or • to set some preferences...
... CH LOCK V I DEO LOCK FRONT PANEL LOCK NEW P I N CODE OFF OFF OFF : SELECT EXIT : END 43HX71 TV front panel CH MENU VOL VOL EXIT TV/VIDEO TOUCH FOCUS PO CH MENU yzx • EXIT 53HX71 MENU VOL CH EXIT VOL TV/VIDEO TOUCH FOCUS CH POWER MENU yzx • EXIT MENU/ENTER yzx • EXIT Note: You can access the menu with the buttons on the TV using the remote control. 1. Press x or • to set some preferences...

Owners Manual
Page 28
... TV CABLE CLEAR ALL 4. Press CH RTN. Press MENU, and then press x or • until the CUSTOM menu appears. 2. CH INPUT will switch back and forth between the two channels. Select a second channel with the Channel Number buttons (0-9, 100). 3. Each time you do not normally watch. Press the Channel Number buttons to highlight FAVORITE CH1 or FAVORITE CH2. Select the first channel or video mode you want to display...
... TV CABLE CLEAR ALL 4. Press CH RTN. Press MENU, and then press x or • until the CUSTOM menu appears. 2. CH INPUT will switch back and forth between the two channels. Select a second channel with the Channel Number buttons (0-9, 100). 3. Each time you do not normally watch. Press the Channel Number buttons to highlight FAVORITE CH1 or FAVORITE CH2. Select the first channel or video mode you want to display...

Owners Manual
Page 41
... Preference Picture Quality Bright and dynamic picture (factory setting) Standard picture setting (factory setting) Movie-like picture setting (factory setting) Your personal preference* *(see page 42) before closing the Picture menu or the TV will return to the previous picture mode. 43HX71 TV front panel CH MENU VOL VOL EXIT TV/VIDEO TOUCH FOCUS PO CH Using the Remote Control Setting up your TV Using the TV's Features P I CTURE ANTENNA MODE SPORTS / STANDARD / MOV I E / PREFERENCE CONTRAST 80 BR I GHTNESS 50 COLOR 50 T I NT 0 SHARPNESS 50 RESET SAVE...
... Preference Picture Quality Bright and dynamic picture (factory setting) Standard picture setting (factory setting) Movie-like picture setting (factory setting) Your personal preference* *(see page 42) before closing the Picture menu or the TV will return to the previous picture mode. 43HX71 TV front panel CH MENU VOL VOL EXIT TV/VIDEO TOUCH FOCUS PO CH Using the Remote Control Setting up your TV Using the TV's Features P I CTURE ANTENNA MODE SPORTS / STANDARD / MOV I E / PREFERENCE CONTRAST 80 BR I GHTNESS 50 COLOR 50 T I NT 0 SHARPNESS 50 RESET SAVE...

Owners Manual
Page 44
... the PIP/Double-Window is selected, the video OUT jack does not output a signal. Press MENU, and then press x or • until the CUSTOM menu appears. 2. Note: • When ColorStream HD 1 or HD 2 is active, the window will close. 43HX71 TV front panel CH MENU VOL VOL EXIT TV/VIDEO TOUCH FOCUS PO CH TV/VIDEO 53HX71 MENU VOL CH EXIT VOL TV/VIDEO TOUCH FOCUS CH POWER TV/VIDEO Setting up your TV Using the TV...
... the PIP/Double-Window is selected, the video OUT jack does not output a signal. Press MENU, and then press x or • until the CUSTOM menu appears. 2. Note: • When ColorStream HD 1 or HD 2 is active, the window will close. 43HX71 TV front panel CH MENU VOL VOL EXIT TV/VIDEO TOUCH FOCUS PO CH TV/VIDEO 53HX71 MENU VOL CH EXIT VOL TV/VIDEO TOUCH FOCUS CH POWER TV/VIDEO Setting up your TV Using the TV...

Owners Manual
Page 47
... TV Adjusting the sound Muting the sound Press MUTE to reduce the noise. Press x or • to highlight MTS. 3. MENU yzx • Note : A second audio program (SAP) can hear the station's normal audio. yzx • MUTE RECALL When the TV receives a stereo or SAP broadcast, the word STEREO or SAP appears on-screen every time the TV is turned on, the channel is changed, or the RECALL button is pressed. 43HX71 TV...
... TV Adjusting the sound Muting the sound Press MUTE to reduce the noise. Press x or • to highlight MTS. 3. MENU yzx • Note : A second audio program (SAP) can hear the station's normal audio. yzx • MUTE RECALL When the TV receives a stereo or SAP broadcast, the word STEREO or SAP appears on-screen every time the TV is turned on, the channel is changed, or the RECALL button is pressed. 43HX71 TV...

Owners Manual
Page 48
...- To turn on page 47). 2. Setting up your TV's sound by adjusting the bass, treble, and balance. WOW technology is incorporated under license from a TV broadcast or video input. The feature uses stereo signals from SRS...channel, depending on the item selected. Introduction Connecting your desired bass expansion level from among HIGH, LOW or OFF. WOW consists of SRS Labs, Inc. Press MENU, and then press x or • until the THEATER menu appears. 3. Press x or • to create exceptional sound quality from the TV's speakers. To adjust the WOW feature: 1. Select STEREO mode...
...- To turn on page 47). 2. Setting up your TV's sound by adjusting the bass, treble, and balance. WOW technology is incorporated under license from a TV broadcast or video input. The feature uses stereo signals from SRS...channel, depending on the item selected. Introduction Connecting your desired bass expansion level from among HIGH, LOW or OFF. WOW consists of SRS Labs, Inc. Press MENU, and then press x or • until the THEATER menu appears. 3. Press x or • to create exceptional sound quality from the TV's speakers. To adjust the WOW feature: 1. Select STEREO mode...

Owners Manual
Page 53
... receive above channel 13 • Make sure the TV/CABLE switch is set to the mode that the SPEAKERS function in the PICTURE menu. Poor color or no sound • Check the antenna/cable connections. The remote control does not operate • Check whether the appropriate device mode is set to one of the problem and some solutions. Using the Remote Control Poor picture, sound OK • Check the antenna connections. • The station may have broadcast difficulties. Try another channel. • Adjust...
... receive above channel 13 • Make sure the TV/CABLE switch is set to the mode that the SPEAKERS function in the PICTURE menu. Poor color or no sound • Check the antenna/cable connections. The remote control does not operate • Check whether the appropriate device mode is set to one of the problem and some solutions. Using the Remote Control Poor picture, sound OK • Check the antenna connections. • The station may have broadcast difficulties. Try another channel. • Adjust...
Owners Manual
Page 54
... performed in electric power, improper installation, improper maintenance or use have been modified or had the serial number removed, altered, defaced or rendered illegible. and used in the U.S.A. During this manual and checking the "Troubleshooting" section, you find the nearest TOSHIBA Authorized Service Station. For additional information, visit our web site: www.toshiba.com Setting up , adjustment of customer controls and installation or repair of original retail...
... performed in electric power, improper installation, improper maintenance or use have been modified or had the serial number removed, altered, defaced or rendered illegible. and used in the U.S.A. During this manual and checking the "Troubleshooting" section, you find the nearest TOSHIBA Authorized Service Station. For additional information, visit our web site: www.toshiba.com Setting up , adjustment of customer controls and installation or repair of original retail...

Owners Manual
Page 55
... button 28 Channel Number buttons 25 Channel programming ADD/ERASE 25 Automatic programming 24 TV/CABLE selection 24 Cinema mode 43 Clock, setting 46 Closed caption 45 ColorStream cables 5 Convergence adjustment 26 Color temperature 43 D Demonstration mode 51 Double-window 32 DNR (Digital Noise Reduction 42 DTV receiver connection 9 DVD connection 7, 8 FI (FAV) x • buttons 28 FAVORITE button 34 Favorite channels 28 FOCUS feature 48 Front of the TV 4 Front panel lock 40 Image shape selection 31 INPUT button 44 LM Labeling channels 29 Labeling video inputs...
... button 28 Channel Number buttons 25 Channel programming ADD/ERASE 25 Automatic programming 24 TV/CABLE selection 24 Cinema mode 43 Clock, setting 46 Closed caption 45 ColorStream cables 5 Convergence adjustment 26 Color temperature 43 D Demonstration mode 51 Double-window 32 DNR (Digital Noise Reduction 42 DTV receiver connection 9 DVD connection 7, 8 FI (FAV) x • buttons 28 FAVORITE button 34 Favorite channels 28 FOCUS feature 48 Front of the TV 4 Front panel lock 40 Image shape selection 31 INPUT button 44 LM Labeling channels 29 Labeling video inputs...


