User Manual
Page 9
... Choosing a location for your LCD TV 5 Chapter 1: Introduction 11 Features 11 Overview of installation, setup, and use 11 Front panel control 12 Back panel connections 12 Bundling the cables 13 Chapter 2: Connecting your TV 14 Overview of cable types 14 About the illustrations 14 ...HDMI audio system 19 Connecting a PC 20 Connecting to a home network 21 Chapter 3: Using the remote control 22 Controlling other devices 22 Installing batteries 22 Learning about the Remote Control 23 Chapter 4: Initial Setup and Menu 24 Initial Setup 24 Navigating the menu system 25 Main ...
... Choosing a location for your LCD TV 5 Chapter 1: Introduction 11 Features 11 Overview of installation, setup, and use 11 Front panel control 12 Back panel connections 12 Bundling the cables 13 Chapter 2: Connecting your TV 14 Overview of cable types 14 About the illustrations 14 ...HDMI audio system 19 Connecting a PC 20 Connecting to a home network 21 Chapter 3: Using the remote control 22 Controlling other devices 22 Installing batteries 22 Learning about the Remote Control 23 Chapter 4: Initial Setup and Menu 24 Initial Setup 24 Navigating the menu system 25 Main ...
User Manual
Page 10
...Acceptable signal formats for PC IN and HDMI terminals 75 PC IN signal formats 75 HDMI signal formats 76 Remote control functional key chart 77 Operating other devices 79 Programming the remote to operate other devices . . . 79 Device code setup 79 Searching for a device code 80 ...Locking the volume keys 80 Clearing the remote's programming 80 Resetting to the factory default 80 Operating the TV with combination buttons 81 Remote control codes 82 Limited United States Warranty for LCD Televisions 88 Limited Canadian Warranty for Toshiba Brand Flat Panel Televisions 89 Index 92 ...
...Acceptable signal formats for PC IN and HDMI terminals 75 PC IN signal formats 75 HDMI signal formats 76 Remote control functional key chart 77 Operating other devices 79 Programming the remote to operate other devices . . . 79 Device code setup 79 Searching for a device code 80 ...Locking the volume keys 80 Clearing the remote's programming 80 Resetting to the factory default 80 Operating the TV with combination buttons 81 Remote control codes 82 Limited United States Warranty for LCD Televisions 88 Limited Canadian Warranty for Toshiba Brand Flat Panel Televisions 89 Index 92 ...
User Manual
Page 11
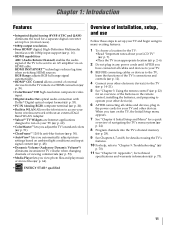
...Volume (Audyssey Dynamic Volume®) eliminates inconsistent TV volume when changing channels or viewing commercials (- p. 14-21). 5 See "Chapter 3: Using the remote control" (- p. 70). 11 See "Chapter 10: Appendix", for the TV: • Read "Important notes about your home wireless network without an ...channels into the TV's channel memory (- p. 7). • Place the TV in any power cords until AFTER you turn on the remote control, installing the batteries, and preparing to an AV amplifier via HDMI connection (p. 39). •ColorStream® HD high-resolution component video...
...Volume (Audyssey Dynamic Volume®) eliminates inconsistent TV volume when changing channels or viewing commercials (- p. 14-21). 5 See "Chapter 3: Using the remote control" (- p. 70). 11 See "Chapter 10: Appendix", for the TV: • Read "Important notes about your home wireless network without an ...channels into the TV's channel memory (- p. 7). • Place the TV in any power cords until AFTER you turn on the remote control, installing the batteries, and preparing to an AV amplifier via HDMI connection (p. 39). •ColorStream® HD high-resolution component video...
User Manual
Page 16
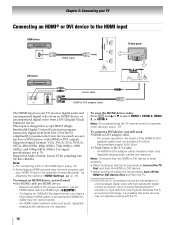
... an HDMI cable with high-bandwidth digital content protection, which is being standardized for reception of high-definition video signals. Note: For programming the TV remote control to operate other devices, see p. 76. Recomended length: 6.6 ft (2m). •3.5mm Stereo to -DVI adapter cable must not exceed 9.8 ft (3m). For signal specifications...
... an HDMI cable with high-bandwidth digital content protection, which is being standardized for reception of high-definition video signals. Note: For programming the TV remote control to operate other devices, see p. 76. Recomended length: 6.6 ft (2m). •3.5mm Stereo to -DVI adapter cable must not exceed 9.8 ft (3m). For signal specifications...
User Manual
Page 17
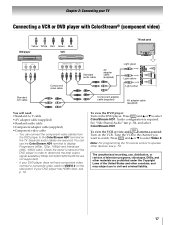
... Chapter 2: Connecting your DVD player does not have component video, connect a composite video cable to VIDEO 2 on the DVD player. Note: For programming the TV remote control to operate other countries, and may subject you want to watch. Separate audio cables are not supported). - Press INPUT and B or b to select Video 2. If...
... Chapter 2: Connecting your DVD player does not have component video, connect a composite video cable to VIDEO 2 on the DVD player. Note: For programming the TV remote control to operate other countries, and may subject you want to watch. Separate audio cables are not supported). - Press INPUT and B or b to select Video 2. If...
User Manual
Page 19
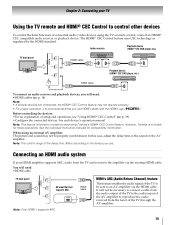
...'s operation manual. When using the TV's remote control, connect an HDMI® CEC compatible audio receiver or playback device. Connecting an HDMI audio system If your TV Using the TV remote and HDMI® CEC Control to control other devices To control the basic functions of connected audio/video devices... receiver and playback devices, you use HDMI cables with the HDMI Logo ( ). Note: The control range of the delay time differs according to models incorporating Toshiba's HDMI® CEC Control feature. It will not be necessary to connect a cable from the audio output of the TV...
...'s operation manual. When using the TV's remote control, connect an HDMI® CEC compatible audio receiver or playback device. Connecting an HDMI audio system If your TV Using the TV remote and HDMI® CEC Control to control other devices To control the basic functions of connected audio/video devices... receiver and playback devices, you use HDMI cables with the HDMI Logo ( ). Note: The control range of the delay time differs according to models incorporating Toshiba's HDMI® CEC Control feature. It will not be necessary to connect a cable from the audio output of the TV...
User Manual
Page 22
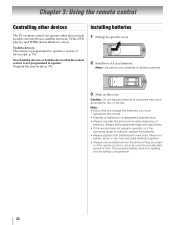
Non-Toshiba devices or Toshiba devices that the remote control is not to operate a variety of devices (- Caution: Do not expose batteries to excessive heat such as cable converter boxes, satellite receivers, ...an extended period of batteries. Installing batteries 1 Pull up to operate: Program the remote (- Toshiba devices: The remote is reduced, replace the batteries. • Always replace both batteries with new ones. p. 79). Chapter 3: Using the remote control Controlling other devices The TV's remote control can operate other devices such as sunshine, fire, or the like.
Non-Toshiba devices or Toshiba devices that the remote control is not to operate a variety of devices (- Caution: Do not expose batteries to excessive heat such as cable converter boxes, satellite receivers, ...an extended period of batteries. Installing batteries 1 Pull up to operate: Program the remote (- Toshiba devices: The remote is reduced, replace the batteries. • Always replace both batteries with new ones. p. 79). Chapter 3: Using the remote control Controlling other devices The TV's remote control can operate other devices such as sunshine, fire, or the like.
User Manual
Page 23
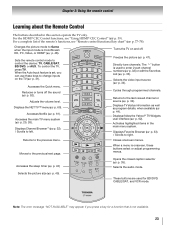
... "NOT AVAILABLE" may appear if you can use these buttons select or adjust programming menus. For the HDMI® CEC Control functions, see "Remote control functional key chart" (- Changes the picture mode to the previous menu. Displays TV status information as well as program details,... Accesses the main TV menu system (- Displays/hides the Yahoo!® TV Widgets user interface (- p. 48). Sets the remote control mode to enter 2-part channel numbers (- To control the TV, press TV. p. 39). Adjusts the volume level. p. 61). The "-" button is used for a function...
... "NOT AVAILABLE" may appear if you can use these buttons select or adjust programming menus. For the HDMI® CEC Control functions, see "Remote control functional key chart" (- Changes the picture mode to the previous menu. Displays TV status information as well as program details,... Accesses the main TV menu system (- Displays/hides the Yahoo!® TV Widgets user interface (- p. 48). Sets the remote control mode to enter 2-part channel numbers (- To control the TV, press TV. p. 39). Adjusts the volume level. p. 61). The "-" button is used for a function...
User Manual
Page 25
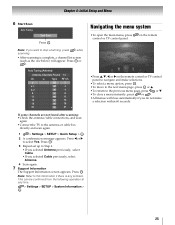
... within 60 seconds. 25 Auto Tuning (Antenna) Antenna Channels Found: 14 Ch. Press . on the remote Wallpaper Timer Settings Network Media Player •Press B, b, C, or c on the remote control or TV control panel to select Yes. Type RF Ch. 2 ATV 2 4-1 DTV 4 4-2 DTV 4 6 ATV... > Quick Setup > . OK 2 A confirmation message appears. OK Navigating the menu system •To open the main menu, press control or TV control panel. This can be confirmed from the following operation at any problem. Chapter 4: Initial Setup and Menu 6 Start Scan Auto Tuning Start...
... within 60 seconds. 25 Auto Tuning (Antenna) Antenna Channels Found: 14 Ch. Press . on the remote Wallpaper Timer Settings Network Media Player •Press B, b, C, or c on the remote control or TV control panel to select Yes. Type RF Ch. 2 ATV 2 4-1 DTV 4 4-2 DTV 4 6 ATV... > Quick Setup > . OK 2 A confirmation message appears. OK Navigating the menu system •To open the main menu, press control or TV control panel. This can be confirmed from the following operation at any problem. Chapter 4: Initial Setup and Menu 6 Start Scan Auto Tuning Start...

User Manual
Page 26
Chapter 4: Initial Setup and Menu Main menu layout To open the main menus (illustrated below), press on the remote control or TV control panel. 1st Layer 2nd Layer 3rd Layer Page Network Media Player Wallpaper Timer Settings NET TV Network Setup Wireless Information Photo ... 52 MTS 52 Balance 53 Bass 53 Treble 53 Advanced Sound Settings 54 Dynamic Volume (Audyssey 53 Dynamic Volume®) Dynamic Range Control 53 1st Layer Settings 2nd Layer APPLICATIONS PREFERENCES 3rd Layer Widgets NET TV Media Player Channel Browser Favorites Browser On Timer Sleep Timer ...
Chapter 4: Initial Setup and Menu Main menu layout To open the main menus (illustrated below), press on the remote control or TV control panel. 1st Layer 2nd Layer 3rd Layer Page Network Media Player Wallpaper Timer Settings NET TV Network Setup Wireless Information Photo ... 52 MTS 52 Balance 53 Bass 53 Treble 53 Advanced Sound Settings 54 Dynamic Volume (Audyssey 53 Dynamic Volume®) Dynamic Range Control 53 1st Layer Settings 2nd Layer APPLICATIONS PREFERENCES 3rd Layer Widgets NET TV Media Player Channel Browser Favorites Browser On Timer Sleep Timer ...
User Manual
Page 28
... and stores newly found channels into memory. OK 2 A confirmation message appears. Then you do not need to select Settings. on the remote control or the control panel, store those channels in the TV's memory. Press C or c to select a menu icon (PICTURE, SOUND, APPLICATIONS, PREFERENCES,... SETUP) Press B or b to be skipped. Option Description Cable Note: If you press CH or CH on the remote control. 28 To skip an antenna source channel from memory. Note: To tune channels not stored in memory, use , select Home. 1 > Settings >...
... and stores newly found channels into memory. OK 2 A confirmation message appears. Then you do not need to select Settings. on the remote control or the control panel, store those channels in the TV's memory. Press C or c to select a menu icon (PICTURE, SOUND, APPLICATIONS, PREFERENCES,... SETUP) Press B or b to be skipped. Option Description Cable Note: If you press CH or CH on the remote control. 28 To skip an antenna source channel from memory. Note: To tune channels not stored in memory, use , select Home. 1 > Settings >...
User Manual
Page 29
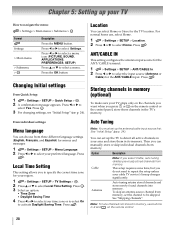
.... Press B or b to select a channel to select Channel Options. To clear the selection, press . Skipping video inputs You can set it to turn on the remote control to be skipped. 1 > Settings > SETUP > TV Settings > . To turn off skip: Press again the RED button to be skipped when selecting inputs in memory, you... the 8 column. Press . The box is known. 1 > Settings > SETUP > Manual Tuning > . OK Note: You cannot tune skipped channels using CH or . To turn on the remote control. OK 2 Use buttons 0-9 on Skip.
.... Press B or b to select a channel to select Channel Options. To clear the selection, press . Skipping video inputs You can set it to turn on the remote control to be skipped. 1 > Settings > SETUP > TV Settings > . To turn off skip: Press again the RED button to be skipped when selecting inputs in memory, you... the 8 column. Press . The box is known. 1 > Settings > SETUP > Manual Tuning > . OK Note: You cannot tune skipped channels using CH or . To turn on the remote control. OK 2 Use buttons 0-9 on Skip.

User Manual
Page 31
... > Auto Input > . Press . Chapter 5: Setting up your TV Setting the Auto Input feature You can change TV inputs using the MODE SELECT buttons on the remote control: TV, CABLE/SAT, BD/ DVD, AUX. To reset Auto Input: Select Reset. Auto Input settings options for 2 seconds and release it.
... > Auto Input > . Press . Chapter 5: Setting up your TV Setting the Auto Input feature You can change TV inputs using the MODE SELECT buttons on the remote control: TV, CABLE/SAT, BD/ DVD, AUX. To reset Auto Input: Select Reset. Auto Input settings options for 2 seconds and release it.

User Manual
Page 32
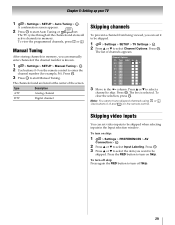
...dash ( - ) button. Digital channels have priority when manually entering a channel number using the 0-9 buttons on the remote control or TV control panel. You can tune both analog and digital channels normally. Note: This feature does not work unless you change inputs ... 1.) Press . Note: To use CH / CH if available. p. 28). 1 > Settings > SETUP > TV Settings > . OK Use the 0-9 buttons on the remote control. (For example, to ). •Quickly change the mode. Enter the sub-channel number. (For example, to factory defaults, highlight Reset and press . Mode Description Standard...
...dash ( - ) button. Digital channels have priority when manually entering a channel number using the 0-9 buttons on the remote control or TV control panel. You can tune both analog and digital channels normally. Note: This feature does not work unless you change inputs ... 1.) Press . Note: To use CH / CH if available. p. 28). 1 > Settings > SETUP > TV Settings > . OK Use the 0-9 buttons on the remote control. (For example, to ). •Quickly change the mode. Enter the sub-channel number. (For example, to factory defaults, highlight Reset and press . Mode Description Standard...

User Manual
Page 33
... the Channel Browser™. Favorites Browser You can quickly create a favorite channels/inputs list that is tuned, the Channel Browser™ adds it on the remote control. •Channels that are added to the History List: As a channel or input is integrated into the Channel Browser™. To tune to a channel or...
... the Channel Browser™. Favorites Browser You can quickly create a favorite channels/inputs list that is tuned, the Channel Browser™ adds it on the remote control. •Channels that are added to the History List: As a channel or input is integrated into the Channel Browser™. To tune to a channel or...
User Manual
Page 34
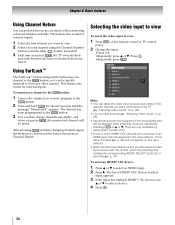
...ANT/CABLE 1 Video 1 2 Video 2 3 ColorStream HD1 4 HDMI 1 5 HDMI 2 6 HDMI 3 7 HDMI 4 8 PC Note: • You can select a video input source with the remote control by using the Channel Number buttons (and the dash ( - ) button if needed). 3 Each time you press CH RTN , the memorized channel will not appear on... the remote control or TV control panel. 2 Change the input: • Press 0-8. • Repeatedly press B or b. The list of HDMI® CEC devices for that are...
...ANT/CABLE 1 Video 1 2 Video 2 3 ColorStream HD1 4 HDMI 1 5 HDMI 2 6 HDMI 3 7 HDMI 4 8 PC Note: • You can select a video input source with the remote control by using the Channel Number buttons (and the dash ( - ) button if needed). 3 Each time you press CH RTN , the memorized channel will not appear on... the remote control or TV control panel. 2 Change the input: • Press 0-8. • Repeatedly press B or b. The list of HDMI® CEC devices for that are...
User Manual
Page 38
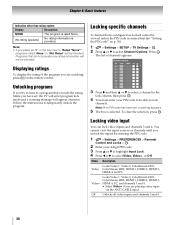
... Display Description NONE The program is rated None. (No rating appears) No rating information is selected. "Setting the PIN code" on the remote control. You cannot view the input sources or channels until you have set , a warning appears. 5 The box is provided. Note: •...then press . Programs that exceeds the rating limits you unlock the inputs by entering the PIN code. 1 > Settings > PREFERENCES > Parental Control and Locks > . Displaying ratings To display the rating of channels appears. Channel Options Ch. OK Locking video input You can lock video inputs...
... Display Description NONE The program is rated None. (No rating appears) No rating information is selected. "Setting the PIN code" on the remote control. You cannot view the input sources or channels until you have set , a warning appears. 5 The box is provided. Note: •...then press . Programs that exceeds the rating limits you unlock the inputs by entering the PIN code. 1 > Settings > PREFERENCES > Parental Control and Locks > . Displaying ratings To display the rating of channels appears. Channel Options Ch. OK Locking video input You can lock video inputs...
User Manual
Page 39
.... 3 Press B or b to select Panel Lock. 4 Press C or c to select On. "Locking video input"). Locking the control panel You can use the remote control to turn it : Set the Input Lock to Off (- When Enable HDMI-CEC Control in Step 4 above. To set to On, the following HDMI® CEC... feature uses CEC technology and allows you set to On, "Panel Lock" appears onscreen when the buttons on . Note: If you to control Toshiba HDMI® CEC compatible devices from being changed accidentally (by children, for playing a video game. Note: • A message appears when 10 minutes, 3 minutes...
.... 3 Press B or b to select Panel Lock. 4 Press C or c to select On. "Locking video input"). Locking the control panel You can use the remote control to turn it : Set the Input Lock to Off (- When Enable HDMI-CEC Control in Step 4 above. To set to On, the following HDMI® CEC... feature uses CEC technology and allows you set to On, "Panel Lock" appears onscreen when the buttons on . Note: If you to control Toshiba HDMI® CEC compatible devices from being changed accidentally (by children, for playing a video game. Note: • A message appears when 10 minutes, 3 minutes...
User Manual
Page 40
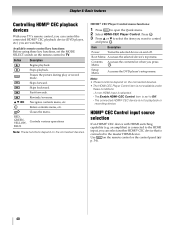
...playback or recording device. an amplifier) is connected to the HDMI input, you want to control and press . Stops playback. RED, GREEN, YELLOW, BLUE Controls various operations Note: These functions depend on the remote control or the control panel (p. 34). 40 OK 3 Press B or b to TV. O K Setup ...these key functions, set to open the Quick menu. 2 Select HDMI-CEC Player Control. OK Item Description Power Turns the selected device on the remote control to select the item you can control the connected HDMI® CEC playback device (DVD player, etc.) you press Menu ...
...playback or recording device. an amplifier) is connected to the HDMI input, you want to control and press . Stops playback. RED, GREEN, YELLOW, BLUE Controls various operations Note: These functions depend on the remote control or the control panel (p. 34). 40 OK 3 Press B or b to TV. O K Setup ...these key functions, set to open the Quick menu. 2 Select HDMI-CEC Player Control. OK Item Description Power Turns the selected device on the remote control to select the item you can control the connected HDMI® CEC playback device (DVD player, etc.) you press Menu ...
User Manual
Page 41
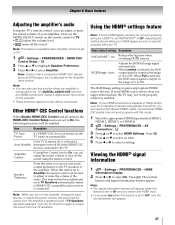
...the TV is connected to the TV's DIGITAL AUDIO OUT terminal (not HDMI connection). Speaker Preference From this feature is set to Amplifier, the remote control can be enabled. Note: When you press Q when this item, you can adjust or mute the sound volume of the audio. If your ... than 60 Hz, you can adjust the sound volume or turn on automatically. Chapter 6: Basic features Adjusting the amplifier's audio Using the TV's remote control, you can set your audio output preference to the TV speakers or the amplifier. This item will need a High Speed HDMI® cable. Mode...
...the TV is connected to the TV's DIGITAL AUDIO OUT terminal (not HDMI connection). Speaker Preference From this feature is set to Amplifier, the remote control can be enabled. Note: When you press Q when this item, you can adjust or mute the sound volume of the audio. If your ... than 60 Hz, you can adjust the sound volume or turn on automatically. Chapter 6: Basic features Adjusting the amplifier's audio Using the TV's remote control, you can set your audio output preference to the TV speakers or the amplifier. This item will need a High Speed HDMI® cable. Mode...


