Owner's Manual - English
Page 4
... 30 on this product can accidentally touch overhead power lines. Note: The lamp(s) inside this manual to a Toshiba Authorized Service Center. 38) If you need to clean the LCD screen, follow this equipment from the sun. 52RV535U_EN.book Page 4 Tuesday, July 22, 2008 5:25 PM 23)...810 of this page. Gently wipe the display panel surface (the TV screen) using a dry, soft cloth only (cotton, flannel, etc.). These actions will damage the LCD screen. When the TV reaches the end of its useful life, dispose of the used TV by the manufacturer. • Upon completion of service, ask the ...
... 30 on this product can accidentally touch overhead power lines. Note: The lamp(s) inside this manual to a Toshiba Authorized Service Center. 38) If you need to clean the LCD screen, follow this equipment from the sun. 52RV535U_EN.book Page 4 Tuesday, July 22, 2008 5:25 PM 23)...810 of this page. Gently wipe the display panel surface (the TV screen) using a dry, soft cloth only (cotton, flannel, etc.). These actions will damage the LCD screen. When the TV reaches the end of its useful life, dispose of the used TV by the manufacturer. • Upon completion of service, ask the ...
Owner's Manual - English
Page 6
...interference that to radio communications. Environmental Protection Agency. marks. Important notes about your LCD TV The following measures: • Reorient or relocate the receiving antenna. • ..., select [Home] mode during initial activation. however, there may appear on -screen target may not work with the instructions, may cause undesired operation. If this ... responsible for normal home use. 52RV535U_EN.book Page 6 Tuesday, July 22, 2008 5:25 PM FCC Declaration of Conformity Compliance Statement (Part 15): The Toshiba 42RV535U, 46RV535U and 52RV535U Televisions...
...interference that to radio communications. Environmental Protection Agency. marks. Important notes about your LCD TV The following measures: • Reorient or relocate the receiving antenna. • ..., select [Home] mode during initial activation. however, there may appear on -screen target may not work with the instructions, may cause undesired operation. If this ... responsible for normal home use. 52RV535U_EN.book Page 6 Tuesday, July 22, 2008 5:25 PM FCC Declaration of Conformity Compliance Statement (Part 15): The Toshiba 42RV535U, 46RV535U and 52RV535U Televisions...
Owner's Manual - English
Page 9
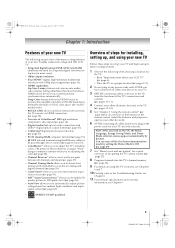
... overview of ColorStream® HD high-resolution component video inputs (- page 19). • IR OUT infrared terminal using its many exciting features of your new Toshiba widescreen, integrated HD, LCD TV: • Integrated digital tuning (8VSB ATSC and QAM) eliminates the need for a separate digital converter settop box... Mode allows you to enhance contrast while you turn off the On-Screen demonstration mode by the RGB or YCbCr color space. (46" and 52" models only) • REGZA LINK allows control of the TV's connections and controls (- page 43). • ENERGY STAR®...
... overview of ColorStream® HD high-resolution component video inputs (- page 19). • IR OUT infrared terminal using its many exciting features of your new Toshiba widescreen, integrated HD, LCD TV: • Integrated digital tuning (8VSB ATSC and QAM) eliminates the need for a separate digital converter settop box... Mode allows you to enhance contrast while you turn off the On-Screen demonstration mode by the RGB or YCbCr color space. (46" and 52" models only) • REGZA LINK allows control of the TV's connections and controls (- page 43). • ENERGY STAR®...
Owner's Manual - English
Page 10
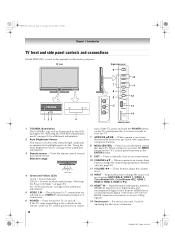
... on page 35 for updating the television's firmware. HDMI connection is necessary to access the menu system (- See "Selecting the TOSHIBA Illumination mode" on -screen, these buttons function as up/down/left/right menu navigation buttons. 8 MENU (ENTER) - Effective range: 16.4 ft (5m... device. 52RV535U_EN.book Page 10 Tuesday, July 22, 2008 5:25 PM Chapter 1: Introduction TV front and side panel controls and connections Model 42RV535U is used in this remote sensor. Used for additional information. 2 Auto Brightness Sensor This sensor will be illuminated by the LED backlight...
... on page 35 for updating the television's firmware. HDMI connection is necessary to access the menu system (- See "Selecting the TOSHIBA Illumination mode" on -screen, these buttons function as up/down/left/right menu navigation buttons. 8 MENU (ENTER) - Effective range: 16.4 ft (5m... device. 52RV535U_EN.book Page 10 Tuesday, July 22, 2008 5:25 PM Chapter 1: Introduction TV front and side panel controls and connections Model 42RV535U is used in this remote sensor. Used for additional information. 2 Auto Brightness Sensor This sensor will be illuminated by the LED backlight...
Owner's Manual - English
Page 19
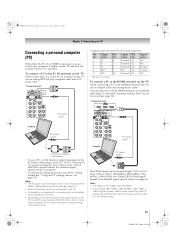
...; An adapter is not needed for mini D-sub 15-pin connector Pin Signal Pin Signal Pin Signal No. Note: • The edges of the screen (i.e. The PC IN terminal can accept and display VGA, SVGA, XGA, WXGA, SXGA, 480i (60Hz), 480p (60Hz), 720p (60Hz), 1080i (60Hz), and 1080p (24Hz/60Hz) ... connecting a PC to display the entire picture within the borders of the images may be able to the PC IN terminal on the TV, use an analog RGB (15-pin) computer cable and a PC audio cable. 52RV535U_EN.book Page 19 Tuesday, July 22, 2008 5:25 PM Chapter 2: Connecting your computer's ...
...; An adapter is not needed for mini D-sub 15-pin connector Pin Signal Pin Signal Pin Signal No. Note: • The edges of the screen (i.e. The PC IN terminal can accept and display VGA, SVGA, XGA, WXGA, SXGA, 480i (60Hz), 480p (60Hz), 720p (60Hz), 1080i (60Hz), and 1080p (24Hz/60Hz) ... connecting a PC to display the entire picture within the borders of the images may be able to the PC IN terminal on the TV, use an analog RGB (15-pin) computer cable and a PC audio cable. 52RV535U_EN.book Page 19 Tuesday, July 22, 2008 5:25 PM Chapter 2: Connecting your computer's ...
Owner's Manual - English
Page 21
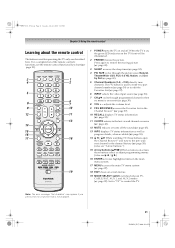
...). 18 EXIT closes on the TV front will be illuminated. 2 FREEZE freezes the picture. When the TV is on and off the sound (- page 37). 6 INPUT selects the video input source (- page 22). The = button is used for a function that is on-screen, these buttons open the Channel Browser...™ and tune to the previous/ next channel in the Channel Brower™ (- Note: The error message "Not Available" may appear if you press a key for operating the TV only are described here....
...). 18 EXIT closes on the TV front will be illuminated. 2 FREEZE freezes the picture. When the TV is on and off the sound (- page 37). 6 INPUT selects the video input source (- page 22). The = button is used for a function that is on-screen, these buttons open the Channel Browser...™ and tune to the previous/ next channel in the Channel Brower™ (- Note: The error message "Not Available" may appear if you press a key for operating the TV only are described here....
Owner's Manual - English
Page 22
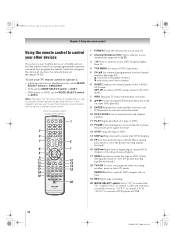
If this happens and you wish to use those features, you have a non-Toshiba device or a Toshiba device that the remote control is programmed, it may not work on and off. 2 Channel Numbers (0-9) Press to directly access channels (as opposed to < ,). 3 +10... converter box or satellite receiver; To use the device's original remote control. SET UP Accesses a DVD's setup menu in the CABLE/ SAT mode. "AUX 2" to control a VCR; b selects the next lower channel. 6 GUIDE Displays the channel guide in the AUX mode. 7 INFO Displays TV status information on-screen. 8 BbC c Press to navigate ...
If this happens and you wish to use those features, you have a non-Toshiba device or a Toshiba device that the remote control is programmed, it may not work on and off. 2 Channel Numbers (0-9) Press to directly access channels (as opposed to < ,). 3 +10... converter box or satellite receiver; To use the device's original remote control. SET UP Accesses a DVD's setup menu in the CABLE/ SAT mode. "AUX 2" to control a VCR; b selects the next lower channel. 6 GUIDE Displays the channel guide in the AUX mode. 7 INFO Displays TV status information on-screen. 8 BbC c Press to navigate ...
Owner's Manual - English
Page 28
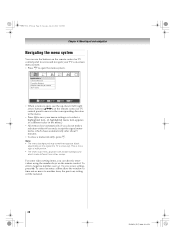
... and navigation Navigating the menu system You can directly enter values using the number keys on the signal the TV is receiving. To enter a negative number, use the up/down/left/right arrow buttons (BbC c) on -screen menu system. • Press Y to open , use =. the previous setting will be restored. 28 RV535U (E/F) Web 213:276...
... and navigation Navigating the menu system You can directly enter values using the number keys on the signal the TV is receiving. To enter a negative number, use the up/down/left/right arrow buttons (BbC c) on -screen menu system. • Press Y to open , use =. the previous setting will be restored. 28 RV535U (E/F) Web 213:276...

Owner's Manual - English
Page 29
...menu language You can choose from three different languages (English, French and Spanish) for 2 seconds. Initial Setup Energy Saving Mode To use this TV for normal home use the Demo Mode item in a retail showroom, please select [Retail]. [Home] mode is recommended for displaying in the Setup menu...Page 29 Tuesday, July 22, 2008 5:25 PM Chapter 5: Setting up your TV Setting the Demo Mode When you first turn on -screen display of inactivity. Initial Setup Menu Language Please select a language. For normal home use the demo, please select [Store (On)]. Initial Setup Demo Mode To...
...menu language You can choose from three different languages (English, French and Spanish) for 2 seconds. Initial Setup Energy Saving Mode To use this TV for normal home use the Demo Mode item in a retail showroom, please select [Retail]. [Home] mode is recommended for displaying in the Setup menu...Page 29 Tuesday, July 22, 2008 5:25 PM Chapter 5: Setting up your TV Setting the Demo Mode When you first turn on -screen display of inactivity. Initial Setup Menu Language Please select a language. For normal home use the demo, please select [Store (On)]. Initial Setup Demo Mode To...
Owner's Manual - English
Page 31
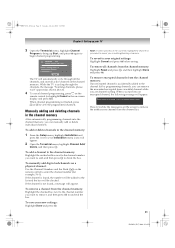
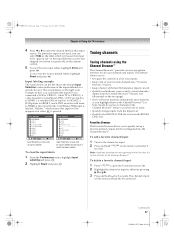
... the Setup menu, highlight Installation and press T. A new set of Channels Found - 52 Scanning Analog Channels Found Channel - 55 Cancel The TV will appear. 2 Open the Terrestrial menu, highlight Channel Add/ Delete, and then press T. To remove encrypted channels from the channel memory: ...Press 1 while the message is provided to check the box. To manually add digital subchannels on a physical channel: Use the Channel Numbers and the Dash (=) on -screen display and press T). Digital Channel Is Encrypted - 52RV535U_EN.book Page 31 Tuesday, July 22, 2008 5:25 PM Chapter...
... the Setup menu, highlight Installation and press T. A new set of Channels Found - 52 Scanning Analog Channels Found Channel - 55 Cancel The TV will appear. 2 Open the Terrestrial menu, highlight Channel Add/ Delete, and then press T. To remove encrypted channels from the channel memory: ...Press 1 while the message is provided to check the box. To manually add digital subchannels on a physical channel: Use the Channel Numbers and the Dash (=) on -screen display and press T). Digital Channel Is Encrypted - 52RV535U_EN.book Page 31 Tuesday, July 22, 2008 5:25 PM Chapter...
Owner's Manual - English
Page 32
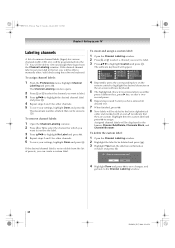
...label: 1 Open the Channel Labeling window. 2 Highlight the label to manually enter/edit labels using the software keyboard. The Channel Labeling window opens. 2 Press < or , to select the...Labeling window. 2 Press < or , to select the channel for other channels. 5 To save your TV Labeling channels A list of presets, you want to remove the label. 3 Press BbC c to indicate ...key on the remote control to highlight the desired character on the on-screen software keyboard. 5 The highlighted character is not provided in the banner, Channel Add/Delete, Channels Block, and Channel Browser.
...label: 1 Open the Channel Labeling window. 2 Highlight the label to manually enter/edit labels using the software keyboard. The Channel Labeling window opens. 2 Press < or , to select the...Labeling window. 2 Press < or , to select the channel for other channels. 5 To save your TV Labeling channels A list of presets, you want to remove the label. 3 Press BbC c to indicate ...key on the remote control to highlight the desired character on the on-screen software keyboard. 5 The highlighted character is not provided in the banner, Channel Add/Delete, Channels Block, and Channel Browser.
Owner's Manual - English
Page 36
...each source, from the following preset list of the Input Selection screen. Note: • When selecting REGZA LINK input sources from the popup window using +, some REGZA LINK devices may automatically turn on the remote control or TV control panel. 2 And then either: a) Press 0-9; If... a REGZA LINK device with HDMI switching capability (e.g. 52RV535U_EN.book Page 36 Tuesday, July 22, 2008 5:25 PM Chapter 6: Using the TV's features Selecting the video input source to view To select the video input source to actually select a particular device from the popup window....
...each source, from the following preset list of the Input Selection screen. Note: • When selecting REGZA LINK input sources from the popup window using +, some REGZA LINK devices may automatically turn on the remote control or TV control panel. 2 And then either: a) Press 0-9; If... a REGZA LINK device with HDMI switching capability (e.g. 52RV535U_EN.book Page 36 Tuesday, July 22, 2008 5:25 PM Chapter 6: Using the TV's features Selecting the video input source to view To select the video input source to actually select a particular device from the popup window....
Owner's Manual - English
Page 37
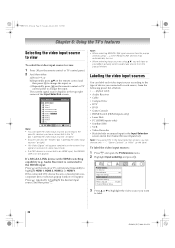
If a particular input is not used, you can select Hide as the label, which will cause that input will be removed from the Channel Browser™ History List (illustrated on the left shows the default Input Selection screen (with all inputs labeled except input 4, which means that input to... HDMI 2, a DVD player to HDMI 3, and a DVD recorder with no inputs labeled. The screen below on the remote control for 3 seconds. 52RV535U_EN.book Page 37 Tuesday, July 22, 2008 5:25 PM Chapter 6: Using the TV's features 4 Press C or c to select the desired label for that is integrated into the ...
If a particular input is not used, you can select Hide as the label, which will cause that input will be removed from the Channel Browser™ History List (illustrated on the left shows the default Input Selection screen (with all inputs labeled except input 4, which means that input to... HDMI 2, a DVD player to HDMI 3, and a DVD recorder with no inputs labeled. The screen below on the remote control for 3 seconds. 52RV535U_EN.book Page 37 Tuesday, July 22, 2008 5:25 PM Chapter 6: Using the TV's features 4 Press C or c to select the desired label for that is integrated into the ...
Owner's Manual - English
Page 40
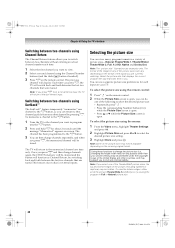
...: 1 Press I . • Press the corresponding Number button (0-6) while the Picture Size screen is open. • Press B or b while the Picture Size screen is open . 52RV535U_EN.book Page 40 Tuesday, July 22, 2008 5:25 PM Chapter 6: Using the TV's features Switching between two channels using Channel Return The Channel Return feature allows you to switch between...
...: 1 Press I . • Press the corresponding Number button (0-6) while the Picture Size screen is open. • Press B or b while the Picture Size screen is open . 52RV535U_EN.book Page 40 Tuesday, July 22, 2008 5:25 PM Chapter 6: Using the TV's features Switching between two channels using Channel Return The Channel Return feature allows you to switch between...
Owner's Manual - English
Page 41
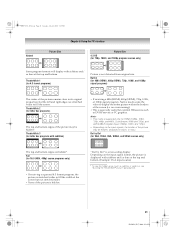
... 720p, 1080i, or 1080p signal program, Native mode scales the video to fill the screen. Dot by Dot" is especially useful for external HD sources such as subtitles or captions), see "Scrolling the TheaterWide® ...to display the entire picture within the borders of the picture is not distorted from original size. page 42). 41 RV535U (E/F) Web 213:276 TheaterWide 2 (for letter box programs) A B C D E...book Page 41 Tuesday, July 22, 2008 5:25 PM Natural Picture Size Chapter 6: Using the TV's features Picture Size 4:3 HD (for 720p, 1080i, and 1080p program sources only) ...
... 720p, 1080i, or 1080p signal program, Native mode scales the video to fill the screen. Dot by Dot" is especially useful for external HD sources such as subtitles or captions), see "Scrolling the TheaterWide® ...to display the entire picture within the borders of the picture is not distorted from original size. page 42). 41 RV535U (E/F) Web 213:276 TheaterWide 2 (for letter box programs) A B C D E...book Page 41 Tuesday, July 22, 2008 5:25 PM Natural Picture Size Chapter 6: Using the TV's features Picture Size 4:3 HD (for 720p, 1080i, and 1080p program sources only) ...
Owner's Manual - English
Page 43
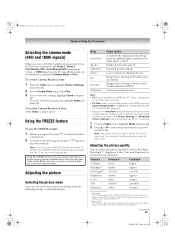
... viewing may subject you to civil and criminal liability. To set the Cinema Mode to the level of the entire screen. Note: If the TV is only available when on ambient light conditions and input signal content Bright and dynamic picture Standard picture settings Lower contrast...save the new settings, highlight Done and press T. Using the FREEZE function for any other than 15 minutes, the FREEZE mode will automatically be released and the TV will automatically be obtained by setting the Cinema Mode to On and a Toshiba REGZA LINK PC connected (- Adjusting the picture quality ...
... viewing may subject you to civil and criminal liability. To set the Cinema Mode to the level of the entire screen. Note: If the TV is only available when on ambient light conditions and input signal content Bright and dynamic picture Standard picture settings Lower contrast...save the new settings, highlight Done and press T. Using the FREEZE function for any other than 15 minutes, the FREEZE mode will automatically be released and the TV will automatically be obtained by setting the Cinema Mode to On and a Toshiba REGZA LINK PC connected (- Adjusting the picture quality ...
Owner's Manual - English
Page 44
...type, edge, and color. 44 RV535U (E/F) Web 213:276 Using the closed caption mode Base closed captions The closed caption mode has two options: • Captions-An on-screen display of the dialogue, narration, and sound effects of TV programs and videos that are automatically saved in program guides). ...press c and B b to select On, and press T. To turn on -screen. • To view text: Highlight T1, T2, T3, or T4. 52RV535U_EN.book Page 44 Tuesday, July 22, 2008 5:25 PM Chapter 6: Using the TV's features To adjust the picture quality: 1 From the Video menu, highlight Picture Settings...
...type, edge, and color. 44 RV535U (E/F) Web 213:276 Using the closed caption mode Base closed captions The closed caption mode has two options: • Captions-An on-screen display of the dialogue, narration, and sound effects of TV programs and videos that are automatically saved in program guides). ...press c and B b to select On, and press T. To turn on -screen. • To view text: Highlight T1, T2, T3, or T4. 52RV535U_EN.book Page 44 Tuesday, July 22, 2008 5:25 PM Chapter 6: Using the TV's features To adjust the picture quality: 1 From the Video menu, highlight Picture Settings...

Owner's Manual - English
Page 46
... Bass center (50) Treble center (50) Balance . . . . . 52RV535U_EN.book Page 46 Tuesday, July 22, 2008 5:25 PM Chapter 6: Using the TV's features Selecting stereo/SAP broadcasts The multi-channel TV sound (MTS) feature allows you are watching is not broadcasting a second audio program, the station's normal audio will automatically output the...). • c makes the bass or treble stronger or increases the balance in volume when the signal source changes (for analog signals on -screen when E is pressed. Note: • You can adjust the audio quality by individual stations).
... Bass center (50) Treble center (50) Balance . . . . . 52RV535U_EN.book Page 46 Tuesday, July 22, 2008 5:25 PM Chapter 6: Using the TV's features Selecting stereo/SAP broadcasts The multi-channel TV sound (MTS) feature allows you are watching is not broadcasting a second audio program, the station's normal audio will automatically output the...). • c makes the bass or treble stronger or increases the balance in volume when the signal source changes (for analog signals on -screen when E is pressed. Note: • You can adjust the audio quality by individual stations).

Owner's Manual - English
Page 47
...Digital Dynamic Range Control will be cleared and you cannot remember your PIN code While the PIN code entering screen is displayed, press E four times within five seconds. You can use the Dolby Digital Dynamic Range Control: 1 From the Audio menu, highlight Audio Setup and press T. 2 ... Done • The Locks/Active screen appears if the PIN code is entered, the Locks menu opens. 52RV535U_EN.book Page 47 Tuesday, July 22, 2008 5:25 PM Chapter 6: Using the TV's features Selecting the optical audio output format You can use this feature to select the optical ...
...Digital Dynamic Range Control will be cleared and you cannot remember your PIN code While the PIN code entering screen is displayed, press E four times within five seconds. You can use the Dolby Digital Dynamic Range Control: 1 From the Audio menu, highlight Audio Setup and press T. 2 ... Done • The Locks/Active screen appears if the PIN code is entered, the Locks menu opens. 52RV535U_EN.book Page 47 Tuesday, July 22, 2008 5:25 PM Chapter 6: Using the TV's features Selecting the optical audio output format You can use this feature to select the optical ...

Owner's Manual - English
Page 48
... additional rating system is not designed, transmitted, or controlled by the TV or Toshiba, nor is the availability of blocking you want to highlight Edit Rating Limits and press T. The Edit Alternate Ratings screen will not be downloaded. Note: • The additional rating system ...Toshiba. • The additional rating system is currently available. • It may vary. 48 RV535U (E/F) Web 213:276 52RV535U_EN.book Page 48 Tuesday, July 22, 2008 5:25 PM Chapter 6: Using the TV's features Changing your PIN code 1 From the Locks menu, press b to display the PIN code entering screen...
... additional rating system is not designed, transmitted, or controlled by the TV or Toshiba, nor is the availability of blocking you want to highlight Edit Rating Limits and press T. The Edit Alternate Ratings screen will not be downloaded. Note: • The additional rating system ...Toshiba. • The additional rating system is currently available. • It may vary. 48 RV535U (E/F) Web 213:276 52RV535U_EN.book Page 48 Tuesday, July 22, 2008 5:25 PM Chapter 6: Using the TV's features Changing your PIN code 1 From the Locks menu, press b to display the PIN code entering screen...


