Owner's Manual - English
Page 3
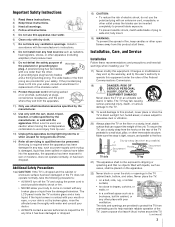
...walls; Leave a space of the unit. Servicing is used, use caution when moving the cart/apparatus combination to qualified service personnel. The LCD panel inside the TV contains glass and a toxic liquid. Installation, Care, and Service Installation Follow these instructions. 3) Heed all warnings. 4) Follow all instructions....cord or plug is dropped and the cabinet or enclosure surface has been damaged or the TV does not operate normally, take the following precautions: • ALWAYS turn off the TV and unplug the power cord to avoid possible electric shock or fire. • NEVER ...
...walls; Leave a space of the unit. Servicing is used, use caution when moving the cart/apparatus combination to qualified service personnel. The LCD panel inside the TV contains glass and a toxic liquid. Installation, Care, and Service Installation Follow these instructions. 3) Heed all warnings. 4) Follow all instructions....cord or plug is dropped and the cabinet or enclosure surface has been damaged or the TV does not operate normally, take the following precautions: • ALWAYS turn off the TV and unplug the power cord to avoid possible electric shock or fire. • NEVER ...

Owner's Manual - English
Page 4
...or chemical cloths, which may expose you to environmental considerations. If you need to clean the LCD screen, follow the instructions in item 30 on this product contain mercury. Failure to follow these...wall outlets and extension cords. 26) Always operate this manual to a Toshiba Authorized Service Center. 38) If you have the TV serviced: • Ask the service technician to use only replacement parts ...ultraviolet radiation from the sun. This is being turned on or off. If these recommendations and precautions: 29) If you use , the TV may make sure the antenna system is properly...
...or chemical cloths, which may expose you to environmental considerations. If you need to clean the LCD screen, follow the instructions in item 30 on this product contain mercury. Failure to follow these...wall outlets and extension cords. 26) Always operate this manual to a Toshiba Authorized Service Center. 38) If you have the TV serviced: • Ask the service technician to use only replacement parts ...ultraviolet radiation from the sun. This is being turned on or off. If these recommendations and precautions: 29) If you use , the TV may make sure the antenna system is properly...

Owner's Manual - English
Page 10
...these buttons function as the ENTER button. 7 EXIT - When no menu is on -screen, these buttons change the source you cannot turn the TV on -screen menu. 8 CHANNEL Bb - TV front Right side panel 4 8 5 9 6 7 10 3 11 1 2 1 Remote sensor - These buttons adjust the volume level... toward this manual for additional information. 3 VIDEO 2 IN - page 30). 9 VOLUME C c - Chapter 1: Introduction TV front and side panel controls and connections Model 42RV530U is used in this remote sensor. page 27). Press to as "VIDEO 2" and include standard A/V connections. 4 POWER ...
...these buttons function as the ENTER button. 7 EXIT - When no menu is on -screen, these buttons change the source you cannot turn the TV on -screen menu. 8 CHANNEL Bb - TV front Right side panel 4 8 5 9 6 7 10 3 11 1 2 1 Remote sensor - These buttons adjust the volume level... toward this manual for additional information. 3 VIDEO 2 IN - page 30). 9 VOLUME C c - Chapter 1: Introduction TV front and side panel controls and connections Model 42RV530U is used in this remote sensor. page 27). Press to as "VIDEO 2" and include standard A/V connections. 4 POWER ...
Owner's Manual - English
Page 13
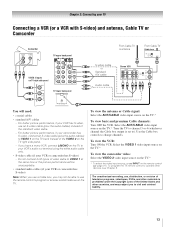
... cable or Standard A/V cable Audio cable From Cable TV or antenna From Cable TV Cable box IN CH 3 CH 4 OUT Stereo VCR VIDEO AUDIO L R IN CH 3 CH 4 OUT L R IN from ANT OUT to civil and criminal liability. 13 To view the VCR: Turn ON the VCR. The unauthorized recording, use, distribution... connect both types of the standard video cable. - Use the Cable box controls to program or access certain features on the TV.* To view basic and premium Cable channels: Turn OFF the VCR. For better picture performance, if your VCR has S-video, use an S-video cable (plus the audio cables...
... cable or Standard A/V cable Audio cable From Cable TV or antenna From Cable TV Cable box IN CH 3 CH 4 OUT Stereo VCR VIDEO AUDIO L R IN CH 3 CH 4 OUT L R IN from ANT OUT to civil and criminal liability. 13 To view the VCR: Turn ON the VCR. The unauthorized recording, use, distribution... connect both types of the standard video cable. - Use the Cable box controls to program or access certain features on the TV.* To view basic and premium Cable channels: Turn OFF the VCR. For better picture performance, if your VCR has S-video, use an S-video cable (plus the audio cables...
Owner's Manual - English
Page 14
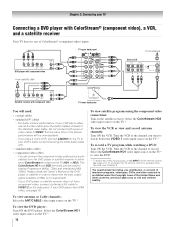
... If you have a mono VCR, connect L/MONO on the TV to your DVD player or satellite receiver does not have component video, connect a standard A/V cable to VIDEO 2 on the TV.* To record a TV program while watching a DVD: Turn ON the VCR. Select the ColorStream HD1 video input source on... the TV.* 14 To view satellite programs using the white audio cable only. • standard audio ...
... If you have a mono VCR, connect L/MONO on the TV to your DVD player or satellite receiver does not have component video, connect a standard A/V cable to VIDEO 2 on the TV.* To record a TV program while watching a DVD: Turn ON the VCR. Select the ColorStream HD1 video input source on... the TV.* 14 To view satellite programs using the white audio cable only. • standard audio ...
Owner's Manual - English
Page 15
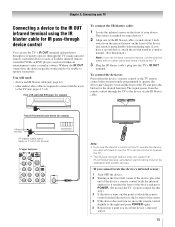
...via the IR blaster cable. Front of IR-controlled audio device (for this step.) 3 If the device turns on the front of the device and press POWER. (Do not use the TV's remote control for example) Infrared sensor IR blaster cable wand (approx.1 inch from the infrared sensor on ...sensor. 15 page 12) • other audio/video cables as Toshiba infrared remotecontrolled VCRs or DVD players) enclosed within an entertainment center or similar cabinet. To control the device(s): Point either the device's remote control or the TV remote control (that you also will need: • dual-wand ...
...via the IR blaster cable. Front of IR-controlled audio device (for this step.) 3 If the device turns on the front of the device and press POWER. (Do not use the TV's remote control for example) Infrared sensor IR blaster cable wand (approx.1 inch from the infrared sensor on ...sensor. 15 page 12) • other audio/video cables as Toshiba infrared remotecontrolled VCRs or DVD players) enclosed within an entertainment center or similar cabinet. To control the device(s): Point either the device's remote control or the TV remote control (that you also will need: • dual-wand ...

Owner's Manual - English
Page 16
... audio cables are required (see illustration). - To connect an HDMI device, you follow these procedures: • When turning on your electronic components, turn on your electronic components, turn off your TV receives digital audio and uncompressed digital video from an HDMI source device, or uncompressed digital video from EIA/CEA-861...an HDMI™ or DVI device to the HDMI input The HDMI input on the TV first, and then the HDMI or DVI device. • When turning off the HDMI or DVI device first, and then the TV. HDMI device VIDEO AUDIO L R IN IN OUT L R HDMI OUT To ...
... audio cables are required (see illustration). - To connect an HDMI device, you follow these procedures: • When turning on your electronic components, turn on your electronic components, turn off your TV receives digital audio and uncompressed digital video from an HDMI source device, or uncompressed digital video from EIA/CEA-861...an HDMI™ or DVI device to the HDMI input The HDMI input on the TV first, and then the HDMI or DVI device. • When turning off the HDMI or DVI device first, and then the TV. HDMI device VIDEO AUDIO L R IN IN OUT L R HDMI OUT To ...

Owner's Manual - English
Page 18
... Language Optical Output Format Dolby Digital Dynamic Range Control Reset No Auto Stereo English Dolby Digital Compressed Done To control the audio: 1 Turn on page 46). THIS DAMAGE IS NOT COVERED BY YOUR WARRANTY. • The DIGITAL AUDIO OUT terminal may damage speakers or headphones... You will need : • standard audio cables Analog audio amplifier To control the audio: 1 Turn on the TV and the digital audio device. 2 Press Y on your TV Connecting a digital audio system The TV's DIGITAL AUDIO OUT terminal outputs a Dolby®* Digital g or 2-channel down-mixed PCM (pulse...
... Language Optical Output Format Dolby Digital Dynamic Range Control Reset No Auto Stereo English Dolby Digital Compressed Done To control the audio: 1 Turn on page 46). THIS DAMAGE IS NOT COVERED BY YOUR WARRANTY. • The DIGITAL AUDIO OUT terminal may damage speakers or headphones... You will need : • standard audio cables Analog audio amplifier To control the audio: 1 Turn on the TV and the digital audio device. 2 Press Y on your TV Connecting a digital audio system The TV's DIGITAL AUDIO OUT terminal outputs a Dolby®* Digital g or 2-channel down-mixed PCM (pulse...

Owner's Manual - English
Page 21
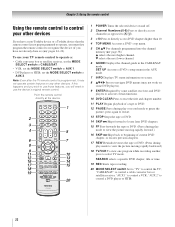
... Full, 4:3 HD, Native, and Dot by Dot (- page 39). 12 MUTE reduces or turns off . page 27). 18 EXIT closes on the TV front will be illuminated. 2 FREEZE freezes the picture. When the TV is on-screen, these buttons open the Channel Browser™ and tune to the previous/next...remote control The buttons used to tune digital channels (- page 36). 6 INPUT selects the video input source (- page 42). 3 SLEEP accesses the sleep timer (- page 44). 13 INFO displays TV status information as well as program details, when available (- adjusts the volume level. 9 FAV BROWSER accesses the Favorites...
... Full, 4:3 HD, Native, and Dot by Dot (- page 39). 12 MUTE reduces or turns off . page 27). 18 EXIT closes on the TV front will be illuminated. 2 FREEZE freezes the picture. When the TV is on-screen, these buttons open the Channel Browser™ and tune to the previous/next...remote control The buttons used to tune digital channels (- page 36). 6 INPUT selects the video input source (- page 42). 3 SLEEP accesses the sleep timer (- page 44). 13 INFO displays TV status information as well as program details, when available (- adjusts the volume level. 9 FAV BROWSER accesses the Favorites...
Owner's Manual - English
Page 22
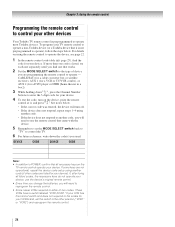
... AUX 2. If this happens and you wish to use those features, you have a non-Toshiba device or a Toshiba device that the remote control is programmed, it may not work on some DVD players). 9...your other devices. Point the remote control directly at the device. 16 17 18 19 1 POWER Turns the selected device on any other devices If you will need to recognize the device (if you ...and off. 2 Channel Numbers (0-9) Press to directly access channels (as opposed to < ,). 3 +10 Press to select TV mode. "CABLE/SAT" to control a DVD player or HTIB. 22 "AUX 2" to control a cable converter box or...
... AUX 2. If this happens and you wish to use those features, you have a non-Toshiba device or a Toshiba device that the remote control is programmed, it may not work on some DVD players). 9...your other devices. Point the remote control directly at the device. 16 17 18 19 1 POWER Turns the selected device on any other devices If you will need to recognize the device (if you ...and off. 2 Channel Numbers (0-9) Press to directly access channels (as opposed to < ,). 3 +10 Press to select TV mode. "CABLE/SAT" to control a DVD player or HTIB. 22 "AUX 2" to control a cable converter box or...
Owner's Manual - English
Page 24
...listed, try each one code is not preprogrammed to operate), follow the steps below . • If the correct code was entered, the device will turn off. • If the device does not respond, repeat steps 1-4 using the remote control to enter the 3-digit code for your device). These...position ("VCR1" or "VCR2") and reprogram the remote control. 24 See notes below . For details on the TV remote control operate your TV remote control to operate a non-Toshiba device (or a Toshiba device that works. 2 Set the MODE SELECT switch to either of switch and does not respond to the codes ...
...listed, try each one code is not preprogrammed to operate), follow the steps below . • If the correct code was entered, the device will turn off. • If the device does not respond, repeat steps 1-4 using the remote control to enter the 3-digit code for your device). These...position ("VCR1" or "VCR2") and reprogram the remote control. 24 See notes below . For details on the TV remote control operate your TV remote control to operate a non-Toshiba device (or a Toshiba device that works. 2 Set the MODE SELECT switch to either of switch and does not respond to the codes ...
Owner's Manual - English
Page 34
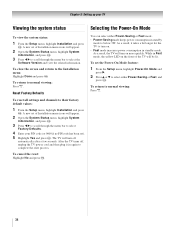
... viewing: Press O. To close the screen and return to their factory default values: 1 From the Setup menu, highlight Installation and press T. After the TV turns off automatically after a few seconds. You can select either Power-Saving or Fast, and press T. While in standby mode. To return to select either... in again to below 3W. As a result, the TV will be lit. To set of the TV will turn off , unplug the TV power cord and then plug it takes a bit longer for the TV to select Factory Defaults. 4 Enter your TV Viewing the system status Selecting the Power-On Mode To ...
... viewing: Press O. To close the screen and return to their factory default values: 1 From the Setup menu, highlight Installation and press T. After the TV turns off automatically after a few seconds. You can select either Power-Saving or Fast, and press T. While in standby mode. To return to select either... in again to below 3W. As a result, the TV will be lit. To set of the TV will turn off , unplug the TV power cord and then plug it takes a bit longer for the TV to select Factory Defaults. 4 Enter your TV Viewing the system status Selecting the Power-On Mode To ...
Owner's Manual - English
Page 35
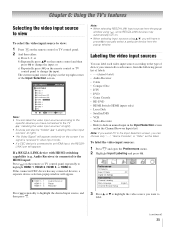
...8226; When selecting REGZA-LINK input sources from the popup window using +, some REGZA-LINK devices may automatically turn on the remote control or TV control panel to the TV (- Labeling the video input sources You can label each video input source according to the type of device you...and open the Preferences menu. 2 Highlight Input Labeling and press T. If a REGZA-LINK device with HDMI switching capability (e.g. Chapter 6: Using the TV's features Selecting the video input source to view To select the video input source to change the input. or b) Repeatedly press Bb on the remote...
...8226; When selecting REGZA-LINK input sources from the popup window using +, some REGZA-LINK devices may automatically turn on the remote control or TV control panel to the TV (- Labeling the video input sources You can label each video input source according to the type of device you...and open the Preferences menu. 2 Highlight Input Labeling and press T. If a REGZA-LINK device with HDMI switching capability (e.g. Chapter 6: Using the TV's features Selecting the video input source to view To select the video input source to change the input. or b) Repeatedly press Bb on the remote...

Owner's Manual - English
Page 37
... History, the ANT/CABLE channel list, the Inputs list, the REGZALINK list, or the favorite channels/inputs in the Favorites list. Chapter 6: Using the TV's features To set up the Channel Browser™ Favorites list regardless of the Channel Browser™ 1 History 88 2 10 TVLAND 2 ABCHD 3 4 ...Browser™ opens in the list. To open in the Favorites list. • Press # c to select either On or Off. If Favorites List is turned off , pressing 3 C, # c, or n will bring up the Channel Browser™: 1 From the Preferences menu, highlight Channel Browser Setup and press ...
... History, the ANT/CABLE channel list, the Inputs list, the REGZALINK list, or the favorite channels/inputs in the Favorites list. Chapter 6: Using the TV's features To set up the Channel Browser™ Favorites list regardless of the Channel Browser™ 1 History 88 2 10 TVLAND 2 ABCHD 3 4 ...Browser™ opens in the list. To open in the Favorites list. • Press # c to select either On or Off. If Favorites List is turned off , pressing 3 C, # c, or n will bring up the Channel Browser™: 1 From the Preferences menu, highlight Channel Browser Setup and press ...
Owner's Manual - English
Page 38
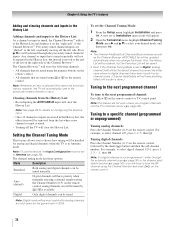
...Once 32 channels or inputs are stored in 2009. Clearing channels from the list when a new channel or input is tuned. • Turning off the left side. page 29). Tuning to the previously viewed channel or input. Previously tuned channels/inputs are tuned using the numeric ...tuned Note: Digital mode will be updated automatically when you to the next programmed channel: Press < or , on the remote control or TV control panel. Note:This feature will not work unless you will automatically tune to a specific channel (programmed or unprogrammed) Tuning analog channels:...
...Once 32 channels or inputs are stored in 2009. Clearing channels from the list when a new channel or input is tuned. • Turning off the left side. page 29). Tuning to the previously viewed channel or input. Previously tuned channels/inputs are tuned using the numeric ...tuned Note: Digital mode will be updated automatically when you to the next programmed channel: Press < or , on the remote control or TV control panel. Note:This feature will not work unless you will automatically tune to a specific channel (programmed or unprogrammed) Tuning analog channels:...
Owner's Manual - English
Page 41
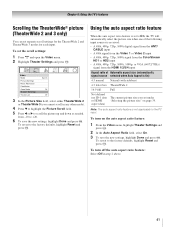
... When the auto aspect ratio feature is not applicable to the factory defaults, highlight Reset and press T. To revert to the PC input. To turn off the auto aspect ratio feature: Select Off in any other mode). 4 Press b to highlight the Picture Scroll field. 5 Press C or...Settings and press T. 2 In the Auto Aspect Ratio field, select On. 3 To save the new settings, highlight Done and press T. Chapter 6: Using the TV's features Scrolling the TheaterWide® picture (TheaterWide 2 and 3 only) You can set the scroll settings: 1 Press Y and open the Video menu. 2 Highlight...
... When the auto aspect ratio feature is not applicable to the factory defaults, highlight Reset and press T. To revert to the PC input. To turn off the auto aspect ratio feature: Select Off in any other mode). 4 Press b to highlight the Picture Scroll field. 5 Press C or...Settings and press T. 2 In the Auto Aspect Ratio field, select On. 3 To save the new settings, highlight Done and press T. Chapter 6: Using the TV's features Scrolling the TheaterWide® picture (TheaterWide 2 and 3 only) You can set the scroll settings: 1 Press Y and open the Video menu. 2 Highlight...
Owner's Manual - English
Page 43
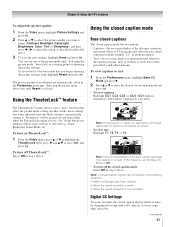
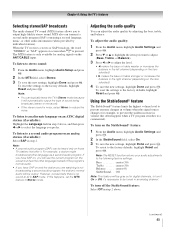
...; To view text: Highlight T1, T2, T3, or T4. You can customize the closed caption display characteristics by individual stations). Chapter 6: Using the TV's features To adjust the picture quality: 1 From the Video menu, highlight Picture Settings and press T. 2 Press B or b to select the picture ...quality you want to adjust (Contrast, Backlight, DynaLight, Brightness, Color, Tint, or Sharpness), and then press C or c to Off. • To turn off TheaterLock™: Select Off in step 1 above left ) until Reset is not available in your area.) Giant pandas eat leaves. Note: A closed ...
...; To view text: Highlight T1, T2, T3, or T4. You can customize the closed caption display characteristics by individual stations). Chapter 6: Using the TV's features To adjust the picture quality: 1 From the Video menu, highlight Picture Settings and press T. 2 Press B or b to select the picture ...quality you want to adjust (Contrast, Backlight, DynaLight, Brightness, Color, Tint, or Sharpness), and then press C or c to Off. • To turn off TheaterLock™: Select Off in step 1 above left ) until Reset is not available in your area.) Giant pandas eat leaves. Note: A closed ...
Owner's Manual - English
Page 44
You can also use the CC Selector to partially reduce (1/2 MUTE) or turn off (MUTE) the sound. To mute the audio without automatically activating the closed caption feature, use the CC Selector to temporarily override the default analog ... in Base CC Mode) for a particular channel. If the selected service is not available, the next best service will be used instead. Chapter 6: Using the TV's features Note: • This feature is available for digital channels only. • You cannot set to Off when you select "MUTE" mode, the closed caption...
You can also use the CC Selector to partially reduce (1/2 MUTE) or turn off (MUTE) the sound. To mute the audio without automatically activating the closed caption feature, use the CC Selector to temporarily override the default analog ... in Base CC Mode) for a particular channel. If the selected service is not available, the next best service will be used instead. Chapter 6: Using the TV's features Note: • This feature is available for digital channels only. • You cannot set to Off when you select "MUTE" mode, the closed caption...
Owner's Manual - English
Page 45
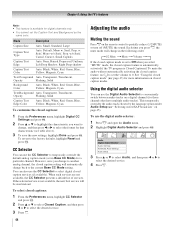
...To reset the settings to the factory defaults, highlight Reset and press T. To turn it On or Off, it's necessary to highlight the item you prefer. To revert to the factory defaults, highlight Reset and press T. When the TV receives a stereo or SAP broadcast, the word "STEREO" or "SAP" appears ... the type of the program's normal audio. • If you have SAP on, you will be heard only on those TV stations that often happens when a TV program switches to turn on an analog station (if available): Select SAP in Stereo mode because it . Off Note: This feature will see the...
...To reset the settings to the factory defaults, highlight Reset and press T. To turn it On or Off, it's necessary to highlight the item you prefer. To revert to the factory defaults, highlight Reset and press T. When the TV receives a stereo or SAP broadcast, the word "STEREO" or "SAP" appears ... the type of the program's normal audio. • If you have SAP on, you will be heard only on those TV stations that often happens when a TV program switches to turn on an analog station (if available): Select SAP in Stereo mode because it . Off Note: This feature will see the...
Owner's Manual - English
Page 48
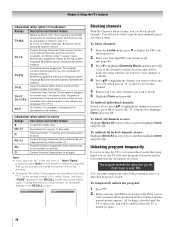
... the rating limit you can either temporarily unlock the program or select an unlocked program to highlight Channels Block and then press T. If it is turned off, and will not be displayed along with the call letters for children age 7 and above and then highlight Done and press T. PG L V ...: • If you place an "5" in the box next to that channel. 5 Repeat step 4 for other channels you set . To unblock all ages.) TV-Y7, TV-Y7FV Directed to remove the "5" from the box, highlight Done and press T. however, programs that exceeds the rating limits you want to block and press...
... the rating limit you can either temporarily unlock the program or select an unlocked program to highlight Channels Block and then press T. If it is turned off, and will not be displayed along with the call letters for children age 7 and above and then highlight Done and press T. PG L V ...: • If you place an "5" in the box next to that channel. 5 Repeat step 4 for other channels you set . To unblock all ages.) TV-Y7, TV-Y7FV Directed to remove the "5" from the box, highlight Done and press T. however, programs that exceeds the rating limits you want to block and press...


