Printable Spec Sheet
Page 2
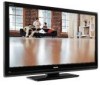
...http://www.tacp.toshiba.com Customer Solutions: 800.631.3811 © Toshiba America Consumer Products, L.L.C. 82 Totowa Road, Wayne, NJ 07470 (2008). 42RV530U Upgrade your viewing experience to the TV. Gaming Mode ...Toshiba Corporation. DynaLight™ Backlight Control utilizes advanced image processing to reach 4,096 levels of time it is suggested that you use the original remote control for cleaner high-action home theater images. SERIES: REGZA® Cabinet Two-Tone Thin-Line Bezel (1.5") Design in High-Gloss Black Screen Size (measured diagonally) 42.0" LCD...
...http://www.tacp.toshiba.com Customer Solutions: 800.631.3811 © Toshiba America Consumer Products, L.L.C. 82 Totowa Road, Wayne, NJ 07470 (2008). 42RV530U Upgrade your viewing experience to the TV. Gaming Mode ...Toshiba Corporation. DynaLight™ Backlight Control utilizes advanced image processing to reach 4,096 levels of time it is suggested that you use the original remote control for cleaner high-action home theater images. SERIES: REGZA® Cabinet Two-Tone Thin-Line Bezel (1.5") Design in High-Gloss Black Screen Size (measured diagonally) 42.0" LCD...

Owner's Manual - English
Page 4
...outlets and extension cords. 26) Always operate this manual to a Toshiba Authorized Service Center. 38) If you leave the TV unattended or unused for the television, avoid locations where the screen may vary until the LCD warms up static charges (see Section 810 of the National Electric ...of malfunction. 30) Always unplug the TV before cleaning. For disposal or recycling information, contact your body (or any item you need to clean the LCD screen, follow these sounds become frequent or continuous, unplug the power cord and contact a Toshiba Authorized Service Center. 35) WARNING:...
...outlets and extension cords. 26) Always operate this manual to a Toshiba Authorized Service Center. 38) If you leave the TV unattended or unused for the television, avoid locations where the screen may vary until the LCD warms up static charges (see Section 810 of the National Electric ...of malfunction. 30) Always unplug the TV before cleaning. For disposal or recycling information, contact your body (or any item you need to clean the LCD screen, follow these sounds become frequent or continuous, unplug the power cord and contact a Toshiba Authorized Service Center. 35) WARNING:...
Owner's Manual - English
Page 6
...• Manufactured under your LCD TV The following measures: • Reorient or relocate the receiving antenna. • Increase the separation between the equipment and the receiver. • Connect the equipment into an outlet on the screen if a fixed, non-...TV technician for 46" and 52" models) 6 This is a structural property of LCD technology, is not a sign of malfunction, and is trademark of HDMI Licensing LLC. (Only available for help. Important notes about your warranty. FCC Declaration of Conformity Compliance Statement (Part 15): The Toshiba 32RV530U, 37RV530U, 42RV530U...
...• Manufactured under your LCD TV The following measures: • Reorient or relocate the receiving antenna. • Increase the separation between the equipment and the receiver. • Connect the equipment into an outlet on the screen if a fixed, non-...TV technician for 46" and 52" models) 6 This is a structural property of LCD technology, is not a sign of malfunction, and is trademark of HDMI Licensing LLC. (Only available for help. Important notes about your warranty. FCC Declaration of Conformity Compliance Statement (Part 15): The Toshiba 32RV530U, 37RV530U, 42RV530U...

Owner's Manual - English
Page 9
...The menu for this feature has a unique "black" design to the TV (- Overview of external devices from the TV remote via HDMI connection (- page 20) for an overview of the buttons on the screen along with Dolby® Digital optical output format (- Deep Color feature ...page 46). • CableClear® digital picture noise reduction (- page 27). 8 Program channels into the TV's channel memory (- page 51). • Two sets of your new Toshiba widescreen, integrated HD, LCD TV: • Integrated digital tuning (8VSB ATSC and QAM) eliminates the need for a separate digital converter set...
...The menu for this feature has a unique "black" design to the TV (- Overview of external devices from the TV remote via HDMI connection (- page 20) for an overview of the buttons on the screen along with Dolby® Digital optical output format (- Deep Color feature ...page 46). • CableClear® digital picture noise reduction (- page 27). 8 Program channels into the TV's channel memory (- page 51). • Two sets of your new Toshiba widescreen, integrated HD, LCD TV: • Integrated digital tuning (8VSB ATSC and QAM) eliminates the need for a separate digital converter set...

Owner's Manual - English
Page 10
... only. Press to turn off . page 27). Chapter 1: Introduction TV front and side panel controls and connections Model 42RV530U is on-screen, these buttons change the source you cannot turn the TV on and off the TV, press and hold the POWER button on the TV control panel for illustration purposes. Point the remote control toward...
... only. Press to turn off . page 27). Chapter 1: Introduction TV front and side panel controls and connections Model 42RV530U is on-screen, these buttons change the source you cannot turn the TV on and off the TV, press and hold the POWER button on the TV control panel for illustration purposes. Point the remote control toward...
Owner's Manual - English
Page 19
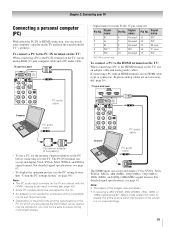
... HDMI terminal on the TV, use a PC, set the monitor output resolution on which you can accept and display VGA, SVGA, XGA, WXGA, SXGA, 480i (60Hz), 480p (60Hz), 720p (60Hz), 1080i (60Hz), and 1080p (24Hz/60Hz) signal formats. Note: • The edges of the screen (i.e. page 16). For... detailed signal specifications, see page 63. • To display the optimum picture, use an analog RGB (15-pin) computer cable and a PC audio cable. TV upper back panel PC audio cable Computer PC audio output PC ...
... HDMI terminal on the TV, use a PC, set the monitor output resolution on which you can accept and display VGA, SVGA, XGA, WXGA, SXGA, 480i (60Hz), 480p (60Hz), 720p (60Hz), 1080i (60Hz), and 1080p (24Hz/60Hz) signal formats. Note: • The edges of the screen (i.e. page 16). For... detailed signal specifications, see page 63. • To display the optimum picture, use an analog RGB (15-pin) computer cable and a PC audio cable. TV upper back panel PC audio cable Computer PC audio output PC ...

Owner's Manual - English
Page 21
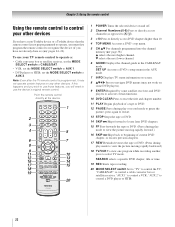
...the remote control's functions, see 3 C / # c.) 16 ENTER activates highlighted items in the Channel Brower™ (- page 23). 1 POWER turns the TV on -screen (- The = button is used for a function that is not available. 21 page 35). 7 CH Bb cycles through the picture sizes: Natural, TheaterWide ...Available" may appear if you press a key for operating the TV only are described here. Chapter 3: Using the remote control Learning about the remote control The buttons used to tune digital channels (- page 42). 3 SLEEP accesses the sleep timer (- adjusts the volume level....
...the remote control's functions, see 3 C / # c.) 16 ENTER activates highlighted items in the Channel Brower™ (- page 23). 1 POWER turns the TV on -screen (- The = button is used for a function that is not available. 21 page 35). 7 CH Bb cycles through the picture sizes: Natural, TheaterWide ...Available" may appear if you press a key for operating the TV only are described here. Chapter 3: Using the remote control Learning about the remote control The buttons used to tune digital channels (- page 42). 3 SLEEP accesses the sleep timer (- adjusts the volume level....
Owner's Manual - English
Page 22
... the MODE SELECT switch to AUX 2. b selects the next lower channel. 6 GUIDE Displays the channel guide in the AUX mode. 7 INFO Displays TV status information on-screen. 8 BbC c Press to navigate DVD menus (may not operate certain features on and off. 2 Channel Numbers (0-9) Press to directly access channels (as...control directly at the device. 16 17 18 19 1 POWER Turns the selected device on any other devices If you have a non-Toshiba device or a Toshiba device that the remote control is programmed, it may not work on some DVD players). 9 ENTER Required by some satellite receivers and ...
... the MODE SELECT switch to AUX 2. b selects the next lower channel. 6 GUIDE Displays the channel guide in the AUX mode. 7 INFO Displays TV status information on-screen. 8 BbC c Press to navigate DVD menus (may not operate certain features on and off. 2 Channel Numbers (0-9) Press to directly access channels (as...control directly at the device. 16 17 18 19 1 POWER Turns the selected device on any other devices If you have a non-Toshiba device or a Toshiba device that the remote control is programmed, it may not work on some DVD players). 9 ENTER Required by some satellite receivers and ...
Owner's Manual - English
Page 28
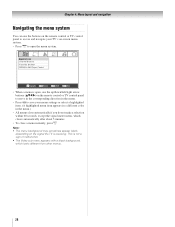
...other menus. 28 Chapter 4: Menu layout and navigation Navigating the menu system You can use the buttons on the remote control or TV control panel to access and navigate your TV's on-screen menu system. • Press Y to open , use the up/down/left/right arrow buttons (BbC c) on the signal ...the TV is open the menu system. Applications Channel Browser Favorites Browser REGZA-LINK Player Control Navigate ENTER Select CH RTN Back EXIT Exit ...
...other menus. 28 Chapter 4: Menu layout and navigation Navigating the menu system You can use the buttons on the remote control or TV control panel to access and navigate your TV's on-screen menu system. • Press Y to open , use the up/down/left/right arrow buttons (BbC c) on the signal ...the TV is open the menu system. Applications Channel Browser Favorites Browser REGZA-LINK Player Control Navigate ENTER Select CH RTN Back EXIT Exit ...

Owner's Manual - English
Page 29
...c to your new settings, highlight Done and press T. To revert to select the input source (Cable or Antenna) for the on the TV. Input Configuration ANT/CABLE In Cancel Cable Done 5 To save your original settings, highlight Cancel and press T. 29 Configuring the antenna input ...Press B or b to close the Preferences menu. Chapter 5: Setting up your TV Selecting the menu language You can choose from three different languages (English, French and Spanish) for the ANT/CABLE input on -screen display of Installation menu icons will appear, as shown below.) Open the Terrestrial ...
...c to your new settings, highlight Done and press T. To revert to select the input source (Cable or Antenna) for the on the TV. Input Configuration ANT/CABLE In Cancel Cable Done 5 To save your original settings, highlight Cancel and press T. 29 Configuring the antenna input ...Press B or b to close the Preferences menu. Chapter 5: Setting up your TV Selecting the menu language You can choose from three different languages (English, French and Spanish) for the ANT/CABLE input on -screen display of Installation menu icons will appear, as shown below.) Open the Terrestrial ...

Owner's Manual - English
Page 30
..., please wait ... 5% Number of Installation menu icons will appear. 3 Open the Terrestrial menu, highlight Channel Program to bring up your TV will automatically cycle through the channels, the message "Scanning channels, please wait" appears (as shown above). 4 To cancel channel programming, ...all the antenna channels, and store all active channels in the channel memory After automatically programming channels into the TV's channel memory When you press < or , on -screen display and press T). When channel programming is found , a message will appear. 2 Open the Terrestrial menu...
..., please wait ... 5% Number of Installation menu icons will appear. 3 Open the Terrestrial menu, highlight Channel Program to bring up your TV will automatically cycle through the channels, the message "Scanning channels, please wait" appears (as shown above). 4 To cancel channel programming, ...all the antenna channels, and store all active channels in the channel memory After automatically programming channels into the TV's channel memory When you press < or , on -screen display and press T). When channel programming is found , a message will appear. 2 Open the Terrestrial menu...
Owner's Manual - English
Page 31
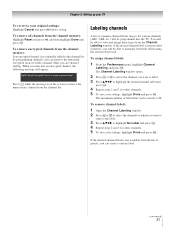
... channel list by programming channels, you are channel surfing. Press 1 on remote to remove channel Press 1 while the message is on the screen to remove the unnecessary channel from the channel memory: Highlight Reset and press T, and then highlight Done and press T. Chapter 5: Setting up your... TV To revert to your settings, highlight Done and press T. When you want to remove the label. 3 Press BbC c to highlight No Label and press...
... channel list by programming channels, you are channel surfing. Press 1 on remote to remove channel Press 1 while the message is on the screen to remove the unnecessary channel from the channel memory: Highlight Reset and press T, and then highlight Done and press T. Chapter 5: Setting up your... TV To revert to your settings, highlight Done and press T. When you want to remove the label. 3 Press BbC c to highlight No Label and press...
Owner's Manual - English
Page 32
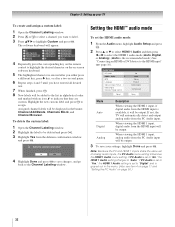
...back to highlight Custom and press T. To delete the custom label: 1 Open the Channel Labeling window. 2 Highlight the label to "Auto." If not, the TV will automatically detect and output analog audio from the PC Audio input will be added to the list in alphabetical order and marked with an...if digital audio from the HDMI input will be displayed in the menu. (Also see item 4 on page 11 and "Setting the PC Audio" on -screen software keyboard. 5 The highlighted character is set of analog audio inputs, the PC Audio menu setting influences the HDMI 1 Audio menu setting. Note: Because ...
...back to highlight Custom and press T. To delete the custom label: 1 Open the Channel Labeling window. 2 Highlight the label to "Auto." If not, the TV will automatically detect and output analog audio from the PC Audio input will be added to the list in alphabetical order and marked with an...if digital audio from the HDMI input will be displayed in the menu. (Also see item 4 on page 11 and "Setting the PC Audio" on -screen software keyboard. 5 The highlighted character is set of analog audio inputs, the PC Audio menu setting influences the HDMI 1 Audio menu setting. Note: Because ...
Owner's Manual - English
Page 33
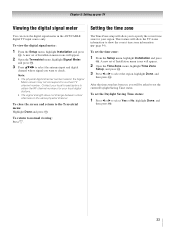
... To return to a virtual TV channel number. page 54). To set the Daylight Saving Time status: 1 Press C or c to specify the correct time zone for your TV Viewing the digital signal meter You can view the digital signal meter in the Signal Meter screen may not correspond to normal ...viewing: Press O. To close the screen and return to show the correct time zone information (- Chapter 5: ...
... To return to a virtual TV channel number. page 54). To set the Daylight Saving Time status: 1 Press C or c to specify the correct time zone for your TV Viewing the digital signal meter You can view the digital signal meter in the Signal Meter screen may not correspond to normal ...viewing: Press O. To close the screen and return to show the correct time zone information (- Chapter 5: ...
Owner's Manual - English
Page 34
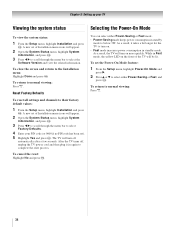
... To reset all settings and channels to the Installation menu: Highlight Done and press T. As a result, it in standby mode. To close the screen and return to their factory default values: 1 From the Setup menu, highlight Installation and press T. As a result, the.... 2 Open the System Status menu, highlight System Information, and press T. 3 Press C c to scroll through the menu bar to select Factory Defaults. 4 Enter your TV Viewing the system status Selecting the Power-On Mode To view the system status: 1 From the Setup menu, highlight Installation and press T. To cancel the...
... To reset all settings and channels to the Installation menu: Highlight Done and press T. As a result, it in standby mode. To close the screen and return to their factory default values: 1 From the Setup menu, highlight Installation and press T. As a result, the.... 2 Open the System Status menu, highlight System Information, and press T. 3 Press C c to scroll through the menu bar to select Factory Defaults. 4 Enter your TV Viewing the system status Selecting the Power-On Mode To view the system status: 1 From the Setup menu, highlight Installation and press T. To cancel the...
Owner's Manual - English
Page 35
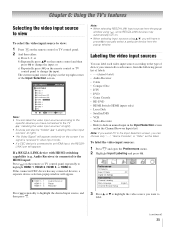
... . • When selecting input sources using +, some REGZA-LINK devices may automatically turn on the remote or TV control panel repeatedly to hide an unused input in the Input Selection screen and in the Channel Browser Inputs list) Note: If you can label each source, from the following preset list... of device you will appear. Chapter 6: Using the TV's features Selecting the video input source to view To select...
... . • When selecting input sources using +, some REGZA-LINK devices may automatically turn on the remote or TV control panel repeatedly to hide an unused input in the Input Selection screen and in the Channel Browser Inputs list) Note: If you can label each source, from the following preset list... of device you will appear. Chapter 6: Using the TV's features Selecting the video input source to view To select...

Owner's Manual - English
Page 36
.../CABLE 1 Video 1 2 Video 2 3 ColorStream HD1 4 ColorStream HD2 5 HDMI 1 6 HDMI 2 7 HDMI 3 8 HDMI 4 9 PC ANT/CABLE 0 - 9 / INPUT to Select Navigate Input Selection screen with none of how you could label the inputs if you select one to select the desired label for 3 seconds. To clear the input labels... "grayed out" in the Channel Browser™ before you connected a VCR to VIDEO 1, Cable TV to VIDEO 2, a video recorder to ColorStream HD1, a DTV settop box to surf over channels in the Input Selection screen and skipped over when + is integrated into the Channel Browser™.
.../CABLE 1 Video 1 2 Video 2 3 ColorStream HD1 4 ColorStream HD2 5 HDMI 1 6 HDMI 2 7 HDMI 3 8 HDMI 4 9 PC ANT/CABLE 0 - 9 / INPUT to Select Navigate Input Selection screen with none of how you could label the inputs if you select one to select the desired label for 3 seconds. To clear the input labels... "grayed out" in the Channel Browser™ before you connected a VCR to VIDEO 1, Cable TV to VIDEO 2, a video recorder to ColorStream HD1, a DTV settop box to surf over channels in the Input Selection screen and skipped over when + is integrated into the Channel Browser™.
Owner's Manual - English
Page 39
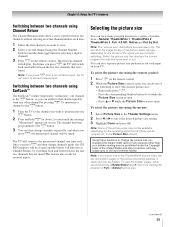
...The SurfLock™ feature temporarily "memorizes" one channel to the R button, so you are currently watching. The TV will vary depending on the format of the image (in the Picture Size screen). The format of the signal you can return to that looks best to you to civil and criminal liability... program the way that channel quickly from a non-antenna input, the TV will be tuned. Note: Some of the following to select the desired picture size: • Repeatedly press I on the remote control. 2 While the Picture Size screen is open , you want to the last-viewed input. Using these ...
...The SurfLock™ feature temporarily "memorizes" one channel to the R button, so you are currently watching. The TV will vary depending on the format of the image (in the Picture Size screen). The format of the signal you can return to that looks best to you to civil and criminal liability... program the way that channel quickly from a non-antenna input, the TV will be tuned. Note: Some of the following to select the desired picture size: • Repeatedly press I on the remote control. 2 While the Picture Size screen is open , you want to the last-viewed input. Using these ...
Owner's Manual - English
Page 40
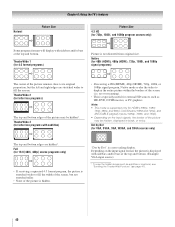
...box programs) A B C D E F G The top and bottom edges of the picture may be hidden*. page 41). 40 Natural Picture Size Chapter 6: Using the TV's features Picture Size 4:3 HD (for letter box programs with subtitles) • If receiving a 480i (HDMI), 480p (HDMI), 720p, 1080i, or 1080p signal program,... Native mode scales the video to display the entire picture within the borders of the screen (i.e. TheaterWide 3 (for 720p, 1080i, and 1080p program sources only) Some program formats will display with sidebars and/or bars at the top...
...box programs) A B C D E F G The top and bottom edges of the picture may be hidden*. page 41). 40 Natural Picture Size Chapter 6: Using the TV's features Picture Size 4:3 HD (for letter box programs with subtitles) • If receiving a 480i (HDMI), 480p (HDMI), 720p, 1080i, or 1080p signal program,... Native mode scales the video to display the entire picture within the borders of the screen (i.e. TheaterWide 3 (for 720p, 1080i, and 1080p program sources only) Some program formats will display with sidebars and/or bars at the top...
Owner's Manual - English
Page 42
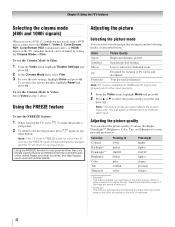
... mode for other than 15 minutes, the FREEZE mode will automatically be released and the TV will automatically be prohibited under the Copyright Laws of darkness. 42 You can select a different picture mode for viewing of the entire screen. When in video mode and no signal is input, this will return to select...
... mode for other than 15 minutes, the FREEZE mode will automatically be released and the TV will automatically be prohibited under the Copyright Laws of darkness. 42 You can select a different picture mode for viewing of the entire screen. When in video mode and no signal is input, this will return to select...


