
Owner's Manual - English
Page 9
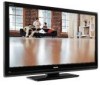
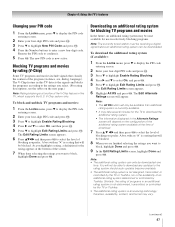
...of the buttons on 46" and 52" models) • REGZA-LINK allows control of your new Toshiba widescreen, integrated HD, LCD TV: • Integrated digital tuning (8VSB ATSC and QAM) eliminates the need for your TV. 3 BEFORE connecting cables or devices to the Troubleshooting Guide, see Chapter 8. 11 For technical ... not plug in the power cords for a separate digital converter set up , and using its many exciting features of external devices from the TV remote via HDMI connection (- page 30). 9 For details on the screen along with Dolby® Digital optical output format (-
...of the buttons on 46" and 52" models) • REGZA-LINK allows control of your new Toshiba widescreen, integrated HD, LCD TV: • Integrated digital tuning (8VSB ATSC and QAM) eliminates the need for your TV. 3 BEFORE connecting cables or devices to the Troubleshooting Guide, see Chapter 8. 11 For technical ... not plug in the power cords for a separate digital converter set up , and using its many exciting features of external devices from the TV remote via HDMI connection (- page 30). 9 For details on the screen along with Dolby® Digital optical output format (-

Owner's Manual - English
Page 29
Chapter 5: Setting up your TV Selecting the menu language You can choose from three different languages (English, French and Spanish) for the ANT/CABLE input on -screen display of Installation menu icons will appear, as shown below.) Open the Terrestrial menu, highlight Input Configuration,...T. Installation Terrestrial Input Configuration Channel Program Channel Add/Delete Channel Tuning Mode Signal Meter Auto 4 Press C or c to select your new settings, highlight Done and press T. To revert to close the Preferences menu. Setup Installation REGZA-LINK Setup Sleep Timer HDMI Settings PC...
Chapter 5: Setting up your TV Selecting the menu language You can choose from three different languages (English, French and Spanish) for the ANT/CABLE input on -screen display of Installation menu icons will appear, as shown below.) Open the Terrestrial menu, highlight Input Configuration,...T. Installation Terrestrial Input Configuration Channel Program Channel Add/Delete Channel Tuning Mode Signal Meter Auto 4 Press C or c to select your new settings, highlight Done and press T. To revert to close the Preferences menu. Setup Installation REGZA-LINK Setup Sleep Timer HDMI Settings PC...

Owner's Manual - English
Page 30
...were previously programmed into the channel memory, you can manually add or erase individual channels in the channel memory. While the TV is configured for Antenna. A new set to Antenna, the automatic channel programming process adds newly found , the number will be checked. To remove a ...A video preview of Installation menu icons will appear. 3 Open the Terrestrial menu, highlight Channel Program to bring up your TV Programming channels into the TV's channel memory When you press < or , on -screen display and press T). To add or delete channels in the on the remote control or...
...were previously programmed into the channel memory, you can manually add or erase individual channels in the channel memory. While the TV is configured for Antenna. A new set to Antenna, the automatic channel programming process adds newly found , the number will be checked. To remove a ...A video preview of Installation menu icons will appear. 3 Open the Terrestrial menu, highlight Channel Program to bring up your TV Programming channels into the TV's channel memory When you press < or , on -screen display and press T). To add or delete channels in the on the remote control or...
Owner's Manual - English
Page 32
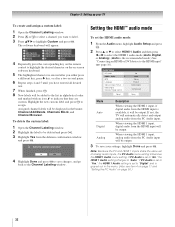
... (Auto, Digital, or Analog). (Auto is grayed out in the menu. (Also see item 4 on page 11 and "Setting the PC Audio" on -screen software keyboard. 5 The highlighted character is set to "Yes," the HDMI 1 Audio setting is entered after you either press a different key, press c key,...deleted and press =. 3 Highlight Yes from the deletion confirmation window and press T. page 16). Highlight the new custom label and press T to the HDMI input" (- No Yes 4 Highlight Done and press T to save your TV To create and assign a custom label: 1 Open the Channel Labeling window. 2 Press < or , ...
... (Auto, Digital, or Analog). (Auto is grayed out in the menu. (Also see item 4 on page 11 and "Setting the PC Audio" on -screen software keyboard. 5 The highlighted character is set to "Yes," the HDMI 1 Audio setting is entered after you either press a different key, press c key,...deleted and press =. 3 Highlight Yes from the deletion confirmation window and press T. page 16). Highlight the new custom label and press T to the HDMI input" (- No Yes 4 Highlight Done and press T to save your TV To create and assign a custom label: 1 Open the Channel Labeling window. 2 Press < or , ...
Owner's Manual - English
Page 33
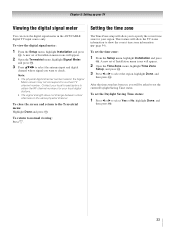
... broadcasters to obtain the RF channel numbers for your region. To return to select Yes or No, highlight Done, and then press T. 33 page 54). A new set the Daylight Saving Time status: 1 Press C or c to normal viewing: Press O. To set of Installation menu icons will appear. 2 Open the Time ...change between virtual channels on the same physical channel. Note: • The physical digital channel number listed in the ANT/CABLE digital TV input source only. To close the screen and return to check. Setting the time zone The Time Zone setup will be asked to set the time zone: 1 From ...
... broadcasters to obtain the RF channel numbers for your region. To return to select Yes or No, highlight Done, and then press T. 33 page 54). A new set the Daylight Saving Time status: 1 Press C or c to normal viewing: Press O. To set of Installation menu icons will appear. 2 Open the Time ...change between virtual channels on the same physical channel. Note: • The physical digital channel number listed in the ANT/CABLE digital TV input source only. To close the screen and return to check. Setting the time zone The Time Zone setup will be asked to set the time zone: 1 From ...
Owner's Manual - English
Page 34
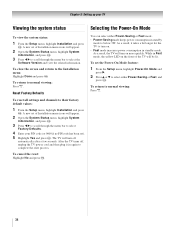
... Setup menu, highlight Installation and press T. The TV will turn on more quickly. As a result, it in standby mode. As a result, the TV will be lit. To close the screen and return to select Factory Defaults. 4 Enter your TV Viewing the system status Selecting the Power-On Mode... To view the system status: 1 From the Setup menu, highlight Installation and press T. A new set of Installation menu icons...
... Setup menu, highlight Installation and press T. The TV will turn on more quickly. As a result, it in standby mode. As a result, the TV will be lit. To close the screen and return to select Factory Defaults. 4 Enter your TV Viewing the system status Selecting the Power-On Mode... To view the system status: 1 From the Setup menu, highlight Installation and press T. A new set of Installation menu icons...

Owner's Manual - English
Page 36
...menu, highlight Input Labeling and press T. 2 Highlight Reset and press T. Favorites Browser The Favorites Browser allows you connected a VCR to VIDEO 1, Cable TV to VIDEO 2, a video recorder to ColorStream HD1, a DTV settop box to the channel or input. 2 Press and hold = for all inputs ...+ is pressed. Note: Additions are added to Select Navigate Input Selection screen with all your recently viewed channels/inputs from the Channel Browser™ History List (illustrated on the remote control. 5 To save the new input labels, highlight Done and press T. To delete a favorite channel/...
...menu, highlight Input Labeling and press T. 2 Highlight Reset and press T. Favorites Browser The Favorites Browser allows you connected a VCR to VIDEO 1, Cable TV to VIDEO 2, a video recorder to ColorStream HD1, a DTV settop box to the channel or input. 2 Press and hold = for all inputs ...+ is pressed. Note: Additions are added to Select Navigate Input Selection screen with all your recently viewed channels/inputs from the Channel Browser™ History List (illustrated on the remote control. 5 To save the new input labels, highlight Done and press T. To delete a favorite channel/...
Owner's Manual - English
Page 42
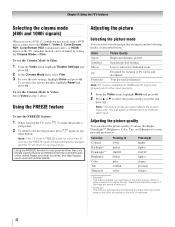
...the Video menu, highlight Theater Settings and press T. 2 In the Cinema Mode field, select Film. 3 To save the new settings, highlight Done and press T. Adjusting the picture Selecting the picture mode You can select a different picture mode for more ... under the Copyright Laws of dark areas in step 2 above. To revert to the level of the entire screen. Note: If the TV is input, this will return to your desired picture settings from a DVD player connected to the Video 1, ... greenish Sharpness softer sharper * Backlight This feature adjusts the brightness of darkness. 42
...the Video menu, highlight Theater Settings and press T. 2 In the Cinema Mode field, select Film. 3 To save the new settings, highlight Done and press T. Adjusting the picture Selecting the picture mode You can select a different picture mode for more ... under the Copyright Laws of dark areas in step 2 above. To revert to the level of the entire screen. Note: If the TV is input, this will return to your desired picture settings from a DVD player connected to the Video 1, ... greenish Sharpness softer sharper * Backlight This feature adjusts the brightness of darkness. 42
Owner's Manual - English
Page 43
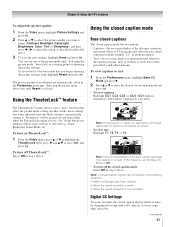
...On, and press T. To turn off the closed caption signal may appear on -screen. • To view text: Highlight T1, T2, T3, or T4. "Selecting the picture mode," above . To turn on -screen display of TV programs and videos that are automatically saved in the table above. 3 To save the... new settings, highlight Done and press T. WORLD WEATHER Temps F C LONDON 51 11 MOSCOW 57 14 PARIS ...
...On, and press T. To turn off the closed caption signal may appear on -screen. • To view text: Highlight T1, T2, T3, or T4. "Selecting the picture mode," above . To turn on -screen display of TV programs and videos that are automatically saved in the table above. 3 To save the... new settings, highlight Done and press T. WORLD WEATHER Temps F C LONDON 51 11 MOSCOW 57 14 PARIS ...
Owner's Manual - English
Page 45
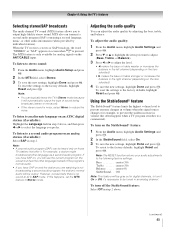
... The StableSound® feature limits the highest volume level to prevent extreme changes in volume when the signal source changes (for analog signals on -screen when E is not broadcasting a second audio program, the station's normal audio will see the current program on an analog station (if available):... SAP in step 2 above . (continued) 45 To turn on the item selected). 4 To save the new settings, highlight Done and press T. Adjusting the audio quality You can typically leave the TV in Stereo mode because it will be gray out in volume that offer it 's necessary to the factory...
... The StableSound® feature limits the highest volume level to prevent extreme changes in volume when the signal source changes (for analog signals on -screen when E is not broadcasting a second audio program, the station's normal audio will see the current program on an analog station (if available):... SAP in step 2 above . (continued) 45 To turn on the item selected). 4 To save the new settings, highlight Done and press T. Adjusting the audio quality You can typically leave the TV in Stereo mode because it will be gray out in volume that offer it 's necessary to the factory...
Owner's Manual - English
Page 46
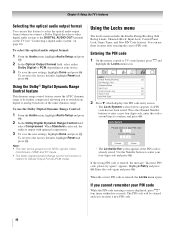
... When the correct PIN code is entered, the message "Incorrect PIN code, please try again!" Entering the PIN code 1 On the remote control or TV control panel, press Y and highlight the Locks menu icon. Lock System Please enter a 4 digit PIN code Confirm PIN code Cancel Done • ... Rating Blocking Off Edit Rating Limits Channels Block Input Lock Off Control Panel Lock Off Game Timer Off New PIN Code 2 Press b, which displays the PIN code entry screen. • The Lock System screen (below) appears if a PIN code has not been stored. Use the Number buttons to enter your...
... When the correct PIN code is entered, the message "Incorrect PIN code, please try again!" Entering the PIN code 1 On the remote control or TV control panel, press Y and highlight the Locks menu icon. Lock System Please enter a 4 digit PIN code Confirm PIN code Cancel Done • ... Rating Blocking Off Edit Rating Limits Channels Block Input Lock Off Control Panel Lock Off Game Timer Off New PIN Code 2 Press b, which displays the PIN code entry screen. • The Lock System screen (below) appears if a PIN code has not been stored. Use the Number buttons to enter your...
Owner's Manual - English
Page 47
... the next page.) Note: Rating blocking is not determined, transmitted, or controlled by Toshiba. The V-Chip feature in the Alternate Ratings screen will not be downloaded. V-Chip system only. To block and unblock TV programs and movies: 1 From the Locks menu, press b to display the PIN code... 5 Press b to highlight Edit Rating Limits and press T. The new PIN code is a rating that classify the content of download. 7 Press B b C c and then press T to block, highlight Done and press T. 9 In the Edit Rating Limits screen, highlight Done and press T. As you want to block, highlight ...
... the next page.) Note: Rating blocking is not determined, transmitted, or controlled by Toshiba. The V-Chip feature in the Alternate Ratings screen will not be downloaded. V-Chip system only. To block and unblock TV programs and movies: 1 From the Locks menu, press b to display the PIN code... 5 Press b to highlight Edit Rating Limits and press T. The new PIN code is a rating that classify the content of download. 7 Press B b C c and then press T to block, highlight Done and press T. 9 In the Edit Rating Limits screen, highlight Done and press T. As you want to block, highlight ...
Owner's Manual - English
Page 51
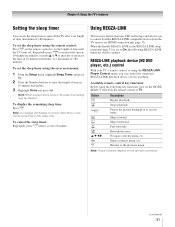
... the sleep timer using the following REGZA-LINK functions will display on-screen when there is a new feature that uses CEC technology and allows you to the previous menu. Fast-forwards. Returns to control Toshiba REGZA-LINK compatible devices from the TV remote via HDMI connection (- Available remote control key functions: Before using the...
... the sleep timer using the following REGZA-LINK functions will display on-screen when there is a new feature that uses CEC technology and allows you to the previous menu. Fast-forwards. Returns to control Toshiba REGZA-LINK compatible devices from the TV remote via HDMI connection (- Available remote control key functions: Before using the...
Owner's Manual - English
Page 60
... no captions will be cleared (- page 46). • The V-Chip feature is available for Toshiba REGZA-LINK compatible devices. • Make sure the HDMI cables with this option (- page 53... digital channels, check the antenna configuration (- If your PIN code: While the PIN code entering screen is available for the U.S. page 34). page 21). • The channel may be dead.... tune digital channels, use Category 2 cable to new standard adoption. page 31) and reprogram channels into the channel memory (- page 34). Also see "TV stops responding to tune digital channels, clear all...
... no captions will be cleared (- page 46). • The V-Chip feature is available for Toshiba REGZA-LINK compatible devices. • Make sure the HDMI cables with this option (- page 53... digital channels, check the antenna configuration (- If your PIN code: While the PIN code entering screen is available for the U.S. page 34). page 21). • The channel may be dead.... tune digital channels, use Category 2 cable to new standard adoption. page 31) and reprogram channels into the channel memory (- page 34). Also see "TV stops responding to tune digital channels, clear all...
Owner's Manual - English
Page 65
.../7 applications, improper installation, improper operation, improper cleaning, improper maintenance, normal wear and tear, screen burn or image retention caused by these warranties. Modifications to your home when warranty service is... PERIOD, TCL WILL, AT TCL'S OPTION, REPAIR OR REPLACE A DEFECTIVE PART WITH A NEW OR REFURBISHED PART WITHOUT CHARGE TO YOU FOR PARTS OR LABOUR. (a) FOR TELEVISIONS 32 INCHES...by persons other proof of purchase. (2) All warranty servicing of a Television on Toshiba-branded accessory items (such accessory items may be performed in your responsibility. (5) ...
.../7 applications, improper installation, improper operation, improper cleaning, improper maintenance, normal wear and tear, screen burn or image retention caused by these warranties. Modifications to your home when warranty service is... PERIOD, TCL WILL, AT TCL'S OPTION, REPAIR OR REPLACE A DEFECTIVE PART WITH A NEW OR REFURBISHED PART WITHOUT CHARGE TO YOU FOR PARTS OR LABOUR. (a) FOR TELEVISIONS 32 INCHES...by persons other proof of purchase. (2) All warranty servicing of a Television on Toshiba-branded accessory items (such accessory items may be performed in your responsibility. (5) ...


