

Owners Manual
Page 4
... malfunction. 30) Always unplug the TV before cleaning. Never attempt to clean the LCD screen, follow these sounds become frequent or continuous, unplug the power cord and contact a Toshiba Authorized Service Center. 35) WARNING: RISK OF SERIOUS PERSONAL INJURY OR EQUIPMENT DAMAGE! Never...OF ELECTRIC SHOCK! Refer all servicing not specified in this manual to a Toshiba Authorized Service Center. 38) If you leave the TV unattended or unused for the television, avoid locations where the screen may be regulated due to environmental considerations. Gently wipe the display panel ...
... malfunction. 30) Always unplug the TV before cleaning. Never attempt to clean the LCD screen, follow these sounds become frequent or continuous, unplug the power cord and contact a Toshiba Authorized Service Center. 35) WARNING: RISK OF SERIOUS PERSONAL INJURY OR EQUIPMENT DAMAGE! Never...OF ELECTRIC SHOCK! Refer all servicing not specified in this manual to a Toshiba Authorized Service Center. 38) If you leave the TV unattended or unused for the television, avoid locations where the screen may be regulated due to environmental considerations. Gently wipe the display panel ...
Owners Manual
Page 6
... receiving antenna. • Increase the separation between the equipment and the receiver. • Connect the equipment into an outlet on the screen if a fixed, non- Note: Interactive video games that interference will not occur in a particular installation. Wayne, NJ 07470. These limits...Information • WOW, SRS and l symbol are not an indication of malfunction; FCC Declaration of Conformity Compliance Statement (Part 15): The Toshiba 26HL67, 32HL67, 37HL67, 42HL67, and 32HL67U Televisions comply with this equipment. Operation is viewed from SRS Labs, Inc. • Manufactured ...
... receiving antenna. • Increase the separation between the equipment and the receiver. • Connect the equipment into an outlet on the screen if a fixed, non- Note: Interactive video games that interference will not occur in a particular installation. Wayne, NJ 07470. These limits...Information • WOW, SRS and l symbol are not an indication of malfunction; FCC Declaration of Conformity Compliance Statement (Part 15): The Toshiba 26HL67, 32HL67, 37HL67, 42HL67, and 32HL67U Televisions comply with this equipment. Operation is viewed from SRS Labs, Inc. • Manufactured ...
Owners Manual
Page 8
.... page 46). • CableClear® digital picture noise reduction (- Certain advanced and interactive digital cable services such as video-on the screen along with Dolby® Digital optical output format (- page 57). • Digital Audio Out optical audio connection with the station numbers, ...so you always know what you're watching (- Chapter 1: Introduction Welcome to Toshiba Thank you for a separate digital converter set -top box. This digital television is required to put the Call Letters (e.g. page 31). 8
.... page 46). • CableClear® digital picture noise reduction (- Certain advanced and interactive digital cable services such as video-on the screen along with Dolby® Digital optical output format (- page 57). • Digital Audio Out optical audio connection with the station numbers, ...so you always know what you're watching (- Chapter 1: Introduction Welcome to Toshiba Thank you for a separate digital converter set -top box. This digital television is required to put the Call Letters (e.g. page 31). 8

Owners Manual
Page 9
... your TV. 4 BEFORE connecting cables or devices to turn the TV off or on the TV. THIS TYPE OF DAMAGE IS NOT COVERED UNDER THE TOSHIBA WARRANTY. 3 Do not plug in the power cords for your TV and other objects to a wall, pillar, or other device(s) (- page 20). 7 See "...navigating the TV's menu system (- Chapter 1: Introduction Overview of steps for installing, setting up your new TV! 9 page 30). 12 For details on the screen. • Place the TV far enough from walls and other devices. pages 22-26). 9 AFTER connecting all cables and devices to set up , and using...
... your TV. 4 BEFORE connecting cables or devices to turn the TV off or on the TV. THIS TYPE OF DAMAGE IS NOT COVERED UNDER THE TOSHIBA WARRANTY. 3 Do not plug in the power cords for your TV and other objects to a wall, pillar, or other device(s) (- page 20). 7 See "...navigating the TV's menu system (- Chapter 1: Introduction Overview of steps for installing, setting up your new TV! 9 page 30). 12 For details on the screen. • Place the TV far enough from walls and other devices. pages 22-26). 9 AFTER connecting all cables and devices to set up , and using...
Owners Manual
Page 10
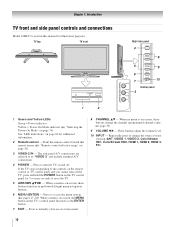
...MENU (ENTER) - Press to reset the TV. 5 ARROWS BbC c - These buttons adjust the volume level. 10 INPUT - When a menu is on-screen, these buttons change the source you cannot turn the TV on and off the TV, press and hold the POWER button on the remote control... 30). 9 VOLUME C c - Chapter 1: Introduction TV front and side panel controls and connections Model 42HL67 is on-screen, these buttons function as the ENTER button. 7 EXIT - "Remote control effective range" on -screen menu. 8 CHANNEL Bb - Press to turn off . If the TV stops responding to as "VIDEO 2" and include...
...MENU (ENTER) - Press to reset the TV. 5 ARROWS BbC c - These buttons adjust the volume level. 10 INPUT - When a menu is on-screen, these buttons change the source you cannot turn the TV on and off the TV, press and hold the POWER button on the remote control... 30). 9 VOLUME C c - Chapter 1: Introduction TV front and side panel controls and connections Model 42HL67 is on-screen, these buttons function as the ENTER button. 7 EXIT - "Remote control effective range" on -screen menu. 8 CHANNEL Bb - Press to turn off . If the TV stops responding to as "VIDEO 2" and include...

Owners Manual
Page 19
... (type A connector). TV upper back panel TV lower back panel Computer PC audio cable • Depending on the DVD's title and the specifications of the screen (i.e. Frequency VGA 640 × 480 60Hz SVGA 800 × 600 60Hz XGA 1024 × 768 60Hz Other formats or non-standard signals will not be...
... (type A connector). TV upper back panel TV lower back panel Computer PC audio cable • Depending on the DVD's title and the specifications of the screen (i.e. Frequency VGA 640 × 480 60Hz SVGA 800 × 600 60Hz XGA 1024 × 768 60Hz Other formats or non-standard signals will not be...

Owners Manual
Page 21
...). 6 INPUT selects the video input source (- page 37). (Also see "Arrow buttons.") 15 Arrow buttons (BbC c) When a menu is on -screen, these buttons open the Channel Browser™ and tune to edit the Favorites List (- page 52). 4 PIC SIZE cycles through programmed channels when no menu... last viewed channel or source (- page 38) or to the previous/next channel in the channel history (- pages 27 and 28). 18 EXIT closes on-screen menus. 19 MODE SELECT switch switches between TV, CABLE/SAT, AUX 1, and AUX 2 modes (- For a complete list of the remote control's functions, see 3...
...). 6 INPUT selects the video input source (- page 37). (Also see "Arrow buttons.") 15 Arrow buttons (BbC c) When a menu is on -screen, these buttons open the Channel Browser™ and tune to edit the Favorites List (- page 52). 4 PIC SIZE cycles through programmed channels when no menu... last viewed channel or source (- page 38) or to the previous/next channel in the channel history (- pages 27 and 28). 18 EXIT closes on-screen menus. 19 MODE SELECT switch switches between TV, CABLE/SAT, AUX 1, and AUX 2 modes (- For a complete list of the remote control's functions, see 3...

Owners Manual
Page 22
... "TV" to control a DVD player or HTIB. 22 If this happens and you wish to use those features, you have a non-Toshiba device or a Toshiba device that the remote control is programmed, it may not work on some DVD players). 9 ENTER Required by some satellite receivers and DVD... press to select TV mode. b selects the next lower channel. 6 GUIDE Displays the channel guide in the AUX mode. 7 INFO Displays TV status information on-screen. 8 BbC c Press to navigate DVD menus (may not operate certain features on and off. 2 Channel Numbers (0-9) Press to directly access channels (as opposed to ...
... "TV" to control a DVD player or HTIB. 22 If this happens and you wish to use those features, you have a non-Toshiba device or a Toshiba device that the remote control is programmed, it may not work on some DVD players). 9 ENTER Required by some satellite receivers and DVD... press to select TV mode. b selects the next lower channel. 6 GUIDE Displays the channel guide in the AUX mode. 7 INFO Displays TV status information on-screen. 8 BbC c Press to navigate DVD menus (may not operate certain features on and off. 2 Channel Numbers (0-9) Press to directly access channels (as opposed to ...

Owners Manual
Page 27
... menu] S Off/On S [Opens the Edit Rating Limits menu] S [Opens the Channels block menu] S Off/Video/Video+ S Off/On S [Opens the New PIN Code entry screen] S [Opens the Installation menu (-
... menu] S Off/On S [Opens the Edit Rating Limits menu] S [Opens the Channels block menu] S Off/Video/Video+ S Off/On S [Opens the New PIN Code entry screen] S [Opens the Installation menu (-

Owners Manual
Page 28
... Input Configuration menu] S [Start] S [Scans for new channels on ANT] S [Opens the Channel Add/Delete menu] S [Opens the Signal Meter menu] S [Opens the System Information screen] Navigating the menu system You can use the buttons on the remote control or TV control panel to access and navigate your TV's on...-screen menu system. • Press Y to open the menu system. • When a menu is open, use the up/down/left/right arrow buttons (BbC c) on the ...
... Input Configuration menu] S [Start] S [Scans for new channels on ANT] S [Opens the Channel Add/Delete menu] S [Opens the Signal Meter menu] S [Opens the System Information screen] Navigating the menu system You can use the buttons on the remote control or TV control panel to access and navigate your TV's on...-screen menu system. • Press Y to open the menu system. • When a menu is open, use the up/down/left/right arrow buttons (BbC c) on the ...

Owners Manual
Page 29
...-On Mode Power-Saving 3 (A new set of menus and messages. To revert to select the input source (Cable or Antenna) for the ANT input on -screen display of Installation menu icons will appear, as shown below.) Open the Terrestrial menu, highlight Input Configuration, and press T. Configuring the antenna input source for...
...-On Mode Power-Saving 3 (A new set of menus and messages. To revert to select the input source (Cable or Antenna) for the ANT input on -screen display of Installation menu icons will appear, as shown below.) Open the Terrestrial menu, highlight Input Configuration, and press T. Configuring the antenna input source for...

Owners Manual
Page 30
... Abort in the channel memory. When channel programming is finished, press < or , to repeat the programming process again unless your TV will stop only on -screen display and press T). This is normal; Follow the steps below to a channel not programmed in the channel memory After automatically programming channels into the TV...
... Abort in the channel memory. When channel programming is finished, press < or , to repeat the programming process again unless your TV will stop only on -screen display and press T). This is normal; Follow the steps below to a channel not programmed in the channel memory After automatically programming channels into the TV...

Owners Manual
Page 31
... example, 56-1). Channel Labeling {No Label} A&E ABC ABCFAM ABCHD AMAX AMAXW AMC ANIMAL ANT 24 A&E Press CH UP/DOWN to change channels. Press 1 on the screen to remove the unnecessary channel from the channel memory: Highlight the checked box next to the channel number you want to remove the label. (continued...
... example, 56-1). Channel Labeling {No Label} A&E ABC ABCFAM ABCHD AMAX AMAXW AMC ANIMAL ANT 24 A&E Press CH UP/DOWN to change channels. Press 1 on the screen to remove the unnecessary channel from the channel memory: Highlight the checked box next to the channel number you want to remove the label. (continued...

Owners Manual
Page 32
... S3endD EEXIFT dExiet f 3 6 MNOmn o 6 9 WX Y Zw x y z 9 INPUT Space 4 Repeatedly press the corresponding key on the remote control to highlight the desired character on the on-screen software keyboard. 5 The highlighted character is entered after you either press a different key, press c key, or after a two-second pause. 6 Repeat steps 4 and 5 until you...
... S3endD EEXIFT dExiet f 3 6 MNOmn o 6 9 WX Y Zw x y z 9 INPUT Space 4 Repeatedly press the corresponding key on the remote control to highlight the desired character on the on-screen software keyboard. 5 The highlighted character is entered after you either press a different key, press c key, or after a two-second pause. 6 Repeat steps 4 and 5 until you...

Owners Manual
Page 33
... Meter, and press T. Signal Meter Signal Locked 0 Peak 0 Physical Digital Channel Virtual Digital Channel Advanced 4 4-1 Done To close the screen and return to the Installation menu: Highlight Done and press T. Reset Factory Defaults To reset all settings and channels to their factory default ...Highlight Installation and press T. Done 5 Enter your TV Viewing the digital signal meter You can view the digital signal meter in the Signal Meter screen may not correspond to a virtual TV channel number. To view the digital signal meter: 1 Press Y and open the Setup menu. 2 ...
... Meter, and press T. Signal Meter Signal Locked 0 Peak 0 Physical Digital Channel Virtual Digital Channel Advanced 4 4-1 Done To close the screen and return to the Installation menu: Highlight Done and press T. Reset Factory Defaults To reset all settings and channels to their factory default ...Highlight Installation and press T. Done 5 Enter your TV Viewing the digital signal meter You can view the digital signal meter in the Signal Meter screen may not correspond to a virtual TV channel number. To view the digital signal meter: 1 Press Y and open the Setup menu. 2 ...

Owners Manual
Page 35
... Labeling and press T. 3 Press B or b to highlight the video source you connected to each source, from the following preset list of the Input Selection screen. or b) Repeatedly press Bb on the remote control or TV control panel. 2 And then either: a) Press 0-8; "Labeling the video input sources" at ...8226; Laser Disk • Satellite/DSS • VCR • Video Recorder • Hide (to hide an unused input in the Input Selection screen) Note: If you have connected to label. Chapter 6: Using the TV's features Selecting the video input source to view To select the video input ...
... Labeling and press T. 3 Press B or b to highlight the video source you connected to each source, from the following preset list of the Input Selection screen. or b) Repeatedly press Bb on the remote control or TV control panel. 2 And then either: a) Press 0-8; "Labeling the video input sources" at ...8226; Laser Disk • Satellite/DSS • VCR • Video Recorder • Hide (to hide an unused input in the Input Selection screen) Note: If you have connected to label. Chapter 6: Using the TV's features Selecting the video input source to view To select the video input ...

Owners Manual
Page 36
...and hold n for all your channels and inputs. Note: Additions are added to the factory default labels, highlight Reset and press T. The screen below right is an example of your recently viewed channels/inputs from the Favorites list. This feature allows you to: • Navigate the ... 0 ANT 1 Video 1 2 Video 2 3 ColorStream HD1 4 ColorStream HD2 5 HDMI 1 6 HDMI 2 7 HDMI 3 8 PC 0 - 8 / INPUT to Select Navigate Input Selection screen with all of your inputs. • Keep a list of how you could label the inputs if you select one to tune). • Quickly change inputs...
...and hold n for all your channels and inputs. Note: Additions are added to the factory default labels, highlight Reset and press T. The screen below right is an example of your recently viewed channels/inputs from the Favorites list. This feature allows you to: • Navigate the ... 0 ANT 1 Video 1 2 Video 2 3 ColorStream HD1 4 ColorStream HD2 5 HDMI 1 6 HDMI 2 7 HDMI 3 8 PC 0 - 8 / INPUT to Select Navigate Input Selection screen with all of your inputs. • Keep a list of how you could label the inputs if you select one to tune). • Quickly change inputs...

Owners Manual
Page 38
... channel will be tuned. Note: If you program channels into the R button. 2 Press and hold R for about 2 seconds until the message "Channel Memorized" appears on-screen. To memorize a channel to the R button: 1 Tune the TV to the channel you will have to view. 2 Select a second channel using the Channel Number buttons...
... channel will be tuned. Note: If you program channels into the R button. 2 Press and hold R for about 2 seconds until the message "Channel Memorized" appears on-screen. To memorize a channel to the R button: 1 Tune the TV to the channel you will have to view. 2 Select a second channel using the Channel Number buttons...

Owners Manual
Page 39
... States and other than your TV. To select the picture size using the menus: 1 Select Picture Size in the Picture Size screen). Using these functions to its original proportion, but only slightly stretched taller. • The top and bottom edges of the picture... are examples only. TheaterWide 1 picture size example TheaterWide 2 picture size (for each input on the remote control. 2 While the Picture Size screen is displayed close to its originally formatted proportion. To view the hidden areas, see "Scrolling the TheaterWide® picture" (- Natural picture size...
... States and other than your TV. To select the picture size using the menus: 1 Select Picture Size in the Picture Size screen). Using these functions to its original proportion, but only slightly stretched taller. • The top and bottom edges of the picture... are examples only. TheaterWide 1 picture size example TheaterWide 2 picture size (for each input on the remote control. 2 While the Picture Size screen is displayed close to its originally formatted proportion. To view the hidden areas, see "Scrolling the TheaterWide® picture" (- Natural picture size...

Owners Manual
Page 40
...and 1080p signals only. To revert to fill the width of the screen, but not stretched taller. • None of the screen (i.e. no overscanning). • This is not distorted from -10 to fill the width of the screen, but only slightly stretched taller. • The top and bottom edges...modes for HDMI and ColorStream inputs. • Depending on the input signals, the border of the picture may be grayed out in the Picture Size screen. • This mode is stretched wider to the factory defaults, highlight Reset and press T. 40 Chapter 6: Using the TV's features TheaterWide 3 ...
...and 1080p signals only. To revert to fill the width of the screen, but not stretched taller. • None of the screen (i.e. no overscanning). • This is not distorted from -10 to fill the width of the screen, but only slightly stretched taller. • The top and bottom edges...modes for HDMI and ColorStream inputs. • Depending on the input signals, the border of the picture may be grayed out in the Picture Size screen. • This mode is stretched wider to the factory defaults, highlight Reset and press T. 40 Chapter 6: Using the TV's features TheaterWide 3 ...


