Owner's Manual - English
Page 4
... power lines or other hazards. Never strike the screen with a sharp or heavy object. 36) • The LCD screen of your TV from lightning and power surges, always unplug the power cord and disconnect the antenna from the TV if you leave the TV unattended or unused for your TOSHIBA TV, follow these sounds become frequent or continuous...
... power lines or other hazards. Never strike the screen with a sharp or heavy object. 36) • The LCD screen of your TV from lightning and power surges, always unplug the power cord and disconnect the antenna from the TV if you leave the TV unattended or unused for your TOSHIBA TV, follow these sounds become frequent or continuous...
Owner's Manual - English
Page 6
...; Manufactured under your LCD TV The following measures: • Reorient or relocate the receiving antenna. • Increase the separation between the equipment and the receiver. • Connect the equipment into an outlet on the screen if a fixed, non- However, there is : Toshiba America Consumer Products,... (dot of time. 2) The LCD panel contained in this TV. Such pixels are not visible when the picture is not covered under license from Dolby Laboratories. FCC Declaration of Conformity Compliance Statement (Part 15): The Toshiba 42HL167, 47HL167, and 52HL167 Televisions comply ...
...; Manufactured under your LCD TV The following measures: • Reorient or relocate the receiving antenna. • Increase the separation between the equipment and the receiver. • Connect the equipment into an outlet on the screen if a fixed, non- However, there is : Toshiba America Consumer Products,... (dot of time. 2) The LCD panel contained in this TV. Such pixels are not visible when the picture is not covered under license from Dolby Laboratories. FCC Declaration of Conformity Compliance Statement (Part 15): The Toshiba 42HL167, 47HL167, and 52HL167 Televisions comply ...

Owner's Manual - English
Page 9
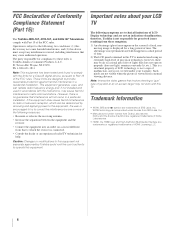
... • CE-Link allows control of a set -top box (in most innovative LCD TVs on the screen along with Dolby® Digital optical output format (- page 64). 9 Chapter 1: Introduction Welcome to Toshiba Thank you for IR pass-through device control (- A security card provided by your ...digital picture noise reduction (- ABC, HBO, etc.) on the market. page 68). • PC IN (Analog RGB) computer terminal (- page 42). • IR OUT infrared terminal using the IR blaster cable for purchasing this feature has a unique "black" design to view encrypted digital programming....
... • CE-Link allows control of a set -top box (in most innovative LCD TVs on the screen along with Dolby® Digital optical output format (- page 64). 9 Chapter 1: Introduction Welcome to Toshiba Thank you for IR pass-through device control (- A security card provided by your ...digital picture noise reduction (- ABC, HBO, etc.) on the market. page 68). • PC IN (Analog RGB) computer terminal (- page 42). • IR OUT infrared terminal using the IR blaster cable for purchasing this feature has a unique "black" design to view encrypted digital programming....
Owner's Manual - English
Page 10
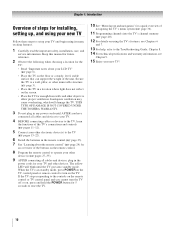
... structure (- page 36). 11 Programming channels into standby mode. Secure the TV to the TV (- page 23). 7 See "Learning about your LCD TV" (- THIS TYPE OF DAMAGE IS NOT COVERED UNDER THE TOSHIBA WARRANTY. 3 Do not plug in a location where light does not reflect... on the remote control. 8 Program the remote control to operate your other objects to allow proper ventilation. page 24) for an overview of the buttons on the screen. • Place the TV...
... structure (- page 36). 11 Programming channels into standby mode. Secure the TV to the TV (- page 23). 7 See "Learning about your LCD TV" (- THIS TYPE OF DAMAGE IS NOT COVERED UNDER THE TOSHIBA WARRANTY. 3 Do not plug in a location where light does not reflect... on the remote control. 8 Program the remote control to operate your other objects to allow proper ventilation. page 24) for an overview of the buttons on the screen. • Place the TV...
Owner's Manual - English
Page 11
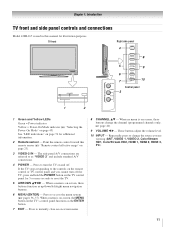
... to access the menu system (- Repeatedly press to as "VIDEO 2" and include standard A/V connections. 4 POWER - When a menu is on-screen, the MENU button on the TV's control panel functions as up/down/left/right menu navigation buttons. 6 MENU (ENTER) - These buttons adjust the volume level. 10 INPUT -...On Mode" on page 45) See "LED indications" on page 74 for 5 or more seconds to turn the TV on and off. Chapter 1: Introduction TV front and side panel controls and connections Model 42HL167 is on-screen, these buttons function as the ENTER button. 7 EXIT - Press to reset the...
... to access the menu system (- Repeatedly press to as "VIDEO 2" and include standard A/V connections. 4 POWER - When a menu is on-screen, the MENU button on the TV's control panel functions as up/down/left/right menu navigation buttons. 6 MENU (ENTER) - These buttons adjust the volume level. 10 INPUT -...On Mode" on page 45) See "LED indications" on page 74 for 5 or more seconds to turn the TV on and off. Chapter 1: Introduction TV front and side panel controls and connections Model 42HL167 is on-screen, these buttons function as the ENTER button. 7 EXIT - Press to reset the...
Owner's Manual - English
Page 22
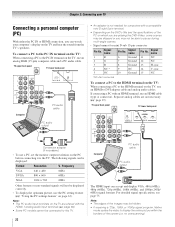
... sound from the TV's speakers. Note: • The edges of the images may not be able to pause during multi-angle scenes. • Signal names for computers with a compatible mini D-sub15-pin terminal. • Depending on the DVD's title and the specifications of the screen (i.e. Separate analog ...cables are shared with an HDMI terminal, use a PC, set the monitor output resolution on which you are playing the DVD-Video, some scenes may be skipped or you can watch your TV Connecting a personal computer (PC) With ...
... sound from the TV's speakers. Note: • The edges of the images may not be able to pause during multi-angle scenes. • Signal names for computers with a compatible mini D-sub15-pin terminal. • Depending on the DVD's title and the specifications of the screen (i.e. Separate analog ...cables are shared with an HDMI terminal, use a PC, set the monitor output resolution on which you are playing the DVD-Video, some scenes may be skipped or you can watch your TV Connecting a personal computer (PC) With ...
Owner's Manual - English
Page 24
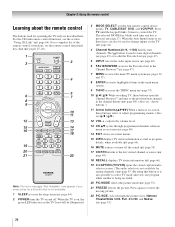
... VCR/PVR. page 55). 17 CH RTN returns to the previous/next channel in the channel history (- page 66). 19 C.CAPTION (TV/VCR) opens the closed caption/audio selector screen. (The audio selector is not available. 1 SLEEP accesses the sleep timer (- page 55.) By using this button, it is set,...control functional key chart (- page 66). 16 MUTE reduces or turns off . page 53). 21 FREEZE freezes the picture. page 64). 2 POWER turns the TV on -screen (- The selected MODE key blinks each time any key is on and off the sound (- page 41). 4 Channel Numbers (0-9, -/100) directly tune channels....
... VCR/PVR. page 55). 17 CH RTN returns to the previous/next channel in the channel history (- page 66). 19 C.CAPTION (TV/VCR) opens the closed caption/audio selector screen. (The audio selector is not available. 1 SLEEP accesses the sleep timer (- page 55.) By using this button, it is set,...control functional key chart (- page 66). 16 MUTE reduces or turns off . page 53). 21 FREEZE freezes the picture. page 64). 2 POWER turns the TV on -screen (- The selected MODE key blinks each time any key is on and off the sound (- page 41). 4 Channel Numbers (0-9, -/100) directly tune channels....
Owner's Manual - English
Page 26
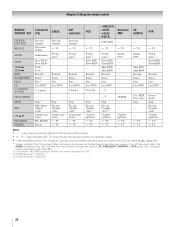
...MODE Freeze --- page 64). *1 Volume will affect the TV, even though the remote control is picked for your TV. When the volume is set on TV, CABLE/SAT, VCR/PVR, or DVD mode. Chapter 3: Using the remote control REMOTE CONTROL KEY Toshiba TV (TV) CABLE CH RTN/ DVD RTN RECALL MUTE SLOW SKIP ...z SKIP Z REW PAUSE/STEP PLAY FF C.CAPTION TV/VCR DISC/AM/FM STOP REC CH B b PIC MODE FREEZE Previous channel On-screen display Sound mute Slow FWD* Slow REW* DAY+ DAY...
...MODE Freeze --- page 64). *1 Volume will affect the TV, even though the remote control is picked for your TV. When the volume is set on TV, CABLE/SAT, VCR/PVR, or DVD mode. Chapter 3: Using the remote control REMOTE CONTROL KEY Toshiba TV (TV) CABLE CH RTN/ DVD RTN RECALL MUTE SLOW SKIP ...z SKIP Z REW PAUSE/STEP PLAY FF C.CAPTION TV/VCR DISC/AM/FM STOP REC CH B b PIC MODE FREEZE Previous channel On-screen display Sound mute Slow FWD* Slow REW* DAY+ DAY...
Owner's Manual - English
Page 36
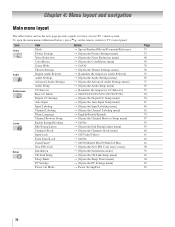
... navigation Main menu layout The tables below ), press Y on the next page provide a quick overview of your TV's menu system. Icon Video Audio Preferences Locks Setup Item Mode Picture Settings Noise Reduction ColorMaster Game Mode Theater Settings ...block menu] S Off/Video/Video+ S Off/On S Off/30 Min/60 Min/90 Min/120 Min S [Opens the New PIN Code entry screen] S [Opens the Installation menu] S [Opens the CE-Link Setup menu] S [Opens the Sleep Timer menu] S [Opens the PC Settings menu... Page 53 53 68 69 70 50 55 56 71 56 55 54 54 41 46 42 39 47 59 59 60 61 62 62 58 39 65 64 63 45 36
... navigation Main menu layout The tables below ), press Y on the next page provide a quick overview of your TV's menu system. Icon Video Audio Preferences Locks Setup Item Mode Picture Settings Noise Reduction ColorMaster Game Mode Theater Settings ...block menu] S Off/Video/Video+ S Off/On S Off/30 Min/60 Min/90 Min/120 Min S [Opens the New PIN Code entry screen] S [Opens the Installation menu] S [Opens the CE-Link Setup menu] S [Opens the Sleep Timer menu] S [Opens the PC Settings menu... Page 53 53 68 69 70 50 55 56 71 56 55 54 54 41 46 42 39 47 59 59 60 61 62 62 58 39 65 64 63 45 36
Owner's Manual - English
Page 37
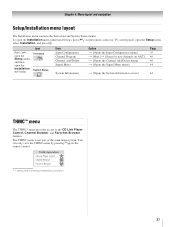
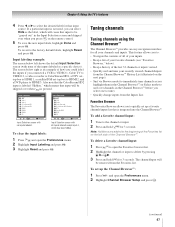
...[Scans for new channels on the remote control. THINC Applications CE-Link Player Control Channel Browser Favorites Browser * Toshiba Home Interactive Network Connection. 37 Chapter 4: Menu layout and navigation Setup/Installation menu layout The Installation menu contains the...Add/Delete menu] S [Opens the Signal Meter menu] Page 39 40 40 44 S [Opens the System Information screen] 44 THINC™ menu The THINC* menu provides access to the CE-Link Player Control, Channel Browser, and... below), press Y on the remote control or TV control panel, open the Installation sub-menu.
...[Scans for new channels on the remote control. THINC Applications CE-Link Player Control Channel Browser Favorites Browser * Toshiba Home Interactive Network Connection. 37 Chapter 4: Menu layout and navigation Setup/Installation menu layout The Installation menu contains the...Add/Delete menu] S [Opens the Signal Meter menu] Page 39 40 40 44 S [Opens the System Information screen] 44 THINC™ menu The THINC* menu provides access to the CE-Link Player Control, Channel Browser, and... below), press Y on the remote control or TV control panel, open the Installation sub-menu.
Owner's Manual - English
Page 38
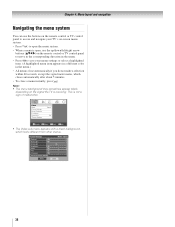
...open the menu system. • When a menu is open, use the up/down/left/right arrow buttons (BbC c) on the signal the TV is not a sign of malfunction. This is receiving. Picture Settings Contrast 100 Back Light 100 DynaLight Brightness 50 Color 50 Tint 0 Sharpness 50...38 Note: • The menu background may sometimes appear black, depending on the remote control or TV control panel to move in the corresponding direction in the menu. • Press T to save your TV's on-screen menu system. • Press Y to access and navigate your menu settings or select a highlighted ...
...open the menu system. • When a menu is open, use the up/down/left/right arrow buttons (BbC c) on the signal the TV is not a sign of malfunction. This is receiving. Picture Settings Contrast 100 Back Light 100 DynaLight Brightness 50 Color 50 Tint 0 Sharpness 50...38 Note: • The menu background may sometimes appear black, depending on the remote control or TV control panel to move in the corresponding direction in the menu. • Press T to save your TV's on-screen menu system. • Press Y to access and navigate your menu settings or select a highlighted ...
Owner's Manual - English
Page 39
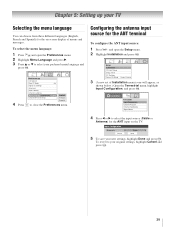
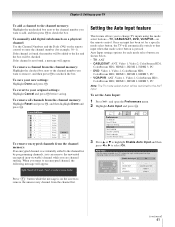
... Off English English Français Español 4 Press O to select the input source (Cable or Antenna) for the ANT input on -screen display of Installation menu icons will appear, as shown below.) Open the Terrestrial menu, highlight Input Configuration, and press T. Input Configuration Antenna In Cancel... Cable Done 5 To save your new settings, highlight Done and press T. Chapter 5: Setting up your TV Selecting the menu language You can choose from three different languages (English, French and Spanish) for the on the...
... Off English English Français Español 4 Press O to select the input source (Cable or Antenna) for the ANT input on -screen display of Installation menu icons will appear, as shown below.) Open the Terrestrial menu, highlight Input Configuration, and press T. Input Configuration Antenna In Cancel... Cable Done 5 To save your new settings, highlight Done and press T. Chapter 5: Setting up your TV Selecting the menu language You can choose from three different languages (English, French and Spanish) for the on the...
Owner's Manual - English
Page 40
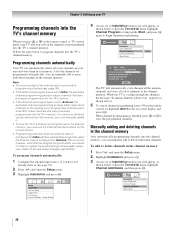
... channels (- however, once channel programming is cycling through all the antenna channels, and store all active channels in your Cable TV service lineup changes significantly. Setup Installation CE-Link Setup Sleep Timer PC Settings Power-On Mode Power-Saving 4 (A new set...finished, press < or , to program channels into the channel memory, you can automatically detect all active channels in the on-screen display and press T). Installation Terrestrial Input Configuration Channel Program Channel Add/Delete Signal Meter Start ANT Cable Scanning channels, please wait ......
... channels (- however, once channel programming is cycling through all the antenna channels, and store all active channels in your Cable TV service lineup changes significantly. Setup Installation CE-Link Setup Sleep Timer PC Settings Power-On Mode Power-Saving 4 (A new set...finished, press < or , to program channels into the channel memory, you can automatically detect all active channels in the on-screen display and press T). Installation Terrestrial Input Configuration Channel Program Channel Add/Delete Signal Meter Start ANT Cable Scanning channels, please wait ......
Owner's Manual - English
Page 41
...will be restricted to the ANT input. If the channel is pressed. Auto Input Use this menu to enable your TV's automatic input switching feature when changing modes on the screen to remove the unnecessary channel from the channel list. Auto Input settings options for example, 56-1). Preferences CC Selector... , the number will be added to the list and the box will appear. Enable Auto Input On SLEEP POWER MODE SELECT CABLE/SAT DVD TV VCR/PVR TV CABLE/SAT DVD VCR/PVR -ColorStream HD1 HDMI 1 Video 1 Reset Done (continued) 41 If the channel is found , a message will be ...
...will be restricted to the ANT input. If the channel is pressed. Auto Input Use this menu to enable your TV's automatic input switching feature when changing modes on the screen to remove the unnecessary channel from the channel list. Auto Input settings options for example, 56-1). Preferences CC Selector... , the number will be added to the list and the box will appear. Enable Auto Input On SLEEP POWER MODE SELECT CABLE/SAT DVD TV VCR/PVR TV CABLE/SAT DVD VCR/PVR -ColorStream HD1 HDMI 1 Video 1 Reset Done (continued) 41 If the channel is found , a message will be ...
Owner's Manual - English
Page 43
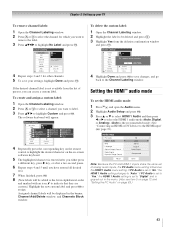
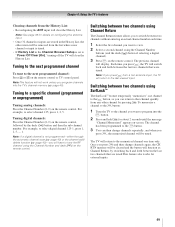
... MNOmn o 6 9 WX Y Zw x y z 9 INPUT Space 4 Repeatedly press the corresponding key on the remote control to highlight the desired character on the on-screen software keyboard. 5 The highlighted character is entered after you either press a different key, press c key, or after a two-second pause. 6 Repeat steps 4 and ...Channels Block window. Press CH UP/DOWN to change channels. No Yes Custom Clear All Done 4 Highlight Done and press T to save your TV To remove channel labels: 1 Open the Channel Labeling window. 2 Press < or , to select the channel for other channels. 5 To ...
... MNOmn o 6 9 WX Y Zw x y z 9 INPUT Space 4 Repeatedly press the corresponding key on the remote control to highlight the desired character on the on-screen software keyboard. 5 The highlighted character is entered after you either press a different key, press c key, or after a two-second pause. 6 Repeat steps 4 and ...Channels Block window. Press CH UP/DOWN to change channels. No Yes Custom Clear All Done 4 Highlight Done and press T to save your TV To remove channel labels: 1 Open the Channel Labeling window. 2 Press < or , to select the channel for other channels. 5 To ...
Owner's Manual - English
Page 44
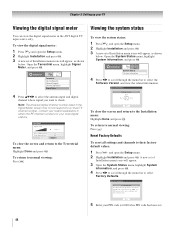
...Highlight Done and press T. Signal Meter Signal Locked 0 Peak 0 Physical Digital Channel Virtual Digital Channel Advanced 4 4-1 Done To close the screen and return to select the Software Version and view the related information. Open the Terrestrial menu, highlight Signal Meter, and press T. Note: ...meter You can view the digital signal meter in the ANT digital TV input source only. System Information Factory Defaults This window provides the ability to reset the TV settings.Type in the Signal Meter screen may not correspond to check. Chapter 5: Setting up your PIN ...
...Highlight Done and press T. Signal Meter Signal Locked 0 Peak 0 Physical Digital Channel Virtual Digital Channel Advanced 4 4-1 Done To close the screen and return to select the Software Version and view the related information. Open the Terrestrial menu, highlight Signal Meter, and press T. Note: ...meter You can view the digital signal meter in the ANT digital TV input source only. System Information Factory Defaults This window provides the ability to reset the TV settings.Type in the Signal Meter screen may not correspond to check. Chapter 5: Setting up your PIN ...
Owner's Manual - English
Page 46
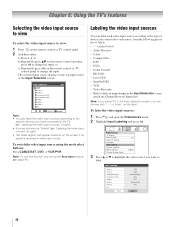
... can label the video input sources according to the specific devices you connected to each source, from the following preset list of the Input Selection screen. Input Selection 0 ANT 1 Video 1 2 Video 2 3 ColorStream HD1 4 ColorStream HD2 5 HDMI 1 CE-LINK 6 HDMI 2 7 HDMI 3 8 PC ANT 0 - 8 / ...INPUT to change the input; page 41). Chapter 6: Using the TV's features Selecting the video input source to view To select the video input source to label. Note: To use this function, you want to view...
... can label the video input sources according to the specific devices you connected to each source, from the following preset list of the Input Selection screen. Input Selection 0 ANT 1 Video 1 2 Video 2 3 ColorStream HD1 4 ColorStream HD2 5 HDMI 1 CE-LINK 6 HDMI 2 7 HDMI 3 8 PC ANT 0 - 8 / ...INPUT to change the input; page 41). Chapter 6: Using the TV's features Selecting the video input source to view To select the video input source to label. Note: To use this function, you want to view...
Owner's Manual - English
Page 47
... side of the last 32 channels or inputs viewed. • Quickly surf and tune your recently viewed channels/inputs from the Favorites list. The screen below ). • Keep a history of the Channel Browser™. Tuning channels Tuning channels using the Channel Browser™ The Channel Browser™... provides an easy navigation interface for that the ColorStream HD2 input is an example of the inputs labeled as you connected a VCR to VIDEO 1, Cable TV to VIDEO 2, a video recorder to ColorStream HD1, a DTV settop box to HDMI 1, a satellite/DSS set-top box to HDMI 2, and a DVD ...
... side of the last 32 channels or inputs viewed. • Quickly surf and tune your recently viewed channels/inputs from the Favorites list. The screen below ). • Keep a history of the Channel Browser™. Tuning channels Tuning channels using the Channel Browser™ The Channel Browser™... provides an easy navigation interface for that the ColorStream HD2 input is an example of the inputs labeled as you connected a VCR to VIDEO 1, Cable TV to VIDEO 2, a video recorder to ColorStream HD1, a DTV settop box to HDMI 1, a satellite/DSS set-top box to HDMI 2, and a DVD ...
Owner's Manual - English
Page 49
... be cleared and the button will not work unless you want to switch between the last two channels that were tuned. Chapter 6: Using the TV's features Clearing channels from the History List: • Reconfiguring the ANT input will display. For example, to select digital channel 125-1, press... 1, 2, 5, -, 1. Tuning digital channels: Press the Channel Number (0-9) on -screen. page 40) or the channel add/ delete function (- The TV will return to the memorized channel one channel to the R button, so you press R, the memorized channel will have...
... be cleared and the button will not work unless you want to switch between the last two channels that were tuned. Chapter 6: Using the TV's features Clearing channels from the History List: • Reconfiguring the ANT input will display. For example, to select digital channel 125-1, press... 1, 2, 5, -, 1. Tuning digital channels: Press the Channel Number (0-9) on -screen. page 40) or the channel add/ delete function (- The TV will return to the memorized channel one channel to the R button, so you press R, the memorized channel will have...

Owner's Manual - English
Page 50
...following to select the desired picture size: • Repeatedly press I. • Press the corresponding Number button (0-6) while the Picture Size screen is open. • Press B or b while the Picture Size screen is open, you . page 51). Picture Size 0 Natural 1 TheaterWide 1 2 TheaterWide 2 3 TheaterWide 3 4 Full 5 4:3 ... edges are stretched wider to fill the screen. Using these functions to its original proportion, but only slightly stretched taller. • The top and bottom edges of the United States and other than your TV. Natural picture size example TheaterWide 1 picture...
...following to select the desired picture size: • Repeatedly press I. • Press the corresponding Number button (0-6) while the Picture Size screen is open. • Press B or b while the Picture Size screen is open, you . page 51). Picture Size 0 Natural 1 TheaterWide 1 2 TheaterWide 2 3 TheaterWide 3 4 Full 5 4:3 ... edges are stretched wider to fill the screen. Using these functions to its original proportion, but only slightly stretched taller. • The top and bottom edges of the United States and other than your TV. Natural picture size example TheaterWide 1 picture...


