User Manual
Page 2
... a "larger than a UL Listed wall bracket appropriate for the size and weight of cable entry as UL, CSA, ETL). • Follow all enclosed instructions for wall mounting this product. • Don't allow children to walls with furniture and television sets. • Don't place flat panel displays on or play with steel studs or old cinder block construction. See "Removing the Pedestal Stand" ( page 6). TOSHIBA Cares! • The consumer...
... a "larger than a UL Listed wall bracket appropriate for the size and weight of cable entry as UL, CSA, ETL). • Follow all enclosed instructions for wall mounting this product. • Don't allow children to walls with furniture and television sets. • Don't place flat panel displays on or play with steel studs or old cinder block construction. See "Removing the Pedestal Stand" ( page 6). TOSHIBA Cares! • The consumer...
User Manual
Page 4
... back of the television at least four (4) inches away from the hook(s) on the apparatus. 27) Never block or cover the slots or openings in a room whose temperature is thundering, do not touch the connecting cables or apparatus. (continued) Never locate the antenna near overhead power lines or other electrical circuits. • Never attempt to a wall stud, pillar, or...
... back of the television at least four (4) inches away from the hook(s) on the apparatus. 27) Never block or cover the slots or openings in a room whose temperature is thundering, do not touch the connecting cables or apparatus. (continued) Never locate the antenna near overhead power lines or other electrical circuits. • Never attempt to a wall stud, pillar, or...
User Manual
Page 5
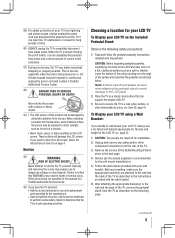
... the rear of the TV. 3) Remove the screws of the VESA Mounting Pattern show in the next page. 4) Always use the screws supplied or recommended by ultraviolet radiation from the sun. Service 44) WARNING: RISK OF ELECTRIC SHOCK! Note: Extreme care should always be exposed to direct sunlight, such as in the instructions provided with your wall bracket. If you need to the LCD panel. 2) Place...
... the rear of the TV. 3) Remove the screws of the VESA Mounting Pattern show in the next page. 4) Always use the screws supplied or recommended by ultraviolet radiation from the sun. Service 44) WARNING: RISK OF ELECTRIC SHOCK! Note: Extreme care should always be exposed to direct sunlight, such as in the instructions provided with your wall bracket. If you need to the LCD panel. 2) Place...

User Manual
Page 9
... Setup 34 Quick Setup from the SETUP menu 34 Selecting the menu language 34 Configuring the antenna input source for the ANT/CABLE terminal 34 Programming channels into the TV's channel memory............34 Programming channels automatically 35 Setting channel skip 35 Setting AV Input mode 36 Setting the HDMI® audio mode 36 Viewing the digital signal meter 36 Setting the time zone 37 Viewing the system status 37 Chapter 6: Using the TV's features 38 Selecting the video input source to view 38 Labeling the video input sources...
... Setup 34 Quick Setup from the SETUP menu 34 Selecting the menu language 34 Configuring the antenna input source for the ANT/CABLE terminal 34 Programming channels into the TV's channel memory............34 Programming channels automatically 35 Setting channel skip 35 Setting AV Input mode 36 Setting the HDMI® audio mode 36 Viewing the digital signal meter 36 Setting the time zone 37 Viewing the system status 37 Chapter 6: Using the TV's features 38 Selecting the video input source to view 38 Labeling the video input sources...

User Manual
Page 14
... optical audio input. 8無 USB port - For use can be configured in Dolby Digital or PCM (pulse-code modulation) format for a complete connection. 7無 DIGITAL AUDIO OUT - PC audio input terminals are switched by AV input mode ( page 36). These include standard A/V connections. Chapter 1: Introduction TV back panel connections For an explanation of cable types and connections, see pages 15-23. 8 7 6 5 TV back 4 32 1 1無 ANT/CABLE - HDMI connection is used to connect the TV to receive 1080p signals...
... optical audio input. 8無 USB port - For use can be configured in Dolby Digital or PCM (pulse-code modulation) format for a complete connection. 7無 DIGITAL AUDIO OUT - PC audio input terminals are switched by AV input mode ( page 36). These include standard A/V connections. Chapter 1: Introduction TV back panel connections For an explanation of cable types and connections, see pages 15-23. 8 7 6 5 TV back 4 32 1 1無 ANT/CABLE - HDMI connection is used to connect the TV to receive 1080p signals...
User Manual
Page 15
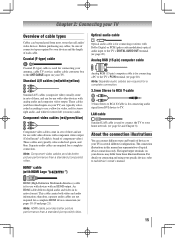
... HDMI Logo " ") Optical audio cable Optical audio cable is Toshiba's brand of component video.) These cables are required for connecting a PC to the TV's PC IN terminal ( page 20). HDMI (High-Definition Multimedia Interface) cable is used for connecting your antenna, cable TV service, and/or cable converter box to the ANT/CABLE input on your devices may differ from those illustrated herein. Separate audio cables are typically color-coded red, green, and blue. HDMI® cable (with analog audio and composite video output...
... HDMI Logo " ") Optical audio cable Optical audio cable is Toshiba's brand of component video.) These cables are required for connecting a PC to the TV's PC IN terminal ( page 20). HDMI (High-Definition Multimedia Interface) cable is used for connecting your antenna, cable TV service, and/or cable converter box to the ANT/CABLE input on your devices may differ from those illustrated herein. Separate audio cables are typically color-coded red, green, and blue. HDMI® cable (with analog audio and composite video output...
User Manual
Page 20
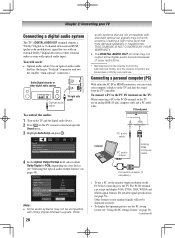
..., use a PC, set the monitor output resolution on page 49). You will not be compatible with Dolby Digital bitstream signals. To connect a PC to the PC IN terminal on the TV: When connecting a PC to the TV. Other formats or non-standard signals will need: • Optical audio cable (Use an optical audio cable that may not output some digital audio sources because of Dolby Laboratories. Dolby, and the double-D symbol are not compatible with optical audio input...
..., use a PC, set the monitor output resolution on page 49). You will not be compatible with Dolby Digital bitstream signals. To connect a PC to the PC IN terminal on the TV: When connecting a PC to the TV. Other formats or non-standard signals will need: • Optical audio cable (Use an optical audio cable that may not output some digital audio sources because of Dolby Laboratories. Dolby, and the double-D symbol are not compatible with optical audio input...
User Manual
Page 25
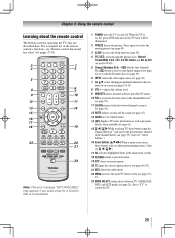
... the audio mode. 22無 MENU accesses the main TV menu system ( pages 3133). 23無 MODE SELECT switch selects between TV, CABLE/SAT, DVD, and AUX modes ( page 26). Set to "TV" to restore the moving picture ( page 45). 3無 SLEEP accesses the sleep timer ( page 58). 4無 PIC SIZE cycles through programmed channels when no menu is on-screen, these buttons select or adjust programming menus. (Also see "Remote control...
... the audio mode. 22無 MENU accesses the main TV menu system ( pages 3133). 23無 MODE SELECT switch selects between TV, CABLE/SAT, DVD, and AUX modes ( page 26). Set to "TV" to restore the moving picture ( page 45). 3無 SLEEP accesses the sleep timer ( page 58). 4無 PIC SIZE cycles through programmed channels when no menu is on-screen, these buttons select or adjust programming menus. (Also see "Remote control...
User Manual
Page 31
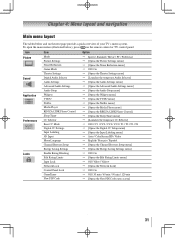
... below and on the remote control or TV control panel. Icon Picture Sound Application Preferences Locks Item Mode Picture Settings Noise Reduction Game Mode Theater Settings Digital Audio Selector Audio Settings Advanced Audio Settings Audio Setup Widgets VUDU Netflix Media Player REGZA-LINK Player Control Sleep Timer CC Selector Base CC Mode Digital CC Settings Input Labeling AV Input Menu Language Channel Browser Setup Energy Saving Settings Enable Rating Blocking Edit Rating Limits Input Lock Network Lock Control Panel Lock GameTimer New PIN Code Option Sports / Standard...
... below and on the remote control or TV control panel. Icon Picture Sound Application Preferences Locks Item Mode Picture Settings Noise Reduction Game Mode Theater Settings Digital Audio Selector Audio Settings Advanced Audio Settings Audio Setup Widgets VUDU Netflix Media Player REGZA-LINK Player Control Sleep Timer CC Selector Base CC Mode Digital CC Settings Input Labeling AV Input Menu Language Channel Browser Setup Energy Saving Settings Enable Rating Blocking Edit Rating Limits Input Lock Network Lock Control Panel Lock GameTimer New PIN Code Option Sports / Standard...

User Manual
Page 32
... menu] [Start] [Scans for new channels on ANT/CABLE] [Opens the Skip / Lock Channel menu] Standard / Auto / Digital Eastern / Newfoundland / Atlantic / Hawaii / Alaska / Pacific / Mountain / Central [Opens the Signal Meter menu] [Opens the System Information screen] Connective Information [Opens the Connective Information screen] 32 Chapter 4: Menu layout and navigation Icon Setup Item Installation REGZA-LINK Setup Network Setup VUDU Deactivation Netflix Deactivation PC Settings Quick Setup Software Upgrade...
... menu] [Start] [Scans for new channels on ANT/CABLE] [Opens the Skip / Lock Channel menu] Standard / Auto / Digital Eastern / Newfoundland / Atlantic / Hawaii / Alaska / Pacific / Mountain / Central [Opens the Signal Meter menu] [Opens the System Information screen] Connective Information [Opens the Connective Information screen] 32 Chapter 4: Menu layout and navigation Icon Setup Item Installation REGZA-LINK Setup Network Setup VUDU Deactivation Netflix Deactivation PC Settings Quick Setup Software Upgrade...
User Manual
Page 34
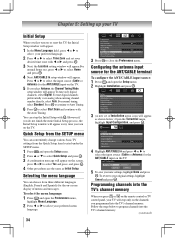
... first turn on the TV. 5無 To save your new settings, highlight Done and press . To tune digital channels preferentially over analog when entering channel number directly, select Auto. Press t or u to select the input source (Cable or Antenna) for the ANT/CABLE terminal To configure the ANT/CABLE input source: 1無 Press and open the Setup menu. 2無 Press p or q to program channels into the TV's channel memory. Quick Setup from the SETUP menu...
... first turn on the TV. 5無 To save your new settings, highlight Done and press . To tune digital channels preferentially over analog when entering channel number directly, select Auto. Press t or u to select the input source (Cable or Antenna) for the ANT/CABLE terminal To configure the ANT/CABLE input source: 1無 Press and open the Setup menu. 2無 Press p or q to program channels into the TV's channel memory. Quick Setup from the SETUP menu...
User Manual
Page 36
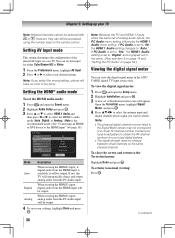
... view the digital signal meter: 1無 Press and open the Sound menu. 2無 Highlight Audio Setup and press . 3無 Press p or q to select HDMI 1 Audio and then press t or u to select the HDMI 1 audio mode (Auto, Digital, or Analog). (Auto is set this input for your local digital stations. • The signal strength does not change between virtual channels on page 54.) Viewing the digital signal meter You can view the digital signal meter in the ANT/ CABLE digital TV input source...
... view the digital signal meter: 1無 Press and open the Sound menu. 2無 Highlight Audio Setup and press . 3無 Press p or q to select HDMI 1 Audio and then press t or u to select the HDMI 1 audio mode (Auto, Digital, or Analog). (Auto is set this input for your local digital stations. • The signal strength does not change between virtual channels on page 54.) Viewing the digital signal meter You can view the digital signal meter in the ANT/ CABLE digital TV input source...
User Manual
Page 47
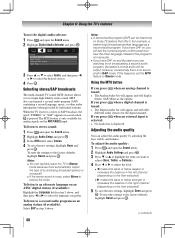
... Color Auto, Black, White, Red, Green, Blue, Yellow, Magenta, Cyan CC Selector You can use the CC Selector to partially reduce (1/2 MUTE) or turn off (MUTE) the sound. However, once you change in Base CC Mode) for a particular channel. When such services are not available, the CC Selector presents a default list of services. If the selected service is available for that channel or service. Adjusting the audio Muting the sound Press on the remote control...
... Color Auto, Black, White, Red, Green, Blue, Yellow, Magenta, Cyan CC Selector You can use the CC Selector to partially reduce (1/2 MUTE) or turn off (MUTE) the sound. However, once you change in Base CC Mode) for a particular channel. When such services are not available, the CC Selector presents a default list of services. If the selected service is available for that channel or service. Adjusting the audio Muting the sound Press on the remote control...
User Manual
Page 48
...;•A second audio program (SAP) can typically leave the TV in Stereo mode because it . However, occasionally there is only available for the digital channel. Using the MTS button If you press when an analog channel is noisy, select Mono to reduce the noise. To reset the settings to the factory defaults, highlight Reset and press . Selecting stereo/SAP broadcasts The multi-channel TV sound (MTS...
...;•A second audio program (SAP) can typically leave the TV in Stereo mode because it . However, occasionally there is only available for the digital channel. Using the MTS button If you press when an analog channel is noisy, select Mono to reduce the noise. To reset the settings to the factory defaults, highlight Reset and press . Selecting stereo/SAP broadcasts The multi-channel TV sound (MTS...

User Manual
Page 49
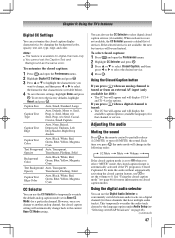
... Sound menu. 2無 Highlight Audio Setup and press . 3無 In the Optical Output Format field, select either Dolby Digital or PCM, depending on page 20). To revert to the factory defaults, highlight Reset and press . Note: ••This item will function in relation to Optical Output Format (PCM mode). Press the Channel Number buttons to enter a new four-digit code, enter the code a second time to confirm, and press . • The Locks...
... Sound menu. 2無 Highlight Audio Setup and press . 3無 In the Optical Output Format field, select either Dolby Digital or PCM, depending on page 20). To revert to the factory defaults, highlight Reset and press . Note: ••This item will function in relation to Optical Output Format (PCM mode). Press the Channel Number buttons to enter a new four-digit code, enter the code a second time to confirm, and press . • The Locks...

User Manual
Page 54
... file size and amount in the menu. (Also see item 3 on page 14 and "Setting the HDMI® Audio mode" on page 36.) Using the Media Player Using the Media Player with USB You can be no audio. Note: The Auto Start function does not operate for loading to view. Note: The prompt will appear. Note: Because the PC and HDMI-1 inputs share the same set to "No," the HDMI 1 Audio setting changes to "Auto...
... file size and amount in the menu. (Also see item 3 on page 14 and "Setting the HDMI® Audio mode" on page 36.) Using the Media Player Using the Media Player with USB You can be no audio. Note: The Auto Start function does not operate for loading to view. Note: The prompt will appear. Note: Because the PC and HDMI-1 inputs share the same set to "No," the HDMI 1 Audio setting changes to "Auto...

User Manual
Page 59
...; Only Audio L/R is connected to external input to listen to music through the TV speakers. 1無 From the Preferences menu, highlight Energy Saving Settings and press . 2無 Press or to select No Signal Power Down and press . 3無 Press or to highlight the item you want to control Toshiba REGZA-LINK compatible devices from the TV remote via HDMI connection (...
...; Only Audio L/R is connected to external input to listen to music through the TV speakers. 1無 From the Preferences menu, highlight Energy Saving Settings and press . 2無 Press or to select No Signal Power Down and press . 3無 Press or to highlight the item you want to control Toshiba REGZA-LINK compatible devices from the TV remote via HDMI connection (...
User Manual
Page 74
... subnet. Chapter 9: Troubleshooting No network connection •• The LAN cables are not connected properly or at all. Network Setup fails (Auto) •• The LAN cables are not connected properly or at all. Check that correspond with stability by using the same network type (DHCP/manual) and have a router, you do not have compatible network settings. •• Too many sharing devices are connected. Connect all cables ( pages...
... subnet. Chapter 9: Troubleshooting No network connection •• The LAN cables are not connected properly or at all. Network Setup fails (Auto) •• The LAN cables are not connected properly or at all. Check that correspond with stability by using the same network type (DHCP/manual) and have a router, you do not have compatible network settings. •• Too many sharing devices are connected. Connect all cables ( pages...
User Manual
Page 77
... the "Your Responsibilities" section apply to Obtain Warranty Service If, after the date of the operating instructions in the Owner's manual as well as outlined in the product's specification listed in this warranty. Rental Units Warranty period begins on our Customer Support Web site "www.tacp.toshiba. How to commercial use of purchase including the serial number for LCD Televisions that is refurbished and resold is exposed...
... the "Your Responsibilities" section apply to Obtain Warranty Service If, after the date of the operating instructions in the Owner's manual as well as outlined in the product's specification listed in this warranty. Rental Units Warranty period begins on our Customer Support Web site "www.tacp.toshiba. How to commercial use of purchase including the serial number for LCD Televisions that is refurbished and resold is exposed...

User Manual
Page 78
... FOLLOWING CONDITIONS: (1) You must provide your responsibility. (5) Warranties extend only to material defects in the Television failing for set installation, setup, adjustment of customer controls, and installation or repair of antenna systems are not covered by a Toshiba Authorized Service Provider (ASP). (3) The warranties from TCL are your bill of the U.S.A. This includes wall mounts, custom cabinets and other installation methods that result in materials or workmanship...
... FOLLOWING CONDITIONS: (1) You must provide your responsibility. (5) Warranties extend only to material defects in the Television failing for set installation, setup, adjustment of customer controls, and installation or repair of antenna systems are not covered by a Toshiba Authorized Service Provider (ASP). (3) The warranties from TCL are your bill of the U.S.A. This includes wall mounts, custom cabinets and other installation methods that result in materials or workmanship...


