
Owners Manual
Page 1
..., or satellite provider. © 2009 TOSHIBA CORPORATION All Rights Reserved Owner's Record The model number and serial number are on the back of steps for setting up your new TV, see page10. Owner's Manual Integrated High Definition LCD Television HIGH-DEFINITION TELEVISION 32RV525RZ 37RV52R 37RV52RZ 37RV525RZ 40RV52R 40RV52RZ 40RV525R 40RV525RZ 46RV525R...
..., or satellite provider. © 2009 TOSHIBA CORPORATION All Rights Reserved Owner's Record The model number and serial number are on the back of steps for setting up your new TV, see page10. Owner's Manual Integrated High Definition LCD Television HIGH-DEFINITION TELEVISION 32RV525RZ 37RV52R 37RV52RZ 37RV525RZ 40RV52R 40RV52RZ 40RV525R 40RV525RZ 46RV525R...

Owners Manual
Page 7
... Manufactured under your warranty. Caution: Changes or modifications to this equipment not expressly approved by Toshiba could void the user's authority to [Home] mode settings, select [Standard] picture mode. [Standard] mode is not covered under license from that to radio communications. To return...that may not work with Part 15 of the FCC rules. FCC Declaration of Conformity Compliance Statement (Part 15): The Toshiba 32RV525RZ, 32RV52RZ, 37RV525RZ, 37RV52RZ, 40RV525R, 40RV525RZ, 40RV52R, 40RV52RZ, 46RV525R, and 46RV525RZ Televisions comply with this TV. Operation is subject to ...
... Manufactured under your warranty. Caution: Changes or modifications to this equipment not expressly approved by Toshiba could void the user's authority to [Home] mode settings, select [Standard] picture mode. [Standard] mode is not covered under license from that to radio communications. To return...that may not work with Part 15 of the FCC rules. FCC Declaration of Conformity Compliance Statement (Part 15): The Toshiba 32RV525RZ, 32RV52RZ, 37RV525RZ, 37RV52RZ, 40RV525R, 40RV525RZ, 40RV52R, 40RV52RZ, 46RV525R, and 46RV525RZ Televisions comply with this TV. Operation is subject to ...
Owners Manual
Page 8
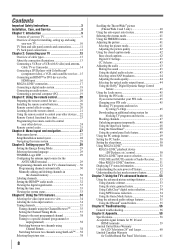
...Main menu layout 27 Setup/Installation menu layout 28 Navigating the menu system 28 Chapter 5: Setting up your TV 29 Setting the Energy Saving Mode 29 Selecting the menu language 29 TOSHIBA Logo LED 29 Configuring the antenna input source for the ANT/CABLE terminal 29 Programming ...auto power off feature 52 Understanding the last mode memory feature 52 Chapter 7: Using the TV's advanced features............53 Using the advanced picture settings features 53 Using dynamic contrast 53 Using the static gamma feature 53 Using CableClear® digital noise reduction 54 Using MPEG noise ...
...Main menu layout 27 Setup/Installation menu layout 28 Navigating the menu system 28 Chapter 5: Setting up your TV 29 Setting the Energy Saving Mode 29 Selecting the menu language 29 TOSHIBA Logo LED 29 Configuring the antenna input source for the ANT/CABLE terminal 29 Programming ...auto power off feature 52 Understanding the last mode memory feature 52 Chapter 7: Using the TV's advanced features............53 Using the advanced picture settings features 53 Using dynamic contrast 53 Using the static gamma feature 53 Using CableClear® digital noise reduction 54 Using MPEG noise ...

Owners Manual
Page 9
ABC, HBO, etc.) on the screen along with Dolby® Digital optical output format ( page 44). • CableClear® digital picture noise reduction ( page 54). • PC IN (Analog RGB) computer terminal ( page 19). • Channel Labeling allows you 're watching ... TV The following are just a few of the many exciting features of your new Toshiba widescreen, integrated HD, LCD TV: • Integrated digital tuning (8VSB ATSC and QAM) eliminates the need for a separate digital converter set-top box (in most cases). • 1080p output resolution. • Three HDMI...
ABC, HBO, etc.) on the screen along with Dolby® Digital optical output format ( page 44). • CableClear® digital picture noise reduction ( page 54). • PC IN (Analog RGB) computer terminal ( page 19). • Channel Labeling allows you 're watching ... TV The following are just a few of the many exciting features of your new Toshiba widescreen, integrated HD, LCD TV: • Integrated digital tuning (8VSB ATSC and QAM) eliminates the need for a separate digital converter set-top box (in most cases). • 1080p output resolution. • Three HDMI...
Owners Manual
Page 13
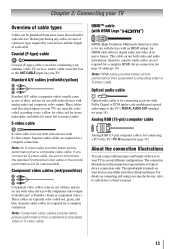
...sets of three and are required for use with video devices with analog audio and composite video output. Note: HDMI cable provides better picture...video cable or the picture performance will be sure to each cable. Note: An S-video cable provides better picture performance than a standard...; cable (with an HDMI output. Note: Component video cables provide better picture performance than a standard (composite) video or S-video cable. Standard A/V ... video cables (red/green/blue) Component video cables come in sets of three, and are typically colorcoded according to the TV's PC...
...sets of three and are required for use with video devices with analog audio and composite video output. Note: HDMI cable provides better picture...video cable or the picture performance will be sure to each cable. Note: An S-video cable provides better picture performance than a standard...; cable (with an HDMI output. Note: Component video cables provide better picture performance than a standard (composite) video or S-video cable. Standard A/V ... video cables (red/green/blue) Component video cables come in sets of three, and are typically colorcoded according to the TV's PC...
Owners Manual
Page 14
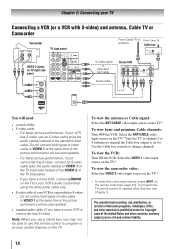
...) −− Do not connect both types of video cable to VIDEO 1 at the same time or the picture performance will need: • coaxial cables • S-video cable −− For better picture performance, if your TV Connecting a VCR (or a VCR with S-video) and antenna, Cable TV or Camcorder ... 3 or 4 (whichever channel the Cable box output is prohibited under the Copyright Laws of television programs, videotapes, DVDs, and other materials is set to). Chapter 2: Connecting your VCR has S-video, use a Cable box, you may subject you to civil and criminal liability. 14
...) −− Do not connect both types of video cable to VIDEO 1 at the same time or the picture performance will need: • coaxial cables • S-video cable −− For better picture performance, if your TV Connecting a VCR (or a VCR with S-video) and antenna, Cable TV or Camcorder ... 3 or 4 (whichever channel the Cable box output is prohibited under the Copyright Laws of television programs, videotapes, DVDs, and other materials is set to). Chapter 2: Connecting your VCR has S-video, use a Cable box, you may subject you to civil and criminal liability. 14
Owners Manual
Page 15
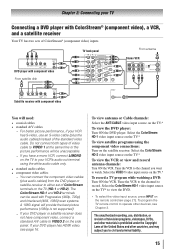
... TV back panel From antenna Stereo VCR VIDEO AUDIO L R IN CH 3 CH 4 OUT L R IN from the DVD player or satellite receiver to either set of the United States and other countries, and may subject you to civil and criminal liability. 15 Select the VIDEO 1 video input source on the... cables −− You can be used with component video You will need: • coaxial cables • standard A/V cables −− For better picture performance, if your DVD player has HDMI video, see Chapter 3. Tune the VCR to the channel to view the DVD. ** To select the video input...
... TV back panel From antenna Stereo VCR VIDEO AUDIO L R IN CH 3 CH 4 OUT L R IN from the DVD player or satellite receiver to either set of the United States and other countries, and may subject you to civil and criminal liability. 15 Select the VIDEO 1 video input source on the... cables −− You can be used with component video You will need: • coaxial cables • standard A/V cables −− For better picture performance, if your DVD player has HDMI video, see Chapter 3. Tune the VCR to the channel to view the DVD. ** To select the video input...
Owners Manual
Page 19
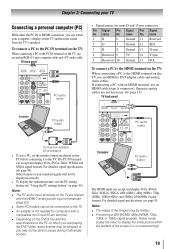
...be able to the TV. Note: •• The edges of the images may not be displayed correctly. • To display the optimum picture, use a PC, set the monitor output resolution on the PC before connecting it to pause during multi-angle scenes. TV back panel Computer PC audio output PC... audio cable Conversion adapter (if necessary) • To use the PC setting feature ( "Using the PC settings feature" on the TV, use an analog RGB (15-pin) computer cable and a PC audio cable. no overscanning). 19 name Pin...
...be able to the TV. Note: •• The edges of the images may not be displayed correctly. • To display the optimum picture, use a PC, set the monitor output resolution on the PC before connecting it to pause during multi-angle scenes. TV back panel Computer PC audio output PC... audio cable Conversion adapter (if necessary) • To use the PC setting feature ( "Using the PC settings feature" on the TV, use an analog RGB (15-pin) computer cable and a PC audio cable. no overscanning). 19 name Pin...

Owners Manual
Page 21
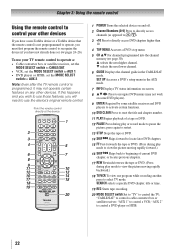
...switches between TV, CABLE/ SAT, AUX 1, and AUX 2 modes ( page 22). Press again to control the TV. 21 Set to "TV" to restore the moving picture ( page 41). 3無 SLEEP accesses the sleep timer ( page 50). 4無 PIC SIZE cycles through programmed channels...to edit the Favorites List ( page 36). 6無 INPUT selects the video input source ( page 34). 7無 CH pq cycles through the picture sizes: Natural, TheaterWide 1/2/3, Full, 4:3 HD, Native and Dot by Dot ( page 39-40). 5無 Channel Numbers (0-9, -/100) directly tune...
...switches between TV, CABLE/ SAT, AUX 1, and AUX 2 modes ( page 22). Press again to control the TV. 21 Set to "TV" to restore the moving picture ( page 41). 3無 SLEEP accesses the sleep timer ( page 50). 4無 PIC SIZE cycles through programmed channels...to edit the Favorites List ( page 36). 6無 INPUT selects the video input source ( page 34). 7無 CH pq cycles through the picture sizes: Natural, TheaterWide 1/2/3, Full, 4:3 HD, Native and Dot by Dot ( page 39-40). 5無 Channel Numbers (0-9, -/100) directly tune...
Owners Manual
Page 22
...specific DVD chapter, title or time. 19無 REC Starts tape recording. 20無 MODE SELECT switch Set to "TV" to control a DVD player or HTIB. 22 "AUX 2" to control the TV; Chapter...devices. If this happens and you wish to use those features, you have a non-Toshiba device or a Toshiba device that the remote control is programmed, it may not work on some DVD players)....to beginning of a tape or DVD. 12無 PAUSE Press during play or record mode to pause the picture; "AUX 1" to control a cable converter box or satellite receiver; q selects the next lower channel. ...
...specific DVD chapter, title or time. 19無 REC Starts tape recording. 20無 MODE SELECT switch Set to "TV" to control a DVD player or HTIB. 22 "AUX 2" to control the TV; Chapter...devices. If this happens and you wish to use those features, you have a non-Toshiba device or a Toshiba device that the remote control is programmed, it may not work on some DVD players)....to beginning of a tape or DVD. 12無 PAUSE Press during play or record mode to pause the picture; "AUX 1" to control a cable converter box or satellite receiver; q selects the next lower channel. ...
Owners Manual
Page 23
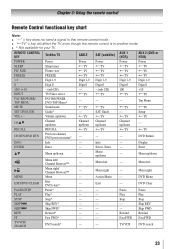
... --- Rewind Rewind FF Fast FWD* --- --- Top Menu MUTE Sound mute TV TV TV TV SET UP/GUIDE Guide* --- Volume up/down TV TV TV TV CHpq Channel up/down Channel Channel ... is in another mode. •• * Not available for your TV. REMOTE CONTROL KEY Toshiba TV CABLE SAT (satellite) AUX 1 (VCR) AUX 2 (DVD or HTIB) POWER Power ...Power Power Power Power SLEEP Sleep timer TV TV TV TV PIC SIZE Picture size TV TV TV TV FREEZE FREEZE TV TV TV TV 1-9 Digit 1-9 Digit 1-9 Digit 1-9 Digit 1-9 Digit 1-9...
... --- Rewind Rewind FF Fast FWD* --- --- Top Menu MUTE Sound mute TV TV TV TV SET UP/GUIDE Guide* --- Volume up/down TV TV TV TV CHpq Channel up/down Channel Channel ... is in another mode. •• * Not available for your TV. REMOTE CONTROL KEY Toshiba TV CABLE SAT (satellite) AUX 1 (VCR) AUX 2 (DVD or HTIB) POWER Power ...Power Power Power Power SLEEP Sleep timer TV TV TV TV PIC SIZE Picture size TV TV TV TV FREEZE FREEZE TV TV TV TV 1-9 Digit 1-9 Digit 1-9 Digit 1-9 Digit 1-9 Digit 1-9...
Owners Manual
Page 27
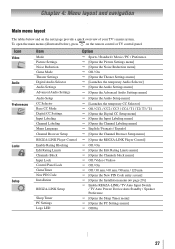
...panel. Icon Video Audio Preferences Locks Setup Item Mode Picture Settings Noise Reduction Game Mode Theater Settings Digital Audio Selector Audio Settings Advanced Audio Settings Audio Setup CC Selector Base CC Mode Digital CC Settings Input Labeling Channel Labeling Menu Language Channel Browser Setup ... Input Lock Control Panel Lock GameTimer New PIN Code Installation REGZA-LINK Setup Sleep Timer PC Settings Logo LED Option Sports / Standard / Movie / PC / Preference [Opens the Picture Settings menu] [Opens the Noise Reduction menu] Off / On ...
...panel. Icon Video Audio Preferences Locks Setup Item Mode Picture Settings Noise Reduction Game Mode Theater Settings Digital Audio Selector Audio Settings Advanced Audio Settings Audio Setup CC Selector Base CC Mode Digital CC Settings Input Labeling Channel Labeling Menu Language Channel Browser Setup ... Input Lock Control Panel Lock GameTimer New PIN Code Installation REGZA-LINK Setup Sleep Timer PC Settings Logo LED Option Sports / Standard / Movie / PC / Preference [Opens the Picture Settings menu] [Opens the Noise Reduction menu] Off / On ...

Owners Manual
Page 39
... be "grayed out" in Full or Natural picture size. Note: If you select one of the TheaterWide® picture sizes, the top and bottom edges of the picture sizes may subject you to select the desired picture size setting. 3無 Highlight Done and press . Note: Some of the picture (including subtitles or captions) may be hidden...
... be "grayed out" in Full or Natural picture size. Note: If you select one of the TheaterWide® picture sizes, the top and bottom edges of the picture sizes may subject you to select the desired picture size setting. 3無 Highlight Done and press . Note: Some of the picture (including subtitles or captions) may be hidden...
Owners Manual
Page 40
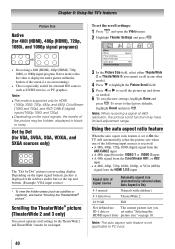
...the factory defaults, highlight Reset and press . Note: The auto aspect ratio feature is set under "Selecting the HDMI aspect data) picture size" on page 38. Chapter 6: Using the TV's features Picture Size Native (for HDMI (1080p,1080i, 720p, 480p, and 480i), ColorStream (1080i ...,1080i, and 720p). ••Depending on the input signals, the border of the picture may have limited adjustment range. Scrolling the TheaterWide® picture (TheaterWide 2 and 3 only) You can set separate scroll settings for the TheaterWide 2 and TheaterWide 3 modes for VGA, SVGA, XGA, WXGA, and SXGA...
...the factory defaults, highlight Reset and press . Note: The auto aspect ratio feature is set under "Selecting the HDMI aspect data) picture size" on page 38. Chapter 6: Using the TV's features Picture Size Native (for HDMI (1080p,1080i, 720p, 480p, and 480i), ColorStream (1080i ...,1080i, and 720p). ••Depending on the input signals, the border of the picture may have limited adjustment range. Scrolling the TheaterWide® picture (TheaterWide 2 and 3 only) You can set separate scroll settings for the TheaterWide 2 and TheaterWide 3 modes for VGA, SVGA, XGA, WXGA, and SXGA...

Owners Manual
Page 41
... and other input sources). Mode Sports Standard Movie PC Preference Picture Quality Bright and dynamic picture (factory setting) Standard picture settings (factory setting) Lower contrast for darkened room (factory setting) Designed for any other button). You can select a different picture mode for other countries, and may be obtained by setting the Cinema Mode to civil and criminal liability. To...
... and other input sources). Mode Sports Standard Movie PC Preference Picture Quality Bright and dynamic picture (factory setting) Standard picture settings (factory setting) Lower contrast for darkened room (factory setting) Designed for any other button). You can select a different picture mode for other countries, and may be obtained by setting the Cinema Mode to civil and criminal liability. To...

Owners Manual
Page 42
... If the program or video you began adjusting the picture settings from, highlight Reset and press . You can adjust the picture quality (Contrast, Backlight, DynaLight™, Brightness, Color, Tint, and Sharpness) to select the picture quality you adjusted are automatically saved in the Preference ...mode ( "Selecting the picture mode," above left ) as a starting point for adjusting the picture settings. Note: If text is not closed captioned, no signal ...
... If the program or video you began adjusting the picture settings from, highlight Reset and press . You can adjust the picture quality (Contrast, Backlight, DynaLight™, Brightness, Color, Tint, and Sharpness) to select the picture quality you adjusted are automatically saved in the Preference ...mode ( "Selecting the picture mode," above left ) as a starting point for adjusting the picture settings. Note: If text is not closed captioned, no signal ...

Owners Manual
Page 48
... game (30-120 minutes). Locks VIDEO 1, VIDEO 2, ColorStream HD1/HD2, HDMI 1, HDMI 2, HDMI 3, PC and channels 3 and 4. • Select Video+ if you set the GameTimer®: 1無 From the Locks menu, press to display the PIN code entering screen. 2無 Enter your four-digit PIN code and...28961; From the Locks menu, Press to view the input sources or channels until the Input Lock is released and the normal picture appears. To set , the TV will enter program lock mode and the following message will be able to display the PIN code entering screen. 2無 Enter...
... game (30-120 minutes). Locks VIDEO 1, VIDEO 2, ColorStream HD1/HD2, HDMI 1, HDMI 2, HDMI 3, PC and channels 3 and 4. • Select Video+ if you set the GameTimer®: 1無 From the Locks menu, press to display the PIN code entering screen. 2無 Enter your four-digit PIN code and...28961; From the Locks menu, Press to view the input sources or channels until the Input Lock is released and the normal picture appears. To set , the TV will enter program lock mode and the following message will be able to display the PIN code entering screen. 2無 Enter...

Owners Manual
Page 49
...Panel Lock. 5無 Press and or to make the appropriate adjustments. picture are cut off, readjust the Horizontal Position and Vertical Position. To adjust the PC settings: 1無 Repeatedly press to select PC input mode ( "Selecting the video input source to ...display the PIN code entering screen. 3無 Enter your settings from center.* Vertical Position Moves the picture up/down. This is pressed, the message "NOT AVAILABLE" appears. When the control panel is locked and any button...
...Panel Lock. 5無 Press and or to make the appropriate adjustments. picture are cut off, readjust the Horizontal Position and Vertical Position. To adjust the PC settings: 1無 Repeatedly press to select PC input mode ( "Selecting the video input source to ...display the PIN code entering screen. 3無 Enter your settings from center.* Vertical Position Moves the picture up/down. This is pressed, the message "NOT AVAILABLE" appears. When the control panel is locked and any button...

Owners Manual
Page 50
... a new feature that uses CEC technology and allows you to control Toshiba REGZA-LINK compatible devices from center.* Highlight this item then press to get an optimum adjustment automatically. ** The default settings may be enabled. Available remote control key functions: Before using the ... of 180 minutes). Skips backward. Pauses the picture during play or record mode. Button Description Begins playback. Stops playback. If PC Audio is set to "Yes," the HDMI 1 Audio setting is set to On, the following key functions, first set to "Digital" and is grayed out in the...
... a new feature that uses CEC technology and allows you to control Toshiba REGZA-LINK compatible devices from center.* Highlight this item then press to get an optimum adjustment automatically. ** The default settings may be enabled. Available remote control key functions: Before using the ... of 180 minutes). Skips backward. Pauses the picture during play or record mode. Button Description Begins playback. Stops playback. If PC Audio is set to "Yes," the HDMI 1 Audio setting is set to On, the following key functions, first set to "Digital" and is grayed out in the...

Owners Manual
Page 53
.... To revert to adjust the static gamma. To adjust the static gamma settings: 1無 Press and open the Video menu. 2無 Highlight Picture Settings and press . 3無 Highlight Advanced Picture Settings and press . • In the Static Gamma field, press ... and press . To select dynamic contrast preferences: 1無 Press and open the Video menu. 2無 Highlight Picture Settings and press . 3無 Highlight Advanced Picture Settings and press . 4無 Highlight Color Temperature and press . 5無 In the Color Temperature field, press &#...
.... To revert to adjust the static gamma. To adjust the static gamma settings: 1無 Press and open the Video menu. 2無 Highlight Picture Settings and press . 3無 Highlight Advanced Picture Settings and press . • In the Static Gamma field, press ... and press . To select dynamic contrast preferences: 1無 Press and open the Video menu. 2無 Highlight Picture Settings and press . 3無 Highlight Advanced Picture Settings and press . 4無 Highlight Color Temperature and press . 5無 In the Color Temperature field, press &#...


