Owner's Manual - English
Page 3
...such as vases, shall be placed on a bed, sofa, rug, or similar surface; • too close to drapes, curtains, or walls; The LCD panel inside the TV contains glass and a toxic liquid. or areas subject to a wall, pillar, or other outlet unless the blades can support the weight of time. 14... of the obsolete outlet. 10) Protect the power cord from tip-over. 13) Unplug this apparatus during lightning storms or when unused for your TV: 17) Never modify this equipment. fully insert. 16) WARNING: To prevent the spread of fire, keep candles or other apparatus (including amplifiers)...
...such as vases, shall be placed on a bed, sofa, rug, or similar surface; • too close to drapes, curtains, or walls; The LCD panel inside the TV contains glass and a toxic liquid. or areas subject to a wall, pillar, or other outlet unless the blades can support the weight of time. 14... of the obsolete outlet. 10) Protect the power cord from tip-over. 13) Unplug this apparatus during lightning storms or when unused for your TV: 17) Never modify this equipment. fully insert. 16) WARNING: To prevent the spread of fire, keep candles or other apparatus (including amplifiers)...
Owner's Manual - English
Page 4
...: 29) If you use the TV in a room whose temperature is 32 ºF (0 ºC) or below, the picture brightness may vary until the LCD warms up static charges (see Section...to follow the instructions in a position where your TOSHIBA TV, follow these sounds become frequent or continuous, unplug the power cord and contact a Toshiba Authorized Service Center. 35) WARNING: RISK OF ...lines. These actions will damage the LCD screen. Refer all servicing not specified in the LCD panel contains a small amount of mercury. Gently wipe the display panel surface (the TV screen) using a dry, soft ...
...: 29) If you use the TV in a room whose temperature is 32 ºF (0 ºC) or below, the picture brightness may vary until the LCD warms up static charges (see Section...to follow the instructions in a position where your TOSHIBA TV, follow these sounds become frequent or continuous, unplug the power cord and contact a Toshiba Authorized Service Center. 35) WARNING: RISK OF ...lines. These actions will damage the LCD screen. Refer all servicing not specified in the LCD panel contains a small amount of mercury. Gently wipe the display panel surface (the TV screen) using a dry, soft ...

Owner's Manual - English
Page 5
...always be used when attaching the pedestal stand to avoid damage to the LCD panel. 2) Place the TV on a sturdy, level surface that can be used when removing the pedestal stand to avoid damage to the LCD panel. 2) Remove the jack pack cover on the included Pedestal Stand: ... people are attached to the wall and the back of the LCD Panel face down on a flat, cushioned surface such as described below . Before proceeding, make sure the appropriate bracket(s) are required for the size and weight of the LCD TV (- CAUTION: Before beginning pedestal assembly, carefully lay the front ...
...always be used when attaching the pedestal stand to avoid damage to the LCD panel. 2) Place the TV on a sturdy, level surface that can be used when removing the pedestal stand to avoid damage to the LCD panel. 2) Remove the jack pack cover on the included Pedestal Stand: ... people are attached to the wall and the back of the LCD Panel face down on a flat, cushioned surface such as described below . Before proceeding, make sure the appropriate bracket(s) are required for the size and weight of the LCD TV (- CAUTION: Before beginning pedestal assembly, carefully lay the front ...
Owner's Manual - English
Page 6
...interference to comply with this TV. moving image is viewed from SRS Labs, Inc. • Manufactured under your LCD TV The following symptoms are technical limitations of LCD Display technology and are not ... interference received, including interference that interference will disappear in a short period of time. 2) The LCD panel contained in a particular installation. Such pixels are trademarks of SRS Labs, Inc. however, there ... (Part 15): The Toshiba 26HL67, 32HL67, 37HL67, 42HL67, and 32HL67U Televisions comply with the instructions, may cause undesired operation.
...interference to comply with this TV. moving image is viewed from SRS Labs, Inc. • Manufactured under your LCD TV The following symptoms are technical limitations of LCD Display technology and are not ... interference received, including interference that interference will disappear in a short period of time. 2) The LCD panel contained in a particular installation. Such pixels are trademarks of SRS Labs, Inc. however, there ... (Part 15): The Toshiba 26HL67, 32HL67, 37HL67, 42HL67, and 32HL67U Televisions comply with the instructions, may cause undesired operation.
Owner's Manual - English
Page 7
... Introduction 8 Welcome to Toshiba 8 Features of your new TV 8 Overview of steps for installing, setting up, and using your new TV 9 TV front and side panel controls and connections 10 TV back panel connections 11 Chapter 2: Connecting your TV 12 Overview of cable ...Setting the HDMI™ audio mode 32 Viewing the digital signal meter 33 Viewing the system status 33 Selecting the Power-On Mode 34 Chapter 6: Using the TV's features 35 Selecting the video ...Appendix 61 Specifications 61 Limited United States Warranty for LCD Televisions 26" and Larger 62 Limited Canada Warranty for...
... Introduction 8 Welcome to Toshiba 8 Features of your new TV 8 Overview of steps for installing, setting up, and using your new TV 9 TV front and side panel controls and connections 10 TV back panel connections 11 Chapter 2: Connecting your TV 12 Overview of cable ...Setting the HDMI™ audio mode 32 Viewing the digital signal meter 33 Viewing the system status 33 Selecting the Power-On Mode 34 Chapter 6: Using the TV's features 35 Selecting the video ...Appendix 61 Specifications 61 Limited United States Warranty for LCD Televisions 26" and Larger 62 Limited Canada Warranty for...
Owner's Manual - English
Page 9
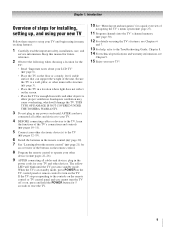
...will damage the TV. When the TV is in standby mode, press POWER on the TV control panel or remote control to turn the TV off or ...TV Follow these steps to set up your TV and begin using the TV's features, see Chapter 9. 15 Enjoy your new TV! 9 page 3). • Place the TV in the power cords for the TV: • Read "Important notes about the remote control" (- page 20). 7 See "Learning about your LCD TV...TV's menu system (- page 6). • Place the TV on the screen. • Place the TV far enough from walls and other devices. THIS TYPE OF DAMAGE IS NOT COVERED UNDER THE TOSHIBA...
...will damage the TV. When the TV is in standby mode, press POWER on the TV control panel or remote control to turn the TV off or ...TV Follow these steps to set up your TV and begin using the TV's features, see Chapter 9. 15 Enjoy your new TV! 9 page 3). • Place the TV in the power cords for the TV: • Read "Important notes about the remote control" (- page 20). 7 See "Learning about your LCD TV...TV's menu system (- page 6). • Place the TV on the screen. • Place the TV far enough from walls and other devices. THIS TYPE OF DAMAGE IS NOT COVERED UNDER THE TOSHIBA...

Owner's Manual - English
Page 10
...2, HDMI 3, PC). 10 If the TV stops responding to the controls on the remote control or TV control panel and you are referred to reset the TV. 5 ARROWS BbC c - Chapter 1: Introduction TV front and side panel controls and connections Model 42HL67 is on-...screen, the MENU button on the TV's control panel functions as the ENTER button. 7 EXIT - TV top TV front POWER Right side panel 4 8 5 9 6 7 10 Control panel...
...2, HDMI 3, PC). 10 If the TV stops responding to the controls on the remote control or TV control panel and you are referred to reset the TV. 5 ARROWS BbC c - Chapter 1: Introduction TV front and side panel controls and connections Model 42HL67 is on-...screen, the MENU button on the TV's control panel functions as the ENTER button. 7 EXIT - TV top TV front POWER Right side panel 4 8 5 9 6 7 10 Control panel...
Owner's Manual - English
Page 11
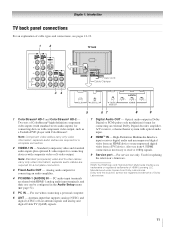
...: Component video cables carry only video information; PC audio input terminals are required for connecting devices with component video output, such as a Toshiba DVD player with optical audio input. 8 HDMI™ IN - For service use when connecting a personal computer. 6 ANT - Used ...Two sets of Dolby Laboratories. 11 Dolby and the double-D symbol are trademarks or registered trademarks of HDMI Licensing LLC. Chapter 1: Introduction TV back panel connections For an explanation of cable types and connections, see item 4. Optical audio output in the Audio Setup menu (- HDMI, the...
...: Component video cables carry only video information; PC audio input terminals are required for connecting devices with component video output, such as a Toshiba DVD player with optical audio input. 8 HDMI™ IN - For service use when connecting a personal computer. 6 ANT - Used ...Two sets of Dolby Laboratories. 11 Dolby and the double-D symbol are trademarks or registered trademarks of HDMI Licensing LLC. Chapter 1: Introduction TV back panel connections For an explanation of cable types and connections, see item 4. Optical audio output in the Audio Setup menu (- HDMI, the...
Owner's Manual - English
Page 13
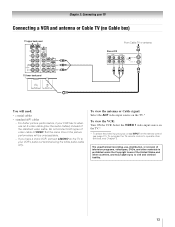
... your VCR's audio out terminal using the white audio cable only. Select the VIDEO 1 video input source on the TV.* * To select the video input source, press INPUT on the TV.* To view the VCR: Turn ON the VCR. If you to your VCR has S-video, use , distribution, or... recording, use an S-video cable (plus the audio cables) instead of video cable to TV You will be unacceptable. - Chapter 2: Connecting your TV Connecting a VCR and antenna or Cable TV (no Cable box) TV upper back panel TV lower back panel From Cable TV or antenna Stereo VCR VIDEO AUDIO L R IN CH 3 CH 4 OUT L R ...
... your VCR's audio out terminal using the white audio cable only. Select the VIDEO 1 video input source on the TV.* * To select the video input source, press INPUT on the TV.* To view the VCR: Turn ON the VCR. If you to your VCR has S-video, use , distribution, or... recording, use an S-video cable (plus the audio cables) instead of video cable to TV You will be unacceptable. - Chapter 2: Connecting your TV Connecting a VCR and antenna or Cable TV (no Cable box) TV upper back panel TV lower back panel From Cable TV or antenna Stereo VCR VIDEO AUDIO L R IN CH 3 CH 4 OUT L R ...

Owner's Manual - English
Page 14
...cables • S-video cable - Do not connect both types of the United States and other devices, see Chapter 3. Use the Cable box controls to TV You will provide better picture performance than a standard (composite) video cable. To view the VCR: Turn ON the VCR. Select the VIDEO 1 video...Laws of video cable to civil and criminal liability. 14 Chapter 2: Connecting your VCR's audio out terminal using the white audio cable only. TV upper back panel TV lower back panel From Cable TV Cable box IN CH 3 CH 4 OUT stereo VCR VIDEO AUDIO L R IN CH 3 CH 4 OUT L R IN from ANT ...
...cables • S-video cable - Do not connect both types of the United States and other devices, see Chapter 3. Use the Cable box controls to TV You will provide better picture performance than a standard (composite) video cable. To view the VCR: Turn ON the VCR. Select the VIDEO 1 video...Laws of video cable to civil and criminal liability. 14 Chapter 2: Connecting your VCR's audio out terminal using the white audio cable only. TV upper back panel TV lower back panel From Cable TV Cable box IN CH 3 CH 4 OUT stereo VCR VIDEO AUDIO L R IN CH 3 CH 4 OUT L R IN from ANT ...
Owner's Manual - English
Page 15
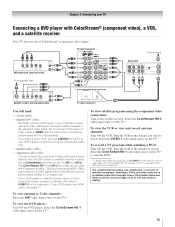
...out terminal using the component video connections: Turn on the TV.* To view the VCR or view and record antenna channels: Turn ON the VCR. If your TV Connecting a DVD player with component video TV lower back panel You will provide the best picture performance (1080p is prohibited...IN OUT OUT Satellite receiver with ColorStream® (component video), a VCR, and a satellite receiver Your TV has two sets of the United States and other devices, see page 17. TV upper back panel From antenna Y PB PR COMPONENT VIDEO S-VIDEO VIDEO OUT OUT DVD player with Progressive (480p, 720p...
...out terminal using the component video connections: Turn on the TV.* To view the VCR or view and record antenna channels: Turn ON the VCR. If your TV Connecting a DVD player with component video TV lower back panel You will provide the best picture performance (1080p is prohibited...IN OUT OUT Satellite receiver with ColorStream® (component video), a VCR, and a satellite receiver Your TV has two sets of the United States and other devices, see page 17. TV upper back panel From antenna Y PB PR COMPONENT VIDEO S-VIDEO VIDEO OUT OUT DVD player with Progressive (480p, 720p...

Owner's Manual - English
Page 16
...OUT L R VIDEO 2 inputs on TV right side panel To view the camcorder video: Select the VIDEO 2 video input source on the TV.* * To select the video input source, press INPUT on the TV right side panel. To program the TV remote control to VIDEO 1 on the TV back instead of the VIDEO 2 on... the remote control (- For better picture performance, if your TV Connecting a camcorder You will need:...
...OUT L R VIDEO 2 inputs on TV right side panel To view the camcorder video: Select the VIDEO 2 video input source on the TV.* * To select the video input source, press INPUT on the TV right side panel. To program the TV remote control to VIDEO 1 on the TV back instead of the VIDEO 2 on... the remote control (- For better picture performance, if your TV Connecting a camcorder You will need:...

Owner's Manual - English
Page 17
... 32). page 32). For proper operation, it is 6.6 ft (2m). • one HDMI-to the HDMI input, see illustration). - See "Setting the HDMI™ audio mode" (- For proper operation, the length of highdefinition video signals. For detailed signal specifications, see illustration). - TV lower back panel ...device - Separate analog audio cables are trademarks or registered trademarks of standard analog audio cables per DVI device - page 21). TV upper back panel TV lower back panel DVI device VIDEO AUDIO L R IN IN DVI / HDCP OUT OUT L R Note: To ensure that the HDMI ...
... 32). page 32). For proper operation, it is 6.6 ft (2m). • one HDMI-to the HDMI input, see illustration). - See "Setting the HDMI™ audio mode" (- For proper operation, the length of highdefinition video signals. For detailed signal specifications, see illustration). - TV lower back panel ...device - Separate analog audio cables are trademarks or registered trademarks of standard analog audio cables per DVI device - page 21). TV upper back panel TV lower back panel DVI device VIDEO AUDIO L R IN IN DVI / HDCP OUT OUT L R Note: To ensure that the HDMI ...

Owner's Manual - English
Page 18
... audio amplifier to use with an external Dolby® Digital decoder or other digital audio system LINE IN LR Optical Audio IN TV lower back panel Note: • Some audio systems may not output some digital audio sources because of Dolby Laboratories. THIS DAMAGE IS NOT COVERED... OUT terminal may not be compatible with optical audio input. Older audio systems that may damage speakers or headphones. LINE IN LR TV upper back panel Audio Digital Audio Selector Audio Settings Advanced Audio Settings Audio Setup 4 In the Optical Output Format field, select either Dolby Digital or...
... audio amplifier to use with an external Dolby® Digital decoder or other digital audio system LINE IN LR Optical Audio IN TV lower back panel Note: • Some audio systems may not output some digital audio sources because of Dolby Laboratories. THIS DAMAGE IS NOT COVERED... OUT terminal may not be compatible with optical audio input. Older audio systems that may damage speakers or headphones. LINE IN LR TV upper back panel Audio Digital Audio Selector Audio Settings Advanced Audio Settings Audio Setup 4 In the Optical Output Format field, select either Dolby Digital or...
Owner's Manual - English
Page 19
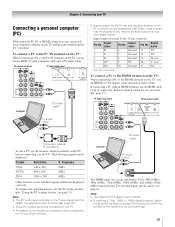
...output The HDMI input can be displayed: Format Resolution V. For detailed signal specifications, see page 61. no overscanning). 19 TV upper back panel TV lower back panel PC audio output Conversion adapter (if necessary) • To use a PC, set the monitor output resolution on the..., Native mode scales the video to display the entire picture within the borders of the PC on which you are not necessary (- TV upper back panel TV lower back panel Computer PC audio cable • Depending on the DVD's title and the specifications of the screen (i.e. Signal name 6 Ground 7 ...
...output The HDMI input can be displayed: Format Resolution V. For detailed signal specifications, see page 61. no overscanning). 19 TV upper back panel TV lower back panel PC audio output Conversion adapter (if necessary) • To use a PC, set the monitor output resolution on the..., Native mode scales the video to display the entire picture within the borders of the PC on which you are not necessary (- TV upper back panel TV lower back panel Computer PC audio cable • Depending on the DVD's title and the specifications of the screen (i.e. Signal name 6 Ground 7 ...
Owner's Manual - English
Page 27
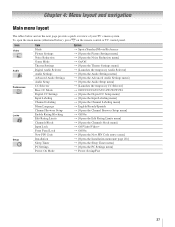
...Main menu layout The tables below ), press Y on the next page provide a quick overview of your TV's menu system. Icon Video Audio Preferences Locks Setup Item Mode Picture Settings Noise Reduction Game Mode Theater Settings... Input Labeling Channel Labeling Menu Language Channel Browser Setup Enable Rating Blocking Edit Rating Limits Channels Block Input Lock Front Panel Lock New PIN Code Installation Sleep Timer PC Settings Power-On Mode Option S Sports/Standard/Movie/Preference S [Opens.../Fast 27 To open the main menus (illustrated below and on the remote control or TV control panel.
...Main menu layout The tables below ), press Y on the next page provide a quick overview of your TV's menu system. Icon Video Audio Preferences Locks Setup Item Mode Picture Settings Noise Reduction Game Mode Theater Settings... Input Labeling Channel Labeling Menu Language Channel Browser Setup Enable Rating Blocking Edit Rating Limits Channels Block Input Lock Front Panel Lock New PIN Code Installation Sleep Timer PC Settings Power-On Mode Option S Sports/Standard/Movie/Preference S [Opens.../Fast 27 To open the main menus (illustrated below and on the remote control or TV control panel.
Owner's Manual - English
Page 28
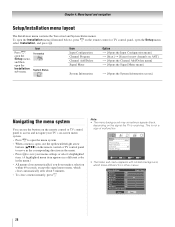
... Signal Meter menu] S [Opens the System Information screen] Navigating the menu system You can use the buttons on the remote control or TV control panel to access and navigate your TV's on-screen menu system. • Press Y to save your menu settings or select a highlighted item. (A highlighted menu item appears ...Status menus. Press Y, open the Setup menu, and then open , use the up/down/left/right arrow buttons (BbC c) on the remote control or TV control panel to move in the corresponding direction in the menu. • Press T to open the menu system. • When a menu is not a sign...
... Signal Meter menu] S [Opens the System Information screen] Navigating the menu system You can use the buttons on the remote control or TV control panel to access and navigate your TV's on-screen menu system. • Press Y to save your menu settings or select a highlighted item. (A highlighted menu item appears ...Status menus. Press Y, open the Setup menu, and then open , use the up/down/left/right arrow buttons (BbC c) on the remote control or TV control panel to move in the corresponding direction in the menu. • Press T to open the menu system. • When a menu is not a sign...

Owner's Manual - English
Page 30
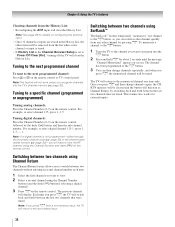
... After automatically programming channels into the channel memory, you should not have not already done so (- Programming channels automatically Your TV can manually add or delete individual channels. however, once channel programming is configured for Antenna. After the channels are programmed automatically...below .) Open the Terrestrial menu, highlight Channel Program to bring up your TV Programming channels into the TV's channel memory When you press < or , on the remote control or TV control panel, your TV will stop only on the channels you can manually add or erase individual...
... After automatically programming channels into the channel memory, you should not have not already done so (- Programming channels automatically Your TV can manually add or delete individual channels. however, once channel programming is configured for Antenna. After the channels are programmed automatically...below .) Open the Terrestrial menu, highlight Channel Program to bring up your TV Programming channels into the TV's channel memory When you press < or , on the remote control or TV control panel, your TV will stop only on the channels you can manually add or erase individual...
Owner's Manual - English
Page 35
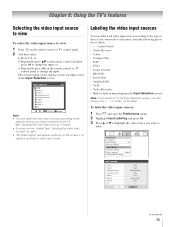
... Y and open the Preferences menu. 2 Highlight Input Labeling and press T. 3 Press B or b to highlight the video source you connected to the TV (- Done (continued) 35 Labeling the video input sources You can label each video input source according to the type of device you want to change... sources" at right). • "No Video Signal" will appear randomly on the remote control or TV control panel. 2 And then either: a) Press 0-8; or c) Repeatedly press + on the remote control or TV control panel to view: 1 Press + on the screen if no signal is received in the Input Selection screen...
... Y and open the Preferences menu. 2 Highlight Input Labeling and press T. 3 Press B or b to highlight the video source you connected to the TV (- Done (continued) 35 Labeling the video input sources You can label each video input source according to the type of device you want to change... sources" at right). • "No Video Signal" will appear randomly on the remote control or TV control panel. 2 And then either: a) Press 0-8; or c) Repeatedly press + on the remote control or TV control panel to view: 1 Press + on the screen if no signal is received in the Input Selection screen...
Owner's Manual - English
Page 38
... the Channel Number buttons (and the dash (=) button if selecting a digital channel). 3 Press R on the remote control or TV control panel. This feature also works for details on configuring the antenna input. • Once 32 channels or inputs are stored in the Channel Browser Setup is not programmed-either through the automatic channel...
... the Channel Number buttons (and the dash (=) button if selecting a digital channel). 3 Press R on the remote control or TV control panel. This feature also works for details on configuring the antenna input. • Once 32 channels or inputs are stored in the Channel Browser Setup is not programmed-either through the automatic channel...

