User Manual
Page 3
... plug is dropped and the cabinet or enclosure surface has been damaged or the TV does not operate normally, take the following precautions: • ALWAYS turn off the TV and unplug the power cord to avoid possible electric shock or fire. • NEVER allow your safety. Keep the product and the...
... plug is dropped and the cabinet or enclosure surface has been damaged or the TV does not operate normally, take the following precautions: • ALWAYS turn off the TV and unplug the power cord to avoid possible electric shock or fire. • NEVER allow your safety. Keep the product and the...
User Manual
Page 4
..., and sides. hot, humid areas; or • in a confined space such as possible) 4" min. Care For better performance and safer operation of your TOSHIBA TV, follow these recommendations and precautions: 34) If you use a sturdy strap from the hook(s) on the rear of the TV to a wall stud, pillar...38) For added protection of your body (or any of the National Electric Code). Never place the TV: • on /off switch, it is turned off using a dry, soft cloth only (cotton, flannel, etc.). The slots and openings are provided to protect the TV from overheating and to drapes, ...
..., and sides. hot, humid areas; or • in a confined space such as possible) 4" min. Care For better performance and safer operation of your TOSHIBA TV, follow these recommendations and precautions: 34) If you use a sturdy strap from the hook(s) on the rear of the TV to a wall stud, pillar...38) For added protection of your body (or any of the National Electric Code). Never place the TV: • on /off switch, it is turned off using a dry, soft cloth only (cotton, flannel, etc.). The slots and openings are provided to protect the TV from overheating and to drapes, ...
User Manual
Page 5
... used when attaching the pedestal stand to avoid damage to the LCD panel. 2) Place the TV on a sturdy, level surface that the TV is being turned on or off. When the TV reaches the end of its useful life, dispose of the TV. 3) Be sure to secure the TV to a wall... television, avoid locations where the screen may result in front of mercury. If these sounds become frequent or continuous, unplug the power cord and contact a Toshiba Authorized Service Center. 41) DANGER: RISK OF SERIOUS PERSONAL INJURY OR DEATH! Leave the bottom of the unit protruding over the edge of the surface...
... used when attaching the pedestal stand to avoid damage to the LCD panel. 2) Place the TV on a sturdy, level surface that the TV is being turned on or off. When the TV reaches the end of its useful life, dispose of the TV. 3) Be sure to secure the TV to a wall... television, avoid locations where the screen may result in front of mercury. If these sounds become frequent or continuous, unplug the power cord and contact a Toshiba Authorized Service Center. 41) DANGER: RISK OF SERIOUS PERSONAL INJURY OR DEATH! Leave the bottom of the unit protruding over the edge of the surface...
User Manual
Page 10
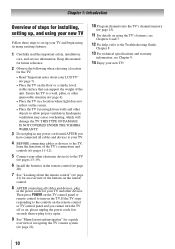
THIS TYPE OF DAMAGE IS NOT COVERED UNDER THE TOSHIBA WARRANTY. 3 Do not plug in a location where light does not reflect on the floor or...from walls and other immovable structure ( page 4). • Place the TV in any power cords until AFTER you cannot turn on the TV. Keep this manual for future reference. 2 Observe the following when choosing a location for the TV: •... may cause overheating, which will damage the TV. Then press POWER on the TV control panel or remote control to turn the TV off or on, please unplug the power cords few seconds then re-plug to try again. 9 See ...
THIS TYPE OF DAMAGE IS NOT COVERED UNDER THE TOSHIBA WARRANTY. 3 Do not plug in a location where light does not reflect on the floor or...from walls and other immovable structure ( page 4). • Place the TV in any power cords until AFTER you cannot turn on the TV. Keep this manual for future reference. 2 Observe the following when choosing a location for the TV: •... may cause overheating, which will damage the TV. Then press POWER on the TV control panel or remote control to turn the TV off or on, please unplug the power cords few seconds then re-plug to try again. 9 See ...
User Manual
Page 11
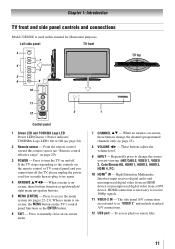
... 6 9 10 TV top 11 12 2 Control panel 1無 Green LED and TOSHIBA Logo LED Power LED(Green) = Power indicator TOSHIBA Logo LED= On or Off ( page 24). 2無 Remote sensor -...a menu is onscreen, the MENU button on -screen menu. 1 7無 CHANNEL pq - Press to turn off . Press to change the channel (programmed channels only; page 25). 8無 VOLUME tu...manual for illustration purposes. Chapter 1: Introduction TV front and side panel controls and connections Model 32E200U is necessary to receive 1080p signals. 11無 VIDEO-2 IN - When a menu is...
... 6 9 10 TV top 11 12 2 Control panel 1無 Green LED and TOSHIBA Logo LED Power LED(Green) = Power indicator TOSHIBA Logo LED= On or Off ( page 24). 2無 Remote sensor -...a menu is onscreen, the MENU button on -screen menu. 1 7無 CHANNEL pq - Press to turn off . Press to change the channel (programmed channels only; page 25). 8無 VOLUME tu...manual for illustration purposes. Chapter 1: Introduction TV front and side panel controls and connections Model 32E200U is necessary to receive 1080p signals. 11無 VIDEO-2 IN - When a menu is...
User Manual
Page 14
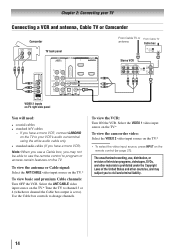
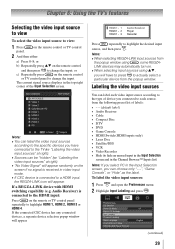
... VIDEO 2 video input source on the TV.* ** To select the video input source, press INPUT on the TV.* To view basic and premium Cable channels: Turn OFF the VCR. The unauthorized recording, use, distribution, or revision of the United States and other materials is set to). Use the Cable box controls...; standard audio cables (If you have a mono VCR) Note: When you use a Cable box, you to civil and criminal liability. 14 To view the VCR: Turn ON the VCR. To view the antenna or Cable signal: Select the ANT/CABLE video input source on the remote control ( page 21).
... VIDEO 2 video input source on the TV.* ** To select the video input source, press INPUT on the TV.* To view basic and premium Cable channels: Turn OFF the VCR. The unauthorized recording, use, distribution, or revision of the United States and other materials is set to). Use the Cable box controls...; standard audio cables (If you have a mono VCR) Note: When you use a Cable box, you to civil and criminal liability. 14 To view the VCR: Turn ON the VCR. To view the antenna or Cable signal: Select the ANT/CABLE video input source on the remote control ( page 21).
User Manual
Page 15
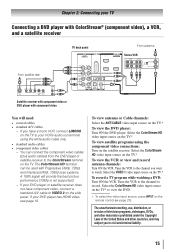
...* to view the DVD. ** To select the video input source, press INPUT on the TV.* To view the VCR or view and record antenna channels: Turn ON the VCR. If your DVD player has HDMI video, see page 16. Select the ColorStream HD video input source on the remote control (... CH 3 CH 4 OUT L R IN from the DVD player or satellite receiver to the ColorStream terminal on the TV.* To record a TV program while watching a DVD: Turn ON the VCR. The ColorStream HD terminal can connect the component video cables (plus audio cables) from ANT OUT to TV Y PB PR Satellite IN...
...* to view the DVD. ** To select the video input source, press INPUT on the TV.* To view the VCR or view and record antenna channels: Turn ON the VCR. If your DVD player has HDMI video, see page 16. Select the ColorStream HD video input source on the remote control (... CH 3 CH 4 OUT L R IN from the DVD player or satellite receiver to the ColorStream terminal on the TV.* To record a TV program while watching a DVD: Turn ON the VCR. The ColorStream HD terminal can connect the component video cables (plus audio cables) from ANT OUT to TV Y PB PR Satellite IN...
User Manual
Page 16
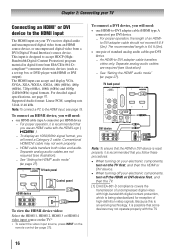
... HDMI 1, HDMI 2, HDMI 3 or HDMI 4 video input source on the TV.* ** To select the video input source, press INPUT on your electronic components, turn off your TV receives digital audio and uncompressed digital video from an HDMI source device, or uncompressed digital video from EIA/CEA-861-D- TV back...HDCP OUT Note: To ensure that the HDMI or DVI device is reset properly, it is recommended that you follow these procedures: •• When turning on the remote control ( page 21). compliant[1] consumer electronic devices (such as a set-top box or DVD player with the TV. 16 ...
... HDMI 1, HDMI 2, HDMI 3 or HDMI 4 video input source on the TV.* ** To select the video input source, press INPUT on your electronic components, turn off your TV receives digital audio and uncompressed digital video from an HDMI source device, or uncompressed digital video from EIA/CEA-861-D- TV back...HDCP OUT Note: To ensure that the HDMI or DVI device is reset properly, it is recommended that you follow these procedures: •• When turning on the remote control ( page 21). compliant[1] consumer electronic devices (such as a set-top box or DVD player with the TV. 16 ...
User Manual
Page 18
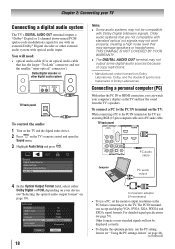
...-code modulation) signal for use with an external Dolby® Digital decoder or other digital audio system TV back panel To control the audio: 1無 Turn on the TV and the digital audio device. 2無 Press on page 44). (continued) The PC IN terminal can watch your computer's display on the...
...-code modulation) signal for use with an external Dolby® Digital decoder or other digital audio system TV back panel To control the audio: 1無 Turn on the TV and the digital audio device. 2無 Press on page 44). (continued) The PC IN terminal can watch your computer's display on the...
User Manual
Page 21
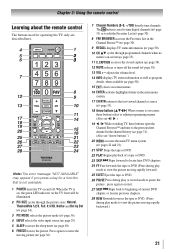
The button is used for a function that is not available. 1無 POWER turns the TV on and off the sound ( page 38). 13無 VOL + - Note: The error message "NOT AVAILABLE" may appear if you press a key ... channels. When the TV is on-screen ( page 25). 11無 C.CAPTION accesses the closed caption ( page 38). 12無 MUTE reduces or turns off . adjusts the volume level. 14無 INFO displays TV status information as well as program details, when available ( page 50). 15無 EXIT...
The button is used for a function that is not available. 1無 POWER turns the TV on and off the sound ( page 38). 13無 VOL + - Note: The error message "NOT AVAILABLE" may appear if you press a key ... channels. When the TV is on-screen ( page 25). 11無 C.CAPTION accesses the closed caption ( page 38). 12無 MUTE reduces or turns off . adjusts the volume level. 14無 INFO displays TV status information as well as program details, when available ( page 50). 15無 EXIT...
User Manual
Page 24
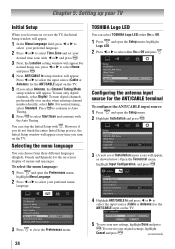
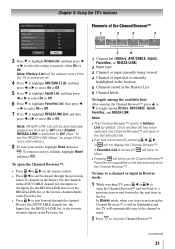
.... To tune digital channels preferentially over analog when entering channel number directly, select Auto. Chapter 5: Setting up your TV Initial Setup When you first turn on or reset the TV, the Initial Setup window will appear. 1無 In the Menu Language field, press t or u to select your ...2無 Press t or u to select Time Zone and set of menus and messages. To tune only digital channels, select Digital. TOSHIBA Logo LED You can select TOSHIBA Logo LED either On or Off and press . You can choose from three different languages (English, French and Spanish) for the ANT...
.... To tune digital channels preferentially over analog when entering channel number directly, select Auto. Chapter 5: Setting up your TV Initial Setup When you first turn on or reset the TV, the Initial Setup window will appear. 1無 In the Menu Language field, press t or u to select your ...2無 Press t or u to select Time Zone and set of menus and messages. To tune only digital channels, select Digital. TOSHIBA Logo LED You can select TOSHIBA Logo LED either On or Off and press . You can choose from three different languages (English, French and Spanish) for the ANT...

User Manual
Page 28
...Factory Defaults. 5無 Highlight Yes and press . 6無 (If PIN code has been set, enter your TV To set of Installation menu icons will turn off , unplug the TV power cord and then plug it in step 5 above. 28 Chapter 5: Setting up your PIN code. To close the screen... . 4無 Press tu to scroll through the menu bar to select the Factory Defaults or Support Information and view the related information. After the TV turns off automatically after a few seconds. Press t or u to complete the reset process. Viewing the system status To view the system status: 1無 ...
...Factory Defaults. 5無 Highlight Yes and press . 6無 (If PIN code has been set, enter your TV To set of Installation menu icons will turn off , unplug the TV power cord and then plug it in step 5 above. 28 Chapter 5: Setting up your PIN code. To close the screen... . 4無 Press tu to scroll through the menu bar to select the Factory Defaults or Support Information and view the related information. After the TV turns off automatically after a few seconds. Press t or u to complete the reset process. Viewing the system status To view the system status: 1無 ...
User Manual
Page 29
... Preferences menu. 2無 Highlight Input Labeling and press . (continued) 29 Press repeatedly to a HDMI input, the REGZA-LINK icon will appear. LINK devices may automatically turn on the remote control or TV control panel. 2無 And then either: a) Press 0-8; The current signal source displays in video input mode. ••If...
... Preferences menu. 2無 Highlight Input Labeling and press . (continued) 29 Press repeatedly to a HDMI input, the REGZA-LINK icon will appear. LINK devices may automatically turn on the remote control or TV control panel. 2無 And then either: a) Press 0-8; The current signal source displays in video input mode. ••If...
User Manual
Page 31
... ANT/CABLE, Inputs, Favorites, or REGZA-LINK) 2無 Input type 3無 Channel or input currently being viewed 4無 Channel or input that is turned off, will have no effect. ••Pressing will bring up the Channel Browser™ Favorites list regardless of the ChannelBrowser™ 3無 Press &#... or to select On or Off. To return to the next item in the last selected list. ••If all lists are turned off . 4無 Press to highlight ANT/CABLE List, and then press or to select On or Off. 5無 Press ...
... ANT/CABLE, Inputs, Favorites, or REGZA-LINK) 2無 Input type 3無 Channel or input currently being viewed 4無 Channel or input that is turned off, will have no effect. ••Pressing will bring up the Channel Browser™ Favorites list regardless of the ChannelBrowser™ 3無 Press &#... or to select On or Off. To return to the next item in the last selected list. ••If all lists are turned off . 4無 Press to highlight ANT/CABLE List, and then press or to select On or Off. 5無 Press ...
User Manual
Page 32
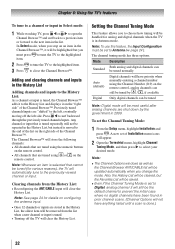
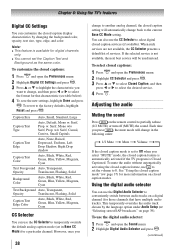
... (for analog and digital channels when the TV is in prior channel scans. (Channel Options will not have anything listed until a scan is tuned. • Turning off the left side. Also, the History List will be handled for various reasons), the TV will have been found in Antenna mode. Any channel...
... (for analog and digital channels when the TV is in prior channel scans. (Channel Options will not have anything listed until a scan is tuned. • Turning off the left side. Also, the History List will be handled for various reasons), the TV will have been found in Antenna mode. Any channel...
User Manual
Page 36
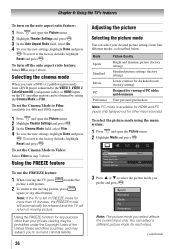
...3無 In the Cinema Mode field, select Film. 4無 To save the new settings, highlight Done and press . Chapter 6: Using the TV's features To turn off the auto aspect ratio feature: Select Off in step 3 above . You can select a different picture mode for more than your desired picture settings from...be prohibited under the Copyright Laws of PC tables and documents Your personal preferences Note: PC mode is left in step 3 above . To turn on the TV, smoother motion can be obtained by setting the Cinema Mode to Video: Select Video in FREEZE mode for each input. (continued)...
...3無 In the Cinema Mode field, select Film. 4無 To save the new settings, highlight Done and press . Chapter 6: Using the TV's features To turn off the auto aspect ratio feature: Select Off in step 3 above . You can select a different picture mode for more than your desired picture settings from...be prohibited under the Copyright Laws of PC tables and documents Your personal preferences Note: PC mode is left in step 3 above . To turn on the TV, smoother motion can be obtained by setting the Cinema Mode to Video: Select Video in FREEZE mode for each input. (continued)...
User Manual
Page 37
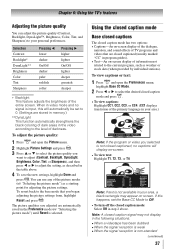
...;When the signal reception is not available in your personal preferences. If this will automatically be set the Base CC Mode to Off. • To turn off the closed caption signal may appear on -screen display of information not related to select the picture quality you adjusted are stored in memory...
...;When the signal reception is not available in your personal preferences. If this will automatically be set the Base CC Mode to Off. • To turn off the closed caption signal may appear on -screen display of information not related to select the picture quality you adjusted are stored in memory...
User Manual
Page 38
...; Highlight CC Selector and press . 3無 Press or to select Closed Caption, and then press or to partially reduce (1/2 MUTE) or turn off (MUTE) the sound. See "Using the closed caption services (if available). Caption Size Auto, Small, Standard, Large Caption Text Type Auto, Default, Mono w. To...
...; Highlight CC Selector and press . 3無 Press or to select Closed Caption, and then press or to partially reduce (1/2 MUTE) or turn off (MUTE) the sound. See "Using the closed caption services (if available). Caption Size Auto, Small, Standard, Large Caption Text Type Auto, Default, Mono w. To...
User Manual
Page 43
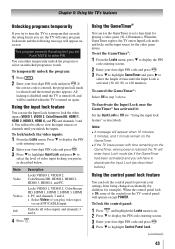
... level of the controls on the GameTimer, when power is released and the normal picture appears. You will not be enabled when the TV is turned on again. Mode Video Video+ Off Description Locks VIDEO 1, VIDEO 2, ColorStream HD, HDMI 1, HDMI 2, HDMI 3, HDMI 4, and PC. Note: ••A message will appear ...the video game device. When the control panel lock is activated (30, 60, 90, or 120 minutes). All locking is disabled until the TV is turned off, and will have to select the length of time until you play video tapes via an ANT/CABLE input. Unlocks all video inputs and...
... level of the controls on the GameTimer, when power is released and the normal picture appears. You will not be enabled when the TV is turned on again. Mode Video Video+ Off Description Locks VIDEO 1, VIDEO 2, ColorStream HD, HDMI 1, HDMI 2, HDMI 3, HDMI 4, and PC. Note: ••A message will appear ...the video game device. When the control panel lock is activated (30, 60, 90, or 120 minutes). All locking is disabled until the TV is turned off, and will have to select the length of time until you play video tapes via an ANT/CABLE input. Unlocks all video inputs and...
User Manual
Page 48
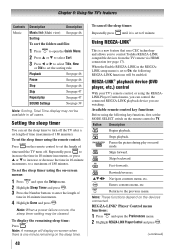
...pqtu Navigate contents menu, etc. Note: These functions depend on the sleep timer. 48 To cancel the sleep timer: Repeatedly press until the TV turns off. Sorting To sort the folders and files 1無 Press to open the Preferences menu. 2無 Highlight REGZA-LINK Player Control and press ... new feature that uses CEC technology and allows you can set the sleep timer to enter the length of 180 minutes. Returns to control Toshiba REGZA-LINK compatible devices from the TV remote via HDMI connection ( page 17). Enters contents menu, etc. Playback Pause See page...
...pqtu Navigate contents menu, etc. Note: These functions depend on the sleep timer. 48 To cancel the sleep timer: Repeatedly press until the TV turns off. Sorting To sort the folders and files 1無 Press to open the Preferences menu. 2無 Highlight REGZA-LINK Player Control and press ... new feature that uses CEC technology and allows you can set the sleep timer to enter the length of 180 minutes. Returns to control Toshiba REGZA-LINK compatible devices from the TV remote via HDMI connection ( page 17). Enters contents menu, etc. Playback Pause See page...

