
Owners Manual
Page 3
... skin is dropped and the cabinet or enclosure surface has been damaged or the TV does not operate normally, take the following precautions: • ALWAYS turn off the TV and unplug the power cord to avoid possible electric shock or fire. • NEVER allow your body to come into contact with...
... skin is dropped and the cabinet or enclosure surface has been damaged or the TV does not operate normally, take the following precautions: • ALWAYS turn off the TV and unplug the power cord to avoid possible electric shock or fire. • NEVER allow your body to come into contact with...
Owners Manual
Page 4
... contact with liquids should not be placed on the rear of the TV to a wall stud, pillar, or other immovable structure. When the TV is turned off switch, it is thundering, do not touch the connecting cables or apparatus. 38) For added protection of your TV from lightning and power surges...) To avoid damage to this equipment from a 120 VAC, 60 Hz power source only. 32) Always make sure you are never in a position where your TOSHIBA TV, follow these recommendations and precautions: 34) If you are provided to protect the TV from overheating and to help maintain reliable operation of the...
... contact with liquids should not be placed on the rear of the TV to a wall stud, pillar, or other immovable structure. When the TV is turned off switch, it is thundering, do not touch the connecting cables or apparatus. 38) For added protection of your TV from lightning and power surges...) To avoid damage to this equipment from a 120 VAC, 60 Hz power source only. 32) Always make sure you are never in a position where your TOSHIBA TV, follow these recommendations and precautions: 34) If you are provided to protect the TV from overheating and to help maintain reliable operation of the...

Owners Manual
Page 5
...and removing the covers may expose you need to the LCD panel. 2) Place the TV on a sturdy, level surface that the TV is being turned on a flat, cushioned surface such as in the next page. When the TV reaches the end of its useful life, dispose of the used ...25, page 4). For disposal or recycling information, contact your wall bracket. If these sounds become frequent or continuous, unplug the power cord and contact a Toshiba Authorized Service Provider. 41) DANGER: RISK OF SERIOUS PERSONAL INJURY OR DEATH! These actions will damage the LCD screen. CAUTION: Do not use the screws...
...and removing the covers may expose you need to the LCD panel. 2) Place the TV on a sturdy, level surface that the TV is being turned on a flat, cushioned surface such as in the next page. When the TV reaches the end of its useful life, dispose of the used ...25, page 4). For disposal or recycling information, contact your wall bracket. If these sounds become frequent or continuous, unplug the power cord and contact a Toshiba Authorized Service Provider. 41) DANGER: RISK OF SERIOUS PERSONAL INJURY OR DEATH! These actions will damage the LCD screen. CAUTION: Do not use the screws...
Owners Manual
Page 10
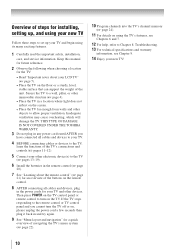
THIS TYPE OF DAMAGE IS NOT COVERED UNDER THE TOSHIBA WARRANTY. 3 Do not plug in any power cords until AFTER you cannot turn on the TV. Secure the TV to allow proper ventilation. Inadequate ventilation may cause overheating, which will damage the TV. Then press POWER on the ...TV control panel or remote control to turn the TV off or on, please unplug the power cord a few seconds then plug it back in and try again. 9 See "Menu layout and navigation...
THIS TYPE OF DAMAGE IS NOT COVERED UNDER THE TOSHIBA WARRANTY. 3 Do not plug in any power cords until AFTER you cannot turn on the TV. Secure the TV to allow proper ventilation. Inadequate ventilation may cause overheating, which will damage the TV. Then press POWER on the ...TV control panel or remote control to turn the TV off or on, please unplug the power cord a few seconds then plug it back in and try again. 9 See "Menu layout and navigation...
Owners Manual
Page 11
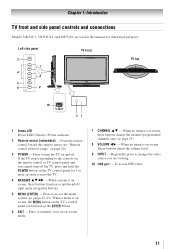
...illustration purposes. Press to access the menu system ( pages 22-23). Point the remote control toward this manual for 5 or more seconds to turn off . These buttons adjust the volume level. 9無 INPUT - When a menu is onscreen, these buttons change the video source you cannot... buttons. 5無 MENU (ENTER) - Press to reset the TV. 4無 ARROWS pqtu - Chapter 1: Introduction TV front and side panel controls and connections Models 32DT2U1, 32DT2UL1, and 40FT2U1 are viewing. 10無 USB port - When no menu is on page 20). 3無 POWER -
...illustration purposes. Press to access the menu system ( pages 22-23). Point the remote control toward this manual for 5 or more seconds to turn off . These buttons adjust the volume level. 9無 INPUT - When a menu is onscreen, these buttons change the video source you cannot... buttons. 5無 MENU (ENTER) - Press to reset the TV. 4無 ARROWS pqtu - Chapter 1: Introduction TV front and side panel controls and connections Models 32DT2U1, 32DT2UL1, and 40FT2U1 are viewing. 10無 USB port - When no menu is on page 20). 3無 POWER -
Owners Manual
Page 14
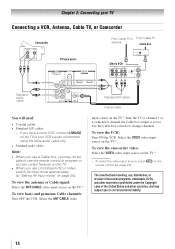
... the ANT/CABLE video input source on the TV to civil and criminal liability. 14 on the TV.* To view basic and premium Cable channels: Turn OFF the VCR. To view the antenna or Cable signal: Select the ANT/CABLE video input source on the The unauthorized recording, use, distribution, or... revision of television programs, videotapes, DVDs, and other materials is set to). To view the VCR: Turn ON the VCR. Select the VIDEO video input source on the TV.* To view the camcorder video: Select the VIDEO video input source on page...
... the ANT/CABLE video input source on the TV to civil and criminal liability. 14 on the TV.* To view basic and premium Cable channels: Turn OFF the VCR. To view the antenna or Cable signal: Select the ANT/CABLE video input source on the The unauthorized recording, use, distribution, or... revision of television programs, videotapes, DVDs, and other materials is set to). To view the VCR: Turn ON the VCR. Select the VIDEO video input source on the TV.* To view the camcorder video: Select the VIDEO video input source on page...
Owners Manual
Page 15
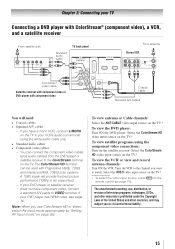
... countries, and may subject you to civil and criminal liability. 15 Select the VIDEO video input source on the TV.* To view the DVD player: Turn ON the DVD player. To view antenna or Cable channels: Select the ANT/CABLE video input source on the TV.* * To select the video input... player or satellite receiver does not have a mono VCR, connect L/MONO on the TV to your VCR's audio out terminal using the component video connections: Turn on the TV. Select the ColorStream HD video input source on the TV.* To view satellite programs using the white audio cable only. • Standard...
... countries, and may subject you to civil and criminal liability. 15 Select the VIDEO video input source on the TV.* To view the DVD player: Turn ON the DVD player. To view antenna or Cable channels: Select the ANT/CABLE video input source on the TV.* * To select the video input... player or satellite receiver does not have a mono VCR, connect L/MONO on the TV to your VCR's audio out terminal using the component video connections: Turn on the TV. Select the ColorStream HD video input source on the TV.* To view satellite programs using the white audio cable only. • Standard...
Owners Manual
Page 16
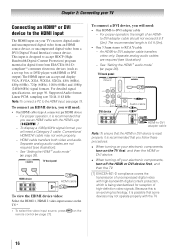
...cable may not operate properly with the TV. 16 on the To connect a DVI device, you follow these procedures: • When turning on your electronic components, turn off the HDMI or DVI device first, and then the TV. [1] EIA/CEA-861-D compliance covers the transmission of uncompressed digital ... device video: Select the HDMI 1, HDMI 2 video input source on the TV first, and then the HDMI or DVI device. • When turning off your electronic components, turn on the TV.* * To select the video input source, press remote control ( page 21). The recommended length is 6.6 ft (2m)....
...cable may not operate properly with the TV. 16 on the To connect a DVI device, you follow these procedures: • When turning on your electronic components, turn off the HDMI or DVI device first, and then the TV. [1] EIA/CEA-861-D compliance covers the transmission of uncompressed digital ... device video: Select the HDMI 1, HDMI 2 video input source on the TV first, and then the HDMI or DVI device. • When turning off your electronic components, turn on the TV.* * To select the video input source, press remote control ( page 21). The recommended length is 6.6 ft (2m)....
Owners Manual
Page 18
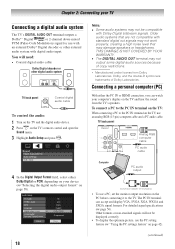
... external Dolby® Digital decoder or other digital audio system DIGITAL AUDIO IN TV back panel Coaxial digital audio cable To control the audio: 1無 Turn on the TV and the digital audio device. 2無 Press on the TV's remote control and open the Sound menu. 3無 Highlight Audio Setup and...
... external Dolby® Digital decoder or other digital audio system DIGITAL AUDIO IN TV back panel Coaxial digital audio cable To control the audio: 1無 Turn on the TV and the digital audio device. 2無 Press on the TV's remote control and open the Sound menu. 3無 Highlight Audio Setup and...
Owners Manual
Page 21
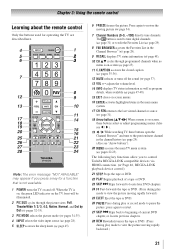
...When a menu is on the TV front will be illuminated. 2無 PIC SIZE cycles through programmed channels when no menu is not available. 1無 POWER turns the TV on -screen ( page 25). 11無 C.CAPTION accesses the closed caption ( pages 35-36). 12無 MUTE reduces or... is on and off the sound ( page 37). 13無 VOL + - Note: The error message "NOT AVAILABLE" may appear if you to control Toshiba REGZA-LINK compatible devices via HDMI connection. ( Page 46, REGZA-LINK playback device control) 21無 STOP Stops the tape or DVD. 22無...
...When a menu is on the TV front will be illuminated. 2無 PIC SIZE cycles through programmed channels when no menu is not available. 1無 POWER turns the TV on -screen ( page 25). 11無 C.CAPTION accesses the closed caption ( pages 35-36). 12無 MUTE reduces or... is on and off the sound ( page 37). 13無 VOL + - Note: The error message "NOT AVAILABLE" may appear if you to control Toshiba REGZA-LINK compatible devices via HDMI connection. ( Page 46, REGZA-LINK playback device control) 21無 STOP Stops the tape or DVD. 22無...
Owners Manual
Page 24
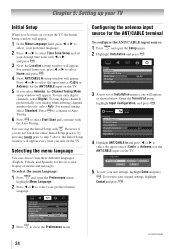
...5無 To save your new settings, highlight Done and press . For normal tuning, select Standard. Chapter 5: Setting up your TV Initial Setup When you turn on or reset the TV, the Initial Setup window will appear. 1無 In the Menu Language field, press t or u to select your preferred language... the ANT/CABLE input on the TV. 5無 If you select Antenna, the Channel Tuning Mode setup window will appear every time you first turn on the TV. To tune digital channels preferentially over analog when entering channel number directly, select Auto. Press t or u to close the Preferences...
...5無 To save your new settings, highlight Done and press . For normal tuning, select Standard. Chapter 5: Setting up your TV Initial Setup When you turn on or reset the TV, the Initial Setup window will appear. 1無 In the Menu Language field, press t or u to select your preferred language... the ANT/CABLE input on the TV. 5無 If you select Antenna, the Channel Tuning Mode setup window will appear every time you first turn on the TV. To tune digital channels preferentially over analog when entering channel number directly, select Auto. Press t or u to close the Preferences...
Owners Manual
Page 27
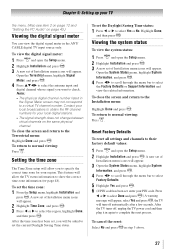
... been set the current Daylight Saving Time status. To close the screen and return to the Installation menu: Highlight Done and press . After the TV turns off automatically after a few seconds. To cancel the reset: Select No and press in the Signal Meter screen may not correspond to a virtual TV ... on page 43.) Viewing the digital signal meter You can view the digital signal meter in again to complete the reset process. This feature will turn off , unplug the TV power cord and then plug it in the ANT/ CABLE digital TV input source only. Note: • The physical digital ...
... been set the current Daylight Saving Time status. To close the screen and return to the Installation menu: Highlight Done and press . After the TV turns off automatically after a few seconds. To cancel the reset: Select No and press in the Signal Meter screen may not correspond to a virtual TV ... on page 43.) Viewing the digital signal meter You can view the digital signal meter in again to complete the reset process. This feature will turn off , unplug the TV power cord and then plug it in the ANT/ CABLE digital TV input source only. Note: • The physical digital ...

Owners Manual
Page 28
... with HDMI switching capability (e.g. Note: • When selecting REGZA-LINK® input sources from the popup window using , some REGZA-LINK® devices may automatically turn on. • When selecting input sources using pq, you want to an HDMI input, the REGZA-LINK® icon will appear randomly on the remote...
... with HDMI switching capability (e.g. Note: • When selecting REGZA-LINK® input sources from the popup window using , some REGZA-LINK® devices may automatically turn on. • When selecting input sources using pq, you want to an HDMI input, the REGZA-LINK® icon will appear randomly on the remote...

Owners Manual
Page 30
Note: • The Channel Browser™ opens in the list. If Favorites List is turned off, will have no effect. • Pressing will automatically tune to close the Channel Browser™. to the previously viewed channel or input. Note: Whenever ... REGZA-LINK® devices in the REGZA-LINK® list, or the favorite channels/inputs in the last selected list. • If all lists are turned off the left side. Adding and clearing channels and inputs in the History List To toggle through the previously tuned channels/inputs. In Browse mode...
Note: • The Channel Browser™ opens in the list. If Favorites List is turned off, will have no effect. • Pressing will automatically tune to close the Channel Browser™. to the previously viewed channel or input. Note: Whenever ... REGZA-LINK® devices in the REGZA-LINK® list, or the favorite channels/inputs in the last selected list. • If all lists are turned off the left side. Adding and clearing channels and inputs in the History List To toggle through the previously tuned channels/inputs. In Browse mode...

Owners Manual
Page 31
... and digital channels when the TV is in prior channel scans. (Channel Options will still be handled for details on configuring the antenna input. • Turning off the TV will display.
... and digital channels when the TV is in prior channel scans. (Channel Options will still be handled for details on configuring the antenna input. • Turning off the TV will display.
Owners Manual
Page 34
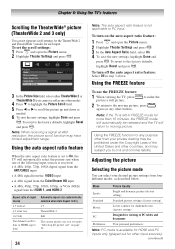
To turn off the auto aspect ratio feature: Select Off in any other mode). 4無 Press q to highlight the Picture Scroll field. 5無 Press t or u to moving ... criminal liability. Note: When receiving a signal at 480i resolution, the picture scroll function may subject you to the factory defaults, highlight Reset and press . To turn on page 32 34 Note: The auto aspect ratio feature is not applicable to the moving picture. Mode Picture Quality Sports Bright and dynamic picture...
To turn off the auto aspect ratio feature: Select Off in any other mode). 4無 Press q to highlight the Picture Scroll field. 5無 Press t or u to moving ... criminal liability. Note: When receiving a signal at 480i resolution, the picture scroll function may subject you to the factory defaults, highlight Reset and press . To turn on page 32 34 Note: The auto aspect ratio feature is not applicable to the moving picture. Mode Picture Quality Sports Bright and dynamic picture...

Owners Manual
Page 36
... is weak • When the signal reception is available for digital channels only. • You cannot set the Base CC Mode to Off. • To turn off the closed caption services (if available). However, once you change to another analog channel, the closed captions: 1無 Press and open the Preferences menu...
... is weak • When the signal reception is available for digital channels only. • You cannot set the Base CC Mode to Off. • To turn off the closed caption services (if available). However, once you change to another analog channel, the closed captions: 1無 Press and open the Preferences menu...

Owners Manual
Page 37
... mute mode will automatically be heard only on those channels that offer it will be output. To reset the settings to partially reduce (1/2 MUTE) or turn off (MUTE) the sound. Chapter 6: Using the TV's features Adjusting the audio Muting the sound Press on the remote control to the factory defaults, highlight...
... mute mode will automatically be heard only on those channels that offer it will be output. To reset the settings to partially reduce (1/2 MUTE) or turn off (MUTE) the sound. Chapter 6: Using the TV's features Adjusting the audio Muting the sound Press on the remote control to the factory defaults, highlight...
Owners Manual
Page 38
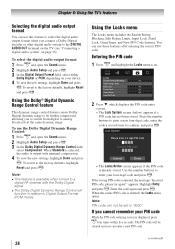
... This dynamic range control feature causes Dolby Digital dynamic range to Digital Output Format (PCM mode). When Standard is selected, the audio is available when turned to the DIGITAL AUDIO OUT terminal on the TV (see "Connecting a digital audio system" on your four-digit code and press . To revert to the...
... This dynamic range control feature causes Dolby Digital dynamic range to Digital Output Format (PCM mode). When Standard is selected, the audio is available when turned to the DIGITAL AUDIO OUT terminal on the TV (see "Connecting a digital audio system" on your four-digit code and press . To revert to the...
Owners Manual
Page 45
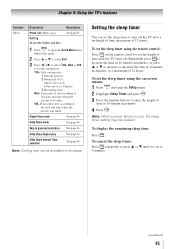
To display the remaining sleep time: Press . Setting the sleep timer You can set the sleep timer to turn off . To set length of time (maximum of 12 hours). Repeatedly press to increase the time in 10-minute increments, or press p or q to increase ... may not be cleared. To cancel the sleep timer: Press repeatedly or press p or q until it is set the length of time until the TV turns off the TV after a set the sleep timer using the remote control: Press on -screen menus: 1無 Press and open the Quick Menu from Multi...
To display the remaining sleep time: Press . Setting the sleep timer You can set the sleep timer to turn off . To set length of time (maximum of 12 hours). Repeatedly press to increase the time in 10-minute increments, or press p or q to increase ... may not be cleared. To cancel the sleep timer: Press repeatedly or press p or q until it is set the length of time until the TV turns off the TV after a set the sleep timer using the remote control: Press on -screen menus: 1無 Press and open the Quick Menu from Multi...


