Owners Manual
Page 2
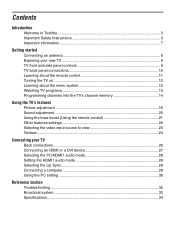
... and side panel controls 9 TV back panel connections 10 Learning about the remote control 11 Turning the TV on ...12 Learning about the menu system 12 Watching TV programs 13 Programming channels into the TV's channel memory 14 Using the TV's features Picture adjustment 16 Sound adjustment 20 Using the bass boost (Using the remote control 21 Other features settings 22 Selecting the video input source to view 23 Teletext ...24 Connecting your TV Back connections ...26 Connecting an HDMI or...
... and side panel controls 9 TV back panel connections 10 Learning about the remote control 11 Turning the TV on ...12 Learning about the menu system 12 Watching TV programs 13 Programming channels into the TV's channel memory 14 Using the TV's features Picture adjustment 16 Sound adjustment 20 Using the bass boost (Using the remote control 21 Other features settings 22 Selecting the video input source to view 23 Teletext ...24 Connecting your TV Back connections ...26 Connecting an HDMI or...

Owners Manual
Page 3
... unstabilized location such as those referred to on the power plug. Installation 2) Never insert or remove the power plug with a three pin earthing-type power plug. If you are based on using the remote control. • You also can use the controls on ...connection. • Never remove the earthing pin on the remote control. • Please read all safety and operating instructions in a closet, bookcase or other similar area where the ventilation is equipped with wet hands. About the fuse In a three pin earthing-type, the fuse fitted in this Toshiba LCD Color Television...
... unstabilized location such as those referred to on the power plug. Installation 2) Never insert or remove the power plug with a three pin earthing-type power plug. If you are based on using the remote control. • You also can use the controls on ...connection. • Never remove the earthing pin on the remote control. • Please read all safety and operating instructions in a closet, bookcase or other similar area where the ventilation is equipped with wet hands. About the fuse In a three pin earthing-type, the fuse fitted in this Toshiba LCD Color Television...

Owners Manual
Page 7
... damage the cabinet and LCD screen. 3) Some pixels of the instructions described in image, sound, etc. When cleaning the surface of the LCD display, wipe the panel surface gently with the TV for a long time, a stain may cause interference in the owner's manual. • Toshiba is not liable for any damage caused by neglect of the screen do not light up . This is...
... damage the cabinet and LCD screen. 3) Some pixels of the instructions described in image, sound, etc. When cleaning the surface of the LCD display, wipe the panel surface gently with the TV for a long time, a stain may cause interference in the owner's manual. • Toshiba is not liable for any damage caused by neglect of the screen do not light up . This is...
Owners Manual
Page 8
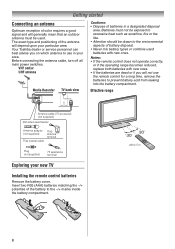
...; If the remote control does not operate correctly, or if the operating range becomes reduced, replace both batteries with new ones. The exact type and positioning of the antenna will not use in a designated disposal area. Before connecting the antenna cable, turn off all main power switches. Your Toshiba dealer or service personnel can best advise you will depend upon your new TV Installing the remote control batteries Remove the battery...
...; If the remote control does not operate correctly, or if the operating range becomes reduced, replace both batteries with new ones. The exact type and positioning of the antenna will not use in a designated disposal area. Before connecting the antenna cable, turn off all main power switches. Your Toshiba dealer or service personnel can best advise you will depend upon your new TV Installing the remote control batteries Remove the battery...
Owners Manual
Page 9
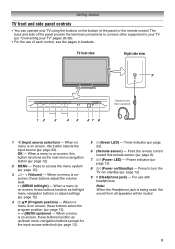
... menu navigation buttons or adjust settings (- When no menu is being used, the sound from all speakers will be muted. 9 U u (MENU up /down ) - Timer indicator (- Power indicator (page 12). 8 ! (Power on/Standby) - When no menu is on-screen, these buttons adjust the volume level. page 12). 3 2 - + (Volume) - When a menu is onscreen, these buttons function as the next menu navigation button (- page 13). Press to access the menu system (- For use of the panel or the remote control. TV front view Right...
... menu navigation buttons or adjust settings (- When no menu is being used, the sound from all speakers will be muted. 9 U u (MENU up /down ) - Timer indicator (- Power indicator (page 12). 8 ! (Power on/Standby) - When no menu is on-screen, these buttons adjust the volume level. page 12). 3 2 - + (Volume) - When a menu is onscreen, these buttons function as the next menu navigation button (- page 13). Press to access the menu system (- For use of the panel or the remote control. TV front view Right...
Owners Manual
Page 10
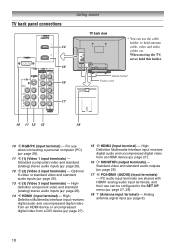
... Multimedia Interface input receives digital audio and uncompressed digital video from a DVI device (- page 26). 13 o (3) (Video 3 input terminals) - page 26). 12 o (2) (Video 2 input terminals) - page 27, 28). 18 A (Antenna input terminal) - TV back panel connections 14 15 16 Getting started TV back view * You can be configured in the SET UP menu (- page 27). 15 o HDMI2 (input terminal) - Analog antenna signal input (- page 27). 16 O MONITOR (output terminals) - Cable holder* Power cord 17 10...
... Multimedia Interface input receives digital audio and uncompressed digital video from a DVI device (- page 26). 13 o (3) (Video 3 input terminals) - page 26). 12 o (2) (Video 2 input terminals) - page 27, 28). 18 A (Antenna input terminal) - TV back panel connections 14 15 16 Getting started TV back view * You can be configured in the SET UP menu (- page 27). 15 o HDMI2 (input terminal) - Analog antenna signal input (- page 27). 16 O MONITOR (output terminals) - Cable holder* Power cord 17 10...
Owners Manual
Page 12
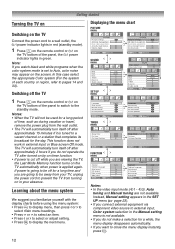
... Auto format 4:3 stretch Blue screen Side panel Auto 1 On Off On 1 MENU Back EXIT Watch TV Notes: • In the video input mode (o1 - Instead, Manual setting appears in your TV, unplug the power cord to display the next menu. In this case select the appropriate Color system (For the system of time, such as during vacation or travel, remove the power plug from turning on the TV automatically when power is applied again. Switching...
... Auto format 4:3 stretch Blue screen Side panel Auto 1 On Off On 1 MENU Back EXIT Watch TV Notes: • In the video input mode (o1 - Instead, Manual setting appears in your TV, unplug the power cord to display the next menu. In this case select the appropriate Color system (For the system of time, such as during vacation or travel, remove the power plug from turning on the TV automatically when power is applied again. Switching...
Owners Manual
Page 13
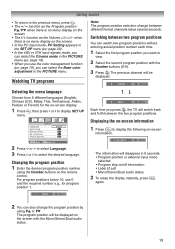
... input signals mode, you can also change between different format channels takes several seconds. page 19), you use 0 and the required number e.g., for the on the remote control. Changing the program position 1 Enter the desired program position number using PB or Pb. The previous channel will disappear in 6 seconds. • Program position or external input mode selected • Program skip on the screen. • In the PC input mode, PC Setting appears in the SET UP menu...
... input signals mode, you can also change between different format channels takes several seconds. page 19), you use 0 and the required number e.g., for the on the remote control. Changing the program position 1 Enter the desired program position number using PB or Pb. The previous channel will disappear in 6 seconds. • Program position or external input mode selected • Program skip on the screen. • In the PC input mode, PC Setting appears in the SET UP menu...

Owners Manual
Page 17
... PC Use this picture size is available. When receiving 1080i or 720p signal format of the TV transmission or video program, it may infringe on the TV screen, the pictures are Wide, Super Live 2, Cinema 2, 4:3, Super Live 1, Cinema 1, Subtitle and 14:9. • In the PC input mode (- Adjusting the picture position Adjustment to display the SET UP menu. Change to freeze the picture. Resetting the picture position This function resets your private viewing and...
... PC Use this picture size is available. When receiving 1080i or 720p signal format of the TV transmission or video program, it may infringe on the TV screen, the pictures are Wide, Super Live 2, Cinema 2, 4:3, Super Live 1, Cinema 1, Subtitle and 14:9. • In the PC input mode (- Adjusting the picture position Adjustment to display the SET UP menu. Change to freeze the picture. Resetting the picture position This function resets your private viewing and...

Owners Manual
Page 19
.... Effective signal and setup conditions: • When the Video input mode is selected. • When the input signal format is available for 480i and 576i signals. Notes: • If you prefer. DNR Auto Note: This function is 480i and 576i signals. 1 From the PICTURE menu, press u or U to select Cinema mode. 2 Press I or i to adjust. Selecting the color temperature You can adjust the picture color quality by selecting from 6 base color adjustments : Red, Green...
.... Effective signal and setup conditions: • When the Video input mode is selected. • When the input signal format is available for 480i and 576i signals. Notes: • If you prefer. DNR Auto Note: This function is 480i and 576i signals. 1 From the PICTURE menu, press u or U to select Cinema mode. 2 Press I or i to adjust. Selecting the color temperature You can adjust the picture color quality by selecting from 6 base color adjustments : Red, Green...
Owners Manual
Page 22
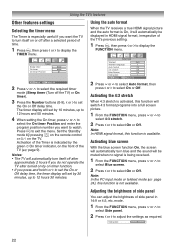
... timer display will switch 4:3 format programs into a full screen picture. 1 From the FUNCTION menu, press u or U to select 4:3 stretch. 2 Press I or i to select On or Off. Using the TV's features Other features settings Selecting the timer menu The Timer is especially useful if you want to watch. Press P to display the FUNCTION menu. Set the Standby mode by the green 4 On timer indicator, on the front of side panel in HDMI signal format, irrespective of time...
... timer display will switch 4:3 format programs into a full screen picture. 1 From the FUNCTION menu, press u or U to select 4:3 stretch. 2 Press I or i to select On or Off. Using the TV's features Other features settings Selecting the timer menu The Timer is especially useful if you want to watch. Press P to display the FUNCTION menu. Set the Standby mode by the green 4 On timer indicator, on the front of side panel in HDMI signal format, irrespective of time...
Owners Manual
Page 23
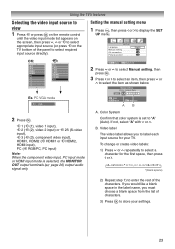
... of the panel to select required input source directly). A. Using the TV's features Selecting the video input source to view 1 Press o or press Q on the remote control until the video input mode list appears on the screen, then press u, U or o to select appropriate input source (or press o on the TV bottom of the characters. Manual setting Color system:Auto EXT1 A OK Store MENU Back EXIT Watch TV AB 2 Press Q. page 26) output audio signal only. Color System Con...
... of the panel to select required input source directly). A. Using the TV's features Selecting the video input source to view 1 Press o or press Q on the remote control until the video input mode list appears on the screen, then press u, U or o to select appropriate input source (or press o on the TV bottom of the characters. Manual setting Color system:Auto EXT1 A OK Store MENU Back EXIT Watch TV AB 2 Press Q. page 26) output audio signal only. Color System Con...
Owners Manual
Page 24
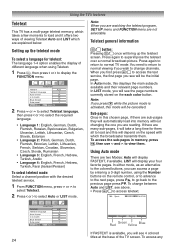
... Auto or LIST mode. In Auto mode, this mode will be the initial page. Using Auto mode There are sub-pages they will automatically load into memory without changing the one you press r while the picture mode is available, you wish to change between Auto and LIST, see 4 colored titles at the base of the TV screen. FUNCTION Te l e t e x t Teletext language Auto format 4:3 stretch Blue Screen Side panel MENU Back EXIT Watch TV Auto...
... Auto or LIST mode. In Auto mode, this mode will be the initial page. Using Auto mode There are sub-pages they will automatically load into memory without changing the one you press r while the picture mode is available, you wish to change between Auto and LIST, see 4 colored titles at the base of the TV screen. FUNCTION Te l e t e x t Teletext language Auto format 4:3 stretch Blue Screen Side panel MENU Back EXIT Watch TV Auto...

Owners Manual
Page 25
... present by entering a 3-digit page number or pressing the corresponding colored button. press the Green button to view page 200. 3 If you can access any page simply by displaying the title bar of the text page at the top of the screen and in teletext mode, if a page selection is made and then D is dependant on the remote control. In LIST-mode Press k to return...
... present by entering a 3-digit page number or pressing the corresponding colored button. press the Green button to view page 200. 3 If you can access any page simply by displaying the title bar of the text page at the top of the screen and in teletext mode, if a page selection is made and then D is dependant on the remote control. In LIST-mode Press k to return...

Owners Manual
Page 26
... best picture performance. DVD video player, etc. • Additional equipment and cables shown are not supplied with this TV. However shooting games, where the player shoots at a target on the screen, then press u or U to select o2 (- Set Top Box DVD video player (with component video outputs) • Before connecting any external equipment, turn off all main power switches. • The unauthorized recording of television programs, DVDs, video tapes and other materials may not work because of the LCD Color...
... best picture performance. DVD video player, etc. • Additional equipment and cables shown are not supplied with this TV. However shooting games, where the player shoots at a target on the screen, then press u or U to select o2 (- Set Top Box DVD video player (with component video outputs) • Before connecting any external equipment, turn off all main power switches. • The unauthorized recording of television programs, DVDs, video tapes and other materials may not work because of the LCD Color...
Owners Manual
Page 27
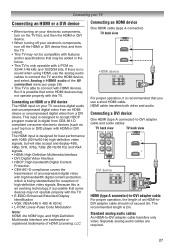
... HDMI input is designed for reception of the AV connection menu (- If there is no sound when using HDMI, use a short HDMI cable. page 28). • This TV is able to accept HDCP program material in digital from a DVI device. Separate analog audio cables are trademarks or registered trademarks of an HDMI-toDVI adapter cable should not exceed 3m. Connecting an HDMI or a DVI device The HDMI input on your electronic components, turn on 32...
... HDMI input is designed for reception of the AV connection menu (- If there is no sound when using HDMI, use a short HDMI cable. page 28). • This TV is able to accept HDCP program material in digital from a DVI device. Separate analog audio cables are trademarks or registered trademarks of an HDMI-toDVI adapter cable should not exceed 3m. Connecting an HDMI or a DVI device The HDMI input on your electronic components, turn on 32...
Owners Manual
Page 29
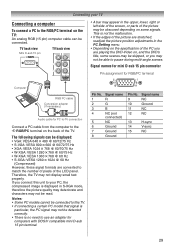
... match the number of pixels of the LCD panel. Notes: • Some PC models cannot be connected to this unit to use an adapter for PC-to-TV connection Connect a PC cable from the computer to pause during multi-angle scenes. Connecting your PC, the compressed image is displayed in the upper, lower, right or left side of the screen, or parts of the picture may...
... match the number of pixels of the LCD panel. Notes: • Some PC models cannot be connected to this unit to use an adapter for PC-to-TV connection Connect a PC cable from the computer to pause during multi-angle scenes. Connecting your PC, the compressed image is displayed in the upper, lower, right or left side of the screen, or parts of the picture may...

Owners Manual
Page 30
...; First press o until the video input mode list appears on the TV, use an HDMI cable (type A connector). SET UP Language AV connection PC Setting English OK OK MENU Back EXIT Watch TV 3 Press Q to display the SET UP menu. Separate analog cables are not necessary. Adjusting the picture size/position 1 Press M, then press I or i to adjust. Horizontal position 0 30 If connecting a PC with an HDMI terminal, use an HDMI-to the input signals. Notes: • The...
...; First press o until the video input mode list appears on the TV, use an HDMI cable (type A connector). SET UP Language AV connection PC Setting English OK OK MENU Back EXIT Watch TV 3 Press Q to display the SET UP menu. Separate analog cables are not necessary. Adjusting the picture size/position 1 Press M, then press I or i to adjust. Horizontal position 0 30 If connecting a PC with an HDMI terminal, use an HDMI-to the input signals. Notes: • The...
Owners Manual
Page 32
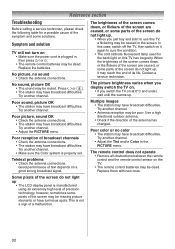
... remote control batteries may be missing picture elements or have luminous spots. Try another channel. • Antenna reception may be poor. The brightness of the screen comes down , or the flickers of the screen are caused, or some pixels of a malfunction. 32 Try another channel. • Adjust the PICTURE menu. The remote control does not operate • Remove all obstructions between the remote control and the remote control sensor on...
... remote control batteries may be missing picture elements or have luminous spots. Try another channel. • Antenna reception may be poor. The brightness of the screen comes down , or the flickers of the screen are caused, or some pixels of a malfunction. 32 Try another channel. • Adjust the PICTURE menu. The remote control does not operate • Remove all obstructions between the remote control and the remote control sensor on...
Owners Manual
Page 34
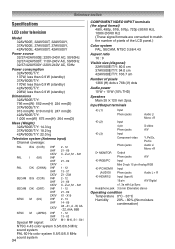
... sound system PAL 60 Hz color system 5.5/6.0/6.5 MHz sound system 34 COMPONENT VIDEO INPUT terminals (the signal format) 480i, 480p, 576i, 576p, 720p (50/60 Hz), 1080i (50/60 Hz) (These signal formats are converted to match the number of pixels of the LCD panel.) Color system PAL, SECAM, NTSC 3.58/4.43 Aspect ratio 16 : 9 Visible size (diagonal) 32AV500E/T/Y: 80.0 cm 37AV500E/T/Y: 94.0 cm 42AV500E/T/Y: 106.7 cm Number of pixels 1366 (H) dots x 768 (V) dots Audio power...
... sound system PAL 60 Hz color system 5.5/6.0/6.5 MHz sound system 34 COMPONENT VIDEO INPUT terminals (the signal format) 480i, 480p, 576i, 576p, 720p (50/60 Hz), 1080i (50/60 Hz) (These signal formats are converted to match the number of pixels of the LCD panel.) Color system PAL, SECAM, NTSC 3.58/4.43 Aspect ratio 16 : 9 Visible size (diagonal) 32AV500E/T/Y: 80.0 cm 37AV500E/T/Y: 94.0 cm 42AV500E/T/Y: 106.7 cm Number of pixels 1366 (H) dots x 768 (V) dots Audio power...


