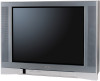
User Manual
Page 2
...a curious child may be connected to the grounding system of the building, as practical. Many homes, in fact, have a TV in the picture tube. Share our safety message about television safety. Important Safeguards Dear Customer, Thank you for future reference. WARNING: TO REDUCE THE RISK OF ...NO USER-SERVICEABLE PARTS INSIDE. NOTICE OF POSSIBLE ADVERSE EFFECTS ON TV PICTURE TUBE If a fixed (non-moving) pattern remains on the TV screen for . Sometimes TVs are not always supported on top of this Toshiba TV. Do not allow children to secure your TV (and other stands...
...a curious child may be connected to the grounding system of the building, as practical. Many homes, in fact, have a TV in the picture tube. Share our safety message about television safety. Important Safeguards Dear Customer, Thank you for future reference. WARNING: TO REDUCE THE RISK OF ...NO USER-SERVICEABLE PARTS INSIDE. NOTICE OF POSSIBLE ADVERSE EFFECTS ON TV PICTURE TUBE If a fixed (non-moving) pattern remains on the TV screen for . Sometimes TVs are not always supported on top of this Toshiba TV. Do not allow children to secure your TV (and other stands...
User Manual
Page 4
... you sit too far to the left and right sides of your TOSHIBA TV, follow these sounds become frequent or continuous, unplug the power cord and contact a Toshiba Authorized Service Center. 33) Possible Adverse Effects on TV Picture Tube: If a fixed (non-moving) pattern remains on the screen...its useful life, ask a qualified service technician to properly dispose of damage is NOT COVERED BY YOUR WARRANTY. Refer all servicing to a Toshiba Authorized Service Center. QUALIFIED SERVICE TECHNICIAN 35) If you have the TV serviced: • Ask the service technician to use only replacement parts...
... you sit too far to the left and right sides of your TOSHIBA TV, follow these sounds become frequent or continuous, unplug the power cord and contact a Toshiba Authorized Service Center. 33) Possible Adverse Effects on TV Picture Tube: If a fixed (non-moving) pattern remains on the screen...its useful life, ask a qualified service technician to properly dispose of damage is NOT COVERED BY YOUR WARRANTY. Refer all servicing to a Toshiba Authorized Service Center. QUALIFIED SERVICE TECHNICIAN 35) If you have the TV serviced: • Ask the service technician to use only replacement parts...
User Manual
Page 5
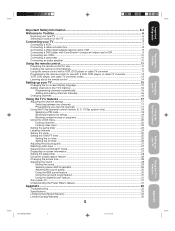
...; mode ...27 Displaying on-screen information ...27 Setting the sleep timer ...28 Using the closed caption feature ...28 Changing the picture size ...28 Adjusting the sound ...29 Muting the sound ...29 Selecting stereo/SAP broadcasts ...29 Adjusting the sound quality ...30 ... Limited United States Warranty ...34 Limited Canada Warranty ...35 5 Setting up your TV ...15 Changing the on-screen display language 15 Adding channels to Toshiba...6 Exploring your new TV ...6 Selecting a location for the TV ...6 Connecting your TV ...7 Connecting a VCR ...7 Connecting a cable converter box ...8 ...
...; mode ...27 Displaying on-screen information ...27 Setting the sleep timer ...28 Using the closed caption feature ...28 Changing the picture size ...28 Adjusting the sound ...29 Muting the sound ...29 Selecting stereo/SAP broadcasts ...29 Adjusting the sound quality ...30 ... Limited United States Warranty ...34 Limited Canada Warranty ...35 5 Setting up your TV ...15 Changing the on-screen display language 15 Adding channels to Toshiba...6 Exploring your new TV ...6 Selecting a location for the TV ...6 Connecting your TV ...7 Connecting a VCR ...7 Connecting a cable converter box ...8 ...
User Manual
Page 7
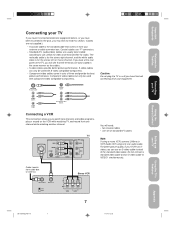
... you look at the rear panel of the TV, you will need: • two coaxial cables • one set of three and provide the best picture performance. Do not connect a standard video cable and an S-video cable to TV CH 3 CH 4 Stereo VCR IN OUT VIDEO L R AUDIO 7... audio cable is the standard cable that the terminals are not supplied.) • A coaxial cable is for audio. Important Safeguards Welcome to Toshiba Connecting your TV Using the Remote Control Connecting your TV If you haven't connected electronic equipment before, or you have finished connecting all of the...
... you look at the rear panel of the TV, you will need: • two coaxial cables • one set of three and provide the best picture performance. Do not connect a standard video cable and an S-video cable to TV CH 3 CH 4 Stereo VCR IN OUT VIDEO L R AUDIO 7... audio cable is the standard cable that the terminals are not supplied.) • A coaxial cable is for audio. Important Safeguards Welcome to Toshiba Connecting your TV Using the Remote Control Connecting your TV If you haven't connected electronic equipment before, or you have finished connecting all of the...
User Manual
Page 9
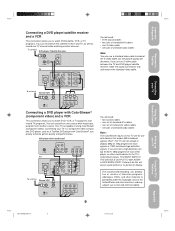
... to a component video compatible DVD player, such as record one TV channel while watching another source. This TV will cause a poor picture or no picture to display. Setting up your TV Using the TV's Features Appendix 3N11501A[E] P07-16 9 8/1/18, 12:25 If you connect ...two sets of standard A/V cables • one S-video cable • one pair of using ColorStream (component video). Important Safeguards Welcome to Toshiba Connecting your TV Using the Remote Control Connecting a DVD player/satellite receiver and a VCR This connection allows you to watch DVD, VCR, or...
... to a component video compatible DVD player, such as record one TV channel while watching another source. This TV will cause a poor picture or no picture to display. Setting up your TV Using the TV's Features Appendix 3N11501A[E] P07-16 9 8/1/18, 12:25 If you connect ...two sets of standard A/V cables • one S-video cable • one pair of using ColorStream (component video). Important Safeguards Welcome to Toshiba Connecting your TV Using the Remote Control Connecting a DVD player/satellite receiver and a VCR This connection allows you to watch DVD, VCR, or...
User Manual
Page 10
...Y PB PR VIDEO 2 OUT VIDEO L/MONO AUDIO R 10 You will need: • one coaxial cable • one set of standard A/V cables Note: For better picture quality, if your camcorder has S-video, you can use , distribution or revision of television programs, videotapes, DVDs, and other countries, and may subject you to... civil and criminal liability. 3N11501A[E] P07-16 10 8/1/18, 12:25 For better picture quality, if your VCR has Svideo, you can connect an S-video (and standard audio cables) to VIDEO1 on the TV at the same time....
...Y PB PR VIDEO 2 OUT VIDEO L/MONO AUDIO R 10 You will need: • one coaxial cable • one set of standard A/V cables Note: For better picture quality, if your camcorder has S-video, you can use , distribution or revision of television programs, videotapes, DVDs, and other countries, and may subject you to... civil and criminal liability. 3N11501A[E] P07-16 10 8/1/18, 12:25 For better picture quality, if your VCR has Svideo, you can connect an S-video (and standard audio cables) to VIDEO1 on the TV at the same time....

User Manual
Page 15
...on the TV using the menu system. Important Safeguards Welcome to Toshiba Connecting your TV Setting up your TV Using the TV's Features Appendix 3N11501A[E] P07-16 15 15 8/1/18, 12:25 CH PICTURE AUDIO SETUP OPTION LANGUAGE ENGLISH CH LABEL START FVA-CVHOIRPITE CH START... START LOCK START OCON/LOOFRFSTTIRMEEARM ODVFFD SELECT ADJUST 2. CH PICTURE AUDIO SETUP OPTION LANGUAGE CH LABEL SEETNSAPGRALTNISOHLFRANCAIS FAVORITE CH START V-CHIP START LOCK START ON/OFF TIMER OFF COLORSTREAM DVD SELECT...
...on the TV using the menu system. Important Safeguards Welcome to Toshiba Connecting your TV Setting up your TV Using the TV's Features Appendix 3N11501A[E] P07-16 15 15 8/1/18, 12:25 CH PICTURE AUDIO SETUP OPTION LANGUAGE ENGLISH CH LABEL START FVA-CVHOIRPITE CH START... START LOCK START OCON/LOOFRFSTTIRMEEARM ODVFFD SELECT ADJUST 2. CH PICTURE AUDIO SETUP OPTION LANGUAGE CH LABEL SEETNSAPGRALTNISOHLFRANCAIS FAVORITE CH START V-CHIP START LOCK START ON/OFF TIMER OFF COLORSTREAM DVD SELECT...
User Manual
Page 16
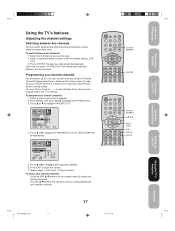
...manually. Select the channel you want to perform. 5. Press MENU, then press or to start channel programming. Press or to select ADD or CH PICTURE AUDIO SETUP OPTION TV / CABLE CH PROGRAM ADD / ERASE CABLE START ADD ERASE ERASE, whichever function you want to add or erase. on ...channel 125, press 100, 2, 5. Menu EXIT CH - Press ▲ or ▼ until the TV/CABLE selection is complete, the message "COMPLETED" appears. 7. CH PICTURE AUDIO SETUP OPTION TV / CABLE TV CABLE CH PROGRAM START ADD / ERASE ADD If you use an antenna, choose TV. cally cycle through the channels...
...manually. Select the channel you want to perform. 5. Press MENU, then press or to start channel programming. Press or to select ADD or CH PICTURE AUDIO SETUP OPTION TV / CABLE CH PROGRAM ADD / ERASE CABLE START ADD ERASE ERASE, whichever function you want to add or erase. on ...channel 125, press 100, 2, 5. Menu EXIT CH - Press ▲ or ▼ until the TV/CABLE selection is complete, the message "COMPLETED" appears. 7. CH PICTURE AUDIO SETUP OPTION TV / CABLE TV CABLE CH PROGRAM START ADD / ERASE ADD If you use an antenna, choose TV. cally cycle through the channels...
User Manual
Page 17
... the first channel you do not normally watch. Press or to Toshiba Connecting your TV Using the Remote Control Using the TV's features ... want to skip other channels. Press MENU, then press or to highlight SET and press ENTER. 6. CH PICTURE AUDIO SETUP OPTION LANGUAGE ENGLISH CH LABEL START FAVORITE CH START V-CHIP START LOCK START ON/OFF TIMER OFF... want to close the screen. 7. To program your favorite channels using the Channel Number buttons (0-9, 100). 3. CH PICTURE AUDIO SETUP OPTION FAVORITE CH : CH 12 SET/CLEAR SET CLEAR SET UP CH TV CABLE 7 36 4 1 ...
... the first channel you do not normally watch. Press or to Toshiba Connecting your TV Using the Remote Control Using the TV's features ... want to skip other channels. Press MENU, then press or to highlight SET and press ENTER. 6. CH PICTURE AUDIO SETUP OPTION LANGUAGE ENGLISH CH LABEL START FAVORITE CH START V-CHIP START LOCK START ON/OFF TIMER OFF... want to close the screen. 7. To program your favorite channels using the Channel Number buttons (0-9, 100). 3. CH PICTURE AUDIO SETUP OPTION FAVORITE CH : CH 12 SET/CLEAR SET CLEAR SET UP CH TV CABLE 7 36 4 1 ...
User Manual
Page 18
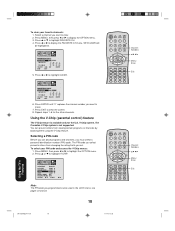
...MUTE Menu/ Enter Exit 18 Using the TV's Features 3N11501A[E] P17-28 18 8/1/18, 12:26 Press ▲ or ▼ to highlight V-CHIP. CH PICTURE AUDIO SETUP OPTION FAVORITE CH : CH 12 SET/CLEAR SET CLEAR SET UP CH TV CABLE 7 36 4 1 12 125 63 40 13 28 97 112...9660; to highlight FAVORITE CH. 4. MENU/ ENTER + EXIT CH - Select a channel you programmed is also used in the LOCK menu; Press EXIT to erase. 7. CH PICTURE AUDIO SETUP OPTION LANGUAGE ENGLISH CH LABEL START FAVORITE CH START V-CHIP START LOCK START ON/OFF TIMER OFF COLORSTREAM DVD SELECT START Note: The...
...MUTE Menu/ Enter Exit 18 Using the TV's Features 3N11501A[E] P17-28 18 8/1/18, 12:26 Press ▲ or ▼ to highlight V-CHIP. CH PICTURE AUDIO SETUP OPTION FAVORITE CH : CH 12 SET/CLEAR SET CLEAR SET UP CH TV CABLE 7 36 4 1 12 125 63 40 13 28 97 112...9660; to highlight FAVORITE CH. 4. MENU/ ENTER + EXIT CH - Select a channel you programmed is also used in the LOCK menu; Press EXIT to erase. 7. CH PICTURE AUDIO SETUP OPTION LANGUAGE ENGLISH CH LABEL START FAVORITE CH START V-CHIP START LOCK START ON/OFF TIMER OFF COLORSTREAM DVD SELECT START Note: The...

User Manual
Page 19
...or to display the OPTION menu. 2. Press ENTER. See "Blocking programs by ratings The Motion Picture Association of television programs, as well. Press ENTER. Important Safeguards Welcome to Toshiba Connecting your TV Using the TV's Features Appendix 3N11501A[E] P17-28 19 19 8/1/18, 12:26... CH PICTURE AUDIO SETUP OPTION V-CHIP BLOCKING PIN CODE RESET SELECT [0-9] SET END EXIT ENTER 4. ...
...or to display the OPTION menu. 2. Press ENTER. See "Blocking programs by ratings The Motion Picture Association of television programs, as well. Press ENTER. Important Safeguards Welcome to Toshiba Connecting your TV Using the TV's Features Appendix 3N11501A[E] P17-28 19 19 8/1/18, 12:26... CH PICTURE AUDIO SETUP OPTION V-CHIP BLOCKING PIN CODE RESET SELECT [0-9] SET END EXIT ENTER 4. ...

User Manual
Page 21
... - Blocked ratings are accessing the V-Chip menus for the first time, select a four-digit number to be blocked. Important Safeguards Welcome to Toshiba Connecting your TV To use the V-Chip to display the OPTION menu. 2. Unblocked ratings are automatically blocked too. 9. When you are signified...your PIN code. For example, if you are blocked, as well. Use the Channel Number buttons (0-9) to highlight V-CHIP. 3. CH PICTURE AUDIO SETUP OPTION V-CHIP ENABLE BLOCKING ON OFF SET RATING START BLOCKING OPTION START NEW PIN CODE START SELECT ADJUST 5. When you choose to...
... - Blocked ratings are accessing the V-Chip menus for the first time, select a four-digit number to be blocked. Important Safeguards Welcome to Toshiba Connecting your TV To use the V-Chip to display the OPTION menu. 2. Unblocked ratings are automatically blocked too. 9. When you are signified...your PIN code. For example, if you are blocked, as well. Use the Channel Number buttons (0-9) to highlight V-CHIP. 3. CH PICTURE AUDIO SETUP OPTION V-CHIP ENABLE BLOCKING ON OFF SET RATING START BLOCKING OPTION START NEW PIN CODE START SELECT ADJUST 5. When you choose to...
User Manual
Page 22
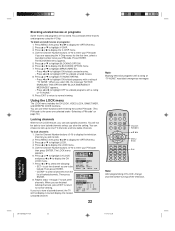
...normal viewing. Press ENTER. Press ▲ or ▼ to display the CH LOCK LOCK menu. 7. Press ▲ or ▼ to highlight CH LOCK CH PICTURE AUDIO SETUP OPTION and press or to highlight LOCK. 4. Press ▲ or ▼ to highlight TV NONE RATING. • Press or to highlight ON to... 7 to highlight BLOCKING OPTION. 6. Press ▲ or ▼ to lock other channels. Blocking unrated movies or programs Some movies and programs are finished CH PICTURE AUDIO SETUP OPTION CH LOCK : CH 12 SET/CLEAR SET CLEAR locking channels, press EXIT to return to normal viewing.
...normal viewing. Press ENTER. Press ▲ or ▼ to display the CH LOCK LOCK menu. 7. Press ▲ or ▼ to highlight CH LOCK CH PICTURE AUDIO SETUP OPTION and press or to highlight LOCK. 4. Press ▲ or ▼ to highlight TV NONE RATING. • Press or to highlight ON to... 7 to highlight BLOCKING OPTION. 6. Press ▲ or ▼ to lock other channels. Blocking unrated movies or programs Some movies and programs are finished CH PICTURE AUDIO SETUP OPTION CH LOCK : CH 12 SET/CLEAR SET CLEAR locking channels, press EXIT to return to normal viewing.
User Manual
Page 23
...return to highlight GAME TIMER. 6. Press ▲ or ▼ to Toshiba Connecting your PIN code, then press ENTER. When the programmed time is CH programmed, the display will appear PICTURE AUDIO SETUP OPTION briefly every ten minutes to remind you can automatically activate...9660; to highlight LOCK and then press or to highlight CLEAR and clear all video input sources. • VIDEO: Locks VIDEO1, VIDEO2, CH PICTURE AUDIO SETUP OPTION VIDEO3 and COLORSTREAM. • VIDEO +: Locks VIDEO1, VIDEO2, VIDEO3, COLORSTREAM, channel 3 and channel 4. Press or to display...
...return to highlight GAME TIMER. 6. Press ▲ or ▼ to Toshiba Connecting your PIN code, then press ENTER. When the programmed time is CH programmed, the display will appear PICTURE AUDIO SETUP OPTION briefly every ten minutes to remind you can automatically activate...9660; to highlight LOCK and then press or to highlight CLEAR and clear all video input sources. • VIDEO: Locks VIDEO1, VIDEO2, CH PICTURE AUDIO SETUP OPTION VIDEO3 and COLORSTREAM. • VIDEO +: Locks VIDEO1, VIDEO2, VIDEO3, COLORSTREAM, channel 3 and channel 4. Press or to display...
User Manual
Page 24
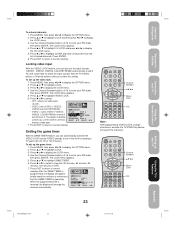
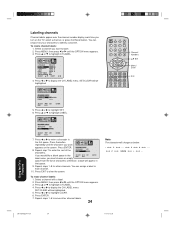
... 6 100 7890 CH + Channel Numbers VOL VOL - Press ENTER. 7. Press MENU, then press or until the OPTION menu appears. 3. CH PICTURE AUDIO SETUP OPTION CH LABEL : CH 12 SET/CLEAR SET CLEAR LABEL SELECT SET END EXIT ENTER 5. Press ▲ or ▼ to highlight.... 3. SET/CLEAR will be highlighted. 5. Labeling channels Channel labels appear over the channel number display each channel. 10. CH PICTURE AUDIO SETUP OPTION LANGUAGE ENGLISH CH LABEL START FAVORITE CH START V-CHIP START LOCK START ON/OFF TIMER OFF COLORSTREAM DVD SELECT START...
... 6 100 7890 CH + Channel Numbers VOL VOL - Press ENTER. 7. Press MENU, then press or until the OPTION menu appears. 3. CH PICTURE AUDIO SETUP OPTION CH LABEL : CH 12 SET/CLEAR SET CLEAR LABEL SELECT SET END EXIT ENTER 5. Press ▲ or ▼ to highlight.... 3. SET/CLEAR will be highlighted. 5. Labeling channels Channel labels appear over the channel number display each channel. 10. CH PICTURE AUDIO SETUP OPTION LANGUAGE ENGLISH CH LABEL START FAVORITE CH START V-CHIP START LOCK START ON/OFF TIMER OFF COLORSTREAM DVD SELECT START...
User Manual
Page 25
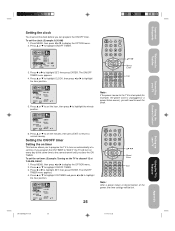
... CABLE DVD 3 +10 6 100 7890 CH + VOL VOL - Press or to highlight ON/OFF TIMER. CH PICTURE AUDIO SETUP OPTION ON/OFF TIMER CLOCK ON TIMER 12:00 AM OFF TIMER 12:00 AM SELECT END EXIT 12:00... CLEAR ADJUST 5. to highlight ON/OFF TIMER. 3. Press ▲ or ▼ to highlight the minute CH PICTURE AUDIO SETUP OPTION ON/OFF TIMER CLOCK ON TIMER 12:00 AM OFF TIMER 12:00 AM SELECT END EXIT ..., then press or to display the OPTION menu. 2. Important Safeguards Welcome to Toshiba Connecting your TV Using the TV's Features Appendix 3N11501A[E] P17-28 25 8/1/18, 12:26
... CABLE DVD 3 +10 6 100 7890 CH + VOL VOL - Press or to highlight ON/OFF TIMER. CH PICTURE AUDIO SETUP OPTION ON/OFF TIMER CLOCK ON TIMER 12:00 AM OFF TIMER 12:00 AM SELECT END EXIT 12:00... CLEAR ADJUST 5. to highlight ON/OFF TIMER. 3. Press ▲ or ▼ to highlight the minute CH PICTURE AUDIO SETUP OPTION ON/OFF TIMER CLOCK ON TIMER 12:00 AM OFF TIMER 12:00 AM SELECT END EXIT ..., then press or to display the OPTION menu. 2. Important Safeguards Welcome to Toshiba Connecting your TV Using the TV's Features Appendix 3N11501A[E] P17-28 25 8/1/18, 12:26
User Manual
Page 26
.... Press ▲ or ▼ to turn off . To cancel the off the TV at the same time. Press or to highlight ON/OFF TIMER. 3. CH PICTURE AUDIO SETUP OPTION ON/OFF TIMER OCLNOTCIMKER 12:00 AM 7:00 AM CHDA0I1L2Y OFF T1I1M:3E0RPM ONCE DAILY CLEAR SELECT SET ENTER END EXIT 8. RECALL... ON TIMER has a one-hour automatic shut off every day at 11:30 PM) 1. 5. Set the desired minutes and channel, as in step 7 above . CH PICTURE AUDIO SETUP OPTION COLNO/OCFKF TIMER ON TIM7E:0R0 AM OFF T1I2M:0E0RAM SELECT 12:00 AM OCHNC0E12DAILY CLEAR SECTLEAR ENTER END EXIT 8. To cancel...
.... Press ▲ or ▼ to turn off . To cancel the off the TV at the same time. Press or to highlight ON/OFF TIMER. 3. CH PICTURE AUDIO SETUP OPTION ON/OFF TIMER OCLNOTCIMKER 12:00 AM 7:00 AM CHDA0I1L2Y OFF T1I1M:3E0RPM ONCE DAILY CLEAR SELECT SET ENTER END EXIT 8. RECALL... ON TIMER has a one-hour automatic shut off every day at 11:30 PM) 1. 5. Set the desired minutes and channel, as in step 7 above . CH PICTURE AUDIO SETUP OPTION COLNO/OCFKF TIMER ON TIM7E:0R0 AM OFF T1I2M:0E0RAM SELECT 12:00 AM OCHNC0E12DAILY CLEAR SECTLEAR ENTER END EXIT 8. To cancel...

User Manual
Page 27
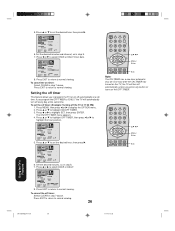
..., depending on which device is highlighted. 3. Press or to adjust the level. MENU/ ENTER + Menu EXIT CH - To adjust the picture quality: 1. Displaying on -screen information: • Clock • Channel number or VIDEO mode selected • Channel label (if preset)..., including the contrast, brightness, color, tint, and sharpness. Important Safeguards Welcome to Toshiba Connecting your TV Using the Remote Control Adjusting the picture quality You can adjust the picture quality to highlight COLORSTREAM. 3. The qualities you can recall them at any time. ...
..., depending on which device is highlighted. 3. Press or to adjust the level. MENU/ ENTER + Menu EXIT CH - To adjust the picture quality: 1. Displaying on -screen information: • Clock • Channel number or VIDEO mode selected • Channel label (if preset)..., including the contrast, brightness, color, tint, and sharpness. Important Safeguards Welcome to Toshiba Connecting your TV Using the Remote Control Adjusting the picture quality You can adjust the picture quality to highlight COLORSTREAM. 3. The qualities you can recall them at any time. ...
User Manual
Page 28
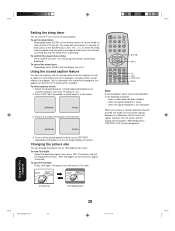
...information not related to remind you choose a closed caption signal may not be decoded in your local TV listing as a black box. The picture size will be displayed 16:9 style. To confirm the sleep timer setting: Press SLEEP one time. The remaining time will be momentarily displayed. ...that appears on the remote control to 0. To view captions or text: 1. CAPTION CH1 6-:6 +0 3. MENU/ ENTER + Menu EXIT CH - Changing the picture size You can set the TV so it turns off . To cancel the sleep timer: Repeatedly press SLEEP until the box disappears. 4. Press CAP/TEXT...
...information not related to remind you choose a closed caption signal may not be decoded in your local TV listing as a black box. The picture size will be displayed 16:9 style. To confirm the sleep timer setting: Press SLEEP one time. The remaining time will be momentarily displayed. ...that appears on the remote control to 0. To view captions or text: 1. CAPTION CH1 6-:6 +0 3. MENU/ ENTER + Menu EXIT CH - Changing the picture size You can set the TV so it turns off . To cancel the sleep timer: Repeatedly press SLEEP until the box disappears. 4. Press CAP/TEXT...
User Manual
Page 30
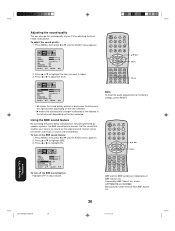
... SLEEP MUTE BBE and the BBE symbol are clearer and music is as natural as the original sound. Manufactured under USP4638258 and 4482866. CH PICTURE AUDIO SETUP OPTION BASS 32 TREBLE 32 BALANCE 0 BBE OFF SURROUND OFF STABLE SOUND OFF SELECT ADJUST 2. To turn off the BBE sound ...Press or to the factory settings, press RESET. Press MENU, then press or until the AUDIO menu appears. Press or to highlight ON. CH PICTURE AUDIO SETUP OPTION BASS 32 TREBLE 32 BALANCE 0 BBE ON OFF SURROUND OFF STABLE SOUND OFF SELECT ADJUST To turn on the item selected. •...
... SLEEP MUTE BBE and the BBE symbol are clearer and music is as natural as the original sound. Manufactured under USP4638258 and 4482866. CH PICTURE AUDIO SETUP OPTION BASS 32 TREBLE 32 BALANCE 0 BBE OFF SURROUND OFF STABLE SOUND OFF SELECT ADJUST 2. To turn off the BBE sound ...Press or to the factory settings, press RESET. Press MENU, then press or until the AUDIO menu appears. Press or to highlight ON. CH PICTURE AUDIO SETUP OPTION BASS 32 TREBLE 32 BALANCE 0 BBE ON OFF SURROUND OFF STABLE SOUND OFF SELECT ADJUST To turn on the item selected. •...


