
User Manual
Page 8
...digital audio system 18 Connecting a stereo audio system 18 Connecting a personal computer (PC 19 Chapter 3: Using the remote control 20 Installing the remote control batteries 20 Remote control effective range 20 Adjusting the viewing angle 20 Learning about the remote control 21 Chapter 4: Menu layout and navigation 22 Main menu layout 22 Setup/Installation menu layout 23 Navigating... 55 Acceptable signal formats for PC IN and HDMI terminals 56 Limited United States Warranty for LCD Televisions .. 57 Limited Canadian Warranty for Toshiba Brand Flat Panel Televisions 58
...digital audio system 18 Connecting a stereo audio system 18 Connecting a personal computer (PC 19 Chapter 3: Using the remote control 20 Installing the remote control batteries 20 Remote control effective range 20 Adjusting the viewing angle 20 Learning about the remote control 21 Chapter 4: Menu layout and navigation 22 Main menu layout 22 Setup/Installation menu layout 23 Navigating... 55 Acceptable signal formats for PC IN and HDMI terminals 56 Limited United States Warranty for LCD Televisions .. 57 Limited Canadian Warranty for Toshiba Brand Flat Panel Televisions 58
User Manual
Page 10
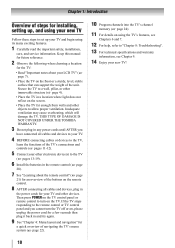
... try again. 9 See "Chapter 4: Menu layout and navigation" for a quick overview of the unit. If the TV stops responding to the remote control or TV control panel and you have connected all cables and devices to your TV. 4 BEFORE connecting cables or devices to the TV, learn the functions of...walls and other devices. THIS TYPE OF DAMAGE IS NOT COVERED UNDER THE TOSHIBA WARRANTY. 3 Do not plug in any power cords until AFTER you cannot turn on the TV. Chapter 1: Introduction Overview of the buttons on the remote control. 8 AFTER connecting all cables and devices, plug in the power cords...
... try again. 9 See "Chapter 4: Menu layout and navigation" for a quick overview of the unit. If the TV stops responding to the remote control or TV control panel and you have connected all cables and devices to your TV. 4 BEFORE connecting cables or devices to the TV, learn the functions of...walls and other devices. THIS TYPE OF DAMAGE IS NOT COVERED UNDER THE TOSHIBA WARRANTY. 3 Do not plug in any power cords until AFTER you cannot turn on the TV. Chapter 1: Introduction Overview of the buttons on the remote control. 8 AFTER connecting all cables and devices, plug in the power cords...
User Manual
Page 11
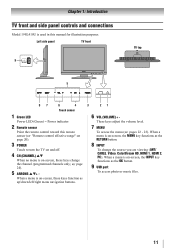
...the channel (programmed channels only; Left side panel TV front TV top Touch sensor 1 Green LED Power LED (Green) = Power indicator 2 Remote sensor Point the remote control toward this manual for illustration purposes. When a menu is on-screen, the MENU key functions as the OK button. 9 USB port To... access photo or music files. 11 Chapter 1: Introduction TV front and side panel controls and connections Model 19SL410U is used in this remote sensor ( "Remote control effective range" on page 20). 3 POWER Touch to turn the TV on and off. 4 CH (CHANNEL) ST ...
...the channel (programmed channels only; Left side panel TV front TV top Touch sensor 1 Green LED Power LED (Green) = Power indicator 2 Remote sensor Point the remote control toward this manual for illustration purposes. When a menu is on-screen, the MENU key functions as the OK button. 9 USB port To... access photo or music files. 11 Chapter 1: Introduction TV front and side panel controls and connections Model 19SL410U is used in this remote sensor ( "Remote control effective range" on page 20). 3 POWER Touch to turn the TV on and off. 4 CH (CHANNEL) ST ...
User Manual
Page 14
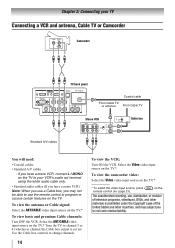
To view the antenna or Cable signal: Select the ANT/CABLE video input source on the The unauthorized recording, use the remote control to civil and criminal liability. on the TV.* To view basic and premium Cable channels: Turn OFF the VCR. If you have a mono VCR, connect L ... United States and other countries, and may subject you to program or access certain features on the TV.* * To select the video input source, press remote control ( page 21). Chapter 2: Connecting your VCR's audio out terminal using the white audio cable only. • Standard audio cables (If you have a mono VCR)...
To view the antenna or Cable signal: Select the ANT/CABLE video input source on the The unauthorized recording, use the remote control to civil and criminal liability. on the TV.* To view basic and premium Cable channels: Turn OFF the VCR. If you have a mono VCR, connect L ... United States and other countries, and may subject you to program or access certain features on the TV.* * To select the video input source, press remote control ( page 21). Chapter 2: Connecting your VCR's audio out terminal using the white audio cable only. • Standard audio cables (If you have a mono VCR)...
User Manual
Page 15
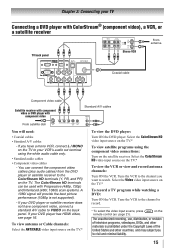
... can connect the component video cables (plus audio cables) from the DVD player or satellite receiver to record. * To select the video input source, press remote control ( page 21). Select the ColorStream HD video input source on the satellite receiver. Tune the VCR to the channel to the ColorStream HD terminals (Y, PB...
... can connect the component video cables (plus audio cables) from the DVD player or satellite receiver to record. * To select the video input source, press remote control ( page 21). Select the ColorStream HD video input source on the satellite receiver. Tune the VCR to the channel to the ColorStream HD terminals (Y, PB...
User Manual
Page 16
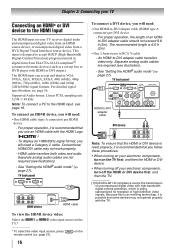
... cable To view the HDMI device video: Select the HDMI 1 or HDMI 2 video input source on the TV.* * To select the video input source, press remote control ( page 21). 16 on the To connect a DVI device, you use an HDMI cable with the HDMI Logo ( ). - Chapter 2: Connecting your TV Connecting an HDMI...
... cable To view the HDMI device video: Select the HDMI 1 or HDMI 2 video input source on the TV.* * To select the video input source, press remote control ( page 21). 16 on the To connect a DVI device, you use an HDMI cable with the HDMI Logo ( ). - Chapter 2: Connecting your TV Connecting an HDMI...
User Manual
Page 17
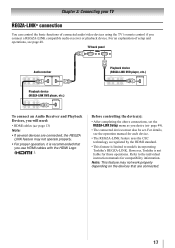
... device(s): • After completing the above connections, set . For an explanation of connected audio/video devices using the TV's remote control if you desire ( page 49). • The connected devices must also be set the REGZA-LINK Setup menu as regulated by ... feature may not operate properly. • For proper operation, it is not liable for compatibility information. However, Toshiba is recommended that are connected. 17 Refer to models incorporating Toshiba's REGZA-LINK. TV back panel Audio receiver Playback device (REGZA-LINK DVD player, etc.) Playback device (REGZA-...
... device(s): • After completing the above connections, set . For an explanation of connected audio/video devices using the TV's remote control if you desire ( page 49). • The connected devices must also be set the REGZA-LINK Setup menu as regulated by ... feature may not operate properly. • For proper operation, it is not liable for compatibility information. However, Toshiba is recommended that are connected. 17 Refer to models incorporating Toshiba's REGZA-LINK. TV back panel Audio receiver Playback device (REGZA-LINK DVD player, etc.) Playback device (REGZA-...
User Manual
Page 18
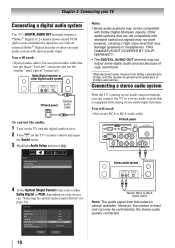
... double-D symbol are not compatible with Dolby Digital bitstream signals. Audio Setup PC Audio HDMI 1 Audio MTS Language Optical Output Format Dolby Digital Dynamic Range Control No Auto Stereo English Dolby Digital Compressed Reset Done 18 Stereo RCA to RCA audio cable TV back panel Sound Digital Audio Selector Audio Settings... decoder or other external audio system with analog stereo audio input terminals. Chapter 2: Connecting your device ( "Selecting the optical audio output format" on the TV's remote control and open the Sound menu. 3 Highlight Audio Setup and press .
... double-D symbol are not compatible with Dolby Digital bitstream signals. Audio Setup PC Audio HDMI 1 Audio MTS Language Optical Output Format Dolby Digital Dynamic Range Control No Auto Stereo English Dolby Digital Compressed Reset Done 18 Stereo RCA to RCA audio cable TV back panel Sound Digital Audio Selector Audio Settings... decoder or other external audio system with analog stereo audio input terminals. Chapter 2: Connecting your device ( "Selecting the optical audio output format" on the TV's remote control and open the Sound menu. 3 Highlight Audio Setup and press .
User Manual
Page 20
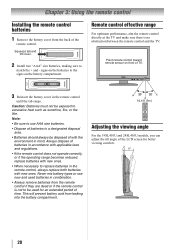
... match the + and - Adjusting the viewing angle For the 19SL410U and 24SL410U models, you can adjust the tilt angle of the remote control. This will prevent battery acid from the remote control if they are dead or if the remote control is no obstruction between the remote control and the TV. signs on the batteries to excessive heat such...
... match the + and - Adjusting the viewing angle For the 19SL410U and 24SL410U models, you can adjust the tilt angle of the remote control. This will prevent battery acid from the remote control if they are dead or if the remote control is no obstruction between the remote control and the TV. signs on the batteries to excessive heat such...
User Manual
Page 21
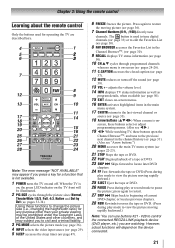
... page 37). 12 MUTE reduces or turns off . Press again to restore the moving rapidly backward.) Note: You can use buttons #21 - #28 to control the connected REGZA-LINK playback device (DVD player, etc.) you to civil and criminal liability. 3 PIC MODE selects the picture mode ( page 36). 4 ...or record mode to pause the picture; When the TV is on - screen, these buttons open the Channel BrowserTM. Chapter 3: Using the remote control Learning about the remote control Only the buttons used to tune digital channels ( page 33) or to edit the Favorites List ( page 30). 8 FAV BROWSER accesses the...
... page 37). 12 MUTE reduces or turns off . Press again to restore the moving rapidly backward.) Note: You can use buttons #21 - #28 to control the connected REGZA-LINK playback device (DVD player, etc.) you to civil and criminal liability. 3 PIC MODE selects the picture mode ( page 36). 4 ...or record mode to pause the picture; When the TV is on - screen, these buttons open the Channel BrowserTM. Chapter 3: Using the remote control Learning about the remote control Only the buttons used to tune digital channels ( page 33) or to edit the Favorites List ( page 30). 8 FAV BROWSER accesses the...
User Manual
Page 22
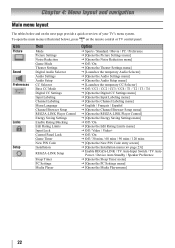
... Labeling menu] J [Opens the Channel Labeling menu] J English / Français / Español J [Opens the Channel Browser Setup menu] J [Opens the REGZA-LINK Player Control] J [Opens the Energy Saving Settings menu] J Off / On J [Opens the Edit Rating Limits menu] J Off / Video / Video+ J Off / On J Off / 30 mins / 60 mins / 90... tables below ), press on the next page provide a quick overview of your TV's menu system. To open the main menus (illustrated below and on the remote control or TV control panel.
... Labeling menu] J [Opens the Channel Labeling menu] J English / Français / Español J [Opens the Channel Browser Setup menu] J [Opens the REGZA-LINK Player Control] J [Opens the Energy Saving Settings menu] J Off / On J [Opens the Edit Rating Limits menu] J Off / Video / Video+ J Off / On J Off / 30 mins / 60 mins / 90... tables below ), press on the next page provide a quick overview of your TV's menu system. To open the main menus (illustrated below and on the remote control or TV control panel.
User Manual
Page 23
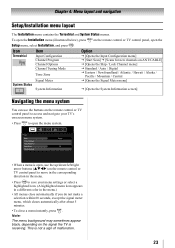
... . To open the Setup menu, select Installation, and press . Note: The menu background may sometimes appear black, depending on the remote control or TV control panel, open the Installation menu (illustrated below), press on the signal the TV is not a sign of malfunction. 23 Icon Terrestrial Item... [Opens the System Information screen] Navigating the menu system You can use the up/down/left/right arrow buttons (STWX) on the remote control or TV control panel to access and navigate your TV's onscreen menu system. • Press to save your menu settings or select a highlighted item....
... . To open the Setup menu, select Installation, and press . Note: The menu background may sometimes appear black, depending on the remote control or TV control panel, open the Installation menu (illustrated below), press on the signal the TV is not a sign of malfunction. 23 Icon Terrestrial Item... [Opens the System Information screen] Navigating the menu system You can use the up/down/left/right arrow buttons (STWX) on the remote control or TV control panel to access and navigate your TV's onscreen menu system. • Press to save your menu settings or select a highlighted item....
User Manual
Page 24
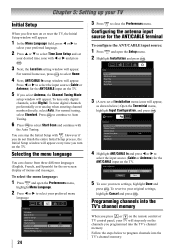
...Setup window will appear. Preferences CC Selector Base CC Mode Digital CC Settings Input Labeling Channel Labeling Menu Language Channel Browser Setup REGZA-LINK Player Control 24 Off Auto English 3 Press to select the input source (Cable or Antenna) for the on the TV. Configuring the antenna input ... appear. Press to continue to Auto Tuning. 6 Press to program channels into the TV's channel memory When you press or on the remote control or TV control panel, your TV will stop the Initial Setup with . To revert to select Time Zone Setup and set of menus and messages. Programming...
...Setup window will appear. Preferences CC Selector Base CC Mode Digital CC Settings Input Labeling Channel Labeling Menu Language Channel Browser Setup REGZA-LINK Player Control 24 Off Auto English 3 Press to select the input source (Cable or Antenna) for the on the TV. Configuring the antenna input ... appear. Press to continue to Auto Tuning. 6 Press to program channels into the TV's channel memory When you press or on the remote control or TV control panel, your TV will stop the Initial Setup with . To revert to select Time Zone Setup and set of menus and messages. Programming...

User Manual
Page 25
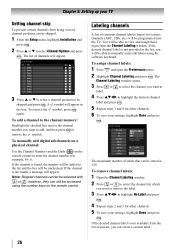
...detect all active channels in the onscreen display and press ). Note: • You must use the Channel Number buttons on the remote control (or highlight Cancel in the channel memory. appears (as shown below.) Open the Terrestrial menu, highlight Channel Program and press to..., please wait... 52% Number of Installation menu icons will appear, as shown above). 5 To cancel channel programming, press on the remote control. • Programming channels when the ANT/CABLE input is configured for Cable will automatically cycle through the channels, the message "Scanning channels...
...detect all active channels in the onscreen display and press ). Note: • You must use the Channel Number buttons on the remote control (or highlight Cancel in the channel memory. appears (as shown below.) Open the Terrestrial menu, highlight Channel Program and press to..., please wait... 52% Number of Installation menu icons will appear, as shown above). 5 To cancel channel programming, press on the remote control. • Programming channels when the ANT/CABLE input is configured for Cable will automatically cycle through the channels, the message "Scanning channels...
User Manual
Page 26
...channel position to remove the symbol. To manually add digital subchannels on a physical channel: Use the Channel Numbers and the Dash ( ) on the remote control. however, they can create a custom label. 26 You will be able to enter the channel number (for example, 56-1). If the desired channel...will be unchecked. Labeling channels A list of presets, you will be able to manually enter/edit labels using the number keys on the remote control to view and assign these logos from the list of common channel labels (logos) for other channels. 6 To save your TV Setting ...
...channel position to remove the symbol. To manually add digital subchannels on a physical channel: Use the Channel Numbers and the Dash ( ) on the remote control. however, they can create a custom label. 26 You will be able to enter the channel number (for example, 56-1). If the desired channel...will be unchecked. Labeling channels A list of presets, you will be able to manually enter/edit labels using the number keys on the remote control to view and assign these logos from the list of common channel labels (logos) for other channels. 6 To save your TV Setting ...
User Manual
Page 27
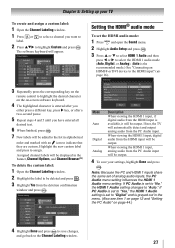
... custom label? Audio Setup PC Audio HDMI 1 Audio MTS Language Optical Output Format Dolby Digital Dynamic Range Control No Auto Stereo English Dolby Digital Compressed Reset Done Mode Auto Digital Analog Description When viewing the HDMI 1...7 8 T U V t u v 8 AMA1X00 Backspace 00 AMAXW Custom AMC Clear All ANIMAL Done 3 DEFd e f 3 6 MNOmn o 6 9 WX Y Z w x y z 9 INPUT Space 3 Repeatedly press the corresponding key on the remote control to highlight the desired character on the on page 44.) 27 Highlight the new custom label and press to the Channel Labeling window. If PC...
... custom label? Audio Setup PC Audio HDMI 1 Audio MTS Language Optical Output Format Dolby Digital Dynamic Range Control No Auto Stereo English Dolby Digital Compressed Reset Done Mode Auto Digital Analog Description When viewing the HDMI 1...7 8 T U V t u v 8 AMA1X00 Backspace 00 AMAXW Custom AMC Clear All ANIMAL Done 3 DEFd e f 3 6 MNOmn o 6 9 WX Y Z w x y z 9 INPUT Space 3 Repeatedly press the corresponding key on the remote control to highlight the desired character on the on page 44.) 27 Highlight the new custom label and press to the Channel Labeling window. If PC...
User Manual
Page 29
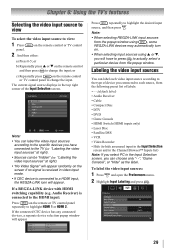
...at right). • "No Video Signal" will appear randomly on the screen if no signal is connected to the HDMI input: Press on the remote control or TV control panel. 2 And then either: a) Press 0-5; Audio Receiver) is received in the top right corner of labels: • - - (default ...• Hide (to actually select a particular device from the popup window using , some REGZA-LINK devices may automatically turn on the remote control and then press to highlight the desired input source, and then press . If the connected CEC device has any connected devices, a ...
...at right). • "No Video Signal" will appear randomly on the screen if no signal is connected to the HDMI input: Press on the remote control or TV control panel. 2 And then either: a) Press 0-5; Audio Receiver) is received in the top right corner of labels: • - - (default ...• Hide (to actually select a particular device from the popup window using , some REGZA-LINK devices may automatically turn on the remote control and then press to highlight the desired input source, and then press . If the connected CEC device has any connected devices, a ...
User Manual
Page 30
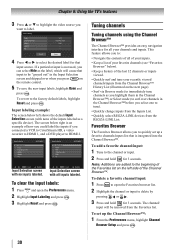
... contents of all of your inputs. • Keep a list of your favorite channels (see "Favorites Browser" below left side of the Favorites list on the remote control. 5 To save the new input labels, highlight Done and press . To delete a favorite channel/input: 1 Press to open the Preferences menu. 2 Highlight Input Labeling and...
... contents of all of your inputs. • Keep a list of your favorite channels (see "Favorites Browser" below left side of the Favorites list on the remote control. 5 To save the new input labels, highlight Done and press . To delete a favorite channel/input: 1 Press to open the Preferences menu. 2 Highlight Input Labeling and...

User Manual
Page 31
... Mode On On On On Off Reset Done 3 Press T to highlight History List, and then press W or X to select the setting you stop on the remote control. • Press to surf backward through the previously tuned 32 channels in the History List, the channels in the ANT/CABLE List, the inputs in...
... Mode On On On On Off Reset Done 3 Press T to highlight History List, and then press W or X to select the setting you stop on the remote control. • Press to surf backward through the previously tuned 32 channels in the History List, the channels in the ANT/CABLE List, the inputs in...
User Manual
Page 32
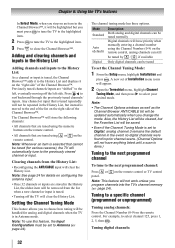
... listed until a scan is done.) Tuning to the next programmed channel To tune to the next programmed channel: Press or on the remote control or TV control panel. Press to select your desired mode. Clearing channels from the list when a new channel or input is tuned. • Turning...tuned channels/ inputs. A new set to a specific channel (programmed or unprogrammed) Tuning analog channels: Press the Channel Number (0-9) on the remote control. Setting the Channel Tuning Mode This feature allows you to choose how tuning will be handled for analog and digital channels when the TV is...
... listed until a scan is done.) Tuning to the next programmed channel To tune to the next programmed channel: Press or on the remote control or TV control panel. Press to select your desired mode. Clearing channels from the list when a new channel or input is tuned. • Turning...tuned channels/ inputs. A new set to a specific channel (programmed or unprogrammed) Tuning analog channels: Press the Channel Number (0-9) on the remote control. Setting the Channel Tuning Mode This feature allows you to choose how tuning will be handled for analog and digital channels when the TV is...


