
User Manual
Page 1
... Toshiba dealer about this TV. Model number: Serial number: 49.18S01.001 Note: To display a High Definition picture, the TV must be receiving a High Definition signal (such as an over-the-air High Definition TV broadcast, a High Definition digital cable program, or a High Definition digital satellite program). Owner's Manual Integrated High Definition LCD Television 19SL410U 24SL410U...
... Toshiba dealer about this TV. Model number: Serial number: 49.18S01.001 Note: To display a High Definition picture, the TV must be receiving a High Definition signal (such as an over-the-air High Definition TV broadcast, a High Definition digital cable program, or a High Definition digital satellite program). Owner's Manual Integrated High Definition LCD Television 19SL410U 24SL410U...
User Manual
Page 2
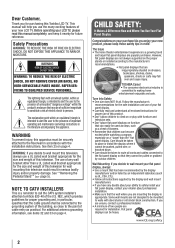
...fit all cords and cables connected to the flat panel display so that can easily be securely attached to the presence of this Toshiba LCD TV. See item 25 on page 4. NOTE TO CATV INSTALLERS This is intended to alert the user to the floor/wall in the... A Difference How and Where You Use Your Flat Panel Display Congratulations on or play with the installation instructions. TOSHIBA Cares! • The consumer electronics industry is appropriate. WARNING To prevent injury, this manual completely, and keep these safety tips in serious bodily injury and/or property damage. This...
...fit all cords and cables connected to the flat panel display so that can easily be securely attached to the presence of this Toshiba LCD TV. See item 25 on page 4. NOTE TO CATV INSTALLERS This is intended to alert the user to the floor/wall in the... A Difference How and Where You Use Your Flat Panel Display Congratulations on or play with the installation instructions. TOSHIBA Cares! • The consumer electronics industry is appropriate. WARNING To prevent injury, this manual completely, and keep these safety tips in serious bodily injury and/or property damage. This...
User Manual
Page 5
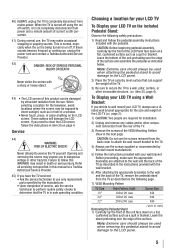
...for installation. 2) Unplug and remove any cables and/or other hazards. Service 44) WARNING: RISK OF ELECTRIC SHOCK! Failure to follow this manual to a Toshiba Authorized Service Provider. 45) If you need to clean the LCD screen, follow the instructions in item 35 on or off. Refer all...or blanket. Note: Extreme care should always be used when attaching the pedestal stand to avoid damage to the LCD panel. 2) Place the TV on a flat, cushioned surface such as described in the instructions provided with the pedestal. Before proceeding, make sure the appropriate bracket(s) are ...
...for installation. 2) Unplug and remove any cables and/or other hazards. Service 44) WARNING: RISK OF ELECTRIC SHOCK! Failure to follow this manual to a Toshiba Authorized Service Provider. 45) If you need to clean the LCD screen, follow the instructions in item 35 on or off. Refer all...or blanket. Note: Extreme care should always be used when attaching the pedestal stand to avoid damage to the LCD panel. 2) Place the TV on a flat, cushioned surface such as described in the instructions provided with the pedestal. Before proceeding, make sure the appropriate bracket(s) are ...
User Manual
Page 10
... NOT COVERED UNDER THE TOSHIBA WARRANTY. 3 Do not plug in a location where light does not reflect on the screen. • Place the TV far enough from walls and other devices. Secure the TV to a wall, pillar, or other immovable structure ( page 4). • Place the TV in any power cords...power cord for a few seconds then plug it back in the power cords for your TV and other objects to allow proper ventilation. Keep this manual for future reference. 2 Observe the following when choosing a location for the TV: • Read "Important notes about the remote control" ( page 21) for ...
... NOT COVERED UNDER THE TOSHIBA WARRANTY. 3 Do not plug in a location where light does not reflect on the screen. • Place the TV far enough from walls and other devices. Secure the TV to a wall, pillar, or other immovable structure ( page 4). • Place the TV in any power cords...power cord for a few seconds then plug it back in the power cords for your TV and other objects to allow proper ventilation. Keep this manual for future reference. 2 Observe the following when choosing a location for the TV: • Read "Important notes about the remote control" ( page 21) for ...
User Manual
Page 11
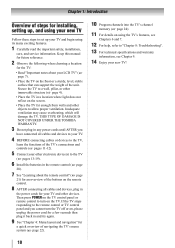
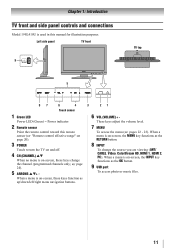
... a menu is on -screen, the MENU key functions as the RETURN button. 8 INPUT To change the channel (programmed channels only; Left side panel TV front TV top Touch sensor 1 Green LED Power LED (Green) = Power indicator 2 Remote sensor Point the remote control toward this remote sensor ( "Remote control ...effective range" on page 20). 3 POWER Touch to turn the TV on and off. 4 CH (CHANNEL) ST When no menu is used in this manual for illustration purposes. These keys adjust the volume level. 7 MENU To access the menu ( pages 22 - 23...
... a menu is on -screen, the MENU key functions as the RETURN button. 8 INPUT To change the channel (programmed channels only; Left side panel TV front TV top Touch sensor 1 Green LED Power LED (Green) = Power indicator 2 Remote sensor Point the remote control toward this remote sensor ( "Remote control ...effective range" on page 20). 3 POWER Touch to turn the TV on and off. 4 CH (CHANNEL) ST When no menu is used in this manual for illustration purposes. These keys adjust the volume level. 7 MENU To access the menu ( pages 22 - 23...
User Manual
Page 13
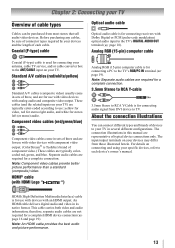
...receivers with Dolby Digital or PCM (pulse-code modulation) optical audio input to the TV's DIGITAL AUDIO OUT terminal ( page 18). Component video cables (red/green/blue) Component video cables come in this manual are typically color-coded according to each cable. Note: Component video cables provide better...; therefore, separate audio cables are required for a complete connection. 3.5mm Stereo to RCA Y-cable 3.5mm Stereo to RCA Y-Cable is Toshiba's brand of component video.) These cables are required for a complete HDMI device connection ( page 16 and page 19). For details on your...
...receivers with Dolby Digital or PCM (pulse-code modulation) optical audio input to the TV's DIGITAL AUDIO OUT terminal ( page 18). Component video cables (red/green/blue) Component video cables come in this manual are typically color-coded according to each cable. Note: Component video cables provide better...; therefore, separate audio cables are required for a complete connection. 3.5mm Stereo to RCA Y-cable 3.5mm Stereo to RCA Y-Cable is Toshiba's brand of component video.) These cables are required for a complete HDMI device connection ( page 16 and page 19). For details on your...
User Manual
Page 17
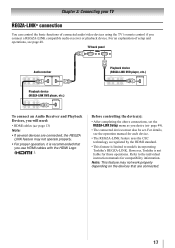
...8226; After completing the above connections, set . For details, see page 48. Refer to models incorporating Toshiba's REGZA-LINK. For an explanation of connected audio/video devices using the TV's remote control if you use HDMI cables with the HDMI Logo ( ). Note: This feature may not ... REGZA-LINK Setup menu as regulated by the HDMI standard. • This feature is limited to the individual instruction manuals for those operations. However, Toshiba is recommended that are connected, the REGZA LINK feature may not work properly depending on the devices that you connect...
...8226; After completing the above connections, set . For details, see page 48. Refer to models incorporating Toshiba's REGZA-LINK. For an explanation of connected audio/video devices using the TV's remote control if you use HDMI cables with the HDMI Logo ( ). Note: This feature may not ... REGZA-LINK Setup menu as regulated by the HDMI standard. • This feature is limited to the individual instruction manuals for those operations. However, Toshiba is recommended that are connected, the REGZA LINK feature may not work properly depending on the devices that you connect...

User Manual
Page 25
... however, once channel programming is finished, you can automatically detect all active channels in its memory. up your TV Programming channels automatically Your TV can manually add or erase individual channels in the onscreen display and press ). appears (as shown below.) Open the Terrestrial ... • The automatic channel programming process will automatically cycle through the channels, the message "Scanning channels, please wait..." While the TV is configured for Cable will appear, as shown above). 5 To cancel channel programming, press on the remote control. • ...
... however, once channel programming is finished, you can automatically detect all active channels in its memory. up your TV Programming channels automatically Your TV can manually add or erase individual channels in the onscreen display and press ). appears (as shown below.) Open the Terrestrial ... • The automatic channel programming process will automatically cycle through the channels, the message "Scanning channels, please wait..." While the TV is configured for Cable will appear, as shown above). 5 To cancel channel programming, press on the remote control. • ...
User Manual
Page 26
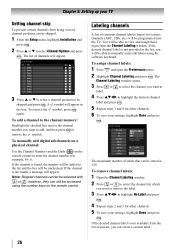
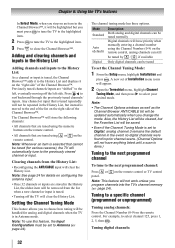
...a physical channel: Use the Channel Numbers and the Dash ( ) on the remote control to manually enter/edit labels using the number keys on the remote control. however, they can be programmed into the TV. Labeling channels A list of labels that can still be unchecked. If the desired channel label ...AMAXW AMC ANIMAL ANT/CABLE 16-1 A&E Press CH UP/DOWN to be able to select Channel Options and press . Chapter 5: Setting up your TV Setting channel skip To prevent certain channels from being viewed, channel positions can create a custom label. 26 To remove the symbol, press again. If...
...a physical channel: Use the Channel Numbers and the Dash ( ) on the remote control to manually enter/edit labels using the number keys on the remote control. however, they can be programmed into the TV. Labeling channels A list of labels that can still be unchecked. If the desired channel label ...AMAXW AMC ANIMAL ANT/CABLE 16-1 A&E Press CH UP/DOWN to be able to select Channel Options and press . Chapter 5: Setting up your TV Setting channel skip To prevent certain channels from being viewed, channel positions can create a custom label. 26 To remove the symbol, press again. If...
User Manual
Page 32
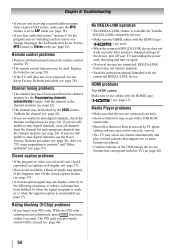
...be cleared, but the Favorites List will be removed from the History List: • Reconfiguring the ANT/CABLE input will not have priority when manually entering a channel number using or on the right side of Installation menu icons will appear. 2 Open the Terrestrial menu, highlight Channel Tuning Mode,...cannot be set of the Channel Browser™. Note: To use this feature, the Input Configuration must press to tune the TV to the highlighted item. 2 Press to tune the TV to the highlighted item. 3 Press to Antenna ( page 24). A new set to close the Channel Browser™. ...
...be cleared, but the Favorites List will be removed from the History List: • Reconfiguring the ANT/CABLE input will not have priority when manually entering a channel number using or on the right side of Installation menu icons will appear. 2 Open the Terrestrial menu, highlight Channel Tuning Mode,...cannot be set of the Channel Browser™. Note: To use this feature, the Input Configuration must press to tune the TV to the highlighted item. 2 Press to tune the TV to the highlighted item. 3 Press to Antenna ( page 24). A new set to close the Channel Browser™. ...

User Manual
Page 45
...1 Press STWX to move the highlight in one window. These pictures are three types of view modes. Toshiba cannot and does not grant such permission. • Depending on the side of the TV. A prompt will disappear after about 10 seconds. When you like to load before content is viewable. ...music files. • While the Media Player is active, the main menus cannot be displayed. Manually open the Media Player There are two methods for photos in a grid format. Chapter 6: Using the TV's features Note: • Gently insert the USB device into the port and do not remove ...
...1 Press STWX to move the highlight in one window. These pictures are three types of view modes. Toshiba cannot and does not grant such permission. • Depending on the side of the TV. A prompt will disappear after about 10 seconds. When you like to load before content is viewable. ...music files. • While the Media Player is active, the main menus cannot be displayed. Manually open the Media Player There are two methods for photos in a grid format. Chapter 6: Using the TV's features Note: • Gently insert the USB device into the port and do not remove ...

User Manual
Page 46
... the music is pressed, the next file will appear. 3 Select a music file and press to start playback. 4 Press to change the photo content manually. During playback • Press to select Off, All or 1. 3 Press . Press to move back to the previous layer. 3 With the desired ...8226; To resume normal playback, press . • To locate a specific file, press or repeatedly. • To adjust volume, press / . Chapter 6: Using the TV's features Single View In this allows you select a folder, press to move to view the previous/next photo. SlideShow This view allows you to stop...
... the music is pressed, the next file will appear. 3 Select a music file and press to start playback. 4 Press to change the photo content manually. During playback • Press to select Off, All or 1. 3 Press . Press to move back to the previous layer. 3 With the desired ...8226; To resume normal playback, press . • To locate a specific file, press or repeatedly. • To adjust volume, press / . Chapter 6: Using the TV's features Single View In this allows you select a folder, press to move to view the previous/next photo. SlideShow This view allows you to stop...
User Manual
Page 54
...Defaults procedure ( page 28). Replace the batteries ( page 20). • If the TV still does not act as music or a foreign language), the SAP mode may not operate properly. • Read the instruction manual furnished with the HDMI Logo ( ) are used. • When the connected REGZA-... to tune digital channels, clear all obstructions between the remote control and the TV. • The remote control batteries may select one format automatically and play it when contents that seems "incorrect" for Toshiba REGZA-LINK compatible devices. • Make sure the HDMI cables with the ...
...Defaults procedure ( page 28). Replace the batteries ( page 20). • If the TV still does not act as music or a foreign language), the SAP mode may not operate properly. • Read the instruction manual furnished with the HDMI Logo ( ) are used. • When the connected REGZA-... to tune digital channels, clear all obstructions between the remote control and the TV. • The remote control batteries may select one format automatically and play it when contents that seems "incorrect" for Toshiba REGZA-LINK compatible devices. • Make sure the HDMI cables with the ...
User Manual
Page 55
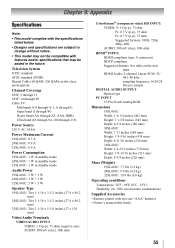
...Supplied Accessories • Remote control with features and/or specifications that may be compatible with two size "AAA" batteries • Owner's manual (this book) 55 Television System NTSC standard ATSC standard (8VSB) Digital Cable (64 QAM, 256 QAM; Chapter 9: Appendix Specifications ...through 13 UHF: 14 through 69 Cable TV: Mid band (A-8 through A-1, A through I) Super band (J through W) Hyper band (AA through ZZ, AAA, BBB) Ultra band (65 through 94, 100 through 135) Power Source 120 V AC, 60 Hz Power Maximum Current 19SL410U: 0.7 A 24SL410U: 0.9 A 32SL410U: 0.9 A Power Consumption...
...Supplied Accessories • Remote control with features and/or specifications that may be compatible with two size "AAA" batteries • Owner's manual (this book) 55 Television System NTSC standard ATSC standard (8VSB) Digital Cable (64 QAM, 256 QAM; Chapter 9: Appendix Specifications ...through 13 UHF: 14 through 69 Cable TV: Mid band (A-8 through A-1, A through I) Super band (J through W) Hyper band (AA through ZZ, AAA, BBB) Ultra band (65 through 94, 100 through 135) Power Source 120 V AC, 60 Hz Power Maximum Current 19SL410U: 0.7 A 24SL410U: 0.9 A 32SL410U: 0.9 A Power Consumption...


