User Manual
Page 5
...timer ...22 Setting the off timer ...23 Adjusting the picture quality ...24 Watching video input ...24 Specifying the ColorStream® setting ...24 Displaying on -screen display language 12 Adding channels to Toshiba...6 Exploring your new TV ...6 Selecting a location for the TV ...6 Connecting your ...the Remote Control Setting up your favorite channels 14 Using theV-Chip (parental control) feature (U.S. Important Safeguards Welcome to Toshiba Connecting your TV Important Safety Information 2-4 Welcome to the TV's memory ...13 Programming channels automatically 13 Adding and erasing...
...timer ...22 Setting the off timer ...23 Adjusting the picture quality ...24 Watching video input ...24 Specifying the ColorStream® setting ...24 Displaying on -screen display language 12 Adding channels to Toshiba...6 Exploring your new TV ...6 Selecting a location for the TV ...6 Connecting your ...the Remote Control Setting up your favorite channels 14 Using theV-Chip (parental control) feature (U.S. Important Safeguards Welcome to Toshiba Connecting your TV Important Safety Information 2-4 Welcome to the TV's memory ...13 Programming channels automatically 13 Adding and erasing...
User Manual
Page 6
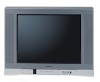
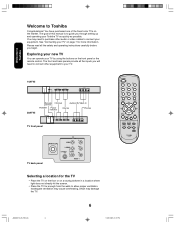
... the buttons on the market. Inadequate ventilation may cause overheating, which may need to connect other audio or video cables to your TV. 14AF45 20AF45 Remote Channel sensor Audio(L/R)/Video In POWER Power indicator Volume Phones TV front panel 16:9 TV back panel ANT (75Ω) IN Y VIDEO ... to guide you through setting up and operating your Toshiba TV as quickly as possible. The goal of the finest color TVs on the front panel or the remote control. Please read all the inputs you begin. The front and back panels provide all the safety and operating instructions ...
... the buttons on the market. Inadequate ventilation may cause overheating, which may need to connect other audio or video cables to your TV. 14AF45 20AF45 Remote Channel sensor Audio(L/R)/Video In POWER Power indicator Volume Phones TV front panel 16:9 TV back panel ANT (75Ω) IN Y VIDEO ... to guide you through setting up and operating your Toshiba TV as quickly as possible. The goal of the finest color TVs on the front panel or the remote control. Please read all the inputs you begin. The front and back panels provide all the safety and operating instructions ...
User Manual
Page 9
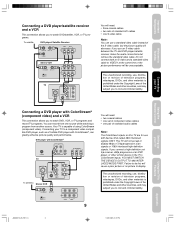
... videotapes, DVDs, and other materials is prohibited under the Copyright Laws of the United States and other similar device to the TV's ColorStream inputs, YOU MUST SWITCH THE DEVICE'S OUTPUT TO 480i INTERLACED MODE FIRST. Connecting your TV Connecting a DVD player with ColorStream® S-VIDEO ... receiver, 480p progressive scan DVD player, or other countries, and may subject you to civil and criminal liability. Important Safeguards Welcome to Toshiba Connecting a DVD player/satellite receiver and a VCR This connection allows you to watch DVD, VCR, or TV programs and record TV ...
... videotapes, DVDs, and other materials is prohibited under the Copyright Laws of the United States and other similar device to the TV's ColorStream inputs, YOU MUST SWITCH THE DEVICE'S OUTPUT TO 480i INTERLACED MODE FIRST. Connecting your TV Connecting a DVD player with ColorStream® S-VIDEO ... receiver, 480p progressive scan DVD player, or other countries, and may subject you to civil and criminal liability. Important Safeguards Welcome to Toshiba Connecting a DVD player/satellite receiver and a VCR This connection allows you to watch DVD, VCR, or TV programs and record TV ...

User Manual
Page 11
... on the batteries to the last viewed channel (page 14) MTS switches among STEREO, SAP, and MONO sound (page 26) TV/VIDEO selects the video input source (page 24) FAV L/M (Favorite Channels) cycle through programmed channels (page 13) VOLUME + / - Install two "AAA" size batteries. mental aspects of ... range becomes reduced, replace both batteries with new ones. • If the batteries are dead or if you will not be drawn to Toshiba Connecting your TV Using the TV's Features Appendix J3S00121A(E)_P07-13 11 13/01/2005, 5:41 PM Important Safeguards Welcome to the environ-...
... on the batteries to the last viewed channel (page 14) MTS switches among STEREO, SAP, and MONO sound (page 26) TV/VIDEO selects the video input source (page 24) FAV L/M (Favorite Channels) cycle through programmed channels (page 13) VOLUME + / - Install two "AAA" size batteries. mental aspects of ... range becomes reduced, replace both batteries with new ones. • If the batteries are dead or if you will not be drawn to Toshiba Connecting your TV Using the TV's Features Appendix J3S00121A(E)_P07-13 11 13/01/2005, 5:41 PM Important Safeguards Welcome to the environ-...
User Manual
Page 20
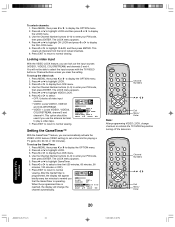
...Channel Numbers cd ab Exit Menu/ Enter Note: After programming VIDEO LOCK, change the channel automatically. The LOCK menu appears. 4. Locking video input With the VIDEO LOCK feature, you clear the setting. Press c or d to select a time limit (30 minutes, 60 minutes, 90... 3 and channel 4. Press MENU, then press a or b to highlight CLEAR, and then press ENTER. Press a or b to remind you can lock out the input sources (VIDEO1, VIDEO2, COLORSTREAM) and channels 3 and 4. After the GameTimer is operating. To set up the GameTimer: 1. Press a or b to highlight GameTimer....
...Channel Numbers cd ab Exit Menu/ Enter Note: After programming VIDEO LOCK, change the channel automatically. The LOCK menu appears. 4. Locking video input With the VIDEO LOCK feature, you clear the setting. Press c or d to select a time limit (30 minutes, 60 minutes, 90... 3 and channel 4. Press MENU, then press a or b to highlight CLEAR, and then press ENTER. Press a or b to remind you can lock out the input sources (VIDEO1, VIDEO2, COLORSTREAM) and channels 3 and 4. After the GameTimer is operating. To set up the GameTimer: 1. Press a or b to highlight GameTimer....

User Manual
Page 24
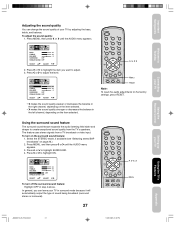
.../OFF TIMER COLORSTREAM SELECT START START START START OFF DVD DTV ADJUST Note: The factory setting is not HD ready. 1. To select the input mode: Press the TV/VIDEO button repeatedly to highlight DVD or DTV, depending on which device is connected. 5. To adjust the picture quality... and sharpness. CH PICTURE AUDIO SETUP OPTION CONTRAST BRIGHTNESS COLOR TINT SHARPNESS SELECT 64 32 32 0 32 ADJUST 2. Watching video input You can use the ColorStream (component video) input for connecting either a DVD player or a DTV receiver. Press c or d to the factory settings, press RESET. The ...
.../OFF TIMER COLORSTREAM SELECT START START START START OFF DVD DTV ADJUST Note: The factory setting is not HD ready. 1. To select the input mode: Press the TV/VIDEO button repeatedly to highlight DVD or DTV, depending on which device is connected. 5. To adjust the picture quality... and sharpness. CH PICTURE AUDIO SETUP OPTION CONTRAST BRIGHTNESS COLOR TINT SHARPNESS SELECT 64 32 32 0 32 ADJUST 2. Watching video input You can use the ColorStream (component video) input for connecting either a DVD player or a DTV receiver. Press c or d to the factory settings, press RESET. The ...
User Manual
Page 27
... sound feature The surround sound feature expands the audio listening field wider and deeper to create exceptional sound quality from a TV broadcast or video input. The feature uses stereo signals from the TV's speakers. Press MENU, and then press a or b until the AUDIO menu appears. CH.... To adjust the sound quality: 1. c d a b Menu Reset Note: To reset the audio adjustments to adjust the level. Important Safeguards Welcome to Toshiba Connecting your TV Using the Remote Control Adjusting the sound quality You can leave your TV in surround mode because it will automatically output the...
... sound feature The surround sound feature expands the audio listening field wider and deeper to create exceptional sound quality from a TV broadcast or video input. The feature uses stereo signals from the TV's speakers. Press MENU, and then press a or b until the AUDIO menu appears. CH.... To adjust the sound quality: 1. c d a b Menu Reset Note: To reset the audio adjustments to adjust the level. Important Safeguards Welcome to Toshiba Connecting your TV Using the Remote Control Adjusting the sound quality You can leave your TV in surround mode because it will automatically output the...
User Manual
Page 29
...• This TV will not accept or display 480p or 720p progressive scan signals or 1080i interlaced high-definition signals through its ColorStream inputs. Press the MTS button on the remote control until STEREO (or MONO) mode is active. • Check the antenna connections....remote control until STEREO (or MONO) mode is active. • The station may have broadcast difficulties. Important Safeguards Welcome to Toshiba Connecting your TV Using the Remote Control Appendix Troubleshooting Before calling a service technician, please check the following table for several hours before...
...• This TV will not accept or display 480p or 720p progressive scan signals or 1080i interlaced high-definition signals through its ColorStream inputs. Press the MTS button on the remote control until STEREO (or MONO) mode is active. • Check the antenna connections....remote control until STEREO (or MONO) mode is active. • The station may have broadcast difficulties. Important Safeguards Welcome to Toshiba Connecting your TV Using the Remote Control Appendix Troubleshooting Before calling a service technician, please check the following table for several hours before...
User Manual
Page 30
... Video/Audio terminals Dimensions Weight Supplied accessories 14AF45 20AF45 14 in. (357 mm) diagonal 20 in. (508 mm) diagonal (Screen size is approximate.) (Screen size is approximate.) NTSC standard VHF: 2-13 UHF: 14-69 Cable TV: 4A, A-5-A-1, A-I, J-W, W+1-W+84 120V AC, 60 Hz 80 W 105 W 2.5 W + 2.5 W 1-5/8 in . S-VIDEO INPUT Y-INPUT: 1V (p-p), 75 ohm, negative sync.
... Video/Audio terminals Dimensions Weight Supplied accessories 14AF45 20AF45 14 in. (357 mm) diagonal 20 in. (508 mm) diagonal (Screen size is approximate.) (Screen size is approximate.) NTSC standard VHF: 2-13 UHF: 14-69 Cable TV: 4A, A-5-A-1, A-I, J-W, W+1-W+84 120V AC, 60 Hz 80 W 105 W 2.5 W + 2.5 W 1-5/8 in . S-VIDEO INPUT Y-INPUT: 1V (p-p), 75 ohm, negative sync.


