User Guide
Page 1
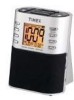
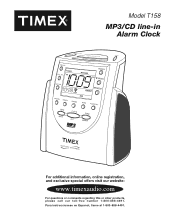
Model T158 MP3/CD line-in Alarm Clock For additional information, online registration, and exclusive special offers visit our website: www.timexaudio.com For questions or comments regarding this or other products, please call our toll-free number 1-800-888-4491. Para instruccionese en Espanol, llame al 1-800-888-4491.
Model T158 MP3/CD line-in Alarm Clock For additional information, online registration, and exclusive special offers visit our website: www.timexaudio.com For questions or comments regarding this or other products, please call our toll-free number 1-800-888-4491. Para instruccionese en Espanol, llame al 1-800-888-4491.
User Guide
Page 5
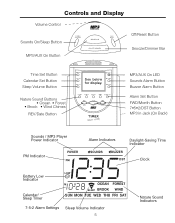
...;5•2/DST Button MP3 in Jack (On Back) Sounds / MP3 Player Power Indicator PM Indicator POWER Alarm Indicators Daylight-Saving Time Indicator SOUNDS BUZZER DST Clock Battery Low Indicator LOW M D Calendar/ Sleep Timer SUN MON TUE WED THU FRI SAT 7-5-2 Alarm Settings Sleep Volume Indicator 5 Nature Sound Indicators Controls and Display...
...;5•2/DST Button MP3 in Jack (On Back) Sounds / MP3 Player Power Indicator PM Indicator POWER Alarm Indicators Daylight-Saving Time Indicator SOUNDS BUZZER DST Clock Battery Low Indicator LOW M D Calendar/ Sleep Timer SUN MON TUE WED THU FRI SAT 7-5-2 Alarm Settings Sleep Volume Indicator 5 Nature Sound Indicators Controls and Display...

User Guide
Page 6
...If this happens you must follow the instructions again from the carton. This will stop flashing. Remove the unit and all set alarms will maintain clock and alarm settings for a prolonged period, such as shown within approximately 8 seconds, the display will assist you do not press the appropriate ..., water, moisture, vibration, and strong magnetic fields. 3. Remember to be used for the life of the time digits (there is restored, the clock will cease using battery power, and will begin counting at the set the correct AM or PM. When power is no AM indicator). 3. Using ...
...If this happens you must follow the instructions again from the carton. This will stop flashing. Remove the unit and all set alarms will maintain clock and alarm settings for a prolonged period, such as shown within approximately 8 seconds, the display will assist you do not press the appropriate ..., water, moisture, vibration, and strong magnetic fields. 3. Remember to be used for the life of the time digits (there is restored, the clock will cease using battery power, and will begin counting at the set the correct AM or PM. When power is no AM indicator). 3. Using ...
User Guide
Page 7
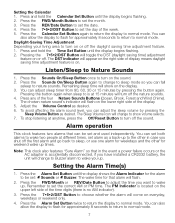
...display means daylight saving time adjustment feature is on or off the first alarm and go back to wake you up times. Note: This clock also features "Sure Alarm" so that in case you shut off . Press the 7•5•2/DST Button to Nature Sounds 1. Listen/.... The PM Indicator is no AM indicator). 3. Setting the Calendar 1. Pressing the 7•5•2/DST Button will flash. 2. Alarm operation This clock features two alarms that alarm will toggle the DST (daylight saving time) adjustment feature on . Press and hold the Calendar Set Button until the ...
...display means daylight saving time adjustment feature is on or off the first alarm and go back to wake you up times. Note: This clock also features "Sure Alarm" so that in case you shut off . Press the 7•5•2/DST Button to Nature Sounds 1. Listen/.... The PM Indicator is no AM indicator). 3. Setting the Calendar 1. Pressing the 7•5•2/DST Button will flash. 2. Alarm operation This clock features two alarms that alarm will toggle the DST (daylight saving time) adjustment feature on . Press and hold the Calendar Set Button until the ...
Operation Manual
Page 1
Model T307 Preset Tuning Clock Radio with MP3 line-in and Nature Sounds
Model T307 Preset Tuning Clock Radio with MP3 line-in and Nature Sounds
Operation Manual
Page 4
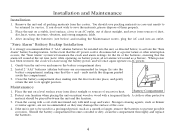
In the event that the alarm will maintain the clock and alarm settings for longer life) into an outlet. Install 2 "AAA" batteries (alkaline batteries are not recommended, as a month or longer, remove the batteries to ... It is disconnected or a power failure or other protective material should save the materials, please dispose of the case. 4. When power has been restored, the clock will cease using the battery power, and will sound as directed below ) and reading the Maintenance notes, plug the AC cord into the battery compartment...
In the event that the alarm will maintain the clock and alarm settings for longer life) into an outlet. Install 2 "AAA" batteries (alkaline batteries are not recommended, as a month or longer, remove the batteries to ... It is disconnected or a power failure or other protective material should save the materials, please dispose of the case. 4. When power has been restored, the clock will cease using the battery power, and will sound as directed below ) and reading the Maintenance notes, plug the AC cord into the battery compartment...
Operation Manual
Page 6
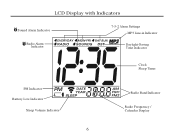
LCD Display with Indicators Sound Alarm Indicator Radio Alarm Indicator 7-5-2 Alarm Settings MP3 Line-in Indicator Daylight-Saving Time Indicator Clock Sleep Timer PM Indicator Battery Low Indicator Sleep Volume Indicator 6 Radio Band Indicator Radio Frequency / Calendar Display
LCD Display with Indicators Sound Alarm Indicator Radio Alarm Indicator 7-5-2 Alarm Settings MP3 Line-in Indicator Daylight-Saving Time Indicator Clock Sleep Timer PM Indicator Battery Low Indicator Sleep Volume Indicator 6 Radio Band Indicator Radio Frequency / Calendar Display
Operation Manual
Page 7
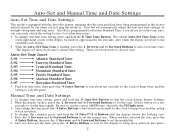
... the flashing year. 5. To change the calendar, press and hold the 8 Time Zone Button. While the Auto-Set Time Zone is programmed for the clock to beep twice and the setting to lock into place. After setting the time, press the 4 Enter Button or wait about ten seconds for Eastern... factory and will revert to set the current year. The display will automatically adjust the time and date settings for a few seconds to the standard clock display. 2. Be sure to set the correct AM/PM time, shown by the PM Indicator. 3. To change your time setting, press and hold the J...
... the flashing year. 5. To change the calendar, press and hold the 8 Time Zone Button. While the Auto-Set Time Zone is programmed for the clock to beep twice and the setting to lock into place. After setting the time, press the 4 Enter Button or wait about ten seconds for Eastern... factory and will revert to set the current year. The display will automatically adjust the time and date settings for a few seconds to the standard clock display. 2. Be sure to set the correct AM/PM time, shown by the PM Indicator. 3. To change your time setting, press and hold the J...
Operation Manual
Page 8
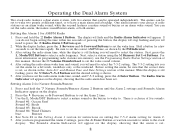
... 7-5-2 setting, press the 4 Enter Button. Hold a button for a full week, weekdays only, or the weekend. First, press the L Mode/DST Button to the clock display. After setting the radio alarm wake time and sound, you will need to . The 7-5-2 setting lets you have a main alarm and a backup. Press the...the L Mode/DST Button to select a nature sound or the buzzer to wake to select the 7-5-2 setting. Operating the Dual Alarm System This clock radio features a dual alarm system, with two alarms that the correct date is set, as shown in the Setting Alarm 1 section for Alarm 2. 5.
... 7-5-2 setting, press the 4 Enter Button. Hold a button for a full week, weekdays only, or the weekend. First, press the L Mode/DST Button to the clock display. After setting the radio alarm wake time and sound, you will need to . The 7-5-2 setting lets you have a main alarm and a backup. Press the...the L Mode/DST Button to select a nature sound or the buzzer to wake to select the 7-5-2 setting. Operating the Dual Alarm System This clock radio features a dual alarm system, with two alarms that the correct date is set, as shown in the Setting Alarm 1 section for Alarm 2. 5.
Operation Manual
Page 9
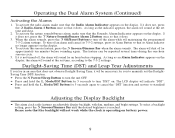
...battery power. 9 To activate the snooze feature, press the 5 Snooze/Dimmer Bar when the alarm sounds. Adjusting the Display Backlight • This alarm clock radio features an adjustable display backlight, with dim, medium, and bright settings. When the alarm sounds, press the 3 Off/Reset Button to the ...programmed 7-5-2 alarm settings. If it does not, press the 2 Radio Alarm 1 Button once so that the backlight will not work while the clock is operating on the display, the alarm will be repeated several times during the one-hour snooze cycle. 5. The feature can be necessary for...
...battery power. 9 To activate the snooze feature, press the 5 Snooze/Dimmer Bar when the alarm sounds. Adjusting the Display Backlight • This alarm clock radio features an adjustable display backlight, with dim, medium, and bright settings. When the alarm sounds, press the 3 Off/Reset Button to the ...programmed 7-5-2 alarm settings. If it does not, press the 2 Radio Alarm 1 Button once so that the backlight will not work while the clock is operating on the display, the alarm will be repeated several times during the one-hour snooze cycle. 5. The feature can be necessary for...
Operation Manual
Page 10
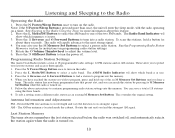
... the station you find a station to turn on . 5. The radio will show which band is turned on the radio. 2. Programming Radio Station Settings This Alarm Clock Radio features a total of the two FM bands. The radio station has now been programmed into the memory. Press the 1 Reverse and 6 Forward Buttons to...
... the station you find a station to turn on . 5. The radio will show which band is turned on the radio. 2. Programming Radio Station Settings This Alarm Clock Radio features a total of the two FM bands. The radio station has now been programmed into the memory. Press the 1 Reverse and 6 Forward Buttons to...
Operation Manual
Page 11
... time. Press the N Power/Sleep Button once to turn off . The sleep timer setting remains active for approximately ten seconds before returning to the standard clock display. Adjusting the sleep volume will also adjust the sleep volume. 5. The radio will show the current sleep volume level. Sleeping to a comfortable level without...
... time. Press the N Power/Sleep Button once to turn off . The sleep timer setting remains active for approximately ten seconds before returning to the standard clock display. Adjusting the sleep volume will also adjust the sleep volume. 5. The radio will show the current sleep volume level. Sleeping to a comfortable level without...


