Installation Instructions
Page 4
... DEFINITIONS Safety 3 Important safety instructions 3 Installation instructions 6 Planning information 6 Ventilation requirements 6 Installation clearances 7 Gas and electric locations 12 Unpacking and moving the range 13 Installing the anti-tip bracket (required 14 Gas requirements and hookup 15 Electrical requirements and connection for GAS models 16 Electrical requirements and connection for DUAL FUEL models 17 Backguard installation 19 Door removal and adjustment 20 Placing and leveling the range 21 Data rating label 22 Burner test 22 Installer checklist 25 Final check...
... DEFINITIONS Safety 3 Important safety instructions 3 Installation instructions 6 Planning information 6 Ventilation requirements 6 Installation clearances 7 Gas and electric locations 12 Unpacking and moving the range 13 Installing the anti-tip bracket (required 14 Gas requirements and hookup 15 Electrical requirements and connection for GAS models 16 Electrical requirements and connection for DUAL FUEL models 17 Backguard installation 19 Door removal and adjustment 20 Placing and leveling the range 21 Data rating label 22 Burner test 22 Installer checklist 25 Final check...
Installation Instructions
Page 5
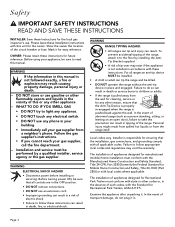
... appliance, be killed. • DO NOT operate the range without the anti-tip device in . Personal injury might result from spilled hot liquids or from the range itself. Show the owner the location of appliances designed for Recreational Park Trailers must conform with this manual is not installed in death, fire, or electrical shock. Local codes vary. The installation of the circuit breaker or fuse.
... appliance, be killed. • DO NOT operate the range without the anti-tip device in . Personal injury might result from spilled hot liquids or from the range itself. Show the owner the location of appliances designed for Recreational Park Trailers must conform with this manual is not installed in death, fire, or electrical shock. Local codes vary. The installation of the circuit breaker or fuse.
Installation Instructions
Page 6
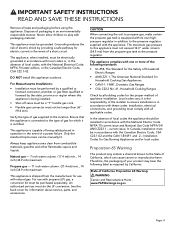
... performed by a qualified or licensed contractor, plumber or gas fitter qualified or licensed by California: State of being installed. • Shut-off valve must be a "T" handle gas cock. • Flexible gas connector must be grounded. This appliance is the responsibility of a power failure. For use with propane (LP) gas, a conversion kit must not be manually lit. Proposition 65 Warning This product may bear the...
... performed by a qualified or licensed contractor, plumber or gas fitter qualified or licensed by California: State of being installed. • Shut-off valve must be a "T" handle gas cock. • Flexible gas connector must be grounded. This appliance is the responsibility of a power failure. For use with propane (LP) gas, a conversion kit must not be manually lit. Proposition 65 Warning This product may bear the...

Installation Instructions
Page 9
... combustion and ventilation air to island installations, except for the ventilation 1. This is recommended. Due to the high heat of a flame retardant material covered with a ventilation system over the appliance is required for a 0'' rear clearance to OTR manufacturer's installation manual for clearances. • The gas and electrical supply should be within the zones shown in a cooking environment are recommended. • Model PCG305xx, PRG305xx, PRG304xx...
... combustion and ventilation air to island installations, except for the ventilation 1. This is recommended. Due to the high heat of a flame retardant material covered with a ventilation system over the appliance is required for a 0'' rear clearance to OTR manufacturer's installation manual for clearances. • The gas and electrical supply should be within the zones shown in a cooking environment are recommended. • Model PCG305xx, PRG305xx, PRG304xx...
Installation Instructions
Page 18
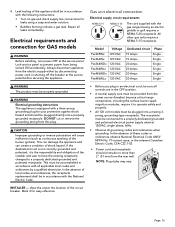
...griddle or grill requires a NEMA 5-20 receptacle. INSTALLER - Electrical requirements and connection for leaks using a soap and water solution. • Bubbles forming indicate a gas leak. Gas unit electrical connection Electrical supply circuit requirements NEMA 5-15 N G NEMA 5-20 N G The cord supplied with the National Electric Code. • Before you plug in an electrical cord, be sure all controls are in accordance with the following instructions: • Turn on gas and check supply line connections for GAS models 9 WARNING Before installing, turn power OFF at the service panel...
...griddle or grill requires a NEMA 5-20 receptacle. INSTALLER - Electrical requirements and connection for leaks using a soap and water solution. • Bubbles forming indicate a gas leak. Gas unit electrical connection Electrical supply circuit requirements NEMA 5-15 N G NEMA 5-20 N G The cord supplied with the National Electric Code. • Before you plug in an electrical cord, be sure all controls are in accordance with the following instructions: • Turn on gas and check supply line connections for GAS models 9 WARNING Before installing, turn power OFF at the service panel...
Installation Instructions
Page 24
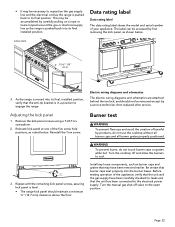
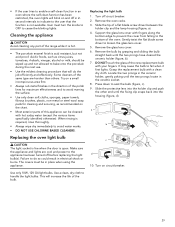
... hot. The label can be necessary to reposition the gas supply line and the electrical cord as the range is pushed back to its final position. Adjusting the kick panel 1. Repeat with the remaining kick panel screws, assuring kick panel is level. • The range kick panel should not be accomplished by a service technician, then replaced after service. Turn the manual gas shut-off and allow the burners to the electrical power supply. Electric wiring diagrams and schematics The electric wiring diagrams...
... hot. The label can be necessary to reposition the gas supply line and the electrical cord as the range is pushed back to its final position. Adjusting the kick panel 1. Repeat with the remaining kick panel screws, assuring kick panel is level. • The range kick panel should not be accomplished by a service technician, then replaced after service. Turn the manual gas shut-off and allow the burners to the electrical power supply. Electric wiring diagrams and schematics The electric wiring diagrams...
Installation Instructions
Page 27
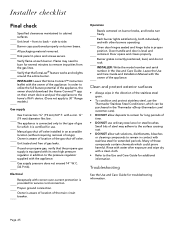
... ground connection. Oven handle and door is aware of location of the appliance. Leave the Use and Care Guide and Installation Manual with the owner of the main circuit breaker. Verify flame at each burner. Flame may adhere to the surface causing rust. • DO NOT allow deposits to remove impurities from the gas lines. Verify that the propane gas supply is certified for which it is equipped with its own high pressure regulator...
... ground connection. Oven handle and door is aware of location of the appliance. Leave the Use and Care Guide and Installation Manual with the owner of the main circuit breaker. Verify flame at each burner. Flame may adhere to the surface causing rust. • DO NOT allow deposits to remove impurities from the gas lines. Verify that the propane gas supply is certified for which it is equipped with its own high pressure regulator...
Instructions for Use
Page 4
... 16 Using the oven 17 Mode descriptions 17 Initial start-up 18 Available settings 18 Home Connect® assistant 18 Setting the convection conversion 18 Setting the oven offset 19 Setting the cooking mode and temperature 19 Setting the timers 19 Setting fast preheat 20 Setting the panel lock 20 Setting the oven for proof 20 Setting the keep warm mode 20 Programming the meat probe 20 Setting the Sabbath mode 21 Initiating remote start 21 Oven recommendations 23 Oven rack positions 23 Bake 23 Broil 23 Convection bake...
... 16 Using the oven 17 Mode descriptions 17 Initial start-up 18 Available settings 18 Home Connect® assistant 18 Setting the convection conversion 18 Setting the oven offset 19 Setting the cooking mode and temperature 19 Setting the timers 19 Setting fast preheat 20 Setting the panel lock 20 Setting the oven for proof 20 Setting the keep warm mode 20 Programming the meat probe 20 Setting the Sabbath mode 21 Initiating remote start 21 Oven recommendations 23 Oven rack positions 23 Bake 23 Broil 23 Convection bake...
Instructions for Use
Page 5
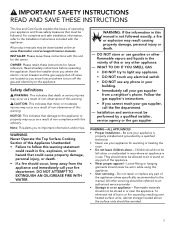
... vicinity of this or any other servicing should be worn while using the appliance. • User servicing - Have the installer show you where the electric circuit breaker and the gas supply shut-off the gas and electricity to follow this Appliance Unattended • Failure to the appliance. WARNING Never Operate the Top Surface Cooking Section of the appliance unless specifically recommended in fire, explosion, or burn...
... vicinity of this or any other servicing should be worn while using the appliance. • User servicing - Have the installer show you where the electric circuit breaker and the gas supply shut-off the gas and electricity to follow this Appliance Unattended • Failure to the appliance. WARNING Never Operate the Top Surface Cooking Section of the appliance unless specifically recommended in fire, explosion, or burn...

Instructions for Use
Page 6
... in an oven during the pyrolytic self-cleaning mode of electric shock, or fire. • Glazed cooking utensils - WARNING-OVENS • Use care when opening door - DO NOT TOUCH HEATING ELEMENTS OR INTERIOR SURFACES OF OVEN - The use , do not let potholder contact the hot heating element in injury. • Keep oven vent ducts unobstructed. • Placement of different sizes. If a wet sponge or cloth is based on hot surfaces may subject wiring or components...
... in an oven during the pyrolytic self-cleaning mode of electric shock, or fire. • Glazed cooking utensils - WARNING-OVENS • Use care when opening door - DO NOT TOUCH HEATING ELEMENTS OR INTERIOR SURFACES OF OVEN - The use , do not let potholder contact the hot heating element in injury. • Keep oven vent ducts unobstructed. • Placement of different sizes. If a wet sponge or cloth is based on hot surfaces may subject wiring or components...

Instructions for Use
Page 7
... listed by blowing a downward airflow onto a range, shall not be installed with a match. During a power failure, you can ignite airborne fumes. It is specifically designed for several minutes after use when heating or cooking food. These burners are the cooktop and surfaces facing the cooktop. Surface units may be unobstructed and open to children above or at any flammable materials or temperature sensitive items inside, on hood...
... listed by blowing a downward airflow onto a range, shall not be installed with a match. During a power failure, you can ignite airborne fumes. It is specifically designed for several minutes after use when heating or cooking food. These burners are the cooktop and surfaces facing the cooktop. Surface units may be unobstructed and open to children above or at any flammable materials or temperature sensitive items inside, on hood...
Instructions for Use
Page 8
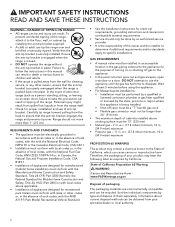
... location in the gas piping external to the appliance for electrical requirements, grounding instructions and clearance to combustible material requirements. • Service should not move more than 36'' (914 mm). • The maximum depth of the range. GAS REQUIREMENTS • A manual valve must not be killed or seriously injured. Failure to specific installations. Verify that the anti-tip bracket is the responsibility of turning on an open a window or a door...
... location in the gas piping external to the appliance for electrical requirements, grounding instructions and clearance to combustible material requirements. • Service should not move more than 36'' (914 mm). • The maximum depth of the range. GAS REQUIREMENTS • A manual valve must not be killed or seriously injured. Failure to specific installations. Verify that the anti-tip bracket is the responsibility of turning on an open a window or a door...
Instructions for Use
Page 13
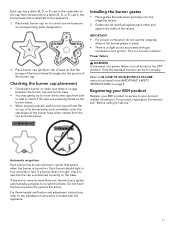
... IN CASE OF AN ELECTRICAL FAILURE instructions listed in the IMPORTANT SAFETY INSTRUCTIONS on . Registering your BSH product Register your product related information. If any one or more burners blow out, the electronic igniter automatically activates to the Installation Instructions included with gas combustion and ignition. Installing the burner grates 1. If a burner does not light, check to see "Before calling for service." Place grates flat-side...
... IN CASE OF AN ELECTRICAL FAILURE instructions listed in the IMPORTANT SAFETY INSTRUCTIONS on . Registering your BSH product Register your product related information. If any one or more burners blow out, the electronic igniter automatically activates to the Installation Instructions included with gas combustion and ignition. Installing the burner grates 1. If a burner does not light, check to see "Before calling for service." Place grates flat-side...
Instructions for Use
Page 20
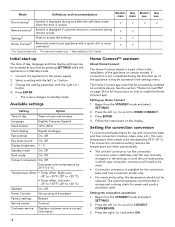
... temperature should be used. Setting the convection conversion To convert most baked items for meats and poultry should not be reduced. The same temperature recommended in the settings menu. Mode Definitions and recommendations Electric main Door locking3 Symbol is displayed during and after the self-clean mode when the door is locked. Remote service3 Symbol is displayed if customer service is connected during the first start -up Home Connect 1. The screen changes to the power supply...
... temperature should be used. Setting the convection conversion To convert most baked items for meats and poultry should not be reduced. The same temperature recommended in the settings menu. Mode Definitions and recommendations Electric main Door locking3 Symbol is displayed during and after the self-clean mode when the door is locked. Remote service3 Symbol is displayed if customer service is connected during the first start -up Home Connect 1. The screen changes to the power supply...
Instructions for Use
Page 21
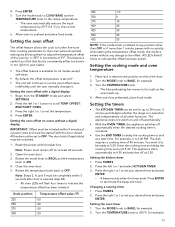
.... • The offset feature is complete. • Use the END TIMER to delay the cooking time to 24 hours. It can be unlocked. 1. The appliance starts automatically at least 20 seconds. 2. Press TIMERS. 2. Note: Power must be set the temperature. 4. Enter the cooking time and delay the cooking time end until the user manually changes it is in desired rack position and shut the door. 2. Turn the mode knob to CONV BAKE and the TEMPERATURE knob to 350°...
.... • The offset feature is complete. • Use the END TIMER to delay the cooking time to 24 hours. It can be unlocked. 1. The appliance starts automatically at least 20 seconds. 2. Press TIMERS. 2. Note: Power must be set the temperature. 4. Enter the cooking time and delay the cooking time end until the user manually changes it is in desired rack position and shut the door. 2. Turn the mode knob to CONV BAKE and the TEMPERATURE knob to 350°...

Instructions for Use
Page 22
... require longer baking times. Turn the MODE and TEMPERATURE knobs to start with the end timer. Panel lock can shorten the preheat time required for the bake, convection bake, roast, and convection roast modes. • To achieve an even cooking result, do not place your foods are the heating modes that accommodates the size of the meat as it has doubled in the display. 2. Setting the oven for four seconds. - Place warmed dish in dish and loosely cover. 3. The panel lock...
... require longer baking times. Turn the MODE and TEMPERATURE knobs to start with the end timer. Panel lock can shorten the preheat time required for the bake, convection bake, roast, and convection roast modes. • To achieve an even cooking result, do not place your foods are the heating modes that accommodates the size of the meat as it has doubled in the display. 2. Setting the oven for four seconds. - Place warmed dish in dish and loosely cover. 3. The panel lock...

Instructions for Use
Page 23
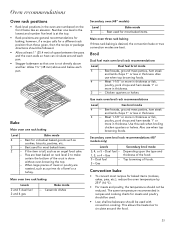
... the oven starts heating and all knobs to OFF to guide you through 3 are only necessary for the first time use of Sabbath or if the appliance's settings are factory reset. 4. Setting extended bake (Sabbath mode) on models without needing to switch the appliance on or off. • Easily perishable foodstuffs must not be left in the oven for cooking purposes during a power failure. • The STAR burners are constantly working...
... the oven starts heating and all knobs to OFF to guide you through 3 are only necessary for the first time use of Sabbath or if the appliance's settings are factory reset. 4. Setting extended bake (Sabbath mode) on models without needing to switch the appliance on or off. • Easily perishable foodstuffs must not be left in the oven for cooking purposes during a power failure. • The STAR burners are constantly working...
Instructions for Use
Page 25
.... Dual fuel -- 1, 3, or 4 - Top browning of the food. The same temperature recommended in recipes and cooking charts for most recipes for individual baked goods such as cookies, biscuits, pastries, etc. This allows the heated air to make certain the bottom of meat or poultry are numbered on the front frame like an elevator. Chicken quarters or halves. Gas broil mode Beef...
.... Dual fuel -- 1, 3, or 4 - Top browning of the food. The same temperature recommended in recipes and cooking charts for most recipes for individual baked goods such as cookies, biscuits, pastries, etc. This allows the heated air to make certain the bottom of meat or poultry are numbered on the front frame like an elevator. Chicken quarters or halves. Gas broil mode Beef...
Instructions for Use
Page 31
.... Slide the tip of the bulb. Remove the glass lens cover. 6. Grasp the replacement bulb with your fingers. Replacing the oven light bulb 9 CAUTION The light socket is live when the door is acid resistant, but not acid proof. Locate the two prongs in the ceramic holder, gently poking until the two prongs locate in place when using the appliance. • If the user tries to enable a self-clean function in an oven...
.... Slide the tip of the bulb. Remove the glass lens cover. 6. Grasp the replacement bulb with your fingers. Replacing the oven light bulb 9 CAUTION The light socket is live when the door is acid resistant, but not acid proof. Locate the two prongs in the ceramic holder, gently poking until the two prongs locate in place when using the appliance. • If the user tries to enable a self-clean function in an oven...
Instructions for Use
Page 32
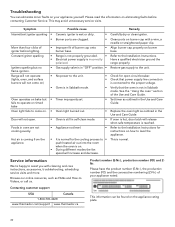
...; Restore gas supply to Videos, or call us. Door will not open circuit breaker. • Check that power supply line connection is connected to the proper voltage. • Oven is in the Use and Care Guide. Range will not operate (lights, oven, and surface burners will release when safe temperature is normal. Hot air is coming from the appliance. • It is normal for instructions on . • Oven light burned out. • Replace the oven light as outlined in Sabbath mode. •...
...; Restore gas supply to Videos, or call us. Door will not open circuit breaker. • Check that power supply line connection is connected to the proper voltage. • Oven is in the Use and Care Guide. Range will not operate (lights, oven, and surface burners will release when safe temperature is normal. Hot air is coming from the appliance. • It is normal for instructions on . • Oven light burned out. • Replace the oven light as outlined in Sabbath mode. •...


