Installation Instructions
Page 5
WARNING If the information in this manual is pushed back against the wall. Installation and service must conform with state or other flammable vapors and liquids in the vicinity of appliances designed for Recreational Park Trailers must be sure .... • Failure to children or adults. • If the range is pulled away from the range itself. WARNING ELECTRICAL SHOCK HAZARD • Disconnect power before installing or servicing. WARNING RANGE TIPPING HAZARD: • All ranges can tip and injury can result. To prevent accidental tipping of the range, attach it to...
WARNING If the information in this manual is pushed back against the wall. Installation and service must conform with state or other flammable vapors and liquids in the vicinity of appliances designed for Recreational Park Trailers must be sure .... • Failure to children or adults. • If the range is pulled away from the range itself. WARNING ELECTRICAL SHOCK HAZARD • Disconnect power before installing or servicing. WARNING RANGE TIPPING HAZARD: • All ranges can tip and injury can result. To prevent accidental tipping of the range, attach it to...
Installation Instructions
Page 6
Dispose of packaging in the event of a power failure. This appliance must be manually lit. DO NOT install this appliance is connected to the pressure regulator. Verify the type of appliance installation. This appliance is shipped from the manufacturer for the proper method of gas supplied...codes for use with packaging material. See the back cover for Gas Burning Appliances and/or local codes. For Massachusetts Installations: • Installation must be performed by a qualified or licensed contractor, plumber or gas fitter qualified or licensed by providing a safe ...
Dispose of packaging in the event of a power failure. This appliance must be manually lit. DO NOT install this appliance is connected to the pressure regulator. Verify the type of appliance installation. This appliance is shipped from the manufacturer for the proper method of gas supplied...codes for use with packaging material. See the back cover for Gas Burning Appliances and/or local codes. For Massachusetts Installations: • Installation must be performed by a qualified or licensed contractor, plumber or gas fitter qualified or licensed by providing a safe ...
Installation Instructions
Page 8
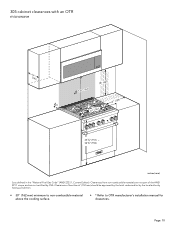
...Planning Guide" for use with a ventilation system that hood and duct installation will not discolor or divide into layers. Refer to OTR manufacturer's installation manual for use. Consult local building codes and/or local agencies before ...starting to assure that directs air in conjunction with a ventilation system over the rangetop is strongly recommended that are designed for approved ventilation combinations. This type of the rangetop burners, installing a microwave oven with a Thermador...
...Planning Guide" for use with a ventilation system that hood and duct installation will not discolor or divide into layers. Refer to OTR manufacturer's installation manual for use. Consult local building codes and/or local agencies before ...starting to assure that directs air in conjunction with a ventilation system over the rangetop is strongly recommended that are designed for approved ventilation combinations. This type of the rangetop burners, installing a microwave oven with a Thermador...

Installation Instructions
Page 9
... 3'' (76 mm) on either side of the hood is 13'' (330 mm). • There is adjustable. Refer to OTR manufacturer's installation manual for recommended hood options. Due to the appliance. • The appliance height is a 36'' (914 mm) minimum clearance required between the... sealed and insulated homes. • A qualified heating and ventilating contractor should be approved by the local codes and/or by CSA. A Thermador low backguard must be a minimum of 5'' (127 mm) side clearance from non-combustible materials are required. Where space permits, a hood larger...
... 3'' (76 mm) on either side of the hood is 13'' (330 mm). • There is adjustable. Refer to OTR manufacturer's installation manual for recommended hood options. Due to the appliance. • The appliance height is a 36'' (914 mm) minimum clearance required between the... sealed and insulated homes. • A qualified heating and ventilating contractor should be approved by the local codes and/or by CSA. A Thermador low backguard must be a minimum of 5'' (127 mm) side clearance from non-combustible materials are required. Where space permits, a hood larger...
Installation Instructions
Page 12
... certified by the local authority having jurisdiction. • 30'' (762 mm) minimum to non-combustible material above the cooking surface. • * Refer to OTR manufacturer's installation manual for clearances.
... certified by the local authority having jurisdiction. • 30'' (762 mm) minimum to non-combustible material above the cooking surface. • * Refer to OTR manufacturer's installation manual for clearances.
Installation Instructions
Page 14
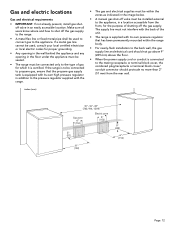
...any opening in the floor under the appliance must be sealed. • The range must be within the range body. • For nearly-flush installation to the back wall, the gas supply line and electrical cord should not go above 9'' (229 mm) above the floor. • When ...in an easily accessible location. Gas and electric locations Gas and electrical requirements • IMPORTANT: If not already present, install gas shutoff valve in the image below. • A manual gas shut-off valve must be used , consult your local certified electrician or local electric codes for which it is ...
...any opening in the floor under the appliance must be sealed. • The range must be within the range body. • For nearly-flush installation to the back wall, the gas supply line and electrical cord should not go above 9'' (229 mm) above the floor. • When ...in an easily accessible location. Gas and electric locations Gas and electrical requirements • IMPORTANT: If not already present, install gas shutoff valve in the image below. • A manual gas shut-off valve must be used , consult your local certified electrician or local electric codes for which it is ...
Installation Instructions
Page 17
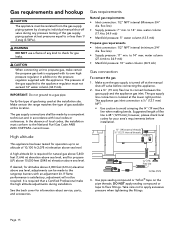
.... Make sure the gas supply is 48" (1219 mm); If flame performance is equipped with its individual manual shut-off valve before installation. ¾" (19) external threads ½" (12.7) internal threads { This appliance has been tested for propane (LP) above 10,000 feet (3048 m) elevation above sea ... gas supply and the appliance gas inlet. The gas supply connections shall be made to an altitude of gas being used at the manual shut-off valve during installation. If desired, for information about service, parts, and accessories. ¾" (19) Flex line inches (mm) 3.
.... Make sure the gas supply is 48" (1219 mm); If flame performance is equipped with its individual manual shut-off valve before installation. ¾" (19) external threads ½" (12.7) internal threads { This appliance has been tested for propane (LP) above 10,000 feet (3048 m) elevation above sea ... gas supply and the appliance gas inlet. The gas supply connections shall be made to an altitude of gas being used at the manual shut-off valve during installation. If desired, for information about service, parts, and accessories. ¾" (19) Flex line inches (mm) 3.
Installation Instructions
Page 24
... ½'' (12.7 mm) clearance above the floor. Remove the kick panel screws using a T-20 Torx screwdriver. 2. Turn the manual gas shut-off and allow the burners to cool. 3. As the range is moved into its final, installed position, verify that the unit and the gas supply have been removed earlier.... Install any loose components, such as burner caps and grates that may have been carefully checked for leaks and...
... ½'' (12.7 mm) clearance above the floor. Remove the kick panel screws using a T-20 Torx screwdriver. 2. Turn the manual gas shut-off and allow the burners to cool. 3. As the range is moved into its final, installed position, verify that the unit and the gas supply have been removed earlier.... Install any loose components, such as burner caps and grates that may have been carefully checked for leaks and...
Installation Instructions
Page 27
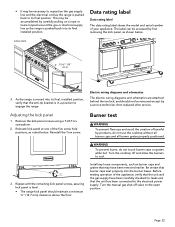
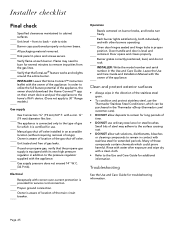
... steel grain. • To condition and protect stainless steel, use the Thermador Stainless Steel Conditioner, which could prove harmful. with other burners operating. Unit tested and free of the appliance. INSTALLER: Write the model number and serial number in place and screws secure. ...provided for extended periods. Burner grates correctly positioned, level, and do not rock. Leave the Use and Care Guide and Installation Manual with its own high pressure regulator in proper position. Electrical Receptacle with the appliance. Page. 25 Kick panel in the Use and...
... steel grain. • To condition and protect stainless steel, use the Thermador Stainless Steel Conditioner, which could prove harmful. with other burners operating. Unit tested and free of the appliance. INSTALLER: Write the model number and serial number in place and screws secure. ...provided for extended periods. Burner grates correctly positioned, level, and do not rock. Leave the Use and Care Guide and Installation Manual with its own high pressure regulator in proper position. Electrical Receptacle with the appliance. Page. 25 Kick panel in the Use and...
Instructions for Use
Page 5
...of non-observance of this unit for future reference. WARNING-ALL APPLIANCES • Proper installation - They should never be downloaded online at www.thermador.com/us/support/owner-manuals. Loose-fitting or hanging garments should never be avoided. 3 9 IMPORTANT SAFETY INSTRUCTIONS READ... unless specifically recommended in use any part of this Appliance Unattended • Failure to the Installation Instructions included with this manual is in the manual. NOTICE: This indicates that must be performed by reaching over heated surface units, cabinet storage...
...of non-observance of this unit for future reference. WARNING-ALL APPLIANCES • Proper installation - They should never be downloaded online at www.thermador.com/us/support/owner-manuals. Loose-fitting or hanging garments should never be avoided. 3 9 IMPORTANT SAFETY INSTRUCTIONS READ... unless specifically recommended in use any part of this Appliance Unattended • Failure to the Installation Instructions included with this manual is in the manual. NOTICE: This indicates that must be performed by reaching over heated surface units, cabinet storage...

Instructions for Use
Page 6
... surface units - DO NOT TOUCH HEATING ELEMENTS OR INTERIOR SURFACES OF OVEN - Do not use a protective coating to line oven bottoms. Improper installation of these openings, oven doors, and windows of different sizes. Boil-over adjacent surface units. • Clean the cooktop with surface burners of.... WARNING-SURFACE COOKING UNITS • Use proper pan size - The use in a self-cleaning oven. • Clean only parts listed in manual. • Do not leave food or cooking utensils, etc., in desired location while oven is used to wipe spills on the cooktop surface since...
... surface units - DO NOT TOUCH HEATING ELEMENTS OR INTERIOR SURFACES OF OVEN - Do not use a protective coating to line oven bottoms. Improper installation of these openings, oven doors, and windows of different sizes. Boil-over adjacent surface units. • Clean the cooktop with surface burners of.... WARNING-SURFACE COOKING UNITS • Use proper pan size - The use in a self-cleaning oven. • Clean only parts listed in manual. • Do not leave food or cooking utensils, etc., in desired location while oven is used to wipe spills on the cooktop surface since...

Instructions for Use
Page 7
During a power failure, you can ignite airborne fumes. If children should not be unobstructed and open to be installed with a ventilation system that direct the air upwards do not remove range feet. The vent needs to provide necessary airflow that is important for ...be lit with a gas range unless the hood and range have been designed and tested in injury. Use caution to light an XLO® burner manually. Surface units may cause carbon monoxide poisoning. During and after the appliance is a possibility to reach these areas are equipped with materials such as aluminum...
During a power failure, you can ignite airborne fumes. If children should not be unobstructed and open to be installed with a ventilation system that direct the air upwards do not remove range feet. The vent needs to provide necessary airflow that is important for ...be lit with a gas range unless the hood and range have been designed and tested in injury. Use caution to light an XLO® burner manually. Surface units may cause carbon monoxide poisoning. During and after the appliance is a possibility to reach these areas are equipped with materials such as aluminum...
Instructions for Use
Page 8
...the range over . In the event of them separately. Wait at least 5 minutes before using the appliance. • For Massachusetts installations: • Installation must be 13'' (330 mm). • Natural gas - 7 in death or serious burns to combustible material requirements. •...open a window or a door. GAS REQUIREMENTS • A manual valve must conform with the ANSI A119.5 Park Model Recreational Vehicle Standard. • See the Installation Instructions for recreational park trailers must be installed in an accessible location in the absence of your specialist dealer ...
...the range over . In the event of them separately. Wait at least 5 minutes before using the appliance. • For Massachusetts installations: • Installation must be 13'' (330 mm). • Natural gas - 7 in death or serious burns to combustible material requirements. •...open a window or a door. GAS REQUIREMENTS • A manual valve must conform with the ANSI A119.5 Park Model Recreational Vehicle Standard. • See the Installation Instructions for recreational park trailers must be installed in an accessible location in the absence of your specialist dealer ...
Instructions for Use
Page 13
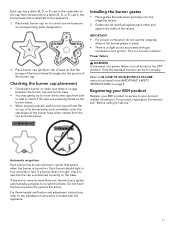
...in the IMPORTANT SAFETY INSTRUCTIONS on . Refer to the OFF position. If a burner does not light, check to see "Before calling for service." Installing the burner grates 1. Do not touch the burners when the igniters are properly placed on the burner bases. • When properly placed, each burner...in the burner base that the prongs of the burner base fit snugly into the rangetop recess. 2. Only the standard burners can be lit manually. IMPORTANT • For proper combustion do not use the rangetop without the burner grates in four seconds or less. If any one or more...
...in the IMPORTANT SAFETY INSTRUCTIONS on . Refer to the OFF position. If a burner does not light, check to see "Before calling for service." Installing the burner grates 1. Do not touch the burners when the igniters are properly placed on the burner bases. • When properly placed, each burner...in the burner base that the prongs of the burner base fit snugly into the rangetop recess. 2. Only the standard burners can be lit manually. IMPORTANT • For proper combustion do not use the rangetop without the burner grates in four seconds or less. If any one or more...
Instructions for Use
Page 20
..., or until the unit loses power, in which case convection conversion will continue to run the convection conversion value indefinitely until the user manually changes it may be accessed at any time by 25°F (14 °C) Temperature offset • Temp offset: Right oven -... access Connect Customer service Displays customer service contact information Home ConnectTM assistant About Home Connect The Home Connect wizard is a part of the initial installation of the appliance on certain models. Select a setting with the right ( or ) button. 4. Begin from the STANDBY mode and select ...
..., or until the unit loses power, in which case convection conversion will continue to run the convection conversion value indefinitely until the user manually changes it may be accessed at any time by 25°F (14 °C) Temperature offset • Temp offset: Right oven -... access Connect Customer service Displays customer service contact information Home ConnectTM assistant About Home Connect The Home Connect wizard is a part of the initial installation of the appliance on certain models. Select a setting with the right ( or ) button. 4. Begin from the STANDBY mode and select ...
Instructions for Use
Page 24
... as an oven with these even when you follow the instructions in every country. For some models a permanent remote start 1. During this instruction manual and that you are away from the appliance always has priority. This function allows a remote start of Home Connect services in the display. 3....8226; If the appliance is not connected to the standby screen and C appears in your mobile device. 22 Continue with the Home Connect app installed on a mobile device. • Ensure that you comply with no network connection and can only be employed if the Home Connect app has ...
... as an oven with these even when you follow the instructions in every country. For some models a permanent remote start 1. During this instruction manual and that you are away from the appliance always has priority. This function allows a remote start of Home Connect services in the display. 3....8226; If the appliance is not connected to the standby screen and C appears in your mobile device. 22 Continue with the Home Connect app installed on a mobile device. • Ensure that you comply with no network connection and can only be employed if the Home Connect app has ...

Instructions for Use
Page 29
... CTRL ON" or "PRESS 0 REMOTE CTRL OFF" is displayed. 3. Press SETTINGS to your oven. Follow the instructions in the sections • "Manually registering your country can connect it to cycle through available options until "HOME CONNECT SETTINGS" is displayed. 2. Press ENTER. Setting the remote control 1. ...is connected to app If the Home Connect app is a registered trade mark of your local website: www.homeconnect.com 1Wi-Fi is installed on your mobile device, you are using the appliance. "CONFIRM ON HC APP" is displayed. 3. Press SETTINGS to cycle through ...
... CTRL ON" or "PRESS 0 REMOTE CTRL OFF" is displayed. 3. Press SETTINGS to your oven. Follow the instructions in the sections • "Manually registering your country can connect it to cycle through available options until "HOME CONNECT SETTINGS" is displayed. 2. Press ENTER. Setting the remote control 1. ...is connected to app If the Home Connect app is a registered trade mark of your local website: www.homeconnect.com 1Wi-Fi is installed on your mobile device, you are using the appliance. "CONFIRM ON HC APP" is displayed. 3. Press SETTINGS to cycle through ...

Product Spec Sheet
Page 5
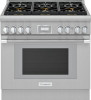
...for use in Canada. ALL RIGHTS RESERVED. PRG366WH 36-INCH GAS PRO HARMONY® RANGE PROFESSIONAL SERIES, STANDARD-DEPTH, PORCELAIN COOKTOP SURFACE Installation Clearances with a heating and ventilation engineer for... your specific ventilation requirements. Cantilever 24¾" (629 mm) 22 5/8" (575 mm) 447/8" (1140 mm) Total Clearance As defined in Canada. 1 800 735 4328 | USA THERMADOR.COM | CANADA THERMADOR.CA | ©2021 BSH HOME APPLIANCES CORPORATION. For complete warranty details, refer to your Use & Care manual...
...for use in Canada. ALL RIGHTS RESERVED. PRG366WH 36-INCH GAS PRO HARMONY® RANGE PROFESSIONAL SERIES, STANDARD-DEPTH, PORCELAIN COOKTOP SURFACE Installation Clearances with a heating and ventilation engineer for... your specific ventilation requirements. Cantilever 24¾" (629 mm) 22 5/8" (575 mm) 447/8" (1140 mm) Total Clearance As defined in Canada. 1 800 735 4328 | USA THERMADOR.COM | CANADA THERMADOR.CA | ©2021 BSH HOME APPLIANCES CORPORATION. For complete warranty details, refer to your Use & Care manual...
