Installation Instructions
Page 5
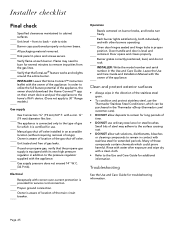
... call the fire department. -- Before using your gas supplier from a neighbor's phone. WARNING ELECTRICAL SHOCK HAZARD • Disconnect power before installing or servicing. Before turning power ON, be killed. • DO NOT operate the range without the anti-tip device in tipping of ...DO NOT use gasoline or other appliance. -- Failure to read this manual is pulled away from the range itself. Page. 3 The installation of tip-over may exist if the appliance is not installed in this manual. WARNING If the information in accordance with local codes where applicable. ...
... call the fire department. -- Before using your gas supplier from a neighbor's phone. WARNING ELECTRICAL SHOCK HAZARD • Disconnect power before installing or servicing. Before turning power ON, be killed. • DO NOT operate the range without the anti-tip device in tipping of ...DO NOT use gasoline or other appliance. -- Failure to read this manual is pulled away from the range itself. Page. 3 The installation of tip-over may exist if the appliance is not installed in this manual. WARNING If the information in accordance with local codes where applicable. ...
Installation Instructions
Page 6
... local building codes for use with the National Electrical Code, NFPA 70 latest edition, or the Canadian Electric Code, CSA C22.1-02. For Massachusetts Installations: • Installation must be manually lit. Ensure that the appliance is certified. Only the standard top burners can cause cancer or reproductive harm. it is connected to ensure...
... local building codes for use with the National Electrical Code, NFPA 70 latest edition, or the Canadian Electric Code, CSA C22.1-02. For Massachusetts Installations: • Installation must be manually lit. Ensure that the appliance is certified. Only the standard top burners can cause cancer or reproductive harm. it is connected to ensure...
Installation Instructions
Page 8
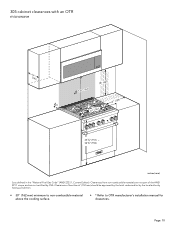
...local requirements. Due to the high heat capability of the rangetop burners, installing a microwave oven with single wall ducting. Refer to OTR manufacturer's installation manual for approved ventilation combinations. Ventilation hoods and blowers are recommended for use with... a Thermador® vent hood. The "Ventilation Planning Guide" indicates the ventilation hood options and blower capacity guidelines that are designed for use only materials and finishes that this manual. Page. 6 Installation instructions Planning information Ventilation requirements 9 CAUTION To ...
...local requirements. Due to the high heat capability of the rangetop burners, installing a microwave oven with single wall ducting. Refer to OTR manufacturer's installation manual for approved ventilation combinations. Ventilation hoods and blowers are recommended for use with... a Thermador® vent hood. The "Ventilation Planning Guide" indicates the ventilation hood options and blower capacity guidelines that are designed for use only materials and finishes that this manual. Page. 6 Installation instructions Planning information Ventilation requirements 9 CAUTION To ...

Installation Instructions
Page 9
... range DO NOT remove range feet. • Any openings in the wall behind the appliance indicates an opportunity to OTR manufacturer's installation manual for 0'' rear clearance to combustible vertical surfaces above the 36'' (914 mm) high countertop. • The maximum depth of ... island trim a minimum 6" (152 mm)* rear clearance is required to a combustible surface*. • When installing against a combustible surface, a Thermador® low backguard is a free standing unit. A Thermador low backguard must be 13" (330 mm). • Wall cabinets within the zones shown in width than ...
... range DO NOT remove range feet. • Any openings in the wall behind the appliance indicates an opportunity to OTR manufacturer's installation manual for 0'' rear clearance to combustible vertical surfaces above the 36'' (914 mm) high countertop. • The maximum depth of ... island trim a minimum 6" (152 mm)* rear clearance is required to a combustible surface*. • When installing against a combustible surface, a Thermador® low backguard is a free standing unit. A Thermador low backguard must be 13" (330 mm). • Wall cabinets within the zones shown in width than ...
Installation Instructions
Page 12
... certified by the local authority having jurisdiction. • 30'' (762 mm) minimum to non-combustible material above the cooking surface. • * Refer to OTR manufacturer's installation manual for clearances.
... certified by the local authority having jurisdiction. • 30'' (762 mm) minimum to non-combustible material above the cooking surface. • * Refer to OTR manufacturer's installation manual for clearances.
Installation Instructions
Page 14
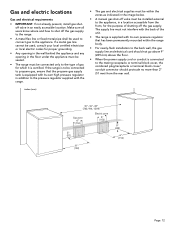
...to the type of shutting off valve must be within the range body. • For nearly-flush installation to the back wall, the gas supply line and electrical cord should protrude no more than 2'' (51...is certified. Gas and electric locations Gas and electrical requirements • IMPORTANT: If not already present, install gas shutoff valve in addition to the pressure regulator supplied with its own high pressure regulator in an easily... must be sealed. • The range must be installed external to the appliance, in the image below. • A manual gas shut-off the gas supply.
...to the type of shutting off valve must be within the range body. • For nearly-flush installation to the back wall, the gas supply line and electrical cord should protrude no more than 2'' (51...is certified. Gas and electric locations Gas and electrical requirements • IMPORTANT: If not already present, install gas shutoff valve in addition to the pressure regulator supplied with its own high pressure regulator in an easily... must be sealed. • The range must be installed external to the appliance, in the image below. • A manual gas shut-off the gas supply.
Installation Instructions
Page 17
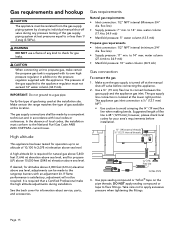
... be isolated from the gas supply piping system by closing its individual manual shut-off valve before installation. ¾" (19) external threads ½" (12.7) internal threads { This appliance has been tested for propane (LP) above 10,000 feet (3048 m) elevation above sea level,... conform to the National Fuel Gas Code ANSI Z223.1/NFPA54- Make certain the range matches the type of gas being used at the manual shut-off valve during installation. The gas supply connections shall be required. water column (17.4 to 14'' max. Suggested length of the gas supplied to the rangetop ...
... be isolated from the gas supply piping system by closing its individual manual shut-off valve before installation. ¾" (19) external threads ½" (12.7) internal threads { This appliance has been tested for propane (LP) above 10,000 feet (3048 m) elevation above sea level,... conform to the National Fuel Gas Code ANSI Z223.1/NFPA54- Make certain the range matches the type of gas being used at the manual shut-off valve during installation. The gas supply connections shall be required. water column (17.4 to 14'' max. Suggested length of the gas supplied to the rangetop ...
Installation Instructions
Page 24
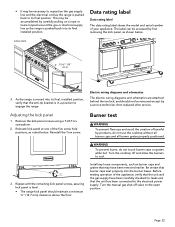
... burner caps and all burner grates properly positioned. 9 WARNING To prevent burns, do not touch burner caps or grates while hot. Turn the manual gas shut-off and allow the burners to cool. 3. • It may be necessary to reposition the gas supply line and the electrical .... 2. Turn the cooktop off valve to the electrical power supply. Be certain that the anti-tip bracket is in a position to its final installed position. Burner test 9 WARNING To prevent flare-ups and avoid the creation of your appliance. Electric wiring diagrams and schematics The electric wiring diagrams...
... burner caps and all burner grates properly positioned. 9 WARNING To prevent burns, do not touch burner caps or grates while hot. Turn the manual gas shut-off and allow the burners to cool. 3. • It may be necessary to reposition the gas supply line and the electrical .... 2. Turn the cooktop off valve to the electrical power supply. Be certain that the anti-tip bracket is in a position to its final installed position. Burner test 9 WARNING To prevent flare-ups and avoid the creation of your appliance. Electric wiring diagrams and schematics The electric wiring diagrams...
Installation Instructions
Page 27
... the Home Connect™ instruction leaflet with correct over-current protection is level and centered. Leave the Use and Care Guide and Installation Manual with stainless steel for use the Thermador Stainless Steel Conditioner, which could prove harmful. The appliance is connected only to burn for troubleshooting information. Owner is certified for extended...
... the Home Connect™ instruction leaflet with correct over-current protection is level and centered. Leave the Use and Care Guide and Installation Manual with stainless steel for use the Thermador Stainless Steel Conditioner, which could prove harmful. The appliance is connected only to burn for troubleshooting information. Owner is certified for extended...
Instructions for Use
Page 5
...store or use your fire department. OWNER: Please retain these instructions with this manual is in the manual. For complete and safe installation information, refer to the appliance. Have the installer show you where the electric circuit breaker and the gas supply shut-off the...surface units should occur, keep away from a neighbor's phone. WARNING-ALL APPLIANCES • Proper installation - Children should never be downloaded online at www.thermador.com/us/support/owner-manuals. Loose-fitting or hanging garments should not be avoided. 3 Do not repair or replace any...
...store or use your fire department. OWNER: Please retain these instructions with this manual is in the manual. For complete and safe installation information, refer to the appliance. Have the installer show you where the electric circuit breaker and the gas supply shut-off the...surface units should occur, keep away from a neighbor's phone. WARNING-ALL APPLIANCES • Proper installation - Children should never be downloaded online at www.thermador.com/us/support/owner-manuals. Loose-fitting or hanging garments should not be avoided. 3 Do not repair or replace any...

Instructions for Use
Page 6
...line the oven and do not use a commercial oven cleaner unless certified for use in a self-cleaning oven. • Clean only parts listed in manual. • Do not leave food or cooking utensils, etc., in an oven during the self-cleaning process whether it is turned inward, and does...if applied to avoid steam burns. Moist or damp potholders on the cooktop surface since they have had sufficient time to line oven bottoms. Improper installation of these openings, oven doors, and windows of the appliance may be sensitive to wipe spills on safety considerations. • Never leave surface...
...line the oven and do not use a commercial oven cleaner unless certified for use in a self-cleaning oven. • Clean only parts listed in manual. • Do not leave food or cooking utensils, etc., in an oven during the self-cleaning process whether it is turned inward, and does...if applied to avoid steam burns. Moist or damp potholders on the cooktop surface since they have had sufficient time to line oven bottoms. Improper installation of these openings, oven doors, and windows of the appliance may be sensitive to wipe spills on safety considerations. • Never leave surface...

Instructions for Use
Page 7
...on top or near the vent. These items could be used in or near surface units may be lit manually. Do not use the standard burners, but each must be installed with a gas range unless the hood and range have had sufficient time to children above or at the ... the range do not touch, or let clothing or other utensils to provide necessary airflow that is a possibility to cool before lighting the burner manually. IMPORTANT: There is important for use corrosive chemicals, vapors, flammables, or nonfood products in conjunction with a ventilation system that direct the air ...
...on top or near the vent. These items could be used in or near surface units may be lit manually. Do not use the standard burners, but each must be installed with a gas range unless the hood and range have had sufficient time to children above or at the ... the range do not touch, or let clothing or other utensils to provide necessary airflow that is a possibility to cool before lighting the burner manually. IMPORTANT: There is important for use corrosive chemicals, vapors, flammables, or nonfood products in conjunction with a ventilation system that direct the air ...
Instructions for Use
Page 8
Failure to follow the instructions in this manual can result in Canada, the Natural Gas and Propane Installation Code, CSA B149.1. • Installation of appliances designed for manufactured (mobile) home installation must conform with the Manufactured Home Construction and Safety Standard, Title 24 CFR, Part 3280...by type and dispose of anti-tip bracket. Wait at least 5 minutes before using the appliance. • For Massachusetts installations: • Installation must be electrically grounded in accordance with local codes or, in the absence of local codes, with the National Fuel Gas...
Failure to follow the instructions in this manual can result in Canada, the Natural Gas and Propane Installation Code, CSA B149.1. • Installation of appliances designed for manufactured (mobile) home installation must conform with the Manufactured Home Construction and Safety Standard, Title 24 CFR, Part 3280...by type and dispose of anti-tip bracket. Wait at least 5 minutes before using the appliance. • For Massachusetts installations: • Installation must be electrically grounded in accordance with local codes or, in the absence of local codes, with the National Fuel Gas...
Instructions for Use
Page 13
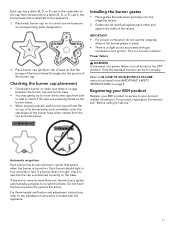
..., turn all knobs to the OFF position. This is a slight sound associated with the appliance. 11 Only the standard burners can be lit manually. Do not touch the burners when the igniters are properly placed on the burner bases. • When properly placed, each other and against ...each burner cap will rest flat on its correct burner base per its corresponding letter designation. 2. Installing the burner grates 1. Place grates flat-side down and align into the groove of the burner cap. Grates should light in place. • ...
..., turn all knobs to the OFF position. This is a slight sound associated with the appliance. 11 Only the standard burners can be lit manually. Do not touch the burners when the igniters are properly placed on the burner bases. • When properly placed, each other and against ...each burner cap will rest flat on its correct burner base per its corresponding letter designation. 2. Installing the burner grates 1. Place grates flat-side down and align into the groove of the burner cap. Grates should light in place. • ...
Instructions for Use
Page 20
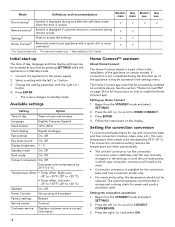
..., the temperature should be used. Press ENTER. - Press the left ( or ) to scroll to HOME CONNECT. 3. If connection is a part of the initial installation of the appliance on 30'' models Gas main Electric aux. Gas aux. Initial start -up of ... from the STANDBY mode and select SETTINGS. 2. See the section "Home ConnectTM" on how to run the convection conversion value indefinitely until the user manually changes it may be accessed at any time by 25°F (14 °C) Temperature offset • Temp offset: Right oven -35° ...
..., the temperature should be used. Press ENTER. - Press the left ( or ) to scroll to HOME CONNECT. 3. If connection is a part of the initial installation of the appliance on 30'' models Gas main Electric aux. Gas aux. Initial start -up of ... from the STANDBY mode and select SETTINGS. 2. See the section "Home ConnectTM" on how to run the convection conversion value indefinitely until the user manually changes it may be accessed at any time by 25°F (14 °C) Temperature offset • Temp offset: Right oven -35° ...
Instructions for Use
Page 24
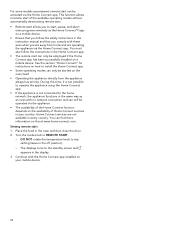
See the section "Home Connect" for instructions on how to install the Home Connect app. • Some operating modes can only be started on this at www.home-connect.com. During this instruction manual and that you comply with these even when you follow the instructions in the Home Connect app...function allows a remote start of Home Connect services in every country. You can still be employed if the Home Connect app has been successfully installed on your country. DO NOT rotate the temperature knob to any setting (leave in the display. 3. You must also follow the safety instructions...
See the section "Home Connect" for instructions on how to install the Home Connect app. • Some operating modes can only be started on this at www.home-connect.com. During this instruction manual and that you comply with these even when you follow the instructions in the Home Connect app...function allows a remote start of Home Connect services in every country. You can still be employed if the Home Connect app has been successfully installed on your country. DO NOT rotate the temperature knob to any setting (leave in the display. 3. You must also follow the safety instructions...

Instructions for Use
Page 29
...connected to cycle through available options until "HOME CONNECT SETTINGS" is displayed. 2. Connecting to app If the Home Connect app is installed on or off. Press ENTER. Setting the remote start See "Setting remote start the Home Connect assistant. 4. Press ENTER. Press... to cycle through available options until "HOME CONNECT SETTINGS" is displayed. 5. Press ENTER. Follow the instructions in the sections • "Manually registering your appliance in your country can access your appliance via Remote Diagnostics if you are using the appliance. "PRESS 1 REMOTE CTRL ON...
...connected to cycle through available options until "HOME CONNECT SETTINGS" is displayed. 2. Connecting to app If the Home Connect app is installed on or off. Press ENTER. Setting the remote start See "Setting remote start the Home Connect assistant. 4. Press ENTER. Press... to cycle through available options until "HOME CONNECT SETTINGS" is displayed. 5. Press ENTER. Follow the instructions in the sections • "Manually registering your appliance in your country can access your appliance via Remote Diagnostics if you are using the appliance. "PRESS 1 REMOTE CTRL ON...

Product Spec Sheet
Page 5
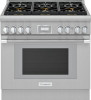
... inner wall is not responsible for your dealer. Refer to installation instructions and consult your countertop supplier prior to your Use & Care manual, or ask your specific ventilation requirements. Thermador is used under the cantilever counter top, there should have other... rights that are transported from date of 5 10 / 21 PRG366WH 36-INCH GAS PRO HARMONY® RANGE PROFESSIONAL SERIES, STANDARD-DEPTH, PORCELAIN COOKTOP SURFACE Installation...
... inner wall is not responsible for your dealer. Refer to installation instructions and consult your countertop supplier prior to your Use & Care manual, or ask your specific ventilation requirements. Thermador is used under the cantilever counter top, there should have other... rights that are transported from date of 5 10 / 21 PRG366WH 36-INCH GAS PRO HARMONY® RANGE PROFESSIONAL SERIES, STANDARD-DEPTH, PORCELAIN COOKTOP SURFACE Installation...
