Use and Care Manual
Page 5
...Range for the First Time 7 Range Description 10 Parts Identification - 48" Range 10 Parts Identification - 36" Range 11 Using The Cooktop 12 Cookware Recommendations 17 Specialty Cookware 18 Surface Burner Cooking Recommendations ....... 19 Electric Griddle (some models 21 Griddle Cooking Recommendations 22 Using the Oven...34 Cleaning Recommendations 36 Do-It-Yourself Maintenance 39 Before Calling For Service 41 Statement of Warranty 42 This THERMADOR® appliance is made by BSH Home Appliances Corporation 5551 McFadden Ave. Huntington Beach, CA 92649 Questions? 1-800-735-4328...
...Range for the First Time 7 Range Description 10 Parts Identification - 48" Range 10 Parts Identification - 36" Range 11 Using The Cooktop 12 Cookware Recommendations 17 Specialty Cookware 18 Surface Burner Cooking Recommendations ....... 19 Electric Griddle (some models 21 Griddle Cooking Recommendations 22 Using the Oven...34 Cleaning Recommendations 36 Do-It-Yourself Maintenance 39 Before Calling For Service 41 Statement of Warranty 42 This THERMADOR® appliance is made by BSH Home Appliances Corporation 5551 McFadden Ave. Huntington Beach, CA 92649 Questions? 1-800-735-4328...
Use and Care Manual
Page 7
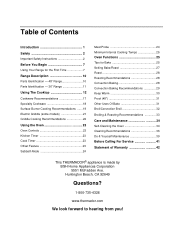
... following items on Page 41. English 2 Field conversion of the appliance for more than a 12" (305mm) horizontal clearance. Before using the range, ensure that it is less than 12" (305mm) minimum horizontal clearance between combustible materials and the back edge of gas for this appliance... qualified electrician, in addition to the Installation Manual accompanying this appliance must be purchased separately and utilized when there is certified. A THERMADOR® Low Back or High Shelf must be located as indicated on Figure 35 on top of heat and moisture. The use with...
... following items on Page 41. English 2 Field conversion of the appliance for more than a 12" (305mm) horizontal clearance. Before using the range, ensure that it is less than 12" (305mm) minimum horizontal clearance between combustible materials and the back edge of gas for this appliance... qualified electrician, in addition to the Installation Manual accompanying this appliance must be purchased separately and utilized when there is certified. A THERMADOR® Low Back or High Shelf must be located as indicated on Figure 35 on top of heat and moisture. The use with...

Use and Care Manual
Page 15
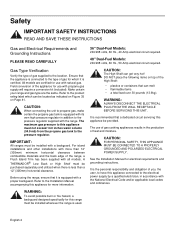
Control Knobs, ExtraLow® Burners (3) 2. Oven Light Switches 8. Temperature Gauge 9. Control Panel Light 12. Main Oven (3 racks included) 17. Range Feet (4) 19. Secondary Oven Control Knobs 6. Control Knobs, ExtraHighTM & ExtraLow® (1) 4. Flush Island Trim (included), High ... 10 Control Knobs, Standard Burners (2) 3. Description Model and Parts Identification - 48" Range 11 11 22 22 55 8 66 7 7 78 7 9 9 1100 9 9 1100 1111 12 12 44 33 11 Figure 4: 48" Dual Fuel Control Panel 13 14 15 14 14 16 17 18 19 WARNING: To provide proper ventilation of the...
Control Knobs, ExtraLow® Burners (3) 2. Oven Light Switches 8. Temperature Gauge 9. Control Panel Light 12. Main Oven (3 racks included) 17. Range Feet (4) 19. Secondary Oven Control Knobs 6. Control Knobs, ExtraHighTM & ExtraLow® (1) 4. Flush Island Trim (included), High ... 10 Control Knobs, Standard Burners (2) 3. Description Model and Parts Identification - 48" Range 11 11 22 22 55 8 66 7 7 78 7 9 9 1100 9 9 1100 1111 12 12 44 33 11 Figure 4: 48" Dual Fuel Control Panel 13 14 15 14 14 16 17 18 19 WARNING: To provide proper ventilation of the...
Use and Care Manual
Page 16
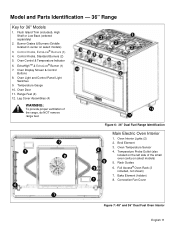
...Element (hidden) 8. Burner Grates & Burners (Griddle located in center on the left side of the range, do NOT remove range feet. 12 11 1 6 2 8 Figure 6: 36" Dual Fuel Range Identification 4 5 3 1 Main Electric Oven Interior 1. Oven Light and Control Panel Light Switches ...9. Broil Element 3. Range Feet (4) 12. Model and Parts Identification - 36" Range Key for 36" Models 1. Oven Display Screen & Control Buttons 8. Full Access® Oven Rack (3 included...
...Element (hidden) 8. Burner Grates & Burners (Griddle located in center on the left side of the range, do NOT remove range feet. 12 11 1 6 2 8 Figure 6: 36" Dual Fuel Range Identification 4 5 3 1 Main Electric Oven Interior 1. Oven Light and Control Panel Light Switches ...9. Broil Element 3. Range Feet (4) 12. Model and Parts Identification - 36" Range Key for 36" Models 1. Oven Display Screen & Control Buttons 8. Full Access® Oven Rack (3 included...
Use and Care Manual
Page 17
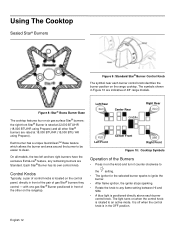
...; Burner positioned in Figure 10 are Standard. Figure 8: Star® Brass Burner Base The cooktop features four or six gas surface Star® burners; English 12 It is off when the control knob is rated at 18,000 BTU/HR (15,000 BTU/ HR using Propane) and all models, the two...
...; Burner positioned in Figure 10 are Standard. Figure 8: Star® Brass Burner Base The cooktop features four or six gas surface Star® burners; English 12 It is off when the control knob is rated at 18,000 BTU/HR (15,000 BTU/ HR using Propane) and all models, the two...
Use and Care Manual
Page 18
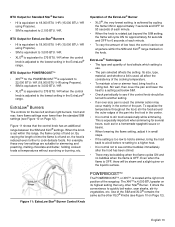
... before re-setting to a higher heat. • It is normal not to see if the control knob should be steam and a slight quiver on Page 12). Stir well, then cover the pan and lower the heat to a setting just below SIM. • Check periodically to see simmer bubbles immediately after the... time the flame is off and on , the heat is reduced even further to cook delicate foods. The XHITM is 4,000 BTU greater on Page 12). Use of the pan. BTU Output for Standard Star® Burners • HI is equivalent to 18,000 BTU / HR (15,000 BTU / HR using...
... before re-setting to a higher heat. • It is normal not to see if the control knob should be steam and a slight quiver on Page 12). Stir well, then cover the pan and lower the heat to a setting just below SIM. • Check periodically to see simmer bubbles immediately after the... time the flame is off and on , the heat is reduced even further to cook delicate foods. The XHITM is 4,000 BTU greater on Page 12). Use of the pan. BTU Output for Standard Star® Burners • HI is equivalent to 18,000 BTU / HR (15,000 BTU / HR using...
Use and Care Manual
Page 19
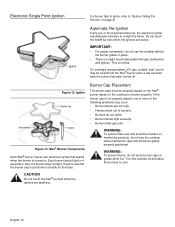
IMPORTANT: • For proper combustion, do not ignite. • Burner flames light unevenly. • Burner emits gas odor. Figure 12: Igniter Burner Cap Placement The burner caps must be heard from the Star® burner ports a few seconds after the burner has been turned off ...
IMPORTANT: • For proper combustion, do not ignite. • Burner flames light unevenly. • Burner emits gas odor. Figure 12: Igniter Burner Cap Placement The burner caps must be heard from the Star® burner ports a few seconds after the burner has been turned off ...
Use and Care Manual
Page 23
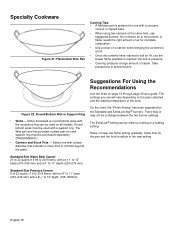
... be a change between the two burner settings. Standard Size Water Bath Canner 21 to 22 quarts (19.95 to 20.9 liters), with an 11" to 12" base (279-305 mm) and a 9" to prevent burns. Standard Size Pressure Canner 8 to 22 quarts (7.6 to 20.9 liters), with an 8" to 11" base (203-279... pan and the food to adjust to maintain the boil or pressure. • Canning produces a large amount of the food. Do not block air to 12" depth (165-305mm). A flame needs the right amount of air for complete combustion. • Use a cover on a canner when bringing the contents to a boil. •...
... be a change between the two burner settings. Standard Size Water Bath Canner 21 to 22 quarts (19.95 to 20.9 liters), with an 11" to 12" base (279-305 mm) and a 9" to prevent burns. Standard Size Pressure Canner 8 to 22 quarts (7.6 to 20.9 liters), with an 8" to 11" base (203-279... pan and the food to adjust to maintain the boil or pressure. • Canning produces a large amount of the food. Do not block air to 12" depth (165-305mm). A flame needs the right amount of air for complete combustion. • Use a cover on a canner when bringing the contents to a boil. •...
Use and Care Manual
Page 27
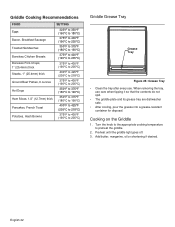
..., Breakfast Sausage Toasted Sandwiches Boneless Chicken Breasts Boneless Pork Chops, 1" (25.4mm) thick Steaks, 1" (25.4mm) thick Ground Beef Patties, 6 ounces Hot Dogs Ham Slices, 1/2" (12.7mm) thick Pancakes, French Toast Potatoes, Hash Browns SETTING 325°F to 350°F (160°C to 180°C) 375°F to 400°F (190...
..., Breakfast Sausage Toasted Sandwiches Boneless Chicken Breasts Boneless Pork Chops, 1" (25.4mm) thick Steaks, 1" (25.4mm) thick Ground Beef Patties, 6 ounces Hot Dogs Ham Slices, 1/2" (12.7mm) thick Pancakes, French Toast Potatoes, Hash Browns SETTING 325°F to 350°F (160°C to 180°C) 375°F to 400°F (190...

Use and Care Manual
Page 28
... "-" buttons to select either too brown or too light for your tastes. • The oven must be turned off when the desired cooking time is 12 hours. This feature is useful if you find that food is also used if a temperature probe is located at anytime during the cooking cycle. CANCEL... not available for Broil, Convection Broil, or Self Clean. Press ENTER. 2. Using the Oven Extended Cooking Functions Oven Setting Controls To set for up to 12 hours. Use the "+" and "-" buttons to select desired time. 5.
... "-" buttons to select either too brown or too light for your tastes. • The oven must be turned off when the desired cooking time is 12 hours. This feature is useful if you find that food is also used if a temperature probe is located at anytime during the cooking cycle. CANCEL... not available for Broil, Convection Broil, or Self Clean. Press ENTER. 2. Using the Oven Extended Cooking Functions Oven Setting Controls To set for up to 12 hours. Use the "+" and "-" buttons to select desired time. 5.
Use and Care Manual
Page 35
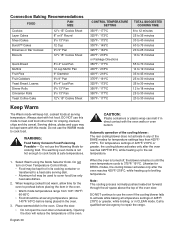
...Cobblers Yeast Bread, Loaves Dinner Rolls Cinnamon Rolls Yeast Coffee Cake 8"x 4" Loaf Pan 12 cup Muffin Pan 9" Diameter 9"x 9" Pan 8"x 4" Loaf Pan 9"x 13" Pan 9"x 13" Pan 12"x 15" Cookie Sheet CONTROL TEMPERATURE SETTING 350°F / 177°C 325°F... / 177°C 350°F / 177°C 350°F / 177°C TOTAL SUGGESTED COOKING TIME 8 to 12 minutes 25 to 35 minutes 30 to 40 minutes 60 to 75 minutes 20 to 25 minutes 10 to 15 minutes 55 ... 14 to 19 minutes 35 to 45 minutes 25 to 30 minutes 25 to 30 minutes 12 to 18 minutes 25 to 30 minutes 20 to 30 minutes Keep Warm The Warm mode ...
...Cobblers Yeast Bread, Loaves Dinner Rolls Cinnamon Rolls Yeast Coffee Cake 8"x 4" Loaf Pan 12 cup Muffin Pan 9" Diameter 9"x 9" Pan 8"x 4" Loaf Pan 9"x 13" Pan 9"x 13" Pan 12"x 15" Cookie Sheet CONTROL TEMPERATURE SETTING 350°F / 177°C 325°F... / 177°C 350°F / 177°C 350°F / 177°C TOTAL SUGGESTED COOKING TIME 8 to 12 minutes 25 to 35 minutes 30 to 40 minutes 60 to 75 minutes 20 to 25 minutes 10 to 15 minutes 55 ... 14 to 19 minutes 35 to 45 minutes 25 to 30 minutes 25 to 30 minutes 12 to 18 minutes 25 to 30 minutes 20 to 30 minutes Keep Warm The Warm mode ...
Use and Care Manual
Page 38
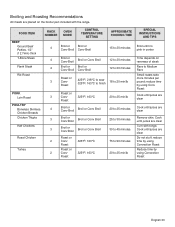
... INSTRUCTIONS AND TIPS Broil until no pink in center Time depends on the broiler pan included with tongs; FOOD ITEM BEEF Ground Beef Patties, 1/2" (12.7mm) thick T-Bone Steak Flank Steak Rib Roast PORK Loin Roast POULTRY Boneless Skinless Chicken Breasts Chicken Thighs Half Chickens Roast Chicken Turkey RACK NUMBER... Broil or Broil or Conv Broil Conv Broil 15 to 20 minutes 4 Broil or Conv Broil Broil or Conv Broil 12 to 20 minutes 4 Broil or Broil or Conv Broil Conv Broil 12 to 20 minutes 3 Roast or Conv Roast 425°F/ 218°C to sear 325°F/ 163°C to finish...
... INSTRUCTIONS AND TIPS Broil until no pink in center Time depends on the broiler pan included with tongs; FOOD ITEM BEEF Ground Beef Patties, 1/2" (12.7mm) thick T-Bone Steak Flank Steak Rib Roast PORK Loin Roast POULTRY Boneless Skinless Chicken Breasts Chicken Thighs Half Chickens Roast Chicken Turkey RACK NUMBER... Broil or Broil or Conv Broil Conv Broil 15 to 20 minutes 4 Broil or Conv Broil Broil or Conv Broil 12 to 20 minutes 4 Broil or Broil or Conv Broil Conv Broil 12 to 20 minutes 3 Roast or Conv Roast 425°F/ 218°C to sear 325°F/ 163°C to finish...
Use and Care Manual
Page 44
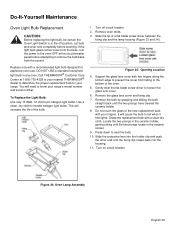
...dry cloth. DO NOT USE a standard household light bulb in the off circuit breaker. 2. To Replace the Light Bulb: Use only 10 Watt, 12 Volt bi-pin halogen light bulbs. Turn off position. Gently twist the flat blade screw driver to the bottom of the bulb. 1. It will ...completely before attempting to determine the proper replacement bulb for appliance oven use. If the light bulb glass comes loose from the socket. Call THERMADOR® Customer Care Center at 1-800-735-4328 or your fingers. Do-It-Yourself Maintenance Oven Light Bulb Replacement CAUTION: Before replacing the...
...dry cloth. DO NOT USE a standard household light bulb in the off circuit breaker. 2. To Replace the Light Bulb: Use only 10 Watt, 12 Volt bi-pin halogen light bulbs. Turn off position. Gently twist the flat blade screw driver to the bottom of the bulb. 1. It will ...completely before attempting to determine the proper replacement bulb for appliance oven use. If the light bulb glass comes loose from the socket. Call THERMADOR® Customer Care Center at 1-800-735-4328 or your fingers. Do-It-Yourself Maintenance Oven Light Bulb Replacement CAUTION: Before replacing the...
Installation Manual
Page 2
... Questions? 1-800-735-4328 www.thermador.com We look forward to hearing from you! English Table of Contents Safety Instructions 1 Important Installation Information 2 Step 1: Ventilation Requirements 3 Step 2: Cabinet Preparation 4 Step 3: Unpacking and Moving the Range 8 Step 4: Door Removal and Reinstallation 10 Step 5: Installing Anti-Tip Device 12 Step 6: Gas Requirements and Hookup...
... Questions? 1-800-735-4328 www.thermador.com We look forward to hearing from you! English Table of Contents Safety Instructions 1 Important Installation Information 2 Step 1: Ventilation Requirements 3 Step 2: Cabinet Preparation 4 Step 3: Unpacking and Moving the Range 8 Step 4: Door Removal and Reinstallation 10 Step 5: Installing Anti-Tip Device 12 Step 6: Gas Requirements and Hookup...
Installation Manual
Page 4
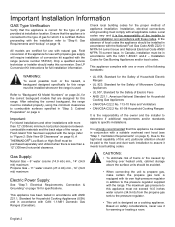
... installation. The maximum gas pressure to this appliance be in addition to combustible surfaces specified in accordance with the CAN 1-B149.1 and.2 - A THERMADOR® Low Back or High Shelf must not exceed 14.0 inches water column (34.9 mb) from the propane gas tank to "Figure 2: ... to ensure installation is the responsibility of the range, a Flush Island Trim has been supplied with natural gas. It is less than 12" (305mm) minimum horizontal clearance between combustible materials and the back edge of the owner and the installer to determine if additional requirements and...
... installation. The maximum gas pressure to this appliance be in addition to combustible surfaces specified in accordance with the CAN 1-B149.1 and.2 - A THERMADOR® Low Back or High Shelf must not exceed 14.0 inches water column (34.9 mb) from the propane gas tank to "Figure 2: ... to ensure installation is the responsibility of the range, a Flush Island Trim has been supplied with natural gas. It is less than 12" (305mm) minimum horizontal clearance between combustible materials and the back edge of the owner and the installer to determine if additional requirements and...
Installation Manual
Page 5
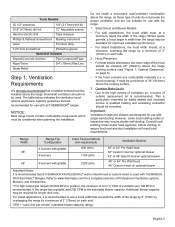
... as these type of outside replacement air is recommended. NOTICE: Most range hoods contain combustible components which must be used with THERMADOR PROFESSIONAL® Ranges. Important: Ventilation hoods and blowers are designed for use with single wall ducting. English 3 Tools Needed ...(2) 1/2" wrenches 1/8" (3.17mm) drill bit 3/16" (4.76mm) drill bit 12" Adjustable wrench Hand or electric drill Tape measure Phillips & flathead screwdrivers Marking instrument Level Furniture dolly T-20 Torx screwdriver Protective...
... as these type of outside replacement air is recommended. NOTICE: Most range hoods contain combustible components which must be used with THERMADOR PROFESSIONAL® Ranges. Important: Ventilation hoods and blowers are designed for use with single wall ducting. English 3 Tools Needed ...(2) 1/2" wrenches 1/8" (3.17mm) drill bit 3/16" (4.76mm) drill bit 12" Adjustable wrench Hand or electric drill Tape measure Phillips & flathead screwdrivers Marking instrument Level Furniture dolly T-20 Torx screwdriver Protective...
Installation Manual
Page 6
... with these ratings. Flame retardant materials bear the mark: UNDERWRITERS LABORATORIES INC. It is the responsibility of the range above the cooking surface, a THERMADOR® Low Back or High Shelf must have a space wide enough to island installations, except for each type of backguard. • A 5"... free standing unit. A 30" (762mm) clearance can be used when the bottom of the wood or metal cabinet is over 12" (305mm), the supplied THERMADOR® Flush Island Trim may allow other flammable vapors and liquids. • Do not obstruct the flow of combustion and ventilation ...
... with these ratings. Flame retardant materials bear the mark: UNDERWRITERS LABORATORIES INC. It is the responsibility of the range above the cooking surface, a THERMADOR® Low Back or High Shelf must have a space wide enough to island installations, except for each type of backguard. • A 5"... free standing unit. A 30" (762mm) clearance can be used when the bottom of the wood or metal cabinet is over 12" (305mm), the supplied THERMADOR® Flush Island Trim may allow other flammable vapors and liquids. • Do not obstruct the flow of combustion and ventilation ...
Installation Manual
Page 8
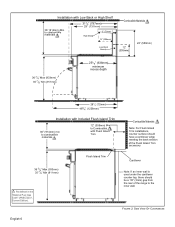
... (933mm) 35 7/8" Min (911mm) 251/8" (638mm) minimum recess depth 281/2" (723mm) 483/4" (1238mm) Installation with Included Flush Island Trim 36" (914mm) min to combustible materials 12" (305mm) Min to the inner wall. English 6 Flush Island Trim Cantilever Note: If an inner wall is used under the cantilever counter top, there should...
... (933mm) 35 7/8" Min (911mm) 251/8" (638mm) minimum recess depth 281/2" (723mm) 483/4" (1238mm) Installation with Included Flush Island Trim 36" (914mm) min to combustible materials 12" (305mm) Min to the inner wall. English 6 Flush Island Trim Cantilever Note: If an inner wall is used under the cantilever counter top, there should...
Installation Manual
Page 14
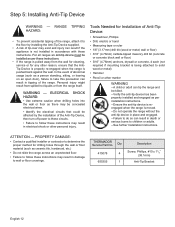
...17mm) drill bit (wood or metal; Qty 415078 4 655355 1 Description Screw, Phillips, #10 x 11/2" (38.1mm) Anti-Tip Bracket English 12 ATTENTION - ELECRICAL SHOCK HAZARD: • Use extreme caution when drilling holes into the wall or floor as per these instructions may be concealed electrical ...sitting, or leaning on an open door), failure to follow these instructions. • If the range is pushed back against the wall. THERMADOR Service Part No. Step 5: Installing Anti-Tip Device WARNING - Personal injury might result from spilled hot liquids or from the wall for...
...17mm) drill bit (wood or metal; Qty 415078 4 655355 1 Description Screw, Phillips, #10 x 11/2" (38.1mm) Anti-Tip Bracket English 12 ATTENTION - ELECRICAL SHOCK HAZARD: • Use extreme caution when drilling holes into the wall or floor as per these instructions may be concealed electrical ...sitting, or leaning on an open door), failure to follow these instructions. • If the range is pushed back against the wall. THERMADOR Service Part No. Step 5: Installing Anti-Tip Device WARNING - Personal injury might result from spilled hot liquids or from the wall for...
Installation Manual
Page 16
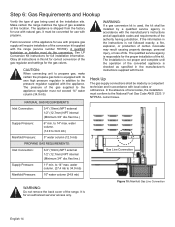
... and in accordance with local codes or ordinances. to 34.9 mb) Manifold Pressure: 5" water column (12.5 mb) PROPANE GAS REQUIREMENTS: Inlet Connection: 3/4" (19mm) NPT external 1/2" (12.7mm) NPT internal (Minimum 3/4" dia. See LP Conversion Kit instructions for an authorized servicer access only.... the back cover of local codes, the installation must do the conversion. current issue. Inlet Connection: 3/4" (19mm) NPT external 1/2" (12.7mm) NPT internal (Minimum 3/4" dia. The appliance is not proper and complete until the operation of life. It must not exceed 14...
... and in accordance with local codes or ordinances. to 34.9 mb) Manifold Pressure: 5" water column (12.5 mb) PROPANE GAS REQUIREMENTS: Inlet Connection: 3/4" (19mm) NPT external 1/2" (12.7mm) NPT internal (Minimum 3/4" dia. See LP Conversion Kit instructions for an authorized servicer access only.... the back cover of local codes, the installation must do the conversion. current issue. Inlet Connection: 3/4" (19mm) NPT external 1/2" (12.7mm) NPT internal (Minimum 3/4" dia. The appliance is not proper and complete until the operation of life. It must not exceed 14...