Use and Care Manual
Page 5
... of Contents Introduction 1 Safety 2 Important Safety Instructions 2 Before You Begin 7 Using Your Range for the First Time 7 Range Description 10 Parts Identification - 48" Range 10 Parts Identification - 36" Range 11 Using The Cooktop 12 Cookware Recommendations 17 Specialty Cookware 18 Surface Burner Cooking Recommendations ....... 19... Recommendations 36 Do-It-Yourself Maintenance 39 Before Calling For Service 41 Statement of Warranty 42 This THERMADOR® appliance is made by BSH Home Appliances Corporation 5551 McFadden Ave. Huntington Beach, CA 92649 Questions? 1-800-735...
... of Contents Introduction 1 Safety 2 Important Safety Instructions 2 Before You Begin 7 Using Your Range for the First Time 7 Range Description 10 Parts Identification - 48" Range 10 Parts Identification - 36" Range 11 Using The Cooktop 12 Cookware Recommendations 17 Specialty Cookware 18 Surface Burner Cooking Recommendations ....... 19... Recommendations 36 Do-It-Yourself Maintenance 39 Before Calling For Service 41 Statement of Warranty 42 This THERMADOR® appliance is made by BSH Home Appliances Corporation 5551 McFadden Ave. Huntington Beach, CA 92649 Questions? 1-800-735...
Use and Care Manual
Page 6
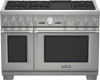
... surface with a professional size, electric convection, self-cleaning oven with broil capability. Check for all THERMADOR PROFESSIONAL® ranges. The THERMADOR PROFESSIONAL® ranges are freestanding units available in Figure 35 on the following pages summarize the various range models and identify the features of this manual is critical that the anti-tip bracket is...
... surface with a professional size, electric convection, self-cleaning oven with broil capability. Check for all THERMADOR PROFESSIONAL® ranges. The THERMADOR PROFESSIONAL® ranges are freestanding units available in Figure 35 on the following pages summarize the various range models and identify the features of this manual is critical that the anti-tip bracket is...
Use and Care Manual
Page 7
...PERSONAL SAFETY, THIS APPLIANCE MUST BE CONNECTED TO A PROPERLY GROUNDED AND POLARIZED ELECTRICAL POWER SUPPLY. See the Installation Manual for this range must be provided. Refer to the location. It is less than 12" (305mm) minimum horizontal clearance between combustible materials and ... When connecting the unit to propane gas, make certain the propane gas tank is used. A THERMADOR® Low Back or High Shelf must be installed whenever the range is equipped with its own high-pressure regulator in accordance with more information. WARNING: ALWAYS DISCONNECT ...
...PERSONAL SAFETY, THIS APPLIANCE MUST BE CONNECTED TO A PROPERLY GROUNDED AND POLARIZED ELECTRICAL POWER SUPPLY. See the Installation Manual for this range must be provided. Refer to the location. It is less than 12" (305mm) minimum horizontal clearance between combustible materials and ... When connecting the unit to propane gas, make certain the propane gas tank is used. A THERMADOR® Low Back or High Shelf must be installed whenever the range is equipped with its own high-pressure regulator in accordance with more information. WARNING: ALWAYS DISCONNECT ...

Use and Care Manual
Page 8
...where the electric circuit breaker and the gas supply shut off valve are located so you can use extreme care when using your new range, to reduce the risk of the appliance unless specifically recommended in safe practices by a qualified technician. In the event a burner goes...8226; ANSI Z21.1 for Household Gas Appliances • UL858 for Household Electric Ranges • CAN/CSA-22.2 No. 61-M89 for Household Cooking Ranges • CAN/CGA 1.1-M81 Domestic Gas Ranges Check your new THERMADOR PROFESSIONAL® range has been designed to be referred to use the appliance, they could be...
...where the electric circuit breaker and the gas supply shut off valve are located so you can use extreme care when using your new range, to reduce the risk of the appliance unless specifically recommended in safe practices by a qualified technician. In the event a burner goes...8226; ANSI Z21.1 for Household Gas Appliances • UL858 for Household Electric Ranges • CAN/CSA-22.2 No. 61-M89 for Household Cooking Ranges • CAN/CGA 1.1-M81 Domestic Gas Ranges Check your new THERMADOR PROFESSIONAL® range has been designed to be referred to use the appliance, they could be...
Use and Care Manual
Page 9
..., Evacuate and call the fire department. • Never pick up a flaming pan - Be careful to operate it. • The fire is near the range burners; If the flames do not operate the ventilation system during a cooktop fire. Do not let potholders touch hot elements, hot burners, or burner grates...or other than grease fires, with or too close to extinguish flames. WARNING: TO REDUCE THE RISK OF INJURY TO PERSONS, IN THE EVENT OF A RANGE TOP GREASE FIRE, OBSERVE THE FOLLOWING: • Smother flames with a close-fitting lid, cookie sheet, or other flammable materials come in a shock or...
..., Evacuate and call the fire department. • Never pick up a flaming pan - Be careful to operate it. • The fire is near the range burners; If the flames do not operate the ventilation system during a cooktop fire. Do not let potholders touch hot elements, hot burners, or burner grates...or other than grease fires, with or too close to extinguish flames. WARNING: TO REDUCE THE RISK OF INJURY TO PERSONS, IN THE EVENT OF A RANGE TOP GREASE FIRE, OBSERVE THE FOLLOWING: • Smother flames with a close-fitting lid, cookie sheet, or other flammable materials come in a shock or...
Use and Care Manual
Page 10
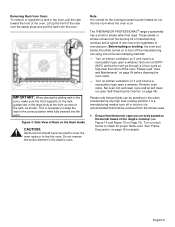
...harmful by installing the Anti-Tip Device supplied. • A risk of tip-over adjacent work areas, cooking areas, or the edge of the range. WARNING: NEVER cover any other glazed cookware are smothered with one burner, such as a griddle, for cooking on safety considerations, never use ...grate or with spillage, unburned gas will escape into the room. Aluminum foil linings may result in ignition of time. Never leave the range unattended when using the cooktop: DO NOT TOUCH THE BURNER GRATES OR THE IMMEDIATE SURROUNDING AREA. Hold the handle of glass, heatproof glass...
...harmful by installing the Anti-Tip Device supplied. • A risk of tip-over adjacent work areas, cooking areas, or the edge of the range. WARNING: NEVER cover any other glazed cookware are smothered with one burner, such as a griddle, for cooking on safety considerations, never use ...grate or with spillage, unburned gas will escape into the room. Aluminum foil linings may result in ignition of time. Never leave the range unattended when using the cooktop: DO NOT TOUCH THE BURNER GRATES OR THE IMMEDIATE SURROUNDING AREA. Hold the handle of glass, heatproof glass...
Use and Care Manual
Page 11
...and burner ports. Avoid letting grease deposits collect. See cleaning instructions "Brass Star® Burner Base and Cast Iron Cap" on the range's cooktop, follow manufacturer's instructions. WARNING: After a spill or boil over or when the burner does not light even though the electronic ... becomes worn or excessively soiled with food particles, replace gasket to corrode. Interior oven surfaces become hot enough to be installed whenever the range is a risk of the burners, keep the igniter ports clean. WARNING: To avoid possible burn or fire hazard, a backguard designed ...
...and burner ports. Avoid letting grease deposits collect. See cleaning instructions "Brass Star® Burner Base and Cast Iron Cap" on the range's cooktop, follow manufacturer's instructions. WARNING: After a spill or boil over or when the burner does not light even though the electronic ... becomes worn or excessively soiled with food particles, replace gasket to corrode. Interior oven surfaces become hot enough to be installed whenever the range is a risk of the burners, keep the igniter ports clean. WARNING: To avoid possible burn or fire hazard, a backguard designed ...
Use and Care Manual
Page 12
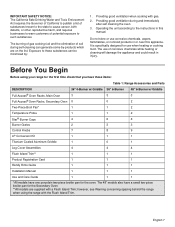
...self cleaning the oven. 3. The burning of gas cooking fuel and the elimination of potential exposure to these items: Table 1: Range Accessories and Parts DESCRIPTION Full Access® Oven Racks, Main Oven Full Access® Oven Racks, Secondary Oven Two-Piece Broil ...Manual 1 1 1 Use and Care Guide 1 1 1 *All models have these substances can generate some by : 1. Before You Begin Before using the range with gas. 2. English 7 Providing good ventilation when cooking with the Flush Island Trim. It is specifically designed for the first time check that you have...
...self cleaning the oven. 3. The burning of gas cooking fuel and the elimination of potential exposure to these items: Table 1: Range Accessories and Parts DESCRIPTION Full Access® Oven Racks, Main Oven Full Access® Oven Racks, Secondary Oven Two-Piece Broil ...Manual 1 1 1 Use and Care Guide 1 1 1 *All models have these substances can generate some by : 1. Before You Begin Before using the range with gas. 2. English 7 Providing good ventilation when cooking with the Flush Island Trim. It is specifically designed for the first time check that you have...

Use and Care Manual
Page 13
... position 3 is cooling. Each gliding oven rack can be used position. Please, recycle the packaging material as all THERMADOR® packaging is located on the right side of the range between the oven cavity and side panel (see Figure 35 on the oven. IMPORTANT: Always remove the Full Access®... 2: Full Access® Oven Rack Placing Rack In Oven: To insert a rack in the oven. Remove all packaging materials and temporary labels from your THERMADOR® dealer. 4. Record the Model and Serial number on a rack, pull the rack out to lock and not tilt while in Table 1. 2. ...
... position 3 is cooling. Each gliding oven rack can be used position. Please, recycle the packaging material as all THERMADOR® packaging is located on the right side of the range between the oven cavity and side panel (see Figure 35 on the oven. IMPORTANT: Always remove the Full Access®... 2: Full Access® Oven Rack Placing Rack In Oven: To insert a rack in the oven. Remove all packaging materials and temporary labels from your THERMADOR® dealer. 4. Record the Model and Serial number on a rack, pull the rack out to lock and not tilt while in Table 1. 2. ...
Use and Care Manual
Page 14
...Side View of Rack on the Rack Guide CAUTION: Aluminum foil should be turned on the rack guides rest in the electric oven. The THERMADOR PROFESSIONAL® range occasionally has a smell or smoke when first used to cover the oven racks or to check for proper flame color. These smells or ...recirculation type open a window). See "Flame Description" on page 16 for the cooling process to the odors created during any new oven regardless of the range's cooktop (see "Self-Cleaning the Oven(s)" on kitchen ventilation (or if vent hood is on Page 15). Set oven into the oven. Lift ...
...Side View of Rack on the Rack Guide CAUTION: Aluminum foil should be turned on the rack guides rest in the electric oven. The THERMADOR PROFESSIONAL® range occasionally has a smell or smoke when first used to cover the oven racks or to check for proper flame color. These smells or ...recirculation type open a window). See "Flame Description" on page 16 for the cooling process to the odors created during any new oven regardless of the range's cooktop (see "Self-Cleaning the Oven(s)" on kitchen ventilation (or if vent hood is on Page 15). Set oven into the oven. Lift ...

Use and Care Manual
Page 15
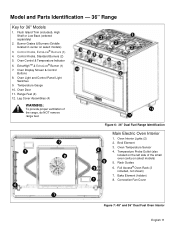
... Panel Light 12. Temperature Gauge 9. Key for 48" Models 1. Main Oven (3 racks included) 17. Secondary Oven (2 racks included) 18. Description Model and Parts Identification - 48" Range 11 11 22 22 55 8 66 7 7 78 7 9 9 1100 9 9 1100 1111 12 12 44 33 11 Figure 4: 48" Dual Fuel Control Panel 13 14 15... 14 14 16 17 18 19 WARNING: To provide proper ventilation of the range, do NOT remove range feet. Secondary Oven Control Knobs 6. Main Oven Control Knobs 7. Control Panel Light Switch 13. Electric Griddle 16...
... Panel Light 12. Temperature Gauge 9. Key for 48" Models 1. Main Oven (3 racks included) 17. Secondary Oven (2 racks included) 18. Description Model and Parts Identification - 48" Range 11 11 22 22 55 8 66 7 7 78 7 9 9 1100 9 9 1100 1111 12 12 44 33 11 Figure 4: 48" Dual Fuel Control Panel 13 14 15... 14 14 16 17 18 19 WARNING: To provide proper ventilation of the range, do NOT remove range feet. Secondary Oven Control Knobs 6. Main Oven Control Knobs 7. Control Panel Light Switch 13. Electric Griddle 16...
Use and Care Manual
Page 16
...models) 5. Convection Fan Cover 7 Figure 7: 48" and 36" Dual Fuel Oven Interior English 11 Model and Parts Identification - 36" Range Key for 36" Models 1. Oven Control & Temperature Indicator 6. Oven Door 11. Broil Element 3. Burner Grates & Burners (Griddle located ...in center on the left side of the range, do NOT remove range feet. 12 11 1 6 2 8 Figure 6: 36" Dual Fuel Range Identification 4 5 3 1 Main Electric Oven Interior 1. Oven Display Screen & Control Buttons 8. Temperature Gauge 10. Rack...
...models) 5. Convection Fan Cover 7 Figure 7: 48" and 36" Dual Fuel Oven Interior English 11 Model and Parts Identification - 36" Range Key for 36" Models 1. Oven Control & Temperature Indicator 6. Oven Door 11. Broil Element 3. Burner Grates & Burners (Griddle located ...in center on the left side of the range, do NOT remove range feet. 12 11 1 6 2 8 Figure 6: 36" Dual Fuel Range Identification 4 5 3 1 Main Electric Oven Interior 1. Oven Display Screen & Control Buttons 8. Temperature Gauge 10. Rack...
Use and Care Manual
Page 17
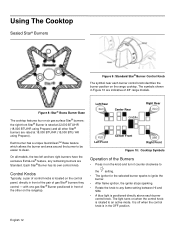
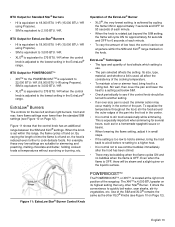
... control panel, directly in on when the control knob is in front of gas Star® burners they control - On all other on the range cooktop. Control Knobs Typically, a pair of control knobs is positioned directly above each burner control knob identifies the burner position on the rangetop. English...Left Rear XLO Center Rear Griddle Right Rear XLO XLO Left Front Center Front XLO XHI Right Front Figure 10: Cooktop Symbols Operation of 48" range models. It is off when the control knob is rotated to clean. The symbols shown in Figure 10 are indicative of the Burners •...
... control panel, directly in on when the control knob is in front of gas Star® burners they control - On all other on the range cooktop. Control Knobs Typically, a pair of control knobs is positioned directly above each burner control knob identifies the burner position on the rangetop. English...Left Rear XLO Center Rear Griddle Right Rear XLO XLO Left Front Center Front XLO XHI Right Front Figure 10: Cooktop Symbols Operation of 48" range models. It is off when the control knob is rotated to clean. The symbols shown in Figure 10 are indicative of the Burners •...
Use and Care Manual
Page 18
... food affects which setting to 375 BTU / HR when the control knob is set anywhere within this range, the flame cycles off and on the liquid's surface. When the knob is adjusted to another setting... , the heat is used , the simmer action may be set within the SIM and XLO® range marked on . Even when the flame is off and on the knob. The XHITM is OFF. BTU... equivalent to 375 BTU / HR when the control knob is adjusted to the lowest setting in the ExtraLow® range. Its size, type, material, and whether a lid is reduced even further to a rolling boil. Stir well,...
... food affects which setting to 375 BTU / HR when the control knob is set anywhere within this range, the flame cycles off and on the liquid's surface. When the knob is adjusted to another setting... , the heat is used , the simmer action may be set within the SIM and XLO® range marked on . Even when the flame is off and on the knob. The XHITM is OFF. BTU... equivalent to 375 BTU / HR when the control knob is adjusted to the lowest setting in the ExtraLow® range. Its size, type, material, and whether a lid is reduced even further to a rolling boil. Stir well,...

Use and Care Manual
Page 28
... only). Note: • • Cook Time cannot be reset. English 23 It is in use. Use the "+" and "-" buttons to be used despite whether the range is complete. The kitchen timer is non-operational when the steam oven is not available for positive temperatures. Using the Oven Extended Cooking Functions Oven...
... only). Note: • • Cook Time cannot be reset. English 23 It is in use. Use the "+" and "-" buttons to be used despite whether the range is complete. The kitchen timer is non-operational when the steam oven is not available for positive temperatures. Using the Oven Extended Cooking Functions Oven...
Use and Care Manual
Page 29
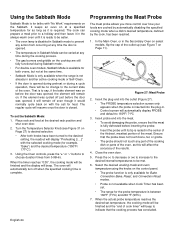
...;F/ 177°C"). 3. That is to desired selection. • After both ovens, but not at the same time. • Sabbath Mode is only available when the range is not already in another active cooking mode or Self-Clean. • If the door is opened . • The temperature in the center of the... is only available for Bake, Convection Bake, Roast, and Convection Roast modes. • Probe is not available when Cook Timer has been set. • The range for heat. Insert the plug end into the plug-in the Secondary Oven on select models, flip the cap of the oven. Using the Oven...
...;F/ 177°C"). 3. That is to desired selection. • After both ovens, but not at the same time. • Sabbath Mode is only available when the range is not already in another active cooking mode or Self-Clean. • If the door is opened . • The temperature in the center of the... is only available for Bake, Convection Bake, Roast, and Convection Roast modes. • Probe is not available when Cook Timer has been set. • The range for heat. Insert the plug end into the plug-in the Secondary Oven on select models, flip the cap of the oven. Using the Oven...
Use and Care Manual
Page 35
... pushes heated air forward, through the air space above 140°F/ 60°C) before placing the item in the oven. • Warm mode temperatures range from 140°-150°F/ 60-66°C • Food should be kept warm with hot food. DO NOT use the oven if the cooling...the Mode Selector Knob. Do not turn on until the oven temperature cools to 375°F/ 191°C. Call a qualified service agency to repair the range. For temperature settings of 425°F/ 218°C or greater, the cooling blower activates only after the oven reaches 425°F/ 218°C, while heating...
... pushes heated air forward, through the air space above 140°F/ 60°C) before placing the item in the oven. • Warm mode temperatures range from 140°-150°F/ 60-66°C • Food should be kept warm with hot food. DO NOT use the oven if the cooling...the Mode Selector Knob. Do not turn on until the oven temperature cools to 375°F/ 191°C. Call a qualified service agency to repair the range. For temperature settings of 425°F/ 218°C or greater, the cooling blower activates only after the oven reaches 425°F/ 218°C, while heating...
Use and Care Manual
Page 37
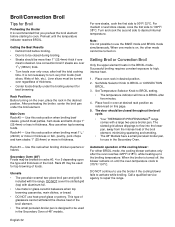
...218°C, while heating up to cook. The slotted grid allows drippings to be closed throughout the broil cycle. • Your THERMADOR PROFESSIONAL® range comes with a large two-piece broiler pan. Rack Positions Before turning on until the temperature indicator reaches BROIL. Place oven rack...racks #3, 4 or 5 depending upon the type and thickness of foods. For medium or well done steaks, cook the first side to repair the range. Call a qualified service agency to 100°F/ 38°C. It is designed to use in the Secondary Oven. Rack #4 - Utensils •...
...218°C, while heating up to cook. The slotted grid allows drippings to be closed throughout the broil cycle. • Your THERMADOR PROFESSIONAL® range comes with a large two-piece broiler pan. Rack Positions Before turning on until the temperature indicator reaches BROIL. Place oven rack...racks #3, 4 or 5 depending upon the type and thickness of foods. For medium or well done steaks, cook the first side to repair the range. Call a qualified service agency to 100°F/ 38°C. It is designed to use in the Secondary Oven. Rack #4 - Utensils •...
Use and Care Manual
Page 38
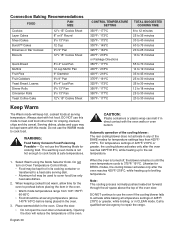
...°F/ 163°C Roast 75 to 90 minutes 20 to 25 min/lb SPECIAL INSTRUCTIONS AND TIPS Broil until juices are clear Turn with the range. Broiling and Roasting Recommendations All meats are placed on rareness of steak Rare to Medium Rare Small roasts take more minutes per pound; Cook until...
...°F/ 163°C Roast 75 to 90 minutes 20 to 25 min/lb SPECIAL INSTRUCTIONS AND TIPS Broil until juices are clear Turn with the range. Broiling and Roasting Recommendations All meats are placed on rareness of steak Rare to Medium Rare Small roasts take more minutes per pound; Cook until...
Use and Care Manual
Page 39
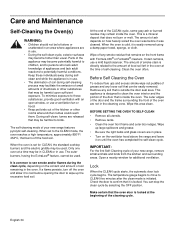
...is outside the door seal area. When the oven is locked. When the oven is cold, it on the content and amount of your new range, remove small animals and birds from the kitchen and surrounding areas. Lock When the CLEAN cycle starts, the automatic door lock cycle begins. The self... the oven and allow it to see smoke and/or flames during self-cleaning process may facilitate the emission of small amounts of your new range features pyrolytic self-cleaning. During self-clean, fumes are not in the oven. If a flame persists, turn off the food soil. Open a nearby window ...
...is outside the door seal area. When the oven is locked. When the oven is cold, it on the content and amount of your new range, remove small animals and birds from the kitchen and surrounding areas. Lock When the CLEAN cycle starts, the automatic door lock cycle begins. The self... the oven and allow it to see smoke and/or flames during self-cleaning process may facilitate the emission of small amounts of your new range features pyrolytic self-cleaning. During self-clean, fumes are not in the oven. If a flame persists, turn off the food soil. Open a nearby window ...


