Use and Care Manual
Page 5
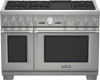
...Huntington Beach, CA 92649 Questions? 1-800-735-4328 www.thermador.com We look forward to hearing from you! Table of Contents Introduction 1 Safety 2 Important Safety Instructions 2 Before You Begin 7 Using Your Range for the First Time 7 Range Description 10 Parts Identification - 48" Range 10 Parts Identification - 36" Range 11 Using The Cooktop ... Self-Cleaning the Oven 34 Cleaning Recommendations 36 Do-It-Yourself Maintenance 39 Before Calling For Service 41 Statement of Warranty 42 This THERMADOR® appliance is made by BSH Home Appliances Corporation 5551 McFadden Ave.
...Huntington Beach, CA 92649 Questions? 1-800-735-4328 www.thermador.com We look forward to hearing from you! Table of Contents Introduction 1 Safety 2 Important Safety Instructions 2 Before You Begin 7 Using Your Range for the First Time 7 Range Description 10 Parts Identification - 48" Range 10 Parts Identification - 36" Range 11 Using The Cooktop ... Self-Cleaning the Oven 34 Cleaning Recommendations 36 Do-It-Yourself Maintenance 39 Before Calling For Service 41 Statement of Warranty 42 This THERMADOR® appliance is made by BSH Home Appliances Corporation 5551 McFadden Ave.

Use and Care Manual
Page 15
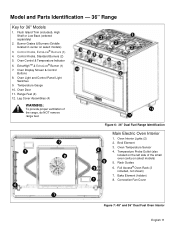
.... Electric Griddle 16. Leg Cover Assembly (4), Toe Kick (ordered separately) Figure 5: 48" Dual Fuel Range Identification English 10 Secondary Oven (2 racks included) 18. Control Knobs, Standard Burners (2) 3. Electric Griddle Knob (1) 5. Oven Display Screens 10. Flush Island Trim (included), High Shelf or Low Back (ordered separately) 14. Temperature Gauge 9. Description Model and Parts...
.... Electric Griddle 16. Leg Cover Assembly (4), Toe Kick (ordered separately) Figure 5: 48" Dual Fuel Range Identification English 10 Secondary Oven (2 racks included) 18. Control Knobs, Standard Burners (2) 3. Electric Griddle Knob (1) 5. Oven Display Screens 10. Flush Island Trim (included), High Shelf or Low Back (ordered separately) 14. Temperature Gauge 9. Description Model and Parts...
Use and Care Manual
Page 16
Temperature Gauge 10. Rack Guides 6. Oven Light and Control Panel Light Switches 9. Oven Interior Lights (2) 2. Oven Temperature Sensor 4. Temperature Probe Outlet (also located ... Knobs, ExtraLow® Burners (3) 4. Burner Grates & Burners (Griddle located in center on select models) 5. Oven Control & Temperature Indicator 6. Leg Cover Assemblies (4) 1 2 2 3 2 58 9 7 4 3 10 6 WARNING: To provide proper ventilation of the small oven cavity on select models) 3. Full Access® Oven Rack (3 included, not shown) 7. ExtraHighTM & ExtraLow® Burner...
Temperature Gauge 10. Rack Guides 6. Oven Light and Control Panel Light Switches 9. Oven Interior Lights (2) 2. Oven Temperature Sensor 4. Temperature Probe Outlet (also located ... Knobs, ExtraLow® Burners (3) 4. Burner Grates & Burners (Griddle located in center on select models) 5. Oven Control & Temperature Indicator 6. Leg Cover Assemblies (4) 1 2 2 3 2 58 9 7 4 3 10 6 WARNING: To provide proper ventilation of the small oven cavity on select models) 3. Full Access® Oven Rack (3 included, not shown) 7. ExtraHighTM & ExtraLow® Burner...
Use and Care Manual
Page 17
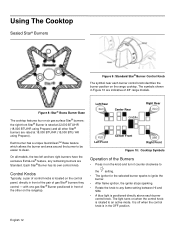
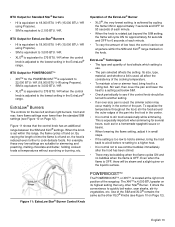
with one gas Star® Burner positioned in Figure 10 are indicative of the other Star® burners are Standard. Figure 8: Star® Brass Burner Base The cooktop features four or six gas surface Star&#... BTU/ HR using Propane). English 12 Left Rear XLO Center Rear Griddle Right Rear XLO XLO Left Front Center Front XLO XHI Right Front Figure 10: Cooktop Symbols Operation of gas Star® burners they control - Using The Cooktop Sealed Star® Burners Figure 9: Standard Star® Burner Control Knob The...
with one gas Star® Burner positioned in Figure 10 are indicative of the other Star® burners are Standard. Figure 8: Star® Brass Burner Base The cooktop features four or six gas surface Star&#... BTU/ HR using Propane). English 12 Left Rear XLO Center Rear Griddle Right Rear XLO XLO Left Front Center Front XLO XHI Right Front Figure 10: Cooktop Symbols Operation of gas Star® burners they control - Using The Cooktop Sealed Star® Burners Figure 9: Standard Star® Burner Control Knob The...
Use and Care Manual
Page 18
... maintain a low or simmer heat, bring the food back to a boil before re-setting to a higher heat. • It is normal not to see Figure 10 on Page 12). Figure 11: ExtraLow Star® Burner Control Knob POWERBOOSTTM The POWERBOOSTTM, or XHITM, is 4,000 BTU greater on the knob. The XHITM... on the liquid's surface. Stir well, then cover the pan and lower the heat to a setting just below SIM. • Check periodically to see Figure 10 on Page 12).
... maintain a low or simmer heat, bring the food back to a boil before re-setting to a higher heat. • It is normal not to see Figure 10 on Page 12). Figure 11: ExtraLow Star® Burner Control Knob POWERBOOSTTM The POWERBOOSTTM, or XHITM, is 4,000 BTU greater on the knob. The XHITM... on the liquid's surface. Stir well, then cover the pan and lower the heat to a setting just below SIM. • Check periodically to see Figure 10 on Page 12).
Use and Care Manual
Page 24
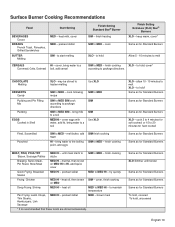
... to melt CEREALS HI - bring water to the boiling point, add eggs SIM finish cooking SIM to hold , uncovered English 19 allow 10 - 15 minutes to MED HI - melt butter, add eggs HI - finish cooking Same as for Standard Burners Same as for Standard Burners MEAT, FISH, POULTRY ...
... to melt CEREALS HI - bring water to the boiling point, add eggs SIM finish cooking SIM to hold , uncovered English 19 allow 10 - 15 minutes to MED HI - melt butter, add eggs HI - finish cooking Same as for Standard Burners Same as for Standard Burners MEAT, FISH, POULTRY ...
Use and Care Manual
Page 25
... simmer XLO - bring liquid to HI - to MED - maintain frying temperature Same as for Standard Burners package directions Deep Frying Saute Stir Fry HI - cook 10 minutes, XLO - heat oil MED HI - cook according to MED - cover, bring water to a boil, add MED to a boil To finish cooking Simmer slowly PASTAS...
... simmer XLO - bring liquid to HI - to MED - maintain frying temperature Same as for Standard Burners package directions Deep Frying Saute Stir Fry HI - cook 10 minutes, XLO - heat oil MED HI - cook according to MED - cover, bring water to a boil, add MED to a boil To finish cooking Simmer slowly PASTAS...
Use and Care Manual
Page 33
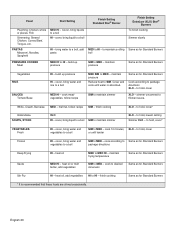
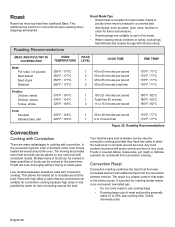
... the heated air to circulate around the oven. Your favorite pans and cookware can be cooked or large quantities of meat and poultry generally takes 10 to rotate pans. Any food cooked uncovered will cook thoroughly without having to 20% less cooking time. Foods in this mode. • When roasting whole...
... the heated air to circulate around the oven. Your favorite pans and cookware can be cooked or large quantities of meat and poultry generally takes 10 to rotate pans. Any food cooked uncovered will cook thoroughly without having to 20% less cooking time. Foods in this mode. • When roasting whole...
Use and Care Manual
Page 35
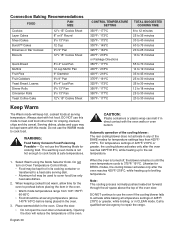
...;F / 177°C TOTAL SUGGESTED COOKING TIME 8 to 12 minutes 25 to 35 minutes 30 to 40 minutes 60 to 75 minutes 20 to 25 minutes 10 to 15 minutes 55 to 70 minutes 14 to 19 minutes 35 to 45 minutes 25 to 30 minutes 25 to 30 minutes 12 to...
...;F / 177°C TOTAL SUGGESTED COOKING TIME 8 to 12 minutes 25 to 35 minutes 30 to 40 minutes 60 to 75 minutes 20 to 25 minutes 10 to 15 minutes 55 to 70 minutes 14 to 19 minutes 35 to 45 minutes 25 to 30 minutes 25 to 30 minutes 12 to...
Use and Care Manual
Page 44
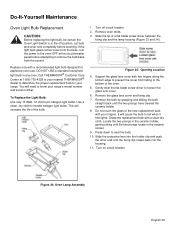
... comes loose from the base, turn the power to the oven OFF at 1-800-735-4328 or your nearest THERMADOR® dealer to know your range. To Replace the Light Bulb: Use only 10 Watt, 12 Volt bi-pin halogen light bulbs. This will increase the life of a flat blade screw driver... any oven. Let bulb and cover cool completely before attempting to remove the bulb base from falling to prevent the cover from the socket. Call THERMADOR® Customer Care Center at the circuit breaker panel before touching. You will cause the bulb to seat the bulb...
... comes loose from the base, turn the power to the oven OFF at 1-800-735-4328 or your nearest THERMADOR® dealer to know your range. To Replace the Light Bulb: Use only 10 Watt, 12 Volt bi-pin halogen light bulbs. This will increase the life of a flat blade screw driver... any oven. Let bulb and cover cool completely before attempting to remove the bulb base from falling to prevent the cover from the socket. Call THERMADOR® Customer Care Center at the circuit breaker panel before touching. You will cause the bulb to seat the bulb...
Installation Manual
Page 2
... 14 Step 7: Electrical Requirements, Connection & Grounding . . . 16 Step 8: Backguard Installation (optional 19 Step 9: Placing and Leveling the Range 25 Step 10: Burner Test and Adjustment 29 Installer Final Check List 30 To Clean and Protect Exterior Surfaces 30 This THERMADOR® appliance is made by BSH Home Appliances Corporation 5551 McFadden Ave.
... 14 Step 7: Electrical Requirements, Connection & Grounding . . . 16 Step 8: Backguard Installation (optional 19 Step 9: Placing and Leveling the Range 25 Step 10: Burner Test and Adjustment 29 Installer Final Check List 30 To Clean and Protect Exterior Surfaces 30 This THERMADOR® appliance is made by BSH Home Appliances Corporation 5551 McFadden Ave.
Installation Manual
Page 4
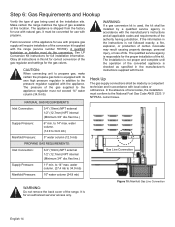
...CAN 1-B149.1 and.2 - Check local building codes for use it is correct for Household Cooking Gas Appliances • CAN/CSA-C22.2 No. 113-10 Fans and Ventilators • CAN/CSA-C22.2 No. 61-08 Household Cooking Ranges It is designed as a cooking appliance. Local codes vary and it...correct backguard models that the appliance is connected to the high heat capability of conversion kit supplied with the range (service number 553182). A THERMADOR® Low Back or High Shelf must be purchased separately and utilized when there is equipped with its own high-pressure regulator in addition ...
...CAN 1-B149.1 and.2 - Check local building codes for use it is correct for Household Cooking Gas Appliances • CAN/CSA-C22.2 No. 113-10 Fans and Ventilators • CAN/CSA-C22.2 No. 61-08 Household Cooking Ranges It is designed as a cooking appliance. Local codes vary and it...correct backguard models that the appliance is connected to the high heat capability of conversion kit supplied with the range (service number 553182). A THERMADOR® Low Back or High Shelf must be purchased separately and utilized when there is equipped with its own high-pressure regulator in addition ...
Installation Manual
Page 9
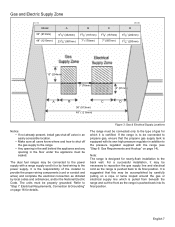
... details. Gas and Electric Supply Zone Model 36" (913mm) 48" (1219mm) A 91/8" (232mm) 231/8" (587mm) B 73/8" (187mm) 7" (178mm) C 73/8" (187mm) 7" (587mm) D 91/8" (232mm) 77/8" (200mm) 10" (254mm) 3" (76mm) 2" (51mm) A B C D 36" (913mm) 48" (1219mm) Notice: • If not already present, install gas shut-off valve in an easily accessible location. • Make...
... details. Gas and Electric Supply Zone Model 36" (913mm) 48" (1219mm) A 91/8" (232mm) 231/8" (587mm) B 73/8" (187mm) 7" (178mm) C 73/8" (187mm) 7" (587mm) D 91/8" (232mm) 77/8" (200mm) 10" (254mm) 3" (76mm) 2" (51mm) A B C D 36" (913mm) 48" (1219mm) Notice: • If not already present, install gas shut-off valve in an easily accessible location. • Make...
Installation Manual
Page 10
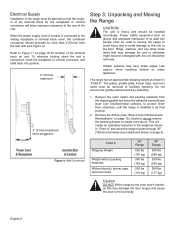
... conduit connector, and slide back into position. 2" (51mm) maximum Step 3: Unpacking and Moving the Range CAUTION: The unit is connected to Figure 11 on page 10);
... conduit connector, and slide back into position. 2" (51mm) maximum Step 3: Unpacking and Moving the Range CAUTION: The unit is connected to Figure 11 on page 10);
Installation Manual
Page 12
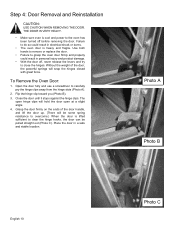
... off , never release the levers and try to grasp the oven door firmly and properly could result in a safe and stable location. Photo A Photo B English 10 Photo C Flip the hinge clip toward you (Photo B). 3. Place the door in electrical shock or burns. • The oven door is cool and power to...
... off , never release the levers and try to grasp the oven door firmly and properly could result in a safe and stable location. Photo A Photo B English 10 Photo C Flip the hinge clip toward you (Photo B). 3. Place the door in electrical shock or burns. • The oven door is cool and power to...
Installation Manual
Page 14
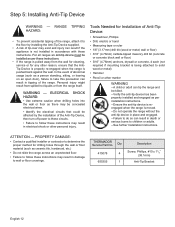
...can result if the appliance is not installed in electrical shock or other reason, ensure that could be installed as per these instructions. THERMADOR Service Part No. Tools Needed for Installation of tip-over may exist and injury can tip the range and be killed. --Verify the... instructions. • If the range is pulled away from the range itself. WARNING - ATTENTION - Qty 415078 4 655355 1 Description Screw, Phillips, #10 x 11/2" (38.1mm) Anti-Tip Bracket English 12 Personal injury might result from spilled hot liquids or from the wall for cleaning, service or for...
...can result if the appliance is not installed in electrical shock or other reason, ensure that could be installed as per these instructions. THERMADOR Service Part No. Tools Needed for Installation of tip-over may exist and injury can tip the range and be killed. --Verify the... instructions. • If the range is pulled away from the range itself. WARNING - ATTENTION - Qty 415078 4 655355 1 Description Screw, Phillips, #10 x 11/2" (38.1mm) Anti-Tip Bracket English 12 Personal injury might result from spilled hot liquids or from the wall for cleaning, service or for...
Installation Manual
Page 16
... for use with propane. Field conversion of the appliance for an authorized servicer access only. If the information in addition to 34.9 mb) 10" water column (24.9 mb) Figure 10: Manifold Gas Line Connection WARNING: Do not remove the back cover of the converted appliance is not followed exactly, a fire, explosion, or...
... for use with propane. Field conversion of the appliance for an authorized servicer access only. If the information in addition to 34.9 mb) 10" water column (24.9 mb) Figure 10: Manifold Gas Line Connection WARNING: Do not remove the back cover of the converted appliance is not followed exactly, a fire, explosion, or...
Installation Manual
Page 17
...) for the purpose of shutting off the gas supply. The appliance pipe connection has a 3/4" (19mm) NPT external thread and a 1/2" (13mm) NPT internal thread (see Figure 10 on gas and check supply line connections for ensuring that has been permanently mounted inside the range. • Make sure the gas supply is supplied...
...) for the purpose of shutting off the gas supply. The appliance pipe connection has a 3/4" (19mm) NPT external thread and a 1/2" (13mm) NPT internal thread (see Figure 10 on gas and check supply line connections for ensuring that has been permanently mounted inside the range. • Make sure the gas supply is supplied...
Installation Manual
Page 21
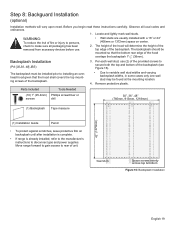
... wall stud widths and varying backsplash widths, in some cases only one wall stud may be found at the mounting location. 4. Parts Included Tools Needed (10) 1" (25.4mm) Phillips screwdriver or screws drill 30", 36", 48" (760mm, 913mm, 1218mm) (1) Backsplash Tape measure 42" (1070mm) (1) Installation Guide Pencil • To protect against...
... wall stud widths and varying backsplash widths, in some cases only one wall stud may be found at the mounting location. 4. Parts Included Tools Needed (10) 1" (25.4mm) Phillips screwdriver or screws drill 30", 36", 48" (760mm, 913mm, 1218mm) (1) Backsplash Tape measure 42" (1070mm) (1) Installation Guide Pencil • To protect against...
Installation Manual
Page 23
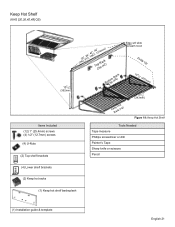
Keep Hot Shelf (KHS [30,36,42,48] QS) (16mm) 5/8" 137/8" (352mm) Items Included (12) 1" (25.4mm) screws (4) 1/2" (12.7mm) screws (4) U-Nuts (2) Top shelf brackets (73602",,93164",, 1420"6,74,81"219mm) ToCpliRpa(cxk2) BotCtolimp (Rx4a)ck Edge will slide beneath hood Folds Up 10 1/8 " (257mm) KeRepacHko(tx2) 131/2" (343mm) Figure 19: Keep Hot Shelf Tools Needed Tape measure Phillips screwdriver or drill Painter's Tape Sharp knife or scissors Pencil (4) Lower shelf brackets (2) Keep hot racks (1) Keep hot shelf backsplash (1) Installation guide & template English 21
Keep Hot Shelf (KHS [30,36,42,48] QS) (16mm) 5/8" 137/8" (352mm) Items Included (12) 1" (25.4mm) screws (4) 1/2" (12.7mm) screws (4) U-Nuts (2) Top shelf brackets (73602",,93164",, 1420"6,74,81"219mm) ToCpliRpa(cxk2) BotCtolimp (Rx4a)ck Edge will slide beneath hood Folds Up 10 1/8 " (257mm) KeRepacHko(tx2) 131/2" (343mm) Figure 19: Keep Hot Shelf Tools Needed Tape measure Phillips screwdriver or drill Painter's Tape Sharp knife or scissors Pencil (4) Lower shelf brackets (2) Keep hot racks (1) Keep hot shelf backsplash (1) Installation guide & template English 21